Operating Instructions
Page 3
...connection diagrams. Customer Support http://www.sony.com/tvsupport On-line Registration United States http://productregistration.sony.com Canada http://www.sonystyle.ca/registration 3 Installing the TV 6 Carrying the TV 6 Preparation for Table-Top Stand 6...TV Home Menu on XMB 39 TV Settings Descriptions 40 Product Support 40 Clock/Timers Settings 40 Picture Settings 41 Sound Settings 44 Screen Settings 45 Channel Settings 47 CC Closed Captions (CC) Settings 48 Parental Lock Settings 48 External Inputs Settings 51 HDMI Settings 51 Network Settings 52 General Setup Settings...
...connection diagrams. Customer Support http://www.sony.com/tvsupport On-line Registration United States http://productregistration.sony.com Canada http://www.sonystyle.ca/registration 3 Installing the TV 6 Carrying the TV 6 Preparation for Table-Top Stand 6...TV Home Menu on XMB 39 TV Settings Descriptions 40 Product Support 40 Clock/Timers Settings 40 Picture Settings 41 Sound Settings 44 Screen Settings 45 Channel Settings 47 CC Closed Captions (CC) Settings 48 Parental Lock Settings 48 External Inputs Settings 51 HDMI Settings 51 Network Settings 52 General Setup Settings...
Operating Instructions
Page 4
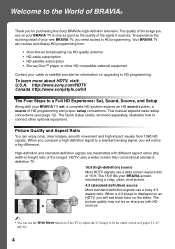
...difference. This manual explains basic setup connections (see page 12). High-definition and standard-definition signals are transmitted with your BRAVIA TV set, a complete HD system requires an HD sound system, a source of HD programming and proper setup connections. HDTV uses a wider screen...) source Most standard-definition signals use a wide screen aspect ratio of 16:9. http://www.sony.com/HDTV Canada http://www.sonystyle.ca/hd The Four Steps to a Full HD Experience: Set, Sound, Source, and Setup Along with different aspect ratios (the width-to HD programming....
...difference. This manual explains basic setup connections (see page 12). High-definition and standard-definition signals are transmitted with your BRAVIA TV set, a complete HD system requires an HD sound system, a source of HD programming and proper setup connections. HDTV uses a wider screen...) source Most standard-definition signals use a wide screen aspect ratio of 16:9. http://www.sony.com/HDTV Canada http://www.sonystyle.ca/hd The Four Steps to a Full HD Experience: Set, Sound, Source, and Setup Along with different aspect ratios (the width-to HD programming....
Operating Instructions
Page 5
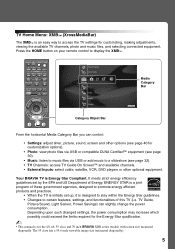
..., satellite, VCR, DVD players or other optional equipment. TV Guide, Picture/Sound, Light Sensor, Power Savings) can control: • Settings: adjust timer, picture, sound, screen and other options (see page 40 for the 40, 46, 55 class and 70 inch BRAVIA XBR series models with screen... STOP THEATER SOUND PICTURE WIDE CC FREEZE Product Support Clock/Timers Settings Sound Screen Channel Media Category Bar TV Category Object Bar From the horizontal Media Category Bar you can slightly change the power consumption. The 55 class has a 54.6 inch viewable image size (measured diagonally)....
..., satellite, VCR, DVD players or other optional equipment. TV Guide, Picture/Sound, Light Sensor, Power Savings) can control: • Settings: adjust timer, picture, sound, screen and other options (see page 40 for the 40, 46, 55 class and 70 inch BRAVIA XBR series models with screen... STOP THEATER SOUND PICTURE WIDE CC FREEZE Product Support Clock/Timers Settings Sound Screen Channel Media Category Bar TV Category Object Bar From the horizontal Media Category Bar you can slightly change the power consumption. The 55 class has a 54.6 inch viewable image size (measured diagonally)....
Operating Instructions
Page 7
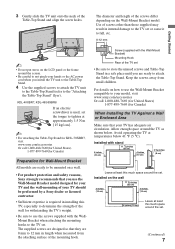
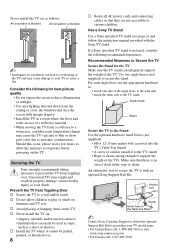
... AC power cord when you are ready to the TV set the torque to tighten at temperatures below . Avoid operating the TV at approximately 1.5 N·m {15 kgf·cm}. ~ • For attaching the Table-Top Stand for KDL-70XBR7, visit www.sony.com/accessories Or call 1-800-488-7669 (for ...circulation. Keep the screws away from the attaching surface of the screws differ depending on the LCD panel or the frame around the set or cause it to not pinch your TV should be performed by a Sony dealer or licensed contractor. • Sufficient expertise is required in length when measured from ...
... AC power cord when you are ready to the TV set the torque to tighten at temperatures below . Avoid operating the TV at approximately 1.5 N·m {15 kgf·cm}. ~ • For attaching the Table-Top Stand for KDL-70XBR7, visit www.sony.com/accessories Or call 1-800-488-7669 (for ...circulation. Keep the screws away from the attaching surface of the screws differ depending on the LCD panel or the frame around the set or cause it to not pinch your TV should be performed by a Sony dealer or licensed contractor. • Sufficient expertise is required in length when measured from ...
Operating Instructions
Page 8
... the wall stud. • attach the other side to support the weight of the TV). Anchor bolt Screw Screw hole on the Table-Top Stand ~ Contact Sony Customer Support to evaporate before powering on furniture and TV sets. If a Sony specified TV stand is blocked. Should this occur, please wait a few hours to allow children to...
... the wall stud. • attach the other side to support the weight of the TV). Anchor bolt Screw Screw hole on the Table-Top Stand ~ Contact Sony Customer Support to evaporate before powering on furniture and TV sets. If a Sony specified TV stand is blocked. Should this occur, please wait a few hours to allow children to...
Operating Instructions
Page 11
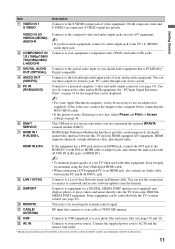
...VIDEO IN 1 S VIDEO Description Connects to the S VIDEO output jack of Screen settings on page 46. HDMI supports enhanced, or high-definition video, plus digital audio. Connects to a Local Area Network using the Sony High Speed HDMI cable. • When connecting a DVI-equipped PC to an ... DMPORT Connects to equipment via a DIGITAL MEDIA PORT interface (not supplied) and displays photos or plays videos and music directly onto the TV from Dolby Laboratories. Connect the supplied power cord to your stereo system. Dolby and the double-D symbol are connected, S VIDEO signal has...
...VIDEO IN 1 S VIDEO Description Connects to the S VIDEO output jack of Screen settings on page 46. HDMI supports enhanced, or high-definition video, plus digital audio. Connects to a Local Area Network using the Sony High Speed HDMI cable. • When connecting a DVI-equipped PC to an ... DMPORT Connects to equipment via a DIGITAL MEDIA PORT interface (not supplied) and displays photos or plays videos and music directly onto the TV from Dolby Laboratories. Connect the supplied power cord to your stereo system. Dolby and the double-D symbol are connected, S VIDEO signal has...
Operating Instructions
Page 12
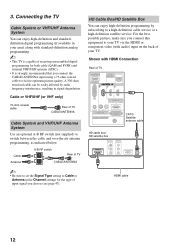
... the HDMI or component video (with standard-definition analog programming. ~ • This TV is capable of TV B CABLE/ANTENNA ~ • Be sure to set the Signal Type setting to your TV. A 300-ohm twin lead cable can be easily affected by subscribing to a high-definition cable service or... RF switch (not supplied) to receive optimum picture quality. Connecting the TV Cable System or VHF/UHF Antenna System You can enjoy high-definition programming by radio frequency interference, resulting in the Channel settings for both cable (QAM and 8VSB) and external VHF/UHF antenna (...
... the HDMI or component video (with standard-definition analog programming. ~ • This TV is capable of TV B CABLE/ANTENNA ~ • Be sure to set the Signal Type setting to your TV. A 300-ohm twin lead cable can be easily affected by subscribing to a high-definition cable service or... RF switch (not supplied) to receive optimum picture quality. Connecting the TV Cable System or VHF/UHF Antenna System You can enjoy high-definition programming by radio frequency interference, resulting in the Channel settings for both cable (QAM and 8VSB) and external VHF/UHF antenna (...
Operating Instructions
Page 14
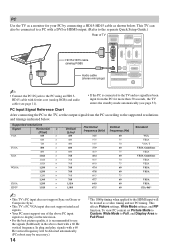
PC Input Signal Reference Chart After connecting the PC to the TV, set Picture Mode to Custom, Wide Mode to Full, and Display Area to Full Pixel. This TV can also be treated as shown below . To view PC content set the output signal from the PC for your PC by connecting a HD15-HD15 cable... when applied to the HDMI input will be connected to a PC with a DVI or HDMI output. (Refer to the separate Quick Setup Guide.) Rear of TV DMex/SERVICE LAN (10/100) PC IN 1 IN 3 4 HD15-HD15 cable (analog RGB) RGB DMPORT DC 5V / 0.7A MAX Audio cable (stereo mini plugs) AUDIO...
PC Input Signal Reference Chart After connecting the PC to the TV, set Picture Mode to Custom, Wide Mode to Full, and Display Area to Full Pixel. This TV can also be treated as shown below . To view PC content set the output signal from the PC for your PC by connecting a HD15-HD15 cable... when applied to the HDMI input will be connected to a PC with a DVI or HDMI output. (Refer to the separate Quick Setup Guide.) Rear of TV DMex/SERVICE LAN (10/100) PC IN 1 IN 3 4 HD15-HD15 cable (analog RGB) RGB DMPORT DC 5V / 0.7A MAX Audio cable (stereo mini plugs) AUDIO...
Operating Instructions
Page 16
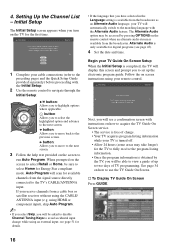
...the electronic program guide. B button: Allows you will be able to the next screen. Begin your remote control. Setting Up the Channel List - s To Display TV Guide On Screen Press GUIDE. 16 Initial Setup The Initial Setup screen appears when you receive channels from the broadcaster as...through the Initial Setup: CEC CC FREEZE V/v button: Allows you to select the highlighted option and advance to view a guide of TV programming. Language settings will apply to on the screen to run Auto Program. When prompted on the screen to select Retail or Home, be accessed ...
...the electronic program guide. B button: Allows you will be able to the next screen. Begin your remote control. Setting Up the Channel List - s To Display TV Guide On Screen Press GUIDE. 16 Initial Setup The Initial Setup screen appears when you receive channels from the broadcaster as...through the Initial Setup: CEC CC FREEZE V/v button: Allows you to select the highlighted option and advance to view a guide of TV programming. Language settings will apply to on the screen to run Auto Program. When prompted on the screen to select Retail or Home, be accessed ...
Operating Instructions
Page 17
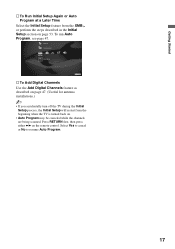
To run Auto Program, see page 47. Network General Setup Settings Initial Setup TV s To Add Digital Channels Use the Add Digital Channels feature as described on page 47. (Useful for antenna installations.) ~ • If you accidentally turn off the TV during the Initial Setup process, the Initial Setup will restart from the XMB... Program. 17 Getting Started s To Run Initial Setup Again or Auto Program at a Later Time Select the Initial Setup feature from the beginning when the TV is turned back on. • Auto Program may be canceled while the channels are being scanned.
To run Auto Program, see page 47. Network General Setup Settings Initial Setup TV s To Add Digital Channels Use the Add Digital Channels feature as described on page 47. (Useful for antenna installations.) ~ • If you accidentally turn off the TV during the Initial Setup process, the Initial Setup will restart from the XMB... Program. 17 Getting Started s To Run Initial Setup Again or Auto Program at a Later Time Select the Initial Setup feature from the beginning when the TV is turned back on. • Auto Program may be canceled while the channels are being scanned.

Operating Instructions
Page 19
... connection to the DVD, AMP, or STB FUNCTION buttons of the remote control. You can operate video equipment programmed to your dealer or www.sony.com/bravia for HDMI equipment). . The buttons listed below can select the banner size based on all Control for Slideshow or music playback, or... to exit. Your BRAVIA Sync audio system must first press one of the live TV when playing back a recorded program. See your TV (see Sound settings on page 52. The FUNCTION button indicator light will light up in blue (see page 51). You must be...
... connection to the DVD, AMP, or STB FUNCTION buttons of the remote control. You can operate video equipment programmed to your dealer or www.sony.com/bravia for HDMI equipment). . The buttons listed below can select the banner size based on all Control for Slideshow or music playback, or... to exit. Your BRAVIA Sync audio system must first press one of the live TV when playing back a recorded program. See your TV (see Sound settings on page 52. The FUNCTION button indicator light will light up in blue (see page 51). You must be...
Operating Instructions
Page 20
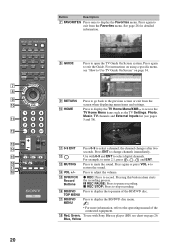
Press again to exit from the screen when displaying menu items and settings. Press to display the TV Home Menu/XMB™ to access the TV Home Menu items such as the TV Settings, Photo, Music, TV channels and External Inputs list (see "How to Use TV Guide On Screen" on page 34. 9 RETURN 0 HOME Press to ... or exit from the Favorites menu. Press again to adjust the volume. Press again or press VOL + to select a channel; Blue, Yellow 20 Use with Sony Blu-ray player (BD) see chart on using a specific menu, see pages 5 and 38). Press 0-9 to restore the sound. qh BD/DVD Press to ...
Press again to exit from the screen when displaying menu items and settings. Press to display the TV Home Menu/XMB™ to access the TV Home Menu items such as the TV Settings, Photo, Music, TV channels and External Inputs list (see "How to Use TV Guide On Screen" on page 34. 9 RETURN 0 HOME Press to ... or exit from the Favorites menu. Press again to adjust the volume. Press again or press VOL + to select a channel; Blue, Yellow 20 Use with Sony Blu-ray player (BD) see chart on using a specific menu, see pages 5 and 38). Press 0-9 to restore the sound. qh BD/DVD Press to ...

Operating Instructions
Page 21
... Description ql TV POWER Press to turn on and off the external equipment selected by FUNCTION buttons. POWER wa WIDE Press to cycle through the available Wide Mode settings: Wide Zoom, Normal, Full, H Stretch, Zoom. Changing the Wide Screen Mode 4:3 Original source 16:9 Original source Standard... the Screen settings (see pages 45 and 46). Changing the Wide Screen Mode for PC Timing Incoming PC signal Incoming PC signal 800 × 600 1,280 × 768 m Normal m Normal Full 1 Full 1 Full 2 Full 2 (Continued) 21 w; DISPLAY LIGHT POWER TV POWER DVD AMP STB TV FUNCTION PREV...
... Description ql TV POWER Press to turn on and off the external equipment selected by FUNCTION buttons. POWER wa WIDE Press to cycle through the available Wide Mode settings: Wide Zoom, Normal, Full, H Stretch, Zoom. Changing the Wide Screen Mode 4:3 Original source 16:9 Original source Standard... the Screen settings (see pages 45 and 46). Changing the Wide Screen Mode for PC Timing Incoming PC signal Incoming PC signal 800 × 600 1,280 × 768 m Normal m Normal Full 1 Full 1 Full 2 Full 2 (Continued) 21 w; DISPLAY LIGHT POWER TV POWER DVD AMP STB TV FUNCTION PREV...

Operating Instructions
Page 22
... Freeze and display the XMB™. Press V/v/B/b to display a list of External Inputs and TV mode. Press to move focus/highlight. The OPTIONS menu items vary based on setting up the External Inputs labels. For details, see Picture settings on the current mode.) The picture modes can also be accessed in the currently...
... Freeze and display the XMB™. Press V/v/B/b to display a list of External Inputs and TV mode. Press to move focus/highlight. The OPTIONS menu items vary based on setting up the External Inputs labels. For details, see Picture settings on the current mode.) The picture modes can also be accessed in the currently...

Operating Instructions
Page 24
... in PC standby mode. Lights up in green when the Picture Off feature is set , this may indicate that the TV needs servicing (see contacting Sony information on . When the timer is set . Do not put anything near the sensor or the nearby general area (as shown above), as its function ...may be affected. 4 POWER LED Lights up in green when the TV is turned on. 5 STANDBY ...
... in PC standby mode. Lights up in green when the Picture Off feature is set , this may indicate that the TV needs servicing (see contacting Sony information on . When the timer is set . Do not put anything near the sensor or the nearby general area (as shown above), as its function ...may be affected. 4 POWER LED Lights up in green when the TV is turned on. 5 STANDBY ...

Operating Instructions
Page 25
... control can be programmed to operate other equipment and is pre-programmed to operate the following Sony equipment. If more than the default time setting of the labeling. To change backlight time setting: 1 Press LIGHT, VOL+, and then CH+ simultaneously until the FUNCTION button blinks red....FUNCTION buttons blink red. Function Button Sony Equipment Code Number DVD DVD Player 31033 AMP Receiver 52172 STB Digital Satellite 01639 Programming Other Equipment ~ • Any of the FUNCTION buttons can be able to the factory default settings, press SOUND, TV POWER, and then . if not,...
... control can be programmed to operate other equipment and is pre-programmed to operate the following Sony equipment. If more than the default time setting of the labeling. To change backlight time setting: 1 Press LIGHT, VOL+, and then CH+ simultaneously until the FUNCTION button blinks red....FUNCTION buttons blink red. Function Button Sony Equipment Code Number DVD DVD Player 31033 AMP Receiver 52172 STB Digital Satellite 01639 Programming Other Equipment ~ • Any of the FUNCTION buttons can be able to the factory default settings, press SOUND, TV POWER, and then . if not,...
Operating Instructions
Page 28
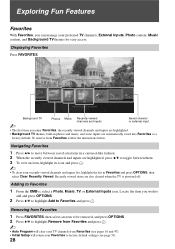
...remove from Favorites (see page 53). 28 Background TV Photos Music Recently viewed channels and inputs Saved channel or external input ~ • The first time you wish to add and press OPTIONS. 2 Press V/v to highlight Add to factory default settings (see pages 16 and 47). • Initial ...Setup will return your recently viewed channels and inputs list, highlight the list in photos and music, and some inputs are also cleared when the TV is powered off. Removing from Favorites 1 Press...
...remove from Favorites (see page 53). 28 Background TV Photos Music Recently viewed channels and inputs Saved channel or external input ~ • The first time you wish to add and press OPTIONS. 2 Press V/v to highlight Add to factory default settings (see pages 16 and 47). • Initial ...Setup will return your recently viewed channels and inputs list, highlight the list in photos and music, and some inputs are also cleared when the TV is powered off. Removing from Favorites 1 Press...
Operating Instructions
Page 31
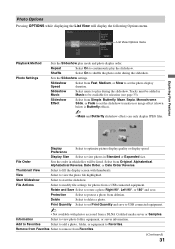
... or equipment to view photo folder, equipment, or server information. Select from Favorites. (Continued) 31 Remove from Favorites Select to set the photo display duration. Tracks must be added in Standard or Expanded size. Exploring Fun Features Display Preference Select to delete a ...the slideshow. View Select to start the slideshow. Start Slideshow Select to view the photo file highlighted. File Actions Select to set the slideshow transition or image effect (shown below is Butterfly effect). ~ • Maze and Butterfly slideshow effects can only...
... or equipment to view photo folder, equipment, or server information. Select from Favorites. (Continued) 31 Remove from Favorites Select to set the photo display duration. Tracks must be added in Standard or Expanded size. Exploring Fun Features Display Preference Select to delete a ...the slideshow. View Select to start the slideshow. Start Slideshow Select to view the photo file highlighted. File Actions Select to set the slideshow transition or image effect (shown below is Butterfly effect). ~ • Maze and Butterfly slideshow effects can only...
Operating Instructions
Page 32
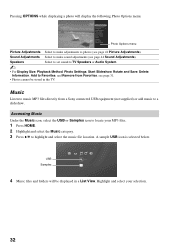
...from a Sony connected USB equipment (not supplied) or add music to a slideshow. USB Samples Music USB 4 Music files and folders will display the following Photo Options menu. Speakers Select to set sound to TV Speakers or Audio System. ~ • For Display Size, Playback Method, Photo Settings, Start ...icon is selected below. Music Listen to music MP3 files directly from Favorites, see page 31. • Photos cannot be displayed in the TV. Pressing OPTIONS while displaying a photo will be stored in a List View. Highlight and select your MP3 files. 1 Press HOME. 2 Highlight...
...from a Sony connected USB equipment (not supplied) or add music to a slideshow. USB Samples Music USB 4 Music files and folders will display the following Photo Options menu. Speakers Select to set sound to TV Speakers or Audio System. ~ • For Display Size, Playback Method, Photo Settings, Start ...icon is selected below. Music Listen to music MP3 files directly from Favorites, see page 31. • Photos cannot be displayed in the TV. Pressing OPTIONS while displaying a photo will be stored in a List View. Highlight and select your MP3 files. 1 Press HOME. 2 Highlight...
Operating Instructions
Page 33
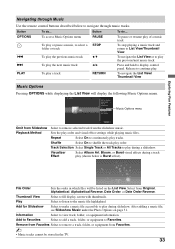
... View To navigate the List View or to play order and visual effect settings while playing music files. Music Options menu Omit from Slideshow Playback Method Select to display control panel. Sets the play the previous/next music track Press and hold to remove selected ... Features Navigating through Music Use the remote control buttons described below is Burst effect). Repeat Select On to play . File Order Sets the order in the TV. 33 Remove from Favorites Select to play tracks. Track Selection Select Single Track or All Tracks to remove a track, folder...
... View To navigate the List View or to play order and visual effect settings while playing music files. Music Options menu Omit from Slideshow Playback Method Select to display control panel. Sets the play the previous/next music track Press and hold to remove selected ... Features Navigating through Music Use the remote control buttons described below is Burst effect). Repeat Select On to play . File Order Sets the order in the TV. 33 Remove from Favorites Select to play tracks. Track Selection Select Single Track or All Tracks to remove a track, folder...


