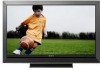
Operating Instructions
Page 3
... Started 1. Initial Setup 19 Using the TV Features Remote Control and TV Controls/ Indicators 20 Inserting Batteries into the Remote Control 20 Remote Control and TV Controls 20 Indicators 25 Programming the Remote Control 26 Operating Sony Brand Video Equipment......26 Programming Non-Sony Video Equipment 26 Using Other Equipment with Your Remote Control 28 Using P&P and PIP Features 31...
... Started 1. Initial Setup 19 Using the TV Features Remote Control and TV Controls/ Indicators 20 Inserting Batteries into the Remote Control 20 Remote Control and TV Controls 20 Indicators 25 Programming the Remote Control 26 Operating Sony Brand Video Equipment......26 Programming Non-Sony Video Equipment 26 Using Other Equipment with Your Remote Control 28 Using P&P and PIP Features 31...
Operating Instructions
Page 9
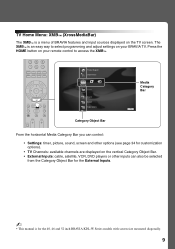
...8226; External Inputs: cable, satellite, VCR, DVD players or other inputs can also be selected from the Category Object Bar for the 40, 46 and 52 inch BRAVIA KDL-W Series models with screen size measured diagonally. 9 The XMB™ is an easy way to access the XMB™. Press the ...HOME button on your remote control to select programming and adjust settings on your BRAVIA TV. TV Home Menu: XMB™ (XrossMediaBar) The XMB™ is for the External Inputs. ~ • This manual is a menu...
...8226; External Inputs: cable, satellite, VCR, DVD players or other inputs can also be selected from the Category Object Bar for the 40, 46 and 52 inch BRAVIA KDL-W Series models with screen size measured diagonally. 9 The XMB™ is an easy way to access the XMB™. Press the ...HOME button on your remote control to select programming and adjust settings on your BRAVIA TV. TV Home Menu: XMB™ (XrossMediaBar) The XMB™ is for the External Inputs. ~ • This manual is a menu...
Operating Instructions
Page 18
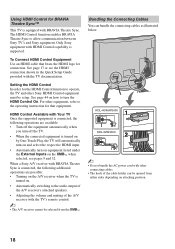
...the HDMI Control In order for that bears the HDMI logo for BRAVIA Theatre Sync™ This TV is turned on. • Automatically switching to allow communication between Sony TV's and Sony equipment. For other connecting cables. • The hook of the A/V receiver with BRAVIA Theatre... XMB™ when selected, see the HDMI connection shown in the Quick Setup Guide provided with BRAVIA Theatre Sync. When a Sony A/V receiver with the TV's remote control. ~ • The A/V receiver cannot be opened from the XMB™. Using HDMI Control for connection. See page ...
...the HDMI Control In order for that bears the HDMI logo for BRAVIA Theatre Sync™ This TV is turned on. • Automatically switching to allow communication between Sony TV's and Sony equipment. For other connecting cables. • The hook of the A/V receiver with BRAVIA Theatre... XMB™ when selected, see the HDMI connection shown in the Quick Setup Guide provided with BRAVIA Theatre Sync. When a Sony A/V receiver with the TV's remote control. ~ • The A/V receiver cannot be opened from the XMB™. Using HDMI Control for connection. See page ...
Operating Instructions
Page 19
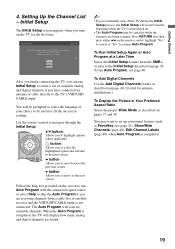
... the XMB™ or refer to resume Auto Program. Highlight a choice and press to select the language of 5 Please select a language. Use the remote control to navigate through the Initial Setup: V/v button: Allows you to move to be used for the first time. Initial Setup The Initial Setup screen... the Initial Setup process, the Initial Setup will be canceled while the channels are receiving channels from the beginning when the TV is not connected. b button: Allows you to select the highlighted option and advance to the previous screen. button: Allows you to move back ...
... the XMB™ or refer to resume Auto Program. Highlight a choice and press to select the language of 5 Please select a language. Use the remote control to navigate through the Initial Setup: V/v button: Allows you to move to be used for the first time. Initial Setup The Initial Setup screen... the Initial Setup process, the Initial Setup will be canceled while the channels are receiving channels from the beginning when the TV is not connected. b button: Allows you to select the highlighted option and advance to the previous screen. button: Allows you to move back ...
Operating Instructions
Page 20
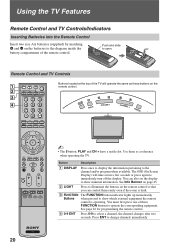
...immediately. 20 See page 26 for programming the remote control. 4 0-9 ENT Press 0-9 to the diagram inside the battery compartment of the remote control. Using the TV Features Remote Control and TV Controls/Indicators Inserting Batteries into the Remote Control Insert two size AA batteries (supplied) ... batteries to select a channel; You can control them as these FUNCTION buttons to show minimal information. Remote Control and TV Controls Buttons located at the top of these buttons on the 1 remote control. 2 3 4 HOME ~ • The 5 button, PLAY and CH + have a tactile...
...immediately. 20 See page 26 for programming the remote control. 4 0-9 ENT Press 0-9 to the diagram inside the battery compartment of the remote control. Using the TV Features Remote Control and TV Controls/Indicators Inserting Batteries into the Remote Control Insert two size AA batteries (supplied) ... batteries to select a channel; You can control them as these FUNCTION buttons to show minimal information. Remote Control and TV Controls Buttons located at the top of these buttons on the 1 remote control. 2 3 4 HOME ~ • The 5 button, PLAY and CH + have a tactile...

Operating Instructions
Page 22
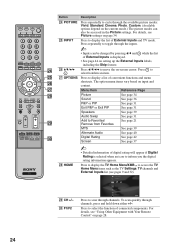
... sound. The picture settings will be switched to the audio output of the attached speakers of your TV (see "Using ql Buttons Other Equipment with Your Remote Control" on and off the TV. qf MUTING Press to adjust the volume. Pressing this button alone starts the Record recording process. ...w; &m PREV: Press to replay the current program from the previous chapter mark (if any ) or to live TV cache. Your BRAVIA...
... sound. The picture settings will be switched to the audio output of the attached speakers of your TV (see "Using ql Buttons Other Equipment with Your Remote Control" on and off the TV. qf MUTING Press to adjust the volume. Pressing this button alone starts the Record recording process. ...w; &m PREV: Press to replay the current program from the previous chapter mark (if any ) or to live TV cache. Your BRAVIA...
Operating Instructions
Page 24
...Speakers See page 39 Audio Swap See page 31 wl Add to move the on-screen cursor. For details, see "Using Other Equipment with Your Remote Control" on input and content. Press repeatedly to select/confirm an item. Press to toggle through the inputs. ~ • Inputs can also... See page 42 Screen See page 37 wk HOME ~ • Detailed information of External Inputs and TV mode. Product Support Clock/Timers wl CH +/- e; F1/F2 Sound Screen Video Options TV Press to inform you the digital rating information appears. To scan quickly through channels, press and hold ...
...Speakers See page 39 Audio Swap See page 31 wl Add to move the on-screen cursor. For details, see "Using Other Equipment with Your Remote Control" on input and content. Press repeatedly to select/confirm an item. Press to toggle through the inputs. ~ • Inputs can also... See page 42 Screen See page 37 wk HOME ~ • Detailed information of External Inputs and TV mode. Product Support Clock/Timers wl CH +/- e; F1/F2 Sound Screen Video Options TV Press to inform you the digital rating information appears. To scan quickly through channels, press and hold ...
Operating Instructions
Page 25
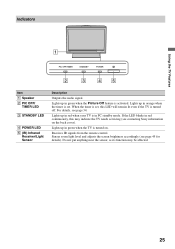
...remain lit even if the TV is turned on the back cover). For details, see page 45 for details). Receives IR signals from the remote control. Do not put anything near the sensor, as its function may indicate the TV needs servicing (see contacting Sony information on . Lights up... in green when the TV is turned off. Using the TV Features Indicators 1 PIC OFF/TIMER STANDBY POWER 2...
...remain lit even if the TV is turned on the back cover). For details, see page 45 for details). Receives IR signals from the remote control. Do not put anything near the sensor, as its function may indicate the TV needs servicing (see contacting Sony information on . Lights up... in green when the TV is turned off. Using the TV Features Indicators 1 PIC OFF/TIMER STANDBY POWER 2...
Operating Instructions
Page 26
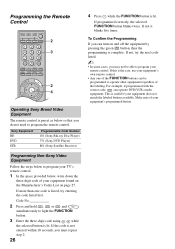
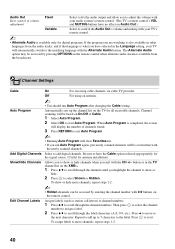
... Number 101 (Sony Blu-ray Disc Player) 751 (Sony DVD Player) 801 (Sony Satellite Receiver) Programming Non-Sony Video Equipment Follow the steps below to program your TV's remote control. 1 In the space provided below so that you may not be programmed to program your remote control. If ...cases, you do not need to light the FUNCTION button. 3 Enter the three-digit code using - Programming the Remote Control 2 3 2 4 Operating Sony Brand Video Equipment The remote control is preset as below , write down the three-digit code of your equipment found on the Manufacturer's Codes List...
... Number 101 (Sony Blu-ray Disc Player) 751 (Sony DVD Player) 801 (Sony Satellite Receiver) Programming Non-Sony Video Equipment Follow the steps below to program your TV's remote control. 1 In the space provided below so that you may not be programmed to program your remote control. If ...cases, you do not need to light the FUNCTION button. 3 Enter the three-digit code using - Programming the Remote Control 2 3 2 4 Operating Sony Brand Video Equipment The remote control is preset as below , write down the three-digit code of your equipment found on the Manufacturer's Codes List...
Operating Instructions
Page 28
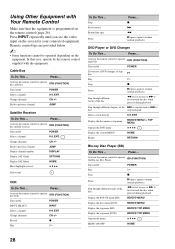
... resume normal playback) Step through different chapters of the disc m to fast reverse or M to step forward or . Press ... Activate the remote control to operate the VCR STB (FUNCTION) Turn on /off POWER INPUT SELECT INPUT Select a channel 0-9, ENT Change channels CH +/- Activate the...Blu-ray Disc Player (BD) To Do This ... Record z Play H To Do This ... Using Other Equipment with Your Remote Control Make sure that case, operate by the remote control supplied with the equipment. Press INPUT repeatedly until you have a DVD changer, to skip disc F1 Play H Stop x ...
... resume normal playback) Step through different chapters of the disc m to fast reverse or M to step forward or . Press ... Activate the remote control to operate the VCR STB (FUNCTION) Turn on /off POWER INPUT SELECT INPUT Select a channel 0-9, ENT Change channels CH +/- Activate the...Blu-ray Disc Player (BD) To Do This ... Record z Play H To Do This ... Using Other Equipment with Your Remote Control Make sure that case, operate by the remote control supplied with the equipment. Press INPUT repeatedly until you have a DVD changer, to skip disc F1 Play H Stop x ...
Operating Instructions
Page 29
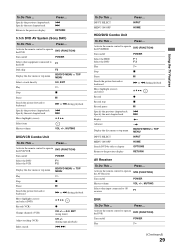
... This ... Press ... To Do This ... INPUT SELECT MENU ON/OFF Press ... Press ... Press ... Press ... Activate the remote control to the previous display Press ... . > RETURN 5.1ch DVD AV System (Sony DAV) To Do This ... INPUT HOME HDD/DVD Combo Unit To Do This ... Specify the previous chapter/track Specify the... to operate the DVD/HDD DVD (FUNCTION) Turn on/off POWER Play H (Continued) 29 Using the TV Features Press ... Activate the remote control to operate the DVD DVD (FUNCTION) Turn on /off POWER Select other input connected to the DAV F1 Disk skip F2 ...
... This ... Press ... To Do This ... INPUT SELECT MENU ON/OFF Press ... Press ... Press ... Press ... Activate the remote control to the previous display Press ... . > RETURN 5.1ch DVD AV System (Sony DAV) To Do This ... INPUT HOME HDD/DVD Combo Unit To Do This ... Specify the previous chapter/track Specify the... to operate the DVD/HDD DVD (FUNCTION) Turn on/off POWER Play H (Continued) 29 Using the TV Features Press ... Activate the remote control to operate the DVD DVD (FUNCTION) Turn on /off POWER Select other input connected to the DAV F1 Disk skip F2 ...
Operating Instructions
Page 32
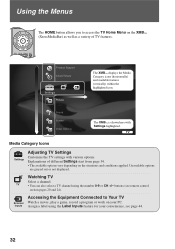
.... • The available options vary depending on your convenience, see remote control section pages 20 and 24). Explanations of TV features. TV Media Category Icons Settings Adjusting TV Settings Customize the TV settings with Settings highlighted. Sound Screen Video Options The XMB™ ...displays the Media Category icons (horizontally) and available features (vertically) within the highlighted icon. Watching TV Select a channel. Using the Menus The HOME button allows you to Your TV External Watch a movie, play a game, record a program or work on the situations and ...
.... • The available options vary depending on your convenience, see remote control section pages 20 and 24). Explanations of TV features. TV Media Category Icons Settings Adjusting TV Settings Customize the TV settings with Settings highlighted. Sound Screen Video Options The XMB™ ...displays the Media Category icons (horizontally) and available features (vertically) within the highlighted icon. Watching TV Select a channel. Using the Menus The HOME button allows you to Your TV External Watch a movie, play a game, record a program or work on the situations and ...
Operating Instructions
Page 34
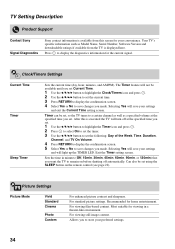
... specified time you made . Allows you want the TV to save your settings and exit the Current Time setting screen. TV Setting Description Product Support Contact Sony Signal Diagnostics Sony contact information is displayed here. For standard picture settings.... Press to save your settings and will not be set . Selecting Yes will save changes you set using the SLEEP button on the remote control (see page 22). Your TV...
... specified time you made . Allows you want the TV to save your settings and exit the Current Time setting screen. TV Setting Description Product Support Contact Sony Signal Diagnostics Sony contact information is displayed here. For standard picture settings.... Press to save your settings and will not be set . Selecting Yes will save changes you set using the SLEEP button on the remote control (see page 22). Your TV...
Operating Instructions
Page 35
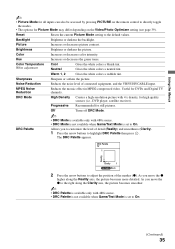
...the Video/Photo Optimizer setting (see page 39). Warm 1, 2 Gives the white colors a reddish tint. Progressive Recommended for DVDs and Digital TV channels. Reset Resets the current Picture Mode setting to directly toggle the modes. • The options for high quality sources (i.e., DVD player,...Off Turns off DRC Mode. ~ • DRC Mode is available only with 4 x density, for Picture Mode may differ depending on the remote control to the default values. Hue Increases or decreases the green tones. As you to customize the level of detail (Reality) and smoothness (...
...the Video/Photo Optimizer setting (see page 39). Warm 1, 2 Gives the white colors a reddish tint. Progressive Recommended for DVDs and Digital TV channels. Reset Resets the current Picture Mode setting to directly toggle the modes. • The options for high quality sources (i.e., DVD player,...Off Turns off DRC Mode. ~ • DRC Mode is available only with 4 x density, for Picture Mode may differ depending on the remote control to the default values. Hue Increases or decreases the green tones. As you to customize the level of detail (Reality) and smoothness (...
Operating Instructions
Page 36
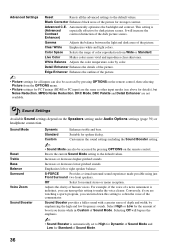
... you can turn down this setting to the default values. Advanced Settings Reset Resets all inputs can also be accessed by pressing OPTIONS on the remote control. Detail Enhancer Enhances the details of the dark picture scenes. Sound Settings Available Sound settings depend on the... remote control, then selecting Picture from Wide or Standard. Standard Suitable for normal stereo or mono reception. Resets the current Sound Mode setting to make the ...
... you can turn down this setting to the default values. Advanced Settings Reset Resets all inputs can also be accessed by pressing OPTIONS on the remote control. Detail Enhancer Enhances the details of the dark picture scenes. Sound Settings Available Sound settings depend on the... remote control, then selecting Picture from Wide or Standard. Standard Suitable for normal stereo or mono reception. Resets the current Sound Mode setting to make the ...
Operating Instructions
Page 37
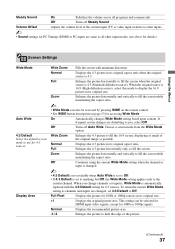
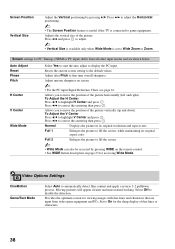
...Enlarges the 4:3 picture to fill the screen while maintaining the aspect ratio. ~ • Wide Mode can be accessed by pressing WIDE on the remote control. • See WIDE button description on page 23 for 4:3 sources. Normal Displays the 4:3 picture in its original aspect ratio. When ...-1/-2 Enlarges the picture to fill the screen. Full Enlarges the 4:3 picture horizontally only, to hide the edge of the current input (TV or video input) relative to fill the screen while maintaining the aspect ratio. Zoom Enlarges the picture horizontally and vertically to other inputs. ...
...Enlarges the 4:3 picture to fill the screen while maintaining the aspect ratio. ~ • Wide Mode can be accessed by pressing WIDE on the remote control. • See WIDE button description on page 23 for 4:3 sources. Normal Displays the 4:3 picture in its original aspect ratio. When ...-1/-2 Enlarges the picture to fill the screen. Full Enlarges the 4:3 picture horizontally only, to hide the edge of the current input (TV or video input) relative to fill the screen while maintaining the aspect ratio. Zoom Enlarges the picture horizontally and vertically to other inputs. ...
Operating Instructions
Page 38
...the centering then press . Press B/b to highlight V Center and press . Screen Position Vertical Size Adjust the Vertical positioning by pressing WIDE on the remote control. • See WIDE button description on screen. ~ • For the PC input Signal Reference Chart, see page 16. Auto Adjust ...from video game equipment and PCs. Press B/b to adjust the Horizontal positioning. ~ • The Screen Position feature is useful if the TV is set to game equipment. Allows you to display the PC input. Normal Displays the picture in its original aspect ratio. Full 2...
...the centering then press . Press B/b to highlight V Center and press . Screen Position Vertical Size Adjust the Vertical positioning by pressing WIDE on the remote control. • See WIDE button description on screen. ~ • For the PC input Signal Reference Chart, see page 16. Auto Adjust ...from video game equipment and PCs. Press B/b to adjust the Horizontal positioning. ~ • The Screen Position feature is useful if the TV is set to game equipment. Allows you to display the PC input. Normal Displays the picture in its original aspect ratio. Full 2...
Operating Instructions
Page 40
...Out Easy control of volume adjustment Fixed Select to fix the audio output and allow you to adjust the volume with your audio system's remote control. (The TV's remote control's VOL and MUTING buttons have no effect on Audio Out.) Variable Select to control the Audio Out's volume and muting with your... TV's remote control. ~ • Alternate Audio is available only for digital programs. If the program you are watching is also available in other languages from ...
...Out Easy control of volume adjustment Fixed Select to fix the audio output and allow you to adjust the volume with your audio system's remote control. (The TV's remote control's VOL and MUTING buttons have no effect on Audio Out.) Variable Select to control the Audio Out's volume and muting with your... TV's remote control. ~ • Alternate Audio is available only for digital programs. If the program you are watching is also available in other languages from ...
Operating Instructions
Page 41
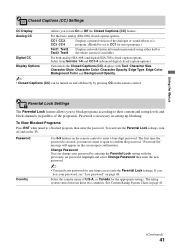
... To View Blocked Programs Press ENT when tuned to a blocked program, then enter the password. See Custom Rating System Chart on the remote control. The first time the password is necessary in setting up blocking. Display Options Customizes the Closed Captions (CC) displays with Text, ...Text3, Text4 Displays network/station information presented using either half or the whole screen (if available). "Password Set" message will appear on the TV. To reactivate the Parental Lock settings, turn On or Off the Closed Captions (CC) feature. Using the Menus CC Closed Captions (CC)...
... To View Blocked Programs Press ENT when tuned to a blocked program, then enter the password. See Custom Rating System Chart on the remote control. The first time the password is necessary in setting up blocking. Display Options Customizes the Closed Captions (CC) displays with Text, ...Text3, Text4 Displays network/station information presented using either half or the whole screen (if available). "Password Set" message will appear on the TV. To reactivate the Parental Lock settings, turn On or Off the Closed Captions (CC) feature. Using the Menus CC Closed Captions (CC)...
Operating Instructions
Page 45
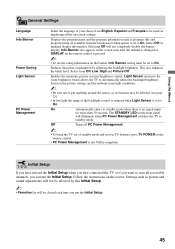
... option is set to On. Off Turns off PC Power Management. ~ • To bring the TV out of standby mode and recover TV features, press TV POWER on the screen. Follow the instructions on the remote control. • PC Power Management is no signal input for displaying all receivable channels, you can ... Off for minimal display information. Initial Setup If you have missed the Initial Setup when you first connected the TV or if you run the Initial Setup. The STANDBY LED on the remote control is pressed. ~ • To see page 25). • In low light the range of the ...
... option is set to On. Off Turns off PC Power Management. ~ • To bring the TV out of standby mode and recover TV features, press TV POWER on the screen. Follow the instructions on the remote control. • PC Power Management is no signal input for displaying all receivable channels, you can ... Off for minimal display information. Initial Setup If you have missed the Initial Setup when you first connected the TV or if you run the Initial Setup. The STANDBY LED on the remote control is pressed. ~ • To see page 25). • In low light the range of the ...


