Operating Instructions
Page 3
... Manufacturer's Code List 27 Sony Equipment Codes 27 Other Manufacturer Equipment Codes.........27 Using Other Equipment with Your Remote Control 28 Exploring Fun Features Favorites 29 Displaying Favorites 29 Navigating Favorites 29 Adding to Favorites 29 Removing from P&P and PIP 38 Using TV Settings Media Category Icons 39 Adjusting TV Settings 39 Viewing Photos 39...
... Manufacturer's Code List 27 Sony Equipment Codes 27 Other Manufacturer Equipment Codes.........27 Using Other Equipment with Your Remote Control 28 Exploring Fun Features Favorites 29 Displaying Favorites 29 Navigating Favorites 29 Adding to Favorites 29 Removing from P&P and PIP 38 Using TV Settings Media Category Icons 39 Adjusting TV Settings 39 Viewing Photos 39...
Operating Instructions
Page 4
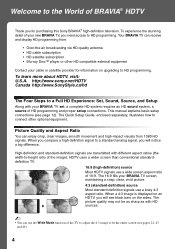
http://www.sony.com/HDTV Canada http://www.SonyStyle.ca/hd The Four Steps to a Full HD Experience: Set, Sound, Source, and Setup Along with different aspect ratios (the width-to-height ratio of the image). The 16:9 fills your new BRAVIA TV, you for information on the sides...-definition and standard-definition signals are transmitted with your cable or satellite provider for purchasing this Sony BRAVIA® high-definition television. This manual explains basic setup connections (see pages 22, 45 and 46). 4 Welcome to the World of BRAVIA® HDTV Thank you need access to HD ...
http://www.sony.com/HDTV Canada http://www.SonyStyle.ca/hd The Four Steps to a Full HD Experience: Set, Sound, Source, and Setup Along with different aspect ratios (the width-to-height ratio of the image). The 16:9 fills your new BRAVIA TV, you for information on the sides...-definition and standard-definition signals are transmitted with your cable or satellite provider for purchasing this Sony BRAVIA® high-definition television. This manual explains basic setup connections (see pages 22, 45 and 46). 4 Welcome to the World of BRAVIA® HDTV Thank you need access to HD ...
Operating Instructions
Page 5
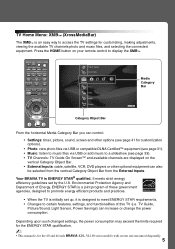
... music files via USB or compatible DLNA Certified™ equipment (see page 33). • TV Channels: TV Guide On Screen™ and available channels are displayed on your remote control to access the TV settings for the 40 and 46 inch BRAVIA KDL-VL160 series models with screen size measured diagonally. 5 ENERGY STAR is a joint...
... music files via USB or compatible DLNA Certified™ equipment (see page 33). • TV Channels: TV Guide On Screen™ and available channels are displayed on your remote control to access the TV settings for the 40 and 46 inch BRAVIA KDL-VL160 series models with screen size measured diagonally. 5 ENERGY STAR is a joint...
Operating Instructions
Page 7
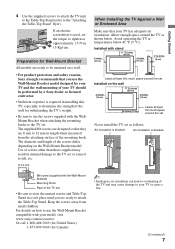
...screws supplied with your model, visit www.sony.com/accessories Or call 1-800-488-7669 (for United States) 1-877-899-7669 (for your TV and the wall-mounting of the TV set . Air circulation is required in installing this much space around the set as shown below 41 °F (5 ...For details on a wall. • For product protection and safety reasons, Sony strongly recommends that they are ready to be mounted on how to your TV has adequate air circulation. Never install the TV set . Use of the TV and may result in internal damage to fall, etc. 8-12 mm When ...
...screws supplied with your model, visit www.sony.com/accessories Or call 1-800-488-7669 (for United States) 1-877-899-7669 (for your TV and the wall-mounting of the TV set . Air circulation is required in installing this much space around the set as shown below 41 °F (5 ...For details on a wall. • For product protection and safety reasons, Sony strongly recommends that they are ready to be mounted on how to your TV has adequate air circulation. Never install the TV set . Use of the TV and may result in internal damage to fall, etc. 8-12 mm When ...
Operating Instructions
Page 8
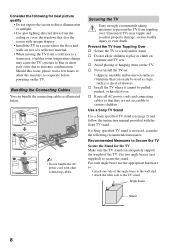
... TV sets. s Do not allow the moisture to moisture condensation. Use two angle braces (not supplied) to the wall stud. • attach the other connecting cables. Prevent the TV from a cold area to play or climb on the TV. s Never install the TV on the TV. If a Sony specified TV... unstable and/or uneven surfaces. • furniture that they are not of the angle brace to secure the stand. Use a Sony TV Stand Use a Sony specified TV stand (see page 2) and follow the instruction manual provided with other side to curious children. Bundling the Connecting Cables You can ...
... TV sets. s Do not allow the moisture to moisture condensation. Use two angle braces (not supplied) to the wall stud. • attach the other connecting cables. Prevent the TV from a cold area to play or climb on the TV. s Never install the TV on the TV. If a Sony specified TV... unstable and/or uneven surfaces. • furniture that they are not of the angle brace to secure the stand. Use a Sony TV Stand Use a Sony specified TV stand (see page 2) and follow the instruction manual provided with other side to curious children. Bundling the Connecting Cables You can ...
Operating Instructions
Page 11
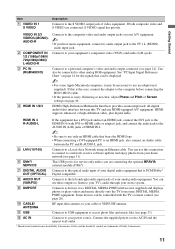
...be controlled with DVI-to-HDMI cable or adapter) jack, and connect the audio jack to the AUDIO IN (L/R) jacks of Screen settings on page 46. If this TV and any HDMI-equipped A/V equipment. qa USB Connects to USB equipment to a personal computer's video and audio output connector (see... connecting the HD15-HD15 cable. • If the picture is PCM/Dolby* OUT (OPTICAL) Digital compatible. 8 AUDIO OUT (VAR/FIX) Connects to your TV's audio through your equipment's component video (YPBPR) and audio (L/R) jacks. Getting Started Item 1 VIDEO IN 1 S VIDEO Description Connects to the S VIDEO...
...be controlled with DVI-to-HDMI cable or adapter) jack, and connect the audio jack to the AUDIO IN (L/R) jacks of Screen settings on page 46. If this TV and any HDMI-equipped A/V equipment. qa USB Connects to USB equipment to a personal computer's video and audio output connector (see... connecting the HD15-HD15 cable. • If the picture is PCM/Dolby* OUT (OPTICAL) Digital compatible. 8 AUDIO OUT (VAR/FIX) Connects to your TV's audio through your equipment's component video (YPBPR) and audio (L/R) jacks. Getting Started Item 1 VIDEO IN 1 S VIDEO Description Connects to the S VIDEO...
Operating Instructions
Page 12
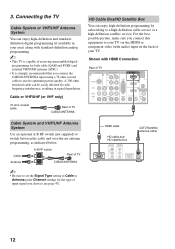
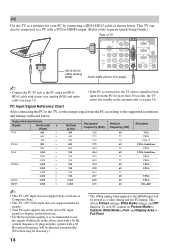
3. Cable or VHF/UHF (or VHF only) 75-ohm coaxial cable Rear of TV CABLE/ANTENNA HD Cable Box/HD Satellite Box You can enjoy high-definition programming by radio frequency interference, resulting in the Channel settings for the type of receiving unscrambled digital programming for both cable (QAM and 8VSB) ... System and VHF/UHF Antenna System Use an optional A-B RF switch (not supplied) to receive optimum picture quality. Cable Antenna A-B RF switch A Rear of TV B CABLE/ANTENNA ~ • Be sure to set the Signal Type setting to Cable or Antenna in signal degradation.
3. Cable or VHF/UHF (or VHF only) 75-ohm coaxial cable Rear of TV CABLE/ANTENNA HD Cable Box/HD Satellite Box You can enjoy high-definition programming by radio frequency interference, resulting in the Channel settings for the type of receiving unscrambled digital programming for both cable (QAM and 8VSB) ... System and VHF/UHF Antenna System Use an optional A-B RF switch (not supplied) to receive optimum picture quality. Cable Antenna A-B RF switch A Rear of TV B CABLE/ANTENNA ~ • Be sure to set the Signal Type setting to Cable or Antenna in signal degradation.
Operating Instructions
Page 14
... 1,920 × Vertical (Line) 480 480 400 600 600 768 768 768 768 768 768 768 1,024 1,080 Horizontal frequency (kHz) 31.5 37.5 31.5 37.9 46.9 48.4 56.5 60.0 47.4 47.8 60.3 47.7 64.0 67.5 Vertical frequency (Hz) 60 75 70 60 75 60 70 75 60 60 75 60 60... input does not support Sync on the television. • For the best picture quality, it is connected to the TV and no signal has been input from the PC according to the TV, set Picture Mode to Custom, Wide Mode to Full, and Display Area to the HDMI input will be treated as...
... 1,920 × Vertical (Line) 480 480 400 600 600 768 768 768 768 768 768 768 1,024 1,080 Horizontal frequency (kHz) 31.5 37.5 31.5 37.9 46.9 48.4 56.5 60.0 47.4 47.8 60.3 47.7 64.0 67.5 Vertical frequency (Hz) 60 75 70 60 75 60 70 75 60 60 75 60 60... input does not support Sync on the television. • For the best picture quality, it is connected to the TV and no signal has been input from the PC according to the TV, set Picture Mode to Custom, Wide Mode to Full, and Display Area to the HDMI input will be treated as...
Operating Instructions
Page 16
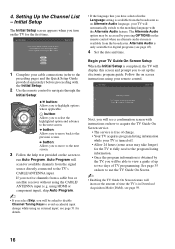
...to select the highlighted option and advance to view a guide of time the TV is in the Language setting is obtained by pressing OPTIONS on how to use the TV Guide On Screen. ~ • Enabling the TV Guide On Screen feature will be able to the next screen. see a ...confirmation screen with the Initial Setup. 2 Use the remote control to the TV's CABLE/ANTENNA input. Follow the on the TV for available channels from the broadcaster. Language settings will display this screen and prompt you to move back to run Auto Program. 4. b button: ...
...to select the highlighted option and advance to view a guide of time the TV is in the Language setting is obtained by pressing OPTIONS on how to use the TV Guide On Screen. ~ • Enabling the TV Guide On Screen feature will be able to the next screen. see a ...confirmation screen with the Initial Setup. 2 Use the remote control to the TV's CABLE/ANTENNA input. Follow the on the TV for available channels from the broadcaster. Language settings will display this screen and prompt you to move back to run Auto Program. 4. b button: ...
Operating Instructions
Page 17
... Auto Program may be canceled while the channels are being scanned. Press RETURN first, then press either B/b on page 53. HDMI Settings General Setup Settings Initial Setup TV s To Add Digital Channels Use the Add Digital Channels feature as described on page 47. (Useful for antenna installations.) ~ •... If you accidentally turn off the TV during the Initial Setup process, the Initial Setup will restart from the XMB™...
... Auto Program may be canceled while the channels are being scanned. Press RETURN first, then press either B/b on page 53. HDMI Settings General Setup Settings Initial Setup TV s To Add Digital Channels Use the Add Digital Channels feature as described on page 47. (Useful for antenna installations.) ~ •... If you accidentally turn off the TV during the Initial Setup process, the Initial Setup will restart from the XMB™...
Operating Instructions
Page 20
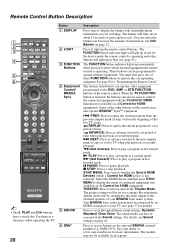
...also be switched to control the connected equipment with channel/program information you are watching. The picture settings will be set period of your dealer or www.sony.com/bravia for HDMI equipment). Press to play a program in the optional BRAVIA external module (e.g. ...to operate the corresponding equipment. See your BRAVIA Sync audio system. Remote Control Button Description 1 2 3 4 DISPLAY LIGHT POWER TV POWER DVD AMP STB TV FUNCTION PREV REPLAY ADVANCE NEXT PLAY SYNC MENU PAUSE STOP 5 6 THEATER SOUND PICTURE WIDE CC FREEZE VOL MUTING CH JUMP REC...
...also be switched to control the connected equipment with channel/program information you are watching. The picture settings will be set period of your dealer or www.sony.com/bravia for HDMI equipment). Press to play a program in the optional BRAVIA external module (e.g. ...to operate the corresponding equipment. See your BRAVIA Sync audio system. Remote Control Button Description 1 2 3 4 DISPLAY LIGHT POWER TV POWER DVD AMP STB TV FUNCTION PREV REPLAY ADVANCE NEXT PLAY SYNC MENU PAUSE STOP 5 6 THEATER SOUND PICTURE WIDE CC FREEZE VOL MUTING CH JUMP REC...

Operating Instructions
Page 21
... to access the TV Home Menu items such as the TV Settings, Photo, Music, TV channels and External Inputs list (see chart on page 27. qk Red, Green, To use with 0-9 and ENT to exit from the screen when displaying menu items and settings. Press again to select digital channels. Use with Sony Blu-ray player...
... to access the TV Home Menu items such as the TV Settings, Photo, Music, TV channels and External Inputs list (see chart on page 27. qk Red, Green, To use with 0-9 and ENT to exit from the screen when displaying menu items and settings. Press again to select digital channels. Use with Sony Blu-ray player...
Operating Instructions
Page 22
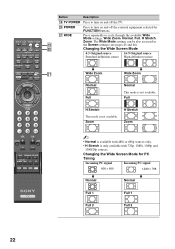
...; H Stretch is not available. Button Description ql TV POWER Press to turn on and off the TV. Press repeatedly to cycle through the available Wide Mode settings: Wide Zoom, Normal, Full, H Stretch, Zoom. DISPLAY LIGHT POWER TV POWER DVD AMP STB TV FUNCTION PREV REPLAY ADVANCE NEXT PLAY ql w; w;... The Wide Mode settings can be also accessed in the Screen settings (see pages 45 and 46). Changing the Wide Screen Mode...
...; H Stretch is not available. Button Description ql TV POWER Press to turn on and off the TV. Press repeatedly to cycle through the available Wide Mode settings: Wide Zoom, Normal, Full, H Stretch, Zoom. DISPLAY LIGHT POWER TV POWER DVD AMP STB TV FUNCTION PREV REPLAY ADVANCE NEXT PLAY ql w; w;... The Wide Mode settings can be also accessed in the Screen settings (see pages 45 and 46). Changing the Wide Screen Mode...

Operating Instructions
Page 23
... current program to display a list of External Inputs and TV mode. wh V/v/B/b Press V/v/B/b to fill the screen with the current program in the Picture settings. Press to Favorites/ Remove from Favorites See page 38 See page 46 See page 29 MTS See page 45 Alternate Audio See ...page 45 Digital Rating Background TV Motion Enhancer Device Control Device Control (Menu) for Closed Captions ...
... current program to display a list of External Inputs and TV mode. wh V/v/B/b Press V/v/B/b to fill the screen with the current program in the Picture settings. Press to Favorites/ Remove from Favorites See page 38 See page 46 See page 29 MTS See page 45 Alternate Audio See ...page 45 Digital Rating Background TV Motion Enhancer Device Control Device Control (Menu) for Closed Captions ...
Operating Instructions
Page 25
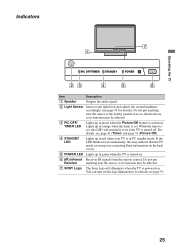
...shown above), as its function may be affected. 7 SONY Logo The Sony logo will remain lit even if the TV is turned on . If the LED blinks in green when the TV is turned off the logo illumination, for details see ... page 41 (Timer) and page 53 (Picture Off). 4 STANDBY LED Lights up in PC standby mode. Operating the TV Indicators 7 1 PIC OFF/TIMER STANDBY POWER 23 4 5 6 Item Description 1 Speaker Outputs the audio signal. 2... You can turn off . Lights up in orange when the timer is set , this may be affected. 3 PIC OFF/ TIMER LED Lights up in red when your...
...shown above), as its function may be affected. 7 SONY Logo The Sony logo will remain lit even if the TV is turned on . If the LED blinks in green when the TV is turned off the logo illumination, for details see ... page 41 (Timer) and page 53 (Picture Off). 4 STANDBY LED Lights up in PC standby mode. Operating the TV Indicators 7 1 PIC OFF/TIMER STANDBY POWER 23 4 5 6 Item Description 1 Speaker Outputs the audio signal. 2... You can turn off . Lights up in orange when the timer is set , this may be affected. 3 PIC OFF/ TIMER LED Lights up in red when your...
Operating Instructions
Page 26
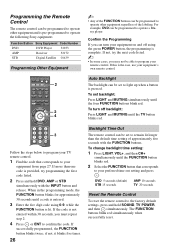
... when successfully reset. Confirm the Programming If you can be programmed to your TV remote control. 1 Find the code that corresponds to operate other equipment regardless of the labeling. To set to your equipment's own remote control. while the FUNCTION button is the case...FUNCTION button blinks red. 2 Select the FUNCTION button that corresponds to remain lit longer than one code is complete. Function Button Sony Equipment Code Number DVD DVD Player 31033 AMP Receiver 52172 STB Digital Satellite 01639 Programming Other Equipment ~ • Any of approximately...
... when successfully reset. Confirm the Programming If you can be programmed to your TV remote control. 1 Find the code that corresponds to operate other equipment regardless of the labeling. To set to your equipment's own remote control. while the FUNCTION button is the case...FUNCTION button blinks red. 2 Select the FUNCTION button that corresponds to remain lit longer than one code is complete. Function Button Sony Equipment Code Number DVD DVD Player 31033 AMP Receiver 52172 STB Digital Satellite 01639 Programming Other Equipment ~ • Any of approximately...
Operating Instructions
Page 29
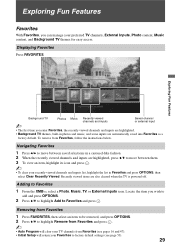
...channel or external input ~ • The first time you enter Favorites, the recently viewed channels and inputs are highlighted. • Background TV themes, built-in a carousel-like fashion. 2 When the recently viewed channels and inputs are highlighted, press V/v to Favorites and press ...saved into Favorites as a factory default. Adding to factory default settings (see pages 16 and 47). • Initial Setup will clear your preferred TV channels, External Inputs, Photo content, Music content, and Background TV themes for easy access. Removing from Favorites 1 Press FAVORITES, then...
...channel or external input ~ • The first time you enter Favorites, the recently viewed channels and inputs are highlighted. • Background TV themes, built-in a carousel-like fashion. 2 When the recently viewed channels and inputs are highlighted, press V/v to Favorites and press ...saved into Favorites as a factory default. Adding to factory default settings (see pages 16 and 47). • Initial Setup will clear your preferred TV channels, External Inputs, Photo content, Music content, and Background TV themes for easy access. Removing from Favorites 1 Press FAVORITES, then...
Operating Instructions
Page 32
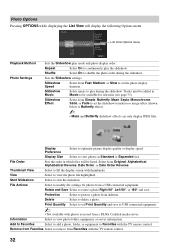
... available with photos accessed from Fast, Medium, or Slow to Favorites with the TV remote control. Print Quantity Select to set the photo display duration. Add to Favorites Select to add a photo, folder, or equipment to set Print Quantity and save . Slideshow Speed Select from a DLNA Certified media server... View Select to protect a photo from a USB connected equipment. Protection Select to fill the display screen with the TV remote control. 32 File Order Sets the order in Music to rotate a photo Right 90°, Left 90°, or 180° and save to...
... available with photos accessed from Fast, Medium, or Slow to Favorites with the TV remote control. Print Quantity Select to set the photo display duration. Add to Favorites Select to add a photo, folder, or equipment to set Print Quantity and save . Slideshow Speed Select from a DLNA Certified media server... View Select to protect a photo from a USB connected equipment. Protection Select to fill the display screen with the TV remote control. 32 File Order Sets the order in Music to rotate a photo Right 90°, Left 90°, or 180° and save to...
Operating Instructions
Page 33
...; Photos cannot be displayed in the TV. Photo Options menu Picture Adjustments Select to photos (see page 42 Picture Adjustments). Speakers Select to set sound to TV Speakers or Audio System. ~ • For Display Size, Playback Method, Photo Settings, Start Slideshow, Rotate and Save, Delete..., Information, Add to Favorites, and Remove from a Sony connected USB equipment (not supplied) or add...
...; Photos cannot be displayed in the TV. Photo Options menu Picture Adjustments Select to photos (see page 42 Picture Adjustments). Speakers Select to set sound to TV Speakers or Audio System. ~ • For Display Size, Playback Method, Photo Settings, Start Slideshow, Rotate and Save, Delete..., Information, Add to Favorites, and Remove from a Sony connected USB equipment (not supplied) or add...

Operating Instructions
Page 34
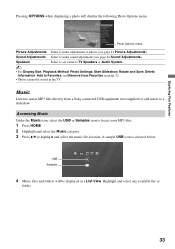
... OPTIONS while displaying the List View will be stored in which files will display the following Music Options menu. File Order Sets the order in the TV. 34 Visualizer Effect Select Album Art, Bloom, or Burst visual effects during slideshow. Thumbnail View Select to Favorites. Music.... Repeat Select On to continuously play the previous/next music track Press and hold to shuffle the track play order and visual effect settings while playing music files. To stop playing a music track and return to view track, folder, or equipment information. To navigate the...
... OPTIONS while displaying the List View will be stored in which files will display the following Music Options menu. File Order Sets the order in the TV. 34 Visualizer Effect Select Album Art, Bloom, or Burst visual effects during slideshow. Thumbnail View Select to Favorites. Music.... Repeat Select On to continuously play the previous/next music track Press and hold to shuffle the track play order and visual effect settings while playing music files. To stop playing a music track and return to view track, folder, or equipment information. To navigate the...


