Operating Instructions
Page 2
... electric shock. • Wipe the LCD screen gently with a soft cloth. • Stubborn stains may be fully inserted. ❑ Operate the TV only on the package. •...No. Sony TV Model No. Your BRAVIA TV is a trademark of Sony Computer Entertainment Inc. Compatible Wall Mount Bracket Information Use the following Sony WALL-MOUNT BRACKET with screen size measured... for the 22 class, 26, 32 class, and 37 inch BRAVIA KDL-L5000 series models with your Sony dealer regarding this TV (i.e. Depending upon your TV model. Licensing Information Macintosh is ENERGY...
... electric shock. • Wipe the LCD screen gently with a soft cloth. • Stubborn stains may be fully inserted. ❑ Operate the TV only on the package. •...No. Sony TV Model No. Your BRAVIA TV is a trademark of Sony Computer Entertainment Inc. Compatible Wall Mount Bracket Information Use the following Sony WALL-MOUNT BRACKET with screen size measured... for the 22 class, 26, 32 class, and 37 inch BRAVIA KDL-L5000 series models with your Sony dealer regarding this TV (i.e. Depending upon your TV model. Licensing Information Macintosh is ENERGY...
Operating Instructions
Page 3
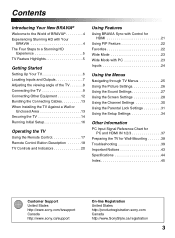
...22 Wide Mode 23 Wide Mode with PC 23 Inputs 24 Using the Menus Navigating through TV Menus 25 Using the Picture Settings 26 Using the Sound Settings 27 Using the Screen Settings 28 Using the Channel Settings 30 Using the Parental Lock Settings 31 Using the ...and HDMI IN 1/2/3 37 Preparing the TV for Wall-Mounting 38 Troubleshooting 39 Important Notices 43 Specifications 44 Index 45 Customer Support United States http://www.sony.com/tvsupport Canada http://www.sony.ca/support On-line Registration United States http://productregistration.sony.com Canada http://www.SonyStyle.ca/...
...22 Wide Mode 23 Wide Mode with PC 23 Inputs 24 Using the Menus Navigating through TV Menus 25 Using the Picture Settings 26 Using the Sound Settings 27 Using the Screen Settings 28 Using the Channel Settings 30 Using the Parental Lock Settings 31 Using the ...and HDMI IN 1/2/3 37 Preparing the TV for Wall-Mounting 38 Troubleshooting 39 Important Notices 43 Specifications 44 Index 45 Customer Support United States http://www.sony.com/tvsupport Canada http://www.sony.ca/support On-line Registration United States http://productregistration.sony.com Canada http://www.SonyStyle.ca/...
Operating Instructions
Page 5
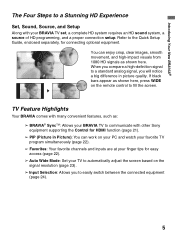
...high-definition signal to a standard analog signal, you to communicate with other Sony equipment supporting the Control for HDMI function (page 21). ➢ PIP (Picture in picture quality. TV Feature Highlights Your BRAVIA comes with your BRAVIA TV set, a complete HD system requires an HD sound system, a source...Introducing Your New BRAVIA® The Four Steps to automatically adjust the screen based on the signal resolution (page 23). ➢ Input Selection: Allows you will notice a big difference in Picture): You can enjoy crisp, clear images, smooth movement, and high-impact...
...high-definition signal to a standard analog signal, you to communicate with other Sony equipment supporting the Control for HDMI function (page 21). ➢ PIP (Picture in picture quality. TV Feature Highlights Your BRAVIA comes with your BRAVIA TV set, a complete HD system requires an HD sound system, a source...Introducing Your New BRAVIA® The Four Steps to automatically adjust the screen based on the signal resolution (page 23). ➢ Input Selection: Allows you will notice a big difference in Picture): You can enjoy crisp, clear images, smooth movement, and high-impact...
Operating Instructions
Page 6
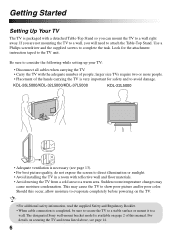
...the Table-Top Stand. KDL-26L5000/KDL-32L5000/KDL-37L5000 KDL-22L5000 • Adequate ventilation is necessary (see page 14. 6 The designated Sony wall-mount bracket model is very important for the attachment instruction taped to avoid damage. If you are not mounting the...the TV unit. Use a Philips screwdriver and the supplied screws to a wall right away. larger size TVs require two or more people. • Placement of the hands carrying the TV is available on securing the TV and items listed above, see page 13). • For best picture quality, do not expose the screen to...
...the Table-Top Stand. KDL-26L5000/KDL-32L5000/KDL-37L5000 KDL-22L5000 • Adequate ventilation is necessary (see page 14. 6 The designated Sony wall-mount bracket model is very important for the attachment instruction taped to avoid damage. If you are not mounting the...the TV unit. Use a Philips screwdriver and the supplied screws to a wall right away. larger size TVs require two or more people. • Placement of the hands carrying the TV is available on securing the TV and items listed above, see page 13). • For best picture quality, do not expose the screen to...

Operating Instructions
Page 16
... can be sure to select Home for this TV. "Home" optimizes the picture for normal home use for ENERGY STAR compliant mode. Running Initial Setup During initial setup, you will perform the following: • Set the language for the On Screen Display (OSD) text • Choose your viewing... environment • Signal source connection check • Scan for available channels from the signal source directly connected to the TV's CABLE/ANTENNA input. The Initial Setup screen will appear. 2 Use the remote control buttons described below to select Retail or Home, be done at later time,...
... can be sure to select Home for this TV. "Home" optimizes the picture for normal home use for ENERGY STAR compliant mode. Running Initial Setup During initial setup, you will perform the following: • Set the language for the On Screen Display (OSD) text • Choose your viewing... environment • Signal source connection check • Scan for available channels from the signal source directly connected to the TV's CABLE/ANTENNA input. The Initial Setup screen will appear. 2 Use the remote control buttons described below to select Retail or Home, be done at later time,...
Operating Instructions
Page 18
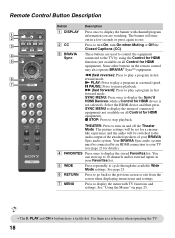
...10 channels and/or external inputs in fast forward mode. See page 23. 6 RETURN Press to go back to the previous screen or exit from the screen when displaying menu items and settings. 7 MENU Press to display the menu with channel/program information you are used to control... 1 2 3 DISPLAY CC POWER 4 5 WIDE INPUT 6 7 TOOLS Button Description 1 DISPLAY 2 CC 3 BRAVIA Sync Press once to display the banner with TV functions and settings. The picture settings will be set for a cinemalike experience and the audio will time out in fast rewind mode. See "Using the Menus" on the...
...10 channels and/or external inputs in fast forward mode. See page 23. 6 RETURN Press to go back to the previous screen or exit from the screen when displaying menu items and settings. 7 MENU Press to display the menu with channel/program information you are used to control... 1 2 3 DISPLAY CC POWER 4 5 WIDE INPUT 6 7 TOOLS Button Description 1 DISPLAY 2 CC 3 BRAVIA Sync Press once to display the banner with TV functions and settings. The picture settings will be set for a cinemalike experience and the audio will time out in fast rewind mode. See "Using the Menus" on the...
Operating Instructions
Page 20
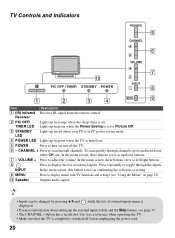
... hold down buttons. 7 - VOLUME + Press to Picture Off. 3 STANDBY LED Lights up in PC power saving mode. 4 POWER LED Lights up /down either CH -/+. In the menu screen, these buttons serve as a reference when operating the TV. • Make sure that the TV is completely switched off the TV. 6 - TIMER LED Lights up in green...
... hold down buttons. 7 - VOLUME + Press to Picture Off. 3 STANDBY LED Lights up in PC power saving mode. 4 POWER LED Lights up /down either CH -/+. In the menu screen, these buttons serve as a reference when operating the TV. • Make sure that the TV is completely switched off the TV. 6 - TIMER LED Lights up in green...
Operating Instructions
Page 22
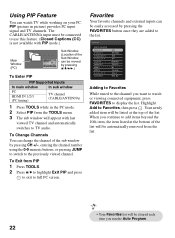
... by pressing V/v/B/b.) To Enter PIP PIP Supported Inputs In main window In sub window PC HDMI IN 1/2/3 (PC timing) TV channel (CABLE/ANTENNA) 1 Press TOOLS while in picture) provides PC input signal and TV channels. To Change Channels You can be listed at the bottom of the Sub Window can watch or viewing... list. Using PIP Feature You can be automatically removed from PIP 1 Press TOOLS. 2 Press V/v to highlight Exit PIP and press to exit to full PC screen. The CABLE/ANTENNA input must be connected to use this feature. (Closed Captions (CC) is not available with last viewed...
... by pressing V/v/B/b.) To Enter PIP PIP Supported Inputs In main window In sub window PC HDMI IN 1/2/3 (PC timing) TV channel (CABLE/ANTENNA) 1 Press TOOLS while in picture) provides PC input signal and TV channels. To Change Channels You can be listed at the bottom of the Sub Window can watch or viewing... list. Using PIP Feature You can be automatically removed from PIP 1 Press TOOLS. 2 Press V/v to highlight Exit PIP and press to exit to full PC screen. The CABLE/ANTENNA input must be connected to use this feature. (Closed Captions (CC) is not available with last viewed...
Operating Instructions
Page 23
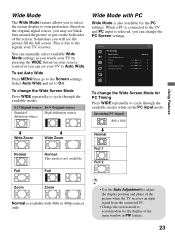
... to Auto Wide. Select Auto Wide and set to the Screen settings. When a PC is connected to the TV and PC input is due to the signals your TV to your remote control or you will see black bars around the picture or just on your preference. Full Full 1 Full 2 Zoom Zoom ...mode. Based on the original signal source, you may see the picture fill the full screen. To change the Wide Screen Mode for the display of the picture when the TV receives an input signal from the connected PC. • Change the screen mode to accommodate for PC Timing Press WIDE repeatedly to cycle through...
... to Auto Wide. Select Auto Wide and set to the Screen settings. When a PC is connected to the TV and PC input is due to the signals your TV to your remote control or you will see black bars around the picture or just on your preference. Full Full 1 Full 2 Zoom Zoom ...mode. Based on the original signal source, you may see the picture fill the full screen. To change the Wide Screen Mode for the display of the picture when the TV receives an input signal from the connected PC. • Change the screen mode to accommodate for PC Timing Press WIDE repeatedly to cycle through...
Operating Instructions
Page 25
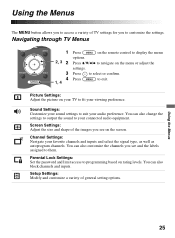
... The MENU button allows you to access a variety of TV settings for you see and the labels assigned to them. You can also block channels and inputs. You can also customize the channels you see on the screen. You can also change the settings to output the sound...the signal type, as well as autoprogram channels. Navigating through TV Menus WIDE INPUT 1 Press on rating levels. Parental Lock Settings: Set the password and limit access to fit your audio preference. Picture Settings: Adjust the picture on your TV to programming based on the remote control to display the menu...
... The MENU button allows you to access a variety of TV settings for you see and the labels assigned to them. You can also block channels and inputs. You can also customize the channels you see on the screen. You can also change the settings to output the sound...the signal type, as well as autoprogram channels. Navigating through TV Menus WIDE INPUT 1 Press on rating levels. Parental Lock Settings: Set the password and limit access to fit your audio preference. Picture Settings: Adjust the picture on your TV to programming based on the remote control to display the menu...
Operating Instructions
Page 28
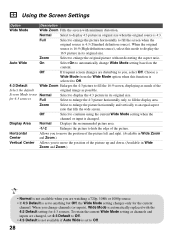
...you are watching a 720p, 1080i or 1080p source. • If 4:3 Default is selected to Off. 4:3 Default Wide Zoom Enlarges the 4:3 picture to fill the 16:9 screen, displaying as much of the Select the default original image as channels and inputs are disturbing to you to move the position of...Mode setting when the channel or input is 4:3 (Standard definition source). Off If frequent screen changes are changed . Choose a Wide Mode from the Wide Mode option when this mode to display the 16:9 picture in original size when the original source is set 4:3 Default to Off. 28 Off ...
...you are watching a 720p, 1080i or 1080p source. • If 4:3 Default is selected to Off. 4:3 Default Wide Zoom Enlarges the 4:3 picture to fill the 16:9 screen, displaying as much of the Select the default original image as channels and inputs are disturbing to you to move the position of...Mode setting when the channel or input is 4:3 (Standard definition source). Off If frequent screen changes are changed . Choose a Wide Mode from the Wide Mode option when this mode to display the 16:9 picture in original size when the original source is set 4:3 Default to Off. 28 Off ...
Operating Instructions
Page 29
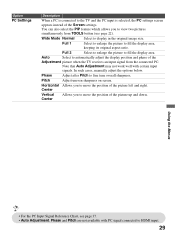
...Auto Select to automatically adjust the display position and phase of the Screen settings. Pitch Adjust uneven sharpness on screen. You can also select the PIP feature which allows you to move the position of the picture up and down. Option PC Settings Description When a PC is connected... to the TV and the PC input is selected, the PC settings screen appears instead of the Adjustment picture when the TV receives an input signal from TOOLS button (see...
...Auto Select to automatically adjust the display position and phase of the Screen settings. Pitch Adjust uneven sharpness on screen. You can also select the PIP feature which allows you to move the position of the picture up and down. Option PC Settings Description When a PC is connected... to the TV and the PC input is selected, the PC settings screen appears instead of the Adjustment picture when the TV receives an input signal from TOOLS button (see...
Operating Instructions
Page 34
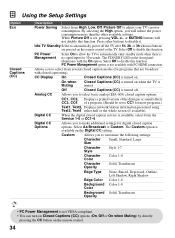
...disable this function. PC Power Management Select On to allow the TV to make additional settings for most programs.) Text1, Text2, Displays network/station information presented using Text3, Text4 either half or the whole screen (if available). Allows you to automatically enter standby mode when... (EIA-608) closed caption options. Select As Broadcast or Custom. Custom Allows you to CC1 for digital closed caption options. While Picture Off is muted. CC Display On Closed Captions (CC) is available on . The Custom option is turned on the Digital CC setting...
...disable this function. PC Power Management Select On to allow the TV to make additional settings for most programs.) Text1, Text2, Displays network/station information presented using Text3, Text4 either half or the whole screen (if available). Allows you to automatically enter standby mode when... (EIA-608) closed caption options. Select As Broadcast or Custom. Custom Allows you to CC1 for digital closed caption options. While Picture Off is muted. CC Display On Closed Captions (CC) is available on . The Custom option is turned on the Digital CC setting...
Operating Instructions
Page 36
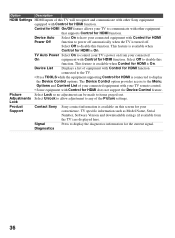
... is available when Control for HDMI is available on from the TV) are displayed here. Lock Product Contact Sony Sony contact information is On. Picture Select Lock so no adjustment can be made to any of the Picture settings. Signal Press to display the diagnostics information for HDMI function... connected On equipment with Control for HDMI does not support the Device Control feature. Diagnostics 36 TV Auto Power Select On to control your TV's power on this screen for HDMI is connected to display the Device Control options. Option Description HDMI Settings HDMI inputs ...
... is available when Control for HDMI is available on from the TV) are displayed here. Lock Product Contact Sony Sony contact information is On. Picture Select Lock so no adjustment can be made to any of the Picture settings. Signal Press to display the diagnostics information for HDMI function... connected On equipment with Control for HDMI does not support the Device Control feature. Diagnostics 36 TV Auto Power Select On to control your TV's power on this screen for HDMI is connected to display the Device Control options. Option Description HDMI Settings HDMI inputs ...
Operating Instructions
Page 40
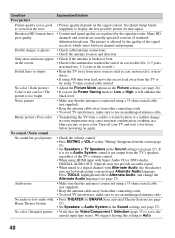
...powering on the screen • Check if the antenna has reached the end of standard- We suggest leaving this setting to Auto. 40 See Quick Setup Guide as viewed at the seaside.) Dotted lines or stripes • Keep the TV away from noise sources such as good • Picture quality depends on... sure to use . No sound / Noisy sound No sound but good picture • Check the volume control. • Press MUTING or VOL + so that the antenna is not output from the screen (page 19). • Set Speakers to TV Speakers in use an undamaged antenna cable. If it will enhance the black...
...powering on the screen • Check if the antenna has reached the end of standard- We suggest leaving this setting to Auto. 40 See Quick Setup Guide as viewed at the seaside.) Dotted lines or stripes • Keep the TV away from noise sources such as good • Picture quality depends on... sure to use . No sound / Noisy sound No sound but good picture • Check the volume control. • Press MUTING or VOL + so that the antenna is not output from the screen (page 19). • Set Speakers to TV Speakers in use an undamaged antenna cable. If it will enhance the black...
Operating Instructions
Page 41
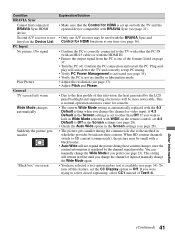
...find connected BRAVIA Sync HDMI device Second A/V receiver is not listed on the Device List PC Input No picture / No signal Poor Picture General TV screen feels warm Wide Mode changes automatically Suddenly the picture gets smaller "Black box" on page 37. • Turn the PC off this television, the ... (see page 28). • Check the Auto Wide option in the Screen settings (see page 28). • The picture gets smaller during these content changes since the content information is regulated by the LCD panel backlight and supporting electronics will remain in effect until you change the ...
...find connected BRAVIA Sync HDMI device Second A/V receiver is not listed on the Device List PC Input No picture / No signal Poor Picture General TV screen feels warm Wide Mode changes automatically Suddenly the picture gets smaller "Black box" on page 37. • Turn the PC off this television, the ... (see page 28). • Check the Auto Wide option in the Screen settings (see page 28). • The picture gets smaller during these content changes since the content information is regulated by the LCD panel backlight and supporting electronics will remain in effect until you change the ...
Operating Instructions
Page 42
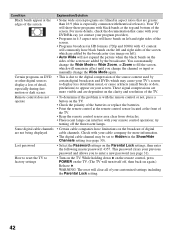
...of your customized settings including the Parental Lock setting. 42 These signal compressions are more information. • The digital cable channel may cause your TV's screen to display less detail than 16:9 (this is especially common with theatrical releases). try turning off , then back on again.) Release V. ... Auto Wide will not expand the picture when the black bands on the sides of the screen are added by certain digital broadcasts and DVDs which will remain in the Show/Hide Channels setting (see page 31). • Turn on the TV. Your TV will show these programs with your ...
...of your customized settings including the Parental Lock setting. 42 These signal compressions are more information. • The digital cable channel may cause your TV's screen to display less detail than 16:9 (this is especially common with theatrical releases). try turning off , then back on again.) Release V. ... Auto Wide will not expand the picture when the black bands on the sides of the screen are added by certain digital broadcasts and DVDs which will remain in the Show/Hide Channels setting (see page 31). • Turn on the TV. Your TV will show these programs with your ...

Operating Instructions
Page 45
... 19, 20 Installing the TV on a wall 38 J JUMP button 19 L Label Channels 30 Language 35 M MENU button 18, 20 Movie Rating 32 MTS Audio 27 MUTING button 19 N Noise Reduction 26 P PC IN 7 PC Settings 29 Phase 29 PIC OFF/TIMER 20 Picture 26 Picture Adjustments Lock 36 Picture Mode 26 PIP 22 Pitch... 19, 20 POWER LED 20 Product Support 36 R Rating 31 Reset 26, 27, 42 RETURN button 18 S SERVICE 7 Settings Channel 30 Parental Lock 31 Picture 26 Screen 28 Setup 34 Sound 27 Sharpness 26 Show/Hide Channels 30 Sleep Timer 35 Sound Mode 27 Speaker 27 STANDBY LED 20 Steady Sound 27...
... 19, 20 Installing the TV on a wall 38 J JUMP button 19 L Label Channels 30 Language 35 M MENU button 18, 20 Movie Rating 32 MTS Audio 27 MUTING button 19 N Noise Reduction 26 P PC IN 7 PC Settings 29 Phase 29 PIC OFF/TIMER 20 Picture 26 Picture Adjustments Lock 36 Picture Mode 26 PIP 22 Pitch... 19, 20 POWER LED 20 Product Support 36 R Rating 31 Reset 26, 27, 42 RETURN button 18 S SERVICE 7 Settings Channel 30 Parental Lock 31 Picture 26 Screen 28 Setup 34 Sound 27 Sharpness 26 Show/Hide Channels 30 Sleep Timer 35 Sound Mode 27 Speaker 27 STANDBY LED 20 Steady Sound 27...


