Setup Guide (Operating Instructions)
Page 6
Table of Contents Getting Started Checking the accessories 8 Inserting batteries into the remote control 8 Before setting up your TV 9 1: Attaching the Table-Top Stand 10 2: Adjusting the viewing angle of the TV 11 3: Connecting the TV 12 4: Securing the TV ...15 5: Bundling the cables 16 6: Running initial setup 17 ...
Table of Contents Getting Started Checking the accessories 8 Inserting batteries into the remote control 8 Before setting up your TV 9 1: Attaching the Table-Top Stand 10 2: Adjusting the viewing angle of the TV 11 3: Connecting the TV 12 4: Securing the TV ...15 5: Bundling the cables 16 6: Running initial setup 17 ...
Setup Guide (Operating Instructions)
Page 8
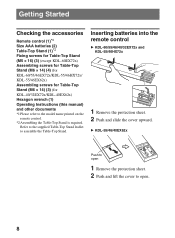
... Remote control (1)*1 Size AAA batteries (2) Table-Top Stand (1)*2 Fixing screws for Table-Top Stand (M5 × 16) (3) (except KDL-60EX72x) Assembling screws for Table-Top Stand (M6 × 14) (4) (for KDL-60/55/46EX72x/KDL-55/46HX72x/ KDL-55/46EX62x) Assembling screws for Table-Top Stand (M6 × 14) (3) (for KDL-40/32EX72x/KDL-40EX62x) Hexagon wrench (1) Operating Instructions (this...
... Remote control (1)*1 Size AAA batteries (2) Table-Top Stand (1)*2 Fixing screws for Table-Top Stand (M5 × 16) (3) (except KDL-60EX72x) Assembling screws for Table-Top Stand (M6 × 14) (4) (for KDL-60/55/46EX72x/KDL-55/46HX72x/ KDL-55/46EX62x) Assembling screws for Table-Top Stand (M6 × 14) (3) (for KDL-40/32EX72x/KDL-40EX62x) Hexagon wrench (1) Operating Instructions (this...
Setup Guide (Operating Instructions)
Page 9
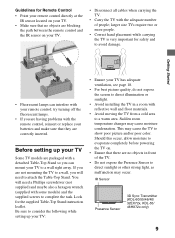
... TVs require two or more people. • Correct hand placement while carrying the TV is very important for the supplied Table-Top Stand instruction leaflet. You will need a Phillips screwdriver (not supplied) and maybe also a hexagon wrench (supplied with a detached Table-Top... and floor materials. • Avoid moving the TV from a cold area to attach the Table-Top Stand. This may occur. IR Sensor Presence Sensor 3D Sync Transmitter (KDL-60/55/46/40/ 32EX72x, KDL-55/ 46HX72x only) 9 Sudden room temperature changes may cause moisture condensation. try turning off the fluorescent...
... TVs require two or more people. • Correct hand placement while carrying the TV is very important for the supplied Table-Top Stand instruction leaflet. You will need a Phillips screwdriver (not supplied) and maybe also a hexagon wrench (supplied with a detached Table-Top... and floor materials. • Avoid moving the TV from a cold area to attach the Table-Top Stand. This may occur. IR Sensor Presence Sensor 3D Sync Transmitter (KDL-60/55/46/40/ 32EX72x, KDL-55/ 46HX72x only) 9 Sudden room temperature changes may cause moisture condensation. try turning off the fluorescent...

Setup Guide (Operating Instructions)
Page 10
... f mark is facing the front. 1: Attaching the Table-Top Stand Refer to the supplied Table-Top Stand instruction leaflet for proper attachment. ~ • Do not put stress on the Table-Top Stand. For KDL-55/46HX72x, KDL-55/46/40/32EX72x and KDL-55/46/40EX62x 1 Place the TV unit on the LCD panel...when you use an electric screwdriver, set the torque at approximately 1.5 N·m {15 kgf·cm}. ~ • Tighten to the Table-Top Stand. Guide pins For KDL-60EX72x 1 Align with the supplied screw and hexagon wrench. ~ • Align the TV from the top, slide it in until the guide pins ...
... f mark is facing the front. 1: Attaching the Table-Top Stand Refer to the supplied Table-Top Stand instruction leaflet for proper attachment. ~ • Do not put stress on the Table-Top Stand. For KDL-55/46HX72x, KDL-55/46/40/32EX72x and KDL-55/46/40EX62x 1 Place the TV unit on the LCD panel...when you use an electric screwdriver, set the torque at approximately 1.5 N·m {15 kgf·cm}. ~ • Tighten to the Table-Top Stand. Guide pins For KDL-60EX72x 1 Align with the supplied screw and hexagon wrench. ~ • Align the TV from the top, slide it in until the guide pins ...
Setup Guide (Operating Instructions)
Page 11
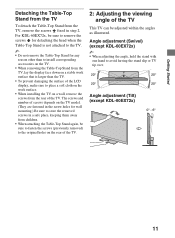
... model. (They are fastened in the screw holes for wall mounting.) Be sure to avoid having the stand slip or TV tip over. 20° 20° 20° 20° Angle adjustment (Tilt) (except KDL-60EX72x) 0° - 6° 11 The screws and number of screws depends on the rear of... the TV. 2: Adjusting the viewing angle of the TV This TV can be adjusted within the angles as illustrated. Angle adjustment (Swivel) (except KDL-60EX72x) ~ • When adjusting the angle, hold the stand with one hand to store the removed screws in step 2. Getting Started Detaching the Table-Top...
... model. (They are fastened in the screw holes for wall mounting.) Be sure to avoid having the stand slip or TV tip over. 20° 20° 20° 20° Angle adjustment (Tilt) (except KDL-60EX72x) 0° - 6° 11 The screws and number of screws depends on the rear of... the TV. 2: Adjusting the viewing angle of the TV This TV can be adjusted within the angles as illustrated. Angle adjustment (Swivel) (except KDL-60EX72x) ~ • When adjusting the angle, hold the stand with one hand to store the removed screws in step 2. Getting Started Detaching the Table-Top...
Setup Guide (Operating Instructions)
Page 15
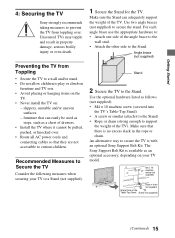
... two angle braces (not supplied) to a Stand (not supplied). An alternative way to secure the TV is no excess slack in property damage, serious bodily injury or even death. 1 Secure the Stand for the TV. Getting Started 4: Securing the TV Sony strongly recommends taking measures to prevent the TV ...from Toppling • Secure the TV to a wall and/or stand. • Do not allow children to play or climb on...
... two angle braces (not supplied) to a Stand (not supplied). An alternative way to secure the TV is no excess slack in property damage, serious bodily injury or even death. 1 Secure the Stand for the TV. Getting Started 4: Securing the TV Sony strongly recommends taking measures to prevent the TV ...from Toppling • Secure the TV to a wall and/or stand. • Do not allow children to play or climb on...
Setup Guide (Operating Instructions)
Page 16
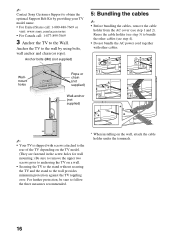
... Be sure to remove the upper two screws prior to anchoring the TV on a wall. • Securing the TV to the stand without securing the TV and the stand to follow the three measures recommended. * When installing on the wall, attach the cable holder under the terminals. 16 For further ...5: Bundling the cables ~ • Before bundling the cables, remove the cable holder from the AC cover (see step 3) to bundle the other cables. ~ Contact Sony Customer Support to obtain the optional Support Belt Kit by providing your TV model name. • For United States call: 1-800-488-7669 or visit...
... Be sure to remove the upper two screws prior to anchoring the TV on a wall. • Securing the TV to the stand without securing the TV and the stand to follow the three measures recommended. * When installing on the wall, attach the cable holder under the terminals. 16 For further ...5: Bundling the cables ~ • Before bundling the cables, remove the cable holder from the AC cover (see step 3) to bundle the other cables. ~ Contact Sony Customer Support to obtain the optional Support Belt Kit by providing your TV model name. • For United States call: 1-800-488-7669 or visit...
Setup Guide (Operating Instructions)
Page 17
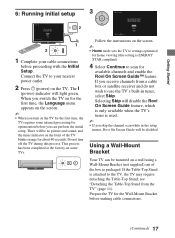
If you turn off the TV during this setting is attached to the TV, the TV may require detaching the Table-Top Stand; If the Table-Top Stand is ENERGY STAR compliant). 4 Select Continue to settings optimized for the first time, the Language menu appears on the screen. ~ • When you .... Connect the TV to use the TV's built-in the setup menus, Rovi On Screen Guide will be disabled. see "Detaching the Table-Top Stand from a cable box or satellite receiver and do not wish to your cable connections before proceeding with the Initial Setup. Do not turn on the...
If you turn off the TV during this setting is attached to the TV, the TV may require detaching the Table-Top Stand; If the Table-Top Stand is ENERGY STAR compliant). 4 Select Continue to settings optimized for the first time, the Language menu appears on the screen. ~ • When you .... Connect the TV to use the TV's built-in the setup menus, Rovi On Screen Guide will be disabled. see "Detaching the Table-Top Stand from a cable box or satellite receiver and do not wish to your cable connections before proceeding with the Initial Setup. Do not turn on the...
Setup Guide (Operating Instructions)
Page 18
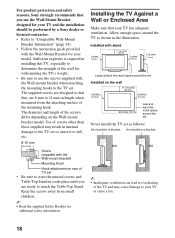
... the TV's weight. • Be sure to use the Wall-Mount Bracket designed for your TV and the installation should be performed by a Sony dealer or licensed contractor. • Refer to "Compatible Wall-Mount Bracket Information" (page 34). • Follow the instruction guide provided with the...overheating of screws other than those supplied may cause damage to attach the Table-Top Stand. The supplied screws are ready to your TV has adequate ventilation. For product protection and safety reasons, Sony strongly recommends that you are designed so that your TV or cause a fire. 18...
... the TV's weight. • Be sure to use the Wall-Mount Bracket designed for your TV and the installation should be performed by a Sony dealer or licensed contractor. • Refer to "Compatible Wall-Mount Bracket Information" (page 34). • Follow the instruction guide provided with the...overheating of screws other than those supplied may cause damage to attach the Table-Top Stand. The supplied screws are ready to your TV has adequate ventilation. For product protection and safety reasons, Sony strongly recommends that you are designed so that your TV or cause a fire. 18...
Setup Guide (Operating Instructions)
Page 32
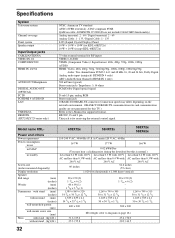
... - 69 Analog Cable: 1 - 135 / Digital Cable: 1 - 135 LCD (Liquid Crystal Display) Panel 10 W + 10 W + 10 W (for KDL-60EX72x) 10 W + 10 W (except KDL-60EX72x) 75-ohm external terminal for RF inputs VIDEO / AUDIO YPBPR (Component Video) / Signal format: 480i, 480p, 720p, 1080i, 1080p AUDIO HDMI: Video... in standby Screen size (inches measured diagonally) Display resolution Speaker Full range (mm) (inches) Woofer (mm) (inches) Dimensions with stand (mm) (inches) without stand (kg)/(lb.) 60EX72x 55HX72x 55EX72x 55EX62x 110-240 V AC, 50/60 Hz (U.S.A./Canada 120 V AC, 60 Hz) 167 W ...
... - 69 Analog Cable: 1 - 135 / Digital Cable: 1 - 135 LCD (Liquid Crystal Display) Panel 10 W + 10 W + 10 W (for KDL-60EX72x) 10 W + 10 W (except KDL-60EX72x) 75-ohm external terminal for RF inputs VIDEO / AUDIO YPBPR (Component Video) / Signal format: 480i, 480p, 720p, 1080i, 1080p AUDIO HDMI: Video... in standby Screen size (inches measured diagonally) Display resolution Speaker Full range (mm) (inches) Woofer (mm) (inches) Dimensions with stand (mm) (inches) without stand (kg)/(lb.) 60EX72x 55HX72x 55EX72x 55EX62x 110-240 V AC, 50/60 Hz (U.S.A./Canada 120 V AC, 60 Hz) 167 W ...
Setup Guide (Operating Instructions)
Page 33
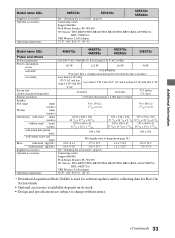
... accessories" (page 8). Connecting cables Support Belt Kit Wall-Mount Bracket: SU-WL500 3D Glasses: TDG-BR250/TDG-BR200/TDG-BR100/TDG-BR50 (KDL-46/40/32EX72x, KDL-46HX72x) USB Wireless LAN Adapter 32 °F - 104 °F (0 °C - 40 °C) * Download Acquisition Mode (DAM) is...DAM* in standby Screen size (inches measured diagonally) Display resolution Speaker Full range (mm) (inches) Woofer (mm) (inches) Dimensions with stand (mm) (inches) without stand (mm) (inches) wall-mount hole pattern (mm) wall-mount screw size (mm) Mass with 240 V AC V AC 46 inches 40...
... accessories" (page 8). Connecting cables Support Belt Kit Wall-Mount Bracket: SU-WL500 3D Glasses: TDG-BR250/TDG-BR200/TDG-BR100/TDG-BR50 (KDL-46/40/32EX72x, KDL-46HX72x) USB Wireless LAN Adapter 32 °F - 104 °F (0 °C - 40 °C) * Download Acquisition Mode (DAM) is...DAM* in standby Screen size (inches measured diagonally) Display resolution Speaker Full range (mm) (inches) Woofer (mm) (inches) Dimensions with stand (mm) (inches) without stand (mm) (inches) wall-mount hole pattern (mm) wall-mount screw size (mm) Mass with 240 V AC V AC 46 inches 40...


