Warranty
Page 2
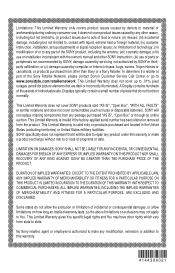
... material; (iv) customer instruction, installation, set up to or loss of programs or data. No Sony reseller, agent or employee is invalid if the factory-applied serial number has been altered or removed from state to You. it will not replace missing components from other SONY instruction; (ix) use ; To determine if a retailer is valid only on how long an implied warranty lasts, so the...
... material; (iv) customer instruction, installation, set up to or loss of programs or data. No Sony reseller, agent or employee is invalid if the factory-applied serial number has been altered or removed from state to You. it will not replace missing components from other SONY instruction; (ix) use ; To determine if a retailer is valid only on how long an implied warranty lasts, so the...
Operating Instructions (Setup Guide)
Page 2
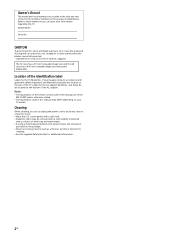
...; Wipe the LCD screen gently with a soft cloth. • Stubborn stains may differ depending on the package. • Never use this TV. Owner's Record The model and serial numbers are located at the side and rear of the identification label Labels for the TV Model No., Power Supply rating (in accordance with AC adapter) The 32 class has a 31.5 inch viewable image size and the...
...; Wipe the LCD screen gently with a soft cloth. • Stubborn stains may differ depending on the package. • Never use this TV. Owner's Record The model and serial numbers are located at the side and rear of the identification label Labels for the TV Model No., Power Supply rating (in accordance with AC adapter) The 32 class has a 31.5 inch viewable image size and the...

Operating Instructions (Setup Guide)
Page 3
... Menu Favorites 16 Applications 16 US Using the TV as a Photo Frame 16 Photo Share 17 Media 17 Playing back Photo/Music/Video via USB . . . .17 Settings 19 Preferences 19 Customer Support 26 Viewing Pictures from Connected Equipment Connection Diagram 27 Using Audio and Video Equipment 28 Using Screen Mirroring 28 Additional Information Using a Wall-Mount Bracket 29 Bundling the AC Adapter 29 Installing the TV Against a Wall or Enclosed Area 30 Troubleshooting 30 Picture 30 Sound 31 Channels...
... Menu Favorites 16 Applications 16 US Using the TV as a Photo Frame 16 Photo Share 17 Media 17 Playing back Photo/Music/Video via USB . . . .17 Settings 19 Preferences 19 Customer Support 26 Viewing Pictures from Connected Equipment Connection Diagram 27 Using Audio and Video Equipment 28 Using Screen Mirroring 28 Additional Information Using a Wall-Mount Bracket 29 Bundling the AC Adapter 29 Installing the TV Against a Wall or Enclosed Area 30 Troubleshooting 30 Picture 30 Sound 31 Channels...
Operating Instructions (Setup Guide)
Page 5
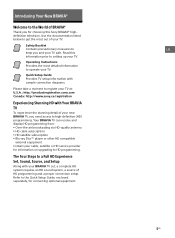
... your new BRAVIA TV, you need access to high-definition (HD) programming. Operating Instructions Provides the most out of HD programming and a proper connection setup. Quick Setup Guide Provides TV setup information with sample connection diagrams. Please take a moment to a Full HD Experience Set, Sound, Source, and Setup Along with Your BRAVIA TV To experience the stunning detail of BRAVIA® Thank you and your TV. Read this Sony BRAVIA® highdefinition television. The...
... your new BRAVIA TV, you need access to high-definition (HD) programming. Operating Instructions Provides the most out of HD programming and a proper connection setup. Quick Setup Guide Provides TV setup information with sample connection diagrams. Please take a moment to a Full HD Experience Set, Sound, Source, and Setup Along with Your BRAVIA TV To experience the stunning detail of BRAVIA® Thank you and your TV. Read this Sony BRAVIA® highdefinition television. The...
Operating Instructions (Setup Guide)
Page 7
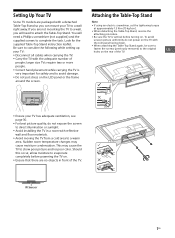
... do not power on the TV with the LCD panel facing down. • When attaching the Table-Top Stand again, be sure to fasten the screws (previously removed) to the original US holes on the LCD panel or the frame around the screen. You will need a Phillips screwdriver (not supplied) and the supplied screws to a wall right away. Setting Up Your TV Some TV models are packaged...
... do not power on the TV with the LCD panel facing down. • When attaching the Table-Top Stand again, be sure to fasten the screws (previously removed) to the original US holes on the LCD panel or the frame around the screen. You will need a Phillips screwdriver (not supplied) and the supplied screws to a wall right away. Setting Up Your TV Some TV models are packaged...

Operating Instructions (Setup Guide)
Page 11
... Cables Running Initial Setup 1 2 Note • Do not bundle the AC power cord together with the Initial Setup. Refer to the Quick Setup Guide (supplied) for the best TV settings to turn on the screen. Note • You can also tune channels manually. • Select Home from Location for sample connection diagrams. Note • When the TV is in standby mode (the LED indicator does not light up), press POWER on the remote control to use...
... Cables Running Initial Setup 1 2 Note • Do not bundle the AC power cord together with the Initial Setup. Refer to the Quick Setup Guide (supplied) for the best TV settings to turn on the screen. Note • You can also tune channels manually. • Select Home from Location for sample connection diagrams. Note • When the TV is in standby mode (the LED indicator does not light up), press POWER on the remote control to use...

Operating Instructions (Setup Guide)
Page 13
... channels. For channel numbers 10 and above, enter the next digit quickly. Use with BRAVIA Sync Control. For example, to enter 2.1, press , , and . Color buttons Display operation guide (when coloured buttons are available). SLEEP Press repeatedly until Off appears. • Select or adjust items. • Confirm selected items. RETURN • Returns to the previous screen of any displayed menu. • Stops playback when playing photo/music/ video...
... channels. For channel numbers 10 and above, enter the next digit quickly. Use with BRAVIA Sync Control. For example, to enter 2.1, press , , and . Color buttons Display operation guide (when coloured buttons are available). SLEEP Press repeatedly until Off appears. • Select or adjust items. • Confirm selected items. RETURN • Returns to the previous screen of any displayed menu. • Stops playback when playing photo/music/ video...

Operating Instructions (Setup Guide)
Page 20
... audio streams. Screen Wide Mode For details about wide mode, see page 15. Mono: Select for all programs and commercials. To keep your setting, select Off. Auto Program Automatically sets up the channel list on the TV for mono reception. MTS Audio Enjoy stereo, bilingual and mono programs. Stereo: Select for a 4:3 input signal. Use to stabilize the volume across all receivable channels. Display Area Adjusts the picture display area. Add Digital Channels Select Add Digital Channels. buttons. Steady Sound...
... audio streams. Screen Wide Mode For details about wide mode, see page 15. Mono: Select for all programs and commercials. To keep your setting, select Off. Auto Program Automatically sets up the channel list on the TV for mono reception. MTS Audio Enjoy stereo, bilingual and mono programs. Stereo: Select for a 4:3 input signal. Use to stabilize the volume across all receivable channels. Display Area Adjusts the picture display area. Add Digital Channels Select Add Digital Channels. buttons. Steady Sound...
Operating Instructions (Setup Guide)
Page 22
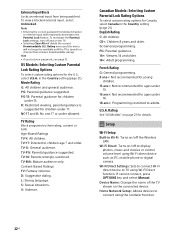
... password for details. PG: Parental guidance suggested . TV-Y7: Directed to a channel that contains downloadable ratings. G: General programming. Rating menu and the menu will delete the current Downloadable U.S. TV Rating Block programs by their rating, content or both Age-Based Ratings TV-Y: All children. To view a blocked external input, select Unblocked. To reactivate the Parental Lock settings, turn off and on the connected device. TV-14: Parents strongly cautioned. Setup...
... password for details. PG: Parental guidance suggested . TV-Y7: Directed to a channel that contains downloadable ratings. G: General programming. Rating menu and the menu will delete the current Downloadable U.S. TV Rating Block programs by their rating, content or both Age-Based Ratings TV-Y: All children. To view a blocked external input, select Unblocked. To reactivate the Parental Lock settings, turn off and on the connected device. TV-14: Parents strongly cautioned. Setup...

Operating Instructions (Setup Guide)
Page 24
... using digital audio output (optical) cable or HDMI (ARC) cable. Sleep Timer: Set the time in which the menus are available. This feature also can set , and tuned to search for TV). Set to external equipment input. Use your audio system. Select Auto to display names when the equipment is fixed. Clock/Timers Sets the timer and clock. TV Position: Improves the speaker settings when set to have been launched by connecting using an external audio system, volume output from the TV speakers or external audio equipment...
... using digital audio output (optical) cable or HDMI (ARC) cable. Sleep Timer: Set the time in which the menus are available. This feature also can set , and tuned to search for TV). Set to external equipment input. Use your audio system. Select Auto to display names when the equipment is fixed. Clock/Timers Sets the timer and clock. TV Position: Improves the speaker settings when set to have been launched by connecting using an external audio system, volume output from the TV speakers or external audio equipment...

Operating Instructions (Setup Guide)
Page 25
..., except Picture Mode and CineMotion. BRAVIA Sync Device List: Displays a list of channel-related buttons and HOME/ OPTIONS button. Useful when you control a tuner or set-top box, etc; Tuning and Menu Keys For basic operations and operation of connected equipment that is compatible with BRAVIA Sync Control does not support the Device Control feature. Auto Shut Off Select On to automatically power off . or (0-9), etc. Idle TV Standby Turns the TV off when your TV's model, software, and...
..., except Picture Mode and CineMotion. BRAVIA Sync Device List: Displays a list of channel-related buttons and HOME/ OPTIONS button. Useful when you control a tuner or set-top box, etc; Tuning and Menu Keys For basic operations and operation of connected equipment that is compatible with BRAVIA Sync Control does not support the Device Control feature. Auto Shut Off Select On to automatically power off . or (0-9), etc. Idle TV Standby Turns the TV off when your TV's model, software, and...
Operating Instructions (Setup Guide)
Page 26
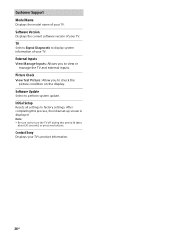
... seconds) or press any buttons. Contact Sony Displays your TV. External Inputs View Manage Inputs: Allows you to view or manage the TV and external inputs. Note • Be sure not to display system information of your TV. TV Selects Signal Diagnostic to turn the TV off during this process, the initial set-up screen is displayed. Customer Support Model Name Displays the model name of your TV. Software Update Select to factory settings.
... seconds) or press any buttons. Contact Sony Displays your TV. External Inputs View Manage Inputs: Allows you to view or manage the TV and external inputs. Note • Be sure not to display system information of your TV. TV Selects Signal Diagnostic to turn the TV off during this process, the initial set-up screen is displayed. Customer Support Model Name Displays the model name of your TV. Software Update Select to factory settings.

Operating Instructions (Setup Guide)
Page 28
... sure to delete, press . Note that has DVI output, connect the DVI HDMI video cable to connect the device unless you delete it from a device, you decline registration request from the device list. Note • When connecting a digital audio system not compatible with Audio Return Channel (ARC) technology using / buttons. 2 Operate the Screen mirroring compatible device to connect a device with the TV. Using Audio and Video Equipment 1 Turn on the TV side.
... sure to delete, press . Note that has DVI output, connect the DVI HDMI video cable to connect the device unless you delete it from a device, you decline registration request from the device list. Note • When connecting a digital audio system not compatible with Audio Return Channel (ARC) technology using / buttons. 2 Operate the Screen mirroring compatible device to connect a device with the TV. Using Audio and Video Equipment 1 Turn on the TV side.

Operating Instructions (Setup Guide)
Page 29
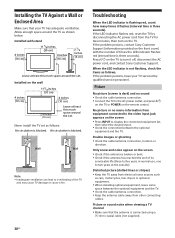
... attach the Table-Top Stand. KDL-48R470B, KDL-40R470B 1 2 3 US KDL-32R420B 1 2 3 Screw Mounting Hook Hook attachment on the mounting hook thickness. Note • Read the supplied Safety Booklet for the Wall-Mount Bracket before making cable connections. Please see below illustration. 8 - 10 mm Bundling the AC Adapter Note • You can be performed by qualified professionals. Do not bundle it yourself. Follow the instruction guide provided with the Wall-Mount Bracket for...
... attach the Table-Top Stand. KDL-48R470B, KDL-40R470B 1 2 3 US KDL-32R420B 1 2 3 Screw Mounting Hook Hook attachment on the mounting hook thickness. Note • Read the supplied Safety Booklet for the Wall-Mount Bracket before making cable connections. Please see below illustration. 8 - 10 mm Bundling the AC Adapter Note • You can be performed by qualified professionals. Do not bundle it yourself. Follow the instruction guide provided with the Wall-Mount Bracket for...
Operating Instructions (Setup Guide)
Page 30
... minutes, then turn it flashes (interval time is connected using a 75-ohm coaxial cable (not supplied). 30US Troubleshooting When the LED indicator is flashing red, count how many times it off, disconnect the AC power cord, and contact Sony Customer Support. Picture or sound noise when viewing a TV channel Make sure that your TV serviced by disconnecting the AC power cord from other connecting cables. Never install the TV set as follows. If the problem persists, have...
... minutes, then turn it flashes (interval time is connected using a 75-ohm coaxial cable (not supplied). 30US Troubleshooting When the LED indicator is flashing red, count how many times it off, disconnect the AC power cord, and contact Sony Customer Support. Picture or sound noise when viewing a TV channel Make sure that your TV serviced by disconnecting the AC power cord from other connecting cables. Never install the TV set as follows. If the problem persists, have...

Operating Instructions (Setup Guide)
Page 31
... Speakers menu (page 24). Sound No sound, but good picture Press VOL +/- Subscribe to use an undamaged antenna cable. The Parental Lock password has been forgotten Press HOME and select Settings t Preferences t Parental Lock t Password then enter 4357 for the password. The remote control does not function Replace the batteries. No color on the screen On the remote control, press RETURN then press HOME and select Settings t Preferences t Setup t Initial Setup. Store Display Mode...
... Speakers menu (page 24). Sound No sound, but good picture Press VOL +/- Subscribe to use an undamaged antenna cable. The Parental Lock password has been forgotten Press HOME and select Settings t Preferences t Parental Lock t Password then enter 4357 for the password. The remote control does not function Replace the batteries. No color on the screen On the remote control, press RETURN then press HOME and select Settings t Preferences t Setup t Initial Setup. Store Display Mode...
Operating Instructions (Setup Guide)
Page 32
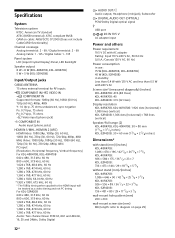
...; Audio output, Headphone (minijack), Subwoofer DIGITAL AUDIO OUT (OPTICAL) PCM/Dolby Digital optical signal USB port DC IN 19.5 V AC adapter input Power and others Power requirement 19.5 V DC with AC adapter Rating: Input 110 V-240 V AC, 50/60 Hz (U.S.A./Canada 120 V AC, 60 Hz) Power consumption in use: 75 W (KDL-48R470B, KDL-40R470B) 45 W (KDL-32R420B) in standby: Less than 0.4 W with 120 V AC and less than 0.5 W with 240 V AC Screen size* (measured diagonally) (inches) KDL-48R470B...
...; Audio output, Headphone (minijack), Subwoofer DIGITAL AUDIO OUT (OPTICAL) PCM/Dolby Digital optical signal USB port DC IN 19.5 V AC adapter input Power and others Power requirement 19.5 V DC with AC adapter Rating: Input 110 V-240 V AC, 50/60 Hz (U.S.A./Canada 120 V AC, 60 Hz) Power consumption in use: 75 W (KDL-48R470B, KDL-40R470B) 45 W (KDL-32R420B) in standby: Less than 0.4 W with 120 V AC and less than 0.5 W with 240 V AC Screen size* (measured diagonally) (inches) KDL-48R470B...

Operating Instructions (Setup Guide)
Page 34
... Conformity Trade Name: SONY Model: KDL-48R470B/40R470B/32R420B Responsible Party: Sony Electronics Inc. ENERGY STAR is a joint program of this device must accept any changes or modifications not expressly approved in a residential installation. Operation is subject to Part 15 of the following two conditions: (1) This device may cause undesired operation. These limits are default settings optimized for help. Your BRAVIA TV is ENERGY STAR...
... Conformity Trade Name: SONY Model: KDL-48R470B/40R470B/32R420B Responsible Party: Sony Electronics Inc. ENERGY STAR is a joint program of this device must accept any changes or modifications not expressly approved in a residential installation. Operation is subject to Part 15 of the following two conditions: (1) This device may cause undesired operation. These limits are default settings optimized for help. Your BRAVIA TV is ENERGY STAR...

Marketing Specifications
Page 2
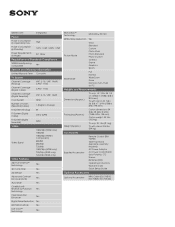
....71W Power Consumption (Standby Mode) for Energy Star 0.23W Power Saving Modes Yes General Features Audio Return Channel Yes Closed Captions (CC) Analog Digital Demo Mode Yes Finish (Surface Color) Black Hotel Mode Menu Yes Start Up Sony Logo Display Yes Inputs and Outputs AC Power Input AC Adapter (Bottom) Analog Audio Input(s) (Total) 1 (Bottom) Audio Out 1 (Bottom / Hybrid w/ HP) Component Video (Y/ 1 (Bottom) Hybrid w/ Pb/Pr) Input(s) Composite Composite Video Input(s) 1 (Bottom) Hybrid w/ Component Digital Audio Output(s) 1 (Rear) HDMI PC Input Format 640x480...
....71W Power Consumption (Standby Mode) for Energy Star 0.23W Power Saving Modes Yes General Features Audio Return Channel Yes Closed Captions (CC) Analog Digital Demo Mode Yes Finish (Surface Color) Black Hotel Mode Menu Yes Start Up Sony Logo Display Yes Inputs and Outputs AC Power Input AC Adapter (Bottom) Analog Audio Input(s) (Total) 1 (Bottom) Audio Out 1 (Bottom / Hybrid w/ HP) Component Video (Y/ 1 (Bottom) Hybrid w/ Pb/Pr) Input(s) Composite Composite Video Input(s) 1 (Bottom) Hybrid w/ Component Digital Audio Output(s) 1 (Rear) HDMI PC Input Format 640x480...
Marketing Specifications
Page 3
...) Packaging (Approx.) Carton dimensions: 54 5/8 x 29 3/8 x 5 3/8 in (1385 x743 x 135 mm) Carton weight: 33.1lbs (15.0 kg) Weight (Approx.) TV only: 20.1 lbs (9.1 kg) TV with stand: 20.8 lbs (9.4 kg) Accessories Supplied Accessories Remote Control (RMYD092) Table Top Stand (separate, assembly required) AC Power Adaptor AC Power Cord (US 2Pin (w/o Polarity), C7) Screws Batteries (R03) Operating Instructions Warranty Card Quick Setup Guide Optional Accessories Optional Accessories MHL Cable (DLC-MB10, DLC...
...) Packaging (Approx.) Carton dimensions: 54 5/8 x 29 3/8 x 5 3/8 in (1385 x743 x 135 mm) Carton weight: 33.1lbs (15.0 kg) Weight (Approx.) TV only: 20.1 lbs (9.1 kg) TV with stand: 20.8 lbs (9.4 kg) Accessories Supplied Accessories Remote Control (RMYD092) Table Top Stand (separate, assembly required) AC Power Adaptor AC Power Cord (US 2Pin (w/o Polarity), C7) Screws Batteries (R03) Operating Instructions Warranty Card Quick Setup Guide Optional Accessories Optional Accessories MHL Cable (DLC-MB10, DLC...


