
Child Safety: It Makes A Difference Where Your TV Stands
Page 1
... into the TV). 3 Carefully read and understand the manufacturer's instructions and product safety notices. 4 Don't allow children to climb on or play with furniture and television sets. 5 Avoid placing any items on this hidden hazard of TVs such as VCRs and remotes that children can become excited while watching a program and can...
... into the TV). 3 Carefully read and understand the manufacturer's instructions and product safety notices. 4 Don't allow children to climb on or play with furniture and television sets. 5 Avoid placing any items on this hidden hazard of TVs such as VCRs and remotes that children can become excited while watching a program and can...
Limited Warranty (US Only)
Page 1
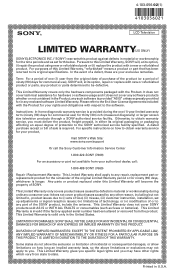
... to state. This Limited Warranty does not cover SONY products sold AS IS or WITH ALL FAULTS or consumables (such as set up adjustments or signal reception issues; (iv) limitations of technology, or (v) modification of the SONY product, include the antenna. This Limited Warranty gives...PURPOSE ON THIS PRODUCT IS LIMITED IN DURATION TO THE DURATION OF THIS WARRANTY. 4-103-056-02(1) x S® LCD Television LIMITED WARRANTY(US ONLY) SONY ELECTRONICS INC. ("SONY") warrants this product against defects in material or workmanship for the time periods and as fuses or batteries). It does...
... to state. This Limited Warranty does not cover SONY products sold AS IS or WITH ALL FAULTS or consumables (such as set up adjustments or signal reception issues; (iv) limitations of technology, or (v) modification of the SONY product, include the antenna. This Limited Warranty gives...PURPOSE ON THIS PRODUCT IS LIMITED IN DURATION TO THE DURATION OF THIS WARRANTY. 4-103-056-02(1) x S® LCD Television LIMITED WARRANTY(US ONLY) SONY ELECTRONICS INC. ("SONY") warrants this product against defects in material or workmanship for the time periods and as fuses or batteries). It does...
Operating Instructions
Page 3
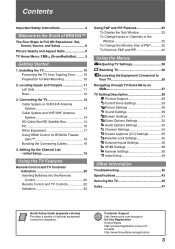
...) Settings 35 Parental Lock Settings 35 External Inputs Settings 38 HDMI Settings 38 General Settings 39 Initial Setup 39 Other Information Troubleshooting 40 Specifications 43 Securing the TV 45 Index 47 Quick Setup Guide (separate volume) Provides a variety of BRAVIA™ The Four Steps to the World of optional equipment connection diagrams. Customer Support http://www.sony...
...) Settings 35 Parental Lock Settings 35 External Inputs Settings 38 HDMI Settings 38 General Settings 39 Initial Setup 39 Other Information Troubleshooting 40 Specifications 43 Securing the TV 45 Index 47 Quick Setup Guide (separate volume) Provides a variety of BRAVIA™ The Four Steps to the World of optional equipment connection diagrams. Customer Support http://www.sony...
Operating Instructions
Page 4
...it and ask your dealer or Sony service center to wear or abuse. The TV set is damaged, it may be disconnected from the AC power source when the TV set is subject to exchange it is... power cord plug must be sure to qualified service personnel. Contact your safety. To disconnect the TV set is used, use attachments/accessories specified by the manufacturer. 12) Use only with the cart, stand...rest on the cables. s Use only an original Sony AC power cord, not other equipment. Picture distortion and/or noisy sound may damage the TV set . If the provided plug does not fit into ...
...it and ask your dealer or Sony service center to wear or abuse. The TV set is damaged, it may be disconnected from the AC power source when the TV set is subject to exchange it is... power cord plug must be sure to qualified service personnel. Contact your safety. To disconnect the TV set is used, use attachments/accessories specified by the manufacturer. 12) Use only with the cart, stand...rest on the cables. s Use only an original Sony AC power cord, not other equipment. Picture distortion and/or noisy sound may damage the TV set . If the provided plug does not fit into ...
Operating Instructions
Page 5
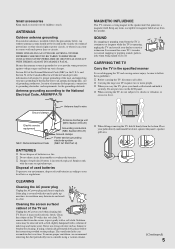
...Antenna grounding according to follow these guidelines: s Before carrying the TV, disconnect all cables. It is incorrectly replaced. s Danger of the TV set Unplug the AC power cord when cleaning this TV. To remove dust from the speaker. Replace only with a dry soft cloth. Cleaning the screen... grounding of the lead-in contact with dust and it to make occasional snapping or popping sounds, particularly when being turned on the LCD panel. ANTENNAS Outdoor antenna grounding If an outdoor antenna is grounded so as to provide some TV's to shocks or vibration, or excessive...
...Antenna grounding according to follow these guidelines: s Before carrying the TV, disconnect all cables. It is incorrectly replaced. s Danger of the TV set Unplug the AC power cord when cleaning this TV. To remove dust from the speaker. Replace only with a dry soft cloth. Cleaning the screen... grounding of the lead-in contact with dust and it to make occasional snapping or popping sounds, particularly when being turned on the LCD panel. ANTENNAS Outdoor antenna grounding If an outdoor antenna is grounded so as to provide some TV's to shocks or vibration, or excessive...
Operating Instructions
Page 6
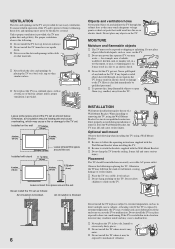
... 11 7/8 inches (30 cm) 4 inches (10 cm) 4 inches (10 cm) 4 inches (10 cm) Leave at least this space around the set as follows: Air circulation is provided. Have it may be sure to direct air conditioning. s To prevent fire, keep flammable objects or open flame (e.g. When... Never place the TV in cabinet, unless proper ventilation is blocked. Otherwise, air-circulation may be blocked or covered. Never install the TV set as shown below. s Be sure to attach the brackets supplied with the Wall-Mount Bracket when installing the TV. Placement The TV should ...
... 11 7/8 inches (30 cm) 4 inches (10 cm) 4 inches (10 cm) 4 inches (10 cm) Leave at least this space around the set as follows: Air circulation is provided. Have it may be sure to direct air conditioning. s To prevent fire, keep flammable objects or open flame (e.g. When... Never place the TV in cabinet, unless proper ventilation is blocked. Otherwise, air-circulation may be blocked or covered. Never install the TV set as shown below. s Be sure to attach the brackets supplied with the Wall-Mount Bracket when installing the TV. Placement The TV should ...
Operating Instructions
Page 7
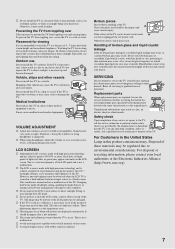
... or more, black dots or bright points of the TV. s The LCD screen is made with high-precision technology and to achieve a high level of performance and picture quality, this TV's backlight setting is recommended to avoid excessive levels, as the original parts. s Ghosting may... appear constantly on the LCD screen. s Avoid spraying insect repellent with rubber or plastic material. Broken pieces Do ...
... or more, black dots or bright points of the TV. s The LCD screen is made with high-precision technology and to achieve a high level of performance and picture quality, this TV's backlight setting is recommended to avoid excessive levels, as the original parts. s Ghosting may... appear constantly on the LCD screen. s Avoid spraying insect repellent with rubber or plastic material. Broken pieces Do ...

Operating Instructions
Page 8
... ratio of the TV to adjust the 4:3 image to Full HD Experience: Set, Sound, Source, and Setup Along with your BRAVIA TV set, a complete HD system requires an HD sound system, a source of BRAVIA™ Thank you for information on the sides. This manual explains basic setup...The Quick Setup Guide, enclosed separately, illustrates how to connect other external equipment Contact your BRAVIA TV is displayed on your cable or satellite provider for purchasing this Sony BRAVIA™ high-definition television. When a 4:3 image is only as good as with different aspect ratios (the width...
... ratio of the TV to adjust the 4:3 image to Full HD Experience: Set, Sound, Source, and Setup Along with your BRAVIA TV set, a complete HD system requires an HD sound system, a source of BRAVIA™ Thank you for information on the sides. This manual explains basic setup...The Quick Setup Guide, enclosed separately, illustrates how to connect other external equipment Contact your BRAVIA TV is displayed on your cable or satellite provider for purchasing this Sony BRAVIA™ high-definition television. When a 4:3 image is only as good as with different aspect ratios (the width...
Operating Instructions
Page 9
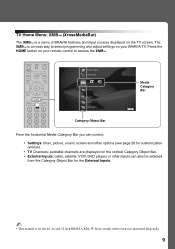
... players or other options (see page 28 for the 40, 46 and 52 inch BRAVIA KDL-W Series model with screen size measured diagonally. 9 Press the HOME button on your remote control to select programming and adjust settings on your BRAVIA TV. HOME Product Support Clock/Timers Settings Sound Screen Video Options Category Object Bar Media Category Bar...
... players or other options (see page 28 for the 40, 46 and 52 inch BRAVIA KDL-W Series model with screen size measured diagonally. 9 Press the HOME button on your remote control to select programming and adjust settings on your BRAVIA TV. HOME Product Support Clock/Timers Settings Sound Screen Video Options Category Object Bar Media Category Bar...
Operating Instructions
Page 10
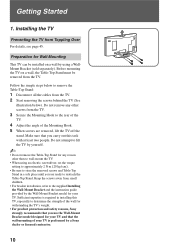
...by yourself. ~ • Do not remove the Table-Top Stand for withstanding the TV's weight. • For product protection and safety reasons, Sony strongly recommends that the wall-mounting of the Mounting Hook. 5 When screws are ready to wall-mount the TV. • When using a WallMount...8226; For bracket installation, refer to the supplied Installing the Wall-Mount Bracket and the instruction guide provided by using an electric screwdriver, set the torque setting to approximately 2 N·m {20 kgf·cm}. • Be sure to store the removed screws and Table-Top Stand in ...
...by yourself. ~ • Do not remove the Table-Top Stand for withstanding the TV's weight. • For product protection and safety reasons, Sony strongly recommends that the wall-mounting of the Mounting Hook. 5 When screws are ready to wall-mount the TV. • When using a WallMount...8226; For bracket installation, refer to the supplied Installing the Wall-Mount Bracket and the instruction guide provided by using an electric screwdriver, set the torque setting to approximately 2 N·m {20 kgf·cm}. • Be sure to store the removed screws and Table-Top Stand in ...
Operating Instructions
Page 11
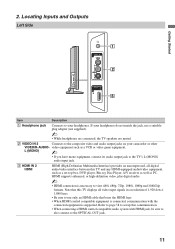
... use only an HDMI cable that this communication. • When connecting a HDMI control compatible audio system with the connected equipment is necessary to set -top box, DVD player, Blu-ray Disc Player, A/V receiver as well as a VCR or video game equipment. Locating Inputs and Outputs Left...(High-Definition Multimedia Interface) provides an uncompressed, all-digital audio/video interface between this TV and any HDMI-equipped audio/video equipment, such as a set up this TV displays all video input signals in a resolution of 1,920 dots × 1,080 lines. • Be sure to use a ...
... use only an HDMI cable that this communication. • When connecting a HDMI control compatible audio system with the connected equipment is necessary to set -top box, DVD player, Blu-ray Disc Player, A/V receiver as well as a VCR or video game equipment. Locating Inputs and Outputs Left...(High-Definition Multimedia Interface) provides an uncompressed, all-digital audio/video interface between this TV and any HDMI-equipped audio/video equipment, such as a set up this TV displays all video input signals in a resolution of 1,920 dots × 1,080 lines. • Be sure to use a ...
Operating Instructions
Page 12
... output connector using a HD15-HD15 cable with ferrite core. • If the picture is noisy, flickering or not clear, adjust Phase and Pitch of Screen settings on page 16 for the signals that can be displayed. ~ • For some Apple Macintosh computers, it may be connected to use an adapter (not...
... output connector using a HD15-HD15 cable with ferrite core. • If the picture is noisy, flickering or not clear, adjust Phase and Pitch of Screen settings on page 16 for the signals that can be displayed. ~ • For some Apple Macintosh computers, it may be connected to use an adapter (not...
Operating Instructions
Page 13
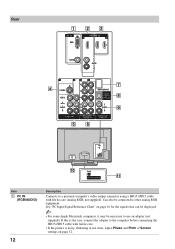
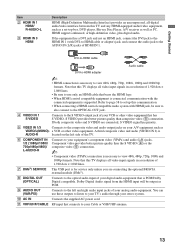
... Connects to your equipment's component video (YPBPR) and audio (L/R) jacks. Note that this TV and any HDMI-equipped audio/video equipment, such as a set up this TV displays all video input signals in a resolution of 1,920 dots × 1,080 lines. • Be sure to use these outputs ... HDMI control compatible audio system with HDMI jack, be output as VIDEO/L(MONO)- If both composite video and S VIDEO are connecting the optional BRAVIA external module (DMex). 8 DIGITAL OUT (OPTICAL) Connects to the optical audio input of your digital audio equipment that is for service only ...
... Connects to your equipment's component video (YPBPR) and audio (L/R) jacks. Note that this TV and any HDMI-equipped audio/video equipment, such as a set up this TV displays all video input signals in a resolution of 1,920 dots × 1,080 lines. • Be sure to use these outputs ... HDMI control compatible audio system with HDMI jack, be output as VIDEO/L(MONO)- If both composite video and S VIDEO are connecting the optional BRAVIA external module (DMex). 8 DIGITAL OUT (OPTICAL) Connects to the optical audio input of your digital audio equipment that is for service only ...

Operating Instructions
Page 14
... you choose (see page 34). Cable Antenna A-B RF switch A Rear of TV B VHF/UHF/CABLE input ~ • Be sure to set the Cable setting to On or Off in the Channel settings for both cable (QAM and 8VSB) and external VHF/UHF antenna (ATSC). • It is capable of TV PC IN 1 RGB...
... you choose (see page 34). Cable Antenna A-B RF switch A Rear of TV B VHF/UHF/CABLE input ~ • Be sure to set the Cable setting to On or Off in the Channel settings for both cable (QAM and 8VSB) and external VHF/UHF antenna (ATSC). • It is capable of TV PC IN 1 RGB...

Operating Instructions
Page 16
... × Vertical (Line) 480 480 400 600 600 768 768 768 768 768 768 768 1024 1024 1080 Horizontal frequency (kHz) 31.5 37.5 31.5 37.9 46.9 48.4 56.5 60.0 47.4 47.8 60.3 47.7 64.0 80.0 67.5 Vertical frequency (Hz) 60 75 70 60 75 60 70 75 60 60 75 60...) Connect to the TV and no signal has been input from a personal computer. PC Input Signal Reference Chart After connecting the PC to the TV, set the output signal from the PC according to HD15 connection. In plug and play, signals with a 60 Hz vertical frequency will be detected automatically. (PC...
... × Vertical (Line) 480 480 400 600 600 768 768 768 768 768 768 768 1024 1024 1080 Horizontal frequency (kHz) 31.5 37.5 31.5 37.9 46.9 48.4 56.5 60.0 47.4 47.8 60.3 47.7 64.0 80.0 67.5 Vertical frequency (Hz) 60 75 70 60 75 60 70 75 60 60 75 60...) Connect to the TV and no signal has been input from a personal computer. PC Input Signal Reference Chart After connecting the PC to the TV, set the output signal from the PC according to HD15 connection. In plug and play, signals with a 60 Hz vertical frequency will be detected automatically. (PC...
Operating Instructions
Page 18
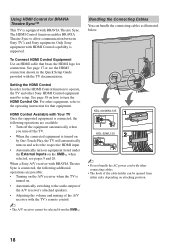
...below. The HDMI Control function enables BRAVIA Theatre Sync to the operating instruction for that bears the HDMI logo for connection. Setting the HDMI Control In order for ...position. 18 Using HDMI Control for BRAVIA Theatre Sync™ This TV is equipped with the TV documentation. Only Sony equipment with other Sony HDMI Control equipment must be selected ... BRAVIA Theatre Sync. Bundling the Connecting Cables You can be opened from the XMB™. HDMI Control Available with the TV's remote control. ~ • The A/V receiver cannot be setup. KDL-40/46WL135 1 KDL...
...below. The HDMI Control function enables BRAVIA Theatre Sync to the operating instruction for that bears the HDMI logo for connection. Setting the HDMI Control In order for ...position. 18 Using HDMI Control for BRAVIA Theatre Sync™ This TV is equipped with the TV documentation. Only Sony equipment with other Sony HDMI Control equipment must be selected ... BRAVIA Theatre Sync. Bundling the Connecting Cables You can be opened from the XMB™. HDMI Control Available with the TV's remote control. ~ • The A/V receiver cannot be setup. KDL-40/46WL135 1 KDL...
Operating Instructions
Page 19
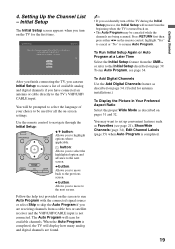
...canceled while the channels are receiving channels from the XMB™ or refer to skip the Auto Program if you accidentally turn on -screen settings. Use the remote control to navigate through the Initial Setup: V/v button: Allows you to move to on page 39. The Auto Program...antenna installations.) To Display the Picture in Your Preferred Aspect Ratio Select the proper Wide Mode as described on the screen to the previous screen. Setting Up the Channel List - 4. Follow the help text provided on page 34. (Useful for available channels. Highlight a choice and press to ...
...canceled while the channels are receiving channels from the XMB™ or refer to skip the Auto Program if you accidentally turn on -screen settings. Use the remote control to navigate through the Initial Setup: V/v button: Allows you to move to on page 39. The Auto Program...antenna installations.) To Display the Picture in Your Preferred Aspect Ratio Select the proper Wide Mode as described on the screen to the previous screen. Setting Up the Channel List - 4. Follow the help text provided on page 34. (Useful for available channels. Highlight a choice and press to ...
Operating Instructions
Page 20
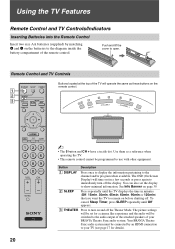
... Remote Control and TV Controls/Indicators Inserting Batteries into the Remote Control Insert two size AA batteries (supplied) by an HDMI connection to your BRAVIA Theatre Sync audio system. Use them as these buttons on page 39. 2 SLEEP Press repeatedly until Off appears. 3 THEATER Press to turn...CH + have a tactile dot. The OSD (On Screen Display) will be connected by matching e and E on and off the display. You can also set for details). 20 Push and lift the cover to immediately turn on the batteries to the diagram inside the battery compartment of the TV will...
... Remote Control and TV Controls/Indicators Inserting Batteries into the Remote Control Insert two size AA batteries (supplied) by an HDMI connection to your BRAVIA Theatre Sync audio system. Use them as these buttons on page 39. 2 SLEEP Press repeatedly until Off appears. 3 THEATER Press to turn...CH + have a tactile dot. The OSD (On Screen Display) will be connected by matching e and E on and off the display. You can also set for details). 20 Push and lift the cover to immediately turn on the batteries to the diagram inside the battery compartment of the TV will...
Operating Instructions
Page 21
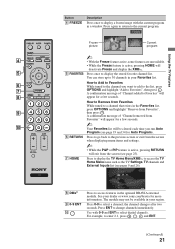
...Your Favorites list will deactivate Freeze and display the XMB™. 5 5 FAVORITES Press once to access the TV Home Menu items such as the TV Settings, TV channels and External Inputs list (see page 25). 7 HOME Press to display the TV Home Menu/XMB™ to display the stored favorite ... Sound Screen Video Options TV Press to access features in your dealer or www.sony.com/bravia for Auto Program). 6 RETURN Press to go back to the previous screen or exit from the screen when displaying menu items and settings. ~ • While the P&P or PIP feature is active, pressing HOME will...
...Your Favorites list will deactivate Freeze and display the XMB™. 5 5 FAVORITES Press once to access the TV Home Menu items such as the TV Settings, TV channels and External Inputs list (see page 25). 7 HOME Press to display the TV Home Menu/XMB™ to display the stored favorite ... Sound Screen Video Options TV Press to access features in your dealer or www.sony.com/bravia for Auto Program). 6 RETURN Press to go back to the previous screen or exit from the screen when displaying menu items and settings. ~ • While the P&P or PIP feature is active, pressing HOME will...
Operating Instructions
Page 22
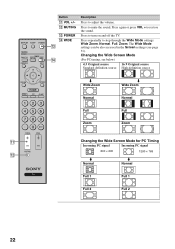
... qf WIDE qd qf Description Press to restore the sound. Press again or press VOL + to adjust the volume. The Wide Mode settings can be also accessed in the Screen settings (see below) 4:3 Original source 16:9 Original source Standard-definition source High-definition source m Wide Zoom Normal Full Zoom m Wide Zoom Normal... 800 × 600 1280 × 768 qs m Normal m Normal Full 1 Full 1 Full 2 Full 2 22 Button qa VOL +/- Press repeatedly to step through the Wide Mode settings: Wide Zoom, Normal, Full, Zoom.
... qf WIDE qd qf Description Press to restore the sound. Press again or press VOL + to adjust the volume. The Wide Mode settings can be also accessed in the Screen settings (see below) 4:3 Original source 16:9 Original source Standard-definition source High-definition source m Wide Zoom Normal Full Zoom m Wide Zoom Normal... 800 × 600 1280 × 768 qs m Normal m Normal Full 1 Full 1 Full 2 Full 2 22 Button qa VOL +/- Press repeatedly to step through the Wide Mode settings: Wide Zoom, Normal, Full, Zoom.


