Operating Instructions
Page 1
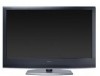
2-889-166-12(2) LCD Digital Color TV Operating Instructions KDL-23S2010 KDL-32S2010 KDL-46S2010 © 2006 Sony Corporation KDL-26S2010 KDL-40S2010
2-889-166-12(2) LCD Digital Color TV Operating Instructions KDL-23S2010 KDL-32S2010 KDL-46S2010 © 2006 Sony Corporation KDL-26S2010 KDL-40S2010
Operating Instructions
Page 2
... Record these numbers in the spaces provided below. For Your Convenience Please contact Sony directly if you call upon your Sony dealer regarding this product. Model No. Please Do Not Return the Product to ... Owner's Record The model and serial numbers are located at : http://www.sony.com/tvsupport or to speak with a support representative: United States 1-800-222-SONY (7669) 8:00 AM - 10:00 PM (EST) Mon-Fri 10:...30 AM - 7:15 PM (EST) Sat-Sun Canada 1-877-899-SONY (7669) 8:00 AM - 6:00 PM (Eastern) 8:00 AM - 5:00 PM (Western) Sony ...
... Record these numbers in the spaces provided below. For Your Convenience Please contact Sony directly if you call upon your Sony dealer regarding this product. Model No. Please Do Not Return the Product to ... Owner's Record The model and serial numbers are located at : http://www.sony.com/tvsupport or to speak with a support representative: United States 1-800-222-SONY (7669) 8:00 AM - 10:00 PM (EST) Mon-Fri 10:...30 AM - 7:15 PM (EST) Sat-Sun Canada 1-877-899-SONY (7669) 8:00 AM - 6:00 PM (Eastern) 8:00 AM - 5:00 PM (Western) Sony ...
Operating Instructions
Page 3
... receiver. s Consult the dealer or an experienced radio/TV technician for installing the specified product. s Use the AC power cord specified by your cable service provider. (Continued) 3 s To obtain the best picture, do not block the ventilation openings. KDL-23S2010 KDL-26S2010 KDL-32S2010 KDL-40S2010 KDL-46S2010 Sony Wall-Mount Bracket Model No. Availability of digital cable...
... receiver. s Consult the dealer or an experienced radio/TV technician for installing the specified product. s Use the AC power cord specified by your cable service provider. (Continued) 3 s To obtain the best picture, do not block the ventilation openings. KDL-23S2010 KDL-26S2010 KDL-32S2010 KDL-40S2010 KDL-46S2010 Sony Wall-Mount Bracket Model No. Availability of digital cable...

Operating Instructions
Page 4
... HDMI Licensing, LLC. "BRAVIA" and are trademarks of SRS Labs, Inc. Trademark Information TruSurround XT, SRS and ( ) symbol are trademarks of Sony Corporation. A polarized plug has two blades with the cart, stand, tripod, bracket, or table specified by BBE Sound, Inc. This... TV incorporates High-Definition Multimedia Interface (HDMI™) technology. A grounding type plug has two blades and a third grounding prong. Manufactured under license from...
... HDMI Licensing, LLC. "BRAVIA" and are trademarks of SRS Labs, Inc. Trademark Information TruSurround XT, SRS and ( ) symbol are trademarks of Sony Corporation. A polarized plug has two blades with the cart, stand, tripod, bracket, or table specified by BBE Sound, Inc. This... TV incorporates High-Definition Multimedia Interface (HDMI™) technology. A grounding type plug has two blades and a third grounding prong. Manufactured under license from...
Operating Instructions
Page 5
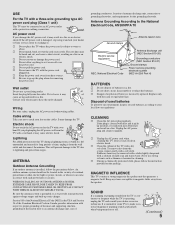
..., unplug the AC power cord when wiring cables. Wiring For your electrician to have the outlet changed. Lightning For added protection for this TV. ANTENNA Outdoor Antenna Grounding If an outdoor antenna is left unattended and unused for cleaning. CLEANING s Clean the AC power plug regularly. ...or twist the cord excessively. s Keep the power cord away from the screen, wipe it may damage the TV. Cable wiring Take care not to catch your dealer or Sony service center to the National Electrical Code, ANSI/NFPA 70 Ground clamps Antenna lead-in wire Electric service equipment ...
..., unplug the AC power cord when wiring cables. Wiring For your electrician to have the outlet changed. Lightning For added protection for this TV. ANTENNA Outdoor Antenna Grounding If an outdoor antenna is left unattended and unused for cleaning. CLEANING s Clean the AC power plug regularly. ...or twist the cord excessively. s Keep the power cord away from the screen, wipe it may damage the TV. Cable wiring Take care not to catch your dealer or Sony service center to the National Electrical Code, ANSI/NFPA 70 Ground clamps Antenna lead-in wire Electric service equipment ...
Operating Instructions
Page 6
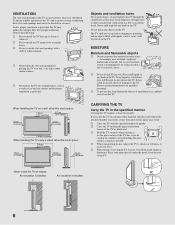
.../8 inches) 5.7 cm (21/4 inches) 10 cm (4 inches) 10 cm (4 inches) 10 cm (4 inches) When installing the TV using a stand, allow this TV get dirty. Have it . If you carry the TV in the TV are provided for example, near a bathtub, washbowl, kitchen sink, or laundry tub, in a fire or an electric shock...as they may touch dangerous voltage points or short out parts that specified and without the specified number of any kind into the TV through , do not subject the TV to hold the panel firmly as possible. s Do not let this much as illustrated. VENTILATION The slots and openings in ...
.../8 inches) 5.7 cm (21/4 inches) 10 cm (4 inches) 10 cm (4 inches) 10 cm (4 inches) When installing the TV using a stand, allow this TV get dirty. Have it . If you carry the TV in the TV are provided for example, near a bathtub, washbowl, kitchen sink, or laundry tub, in a fire or an electric shock...as they may touch dangerous voltage points or short out parts that specified and without the specified number of any kind into the TV through , do not subject the TV to hold the panel firmly as possible. s Do not let this much as illustrated. VENTILATION The slots and openings in ...
Operating Instructions
Page 7
...injury. VOLUME ADJUSTMENT s Adjust the volume so as not to attach the brackets supplied with the wall-mount bracket when installing the TV. LCD SCREEN s Although the LCD screen is not secured properly, it may occur in a fire or an electric shock. Doing so may fall from toppling over... not properly secured during installation or removal from the ceiling. Vehicle Do not install this TV outdoors. s Do not push or scratch the LCD screen, or place objects on an inclined surface, the TV may become dark. The screen glass may break by the manufacturer, as cuts or poisoning...
...injury. VOLUME ADJUSTMENT s Adjust the volume so as not to attach the brackets supplied with the wall-mount bracket when installing the TV. LCD SCREEN s Although the LCD screen is not secured properly, it may occur in a fire or an electric shock. Doing so may fall from toppling over... not properly secured during installation or removal from the ceiling. Vehicle Do not install this TV outdoors. s Do not push or scratch the LCD screen, or place objects on an inclined surface, the TV may become dark. The screen glass may break by the manufacturer, as cuts or poisoning...

Operating Instructions
Page 8
... and to so certify. Servicing Do not attempt to service the TV yourself since opening the cabinet may expose you unplug the AC power ...result. SERVICING Damage requiring service If the surface of the TV cracks, do not touch the TV until you to dangerous voltage or other hazards. Replacement parts...technician to perform routine safety checks (as specified by the manufacturer that the TV is in a fire, an electric shock or other hazards. Refer all... of any service or repairs to the TV, ask the service technician to dispose of the TV. The fluorescent tube used replacement parts specified...
... and to so certify. Servicing Do not attempt to service the TV yourself since opening the cabinet may expose you unplug the AC power ...result. SERVICING Damage requiring service If the surface of the TV cracks, do not touch the TV until you to dangerous voltage or other hazards. Replacement parts...technician to perform routine safety checks (as specified by the manufacturer that the TV is in a fire, an electric shock or other hazards. Refer all... of any service or repairs to the TV, ask the service technician to dispose of the TV. The fluorescent tube used replacement parts specified...
Operating Instructions
Page 9
... Satellite Receiver and Cable/Antenna 13 VCR, Cable and Antenna 13 When Connecting to Optional Equipment 14 Installing the TV ...16 Preventing the TV from Toppling Over 16 Bundling the Connecting Cables 17 Adjusting the Viewing Angle of MENU ...23 Using the Picture...Mounting the KDL-23S2010, KDL-26S2010 and KDL-32S2010.......43 Preparation for Wall Mounting the KDL-40S2010 and KDL-46S2010 44 PC Input Signal Reference Chart 45 Specifications...46 Index...47 9 Initial Setup 18 Basic Operations Remote Control ...19 TV Controls...22 Using the Menus Overview of the TV 17 ...
... Satellite Receiver and Cable/Antenna 13 VCR, Cable and Antenna 13 When Connecting to Optional Equipment 14 Installing the TV ...16 Preventing the TV from Toppling Over 16 Bundling the Connecting Cables 17 Adjusting the Viewing Angle of MENU ...23 Using the Picture...Mounting the KDL-23S2010, KDL-26S2010 and KDL-32S2010.......43 Preparation for Wall Mounting the KDL-40S2010 and KDL-46S2010 44 PC Input Signal Reference Chart 45 Specifications...46 Index...47 9 Initial Setup 18 Basic Operations Remote Control ...19 TV Controls...22 Using the Menus Overview of the TV 17 ...

Operating Instructions
Page 11
... your TV must be easily affected by radio frequency, resulting in your new BRAVIA TV is strongly recommended that are provided in this Sony LCD Digital Color Television. This manual is done, you to receive optimum picture quality. see page 18). When the antenna/cable connection is for models KDL-23S2010, KDL-26S2010, KDL-32S2010, KDL40S2010 and KDL-46S2010.
... your TV must be easily affected by radio frequency, resulting in your new BRAVIA TV is strongly recommended that are provided in this Sony LCD Digital Color Television. This manual is done, you to receive optimum picture quality. see page 18). When the antenna/cable connection is for models KDL-23S2010, KDL-26S2010, KDL-32S2010, KDL40S2010 and KDL-46S2010.
Operating Instructions
Page 12
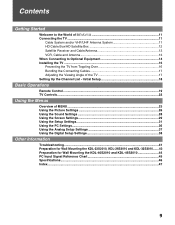
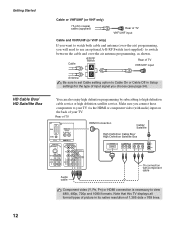
... Cable and VHF/UHF (or VHF only) If you want to watch both cable and antenna (over -the air antenna programming, as shown. Rear of TV 7 6 RGB R AUDIO L AUDIO PC IN VIDEO IN 1 S VIDEO 3 VIDEO L (MONO) AUDIO R HD/DVD IN (1080i/720p/480p/480i) 4 5 Y OPTICAL OUT PB R L AUDIO ...an optional A-B RF Switch (not supplied) to high definition cable service or high definition satellite service. Make sure you connect these components to your TV via the HDMI or component video (with component cable Audio cable Component video (Y, PB, PR) or HDMI connection is necessary to view 480i, ...
... Cable and VHF/UHF (or VHF only) If you want to watch both cable and antenna (over -the air antenna programming, as shown. Rear of TV 7 6 RGB R AUDIO L AUDIO PC IN VIDEO IN 1 S VIDEO 3 VIDEO L (MONO) AUDIO R HD/DVD IN (1080i/720p/480p/480i) 4 5 Y OPTICAL OUT PB R L AUDIO ...an optional A-B RF Switch (not supplied) to high definition cable service or high definition satellite service. Make sure you connect these components to your TV via the HDMI or component video (with component cable Audio cable Component video (Y, PB, PR) or HDMI connection is necessary to view 480i, ...
Operating Instructions
Page 13
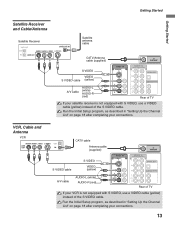
...-R (red) VIDEO IN 1 S VIDEO 3 HD/DVD IN (1080i/720p/480p/480i) 4 5 Y OPTICAL OUT PB VIDEO L (MONO) AUDIO R PR L AUDIO R AUDIO OUT(VAR/FIX) Rear of TV If your satellite receiver is not equipped with S VIDEO, use a VIDEO cable (yellow) instead of the S VIDEO cable. CATV cable Antenna cable (supplied) VHF/UHF...-R (red) VIDEO IN 1 S VIDEO 3 HD/DVD IN (1080i/720p/480p/480i) 4 5 Y OPTICAL OUT PB VIDEO L (MONO) AUDIO R PR L AUDIO R AUDIO OUT(VAR/FIX) Rear of TV If your VCR is not equipped with S VIDEO, use a VIDEO cable (yellow) instead of the S VIDEO cable.
...-R (red) VIDEO IN 1 S VIDEO 3 HD/DVD IN (1080i/720p/480p/480i) 4 5 Y OPTICAL OUT PB VIDEO L (MONO) AUDIO R PR L AUDIO R AUDIO OUT(VAR/FIX) Rear of TV If your satellite receiver is not equipped with S VIDEO, use a VIDEO cable (yellow) instead of the S VIDEO cable. CATV cable Antenna cable (supplied) VHF/UHF...-R (red) VIDEO IN 1 S VIDEO 3 HD/DVD IN (1080i/720p/480p/480i) 4 5 Y OPTICAL OUT PB VIDEO L (MONO) AUDIO R PR L AUDIO R AUDIO OUT(VAR/FIX) Rear of TV If your VCR is not equipped with S VIDEO, use a VIDEO cable (yellow) instead of the S VIDEO cable.
Operating Instructions
Page 14
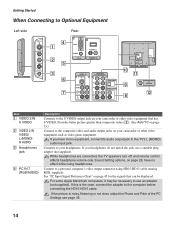
... headphones. If the picture is the case, connect the adapter to the computer before connecting the HD15-HD15 cable. While headphones are connected, the TV speakers turn off, and volume control affects headphone volume only. Sound Setting options, on page 28, have mono equipment, connect its audio output jack... to the TV's L (MONO) audio input jack. If this is noisy, flickering or not clear, adjust the Phase and Pitch of the PC Settings see page ...
... headphones. If the picture is the case, connect the adapter to the computer before connecting the HD15-HD15 cable. While headphones are connected, the TV speakers turn off, and volume control affects headphone volume only. Sound Setting options, on page 28, have mono equipment, connect its audio output jack... to the TV's L (MONO) audio input jack. If this is noisy, flickering or not clear, adjust the Phase and Pitch of the PC Settings see page ...
Operating Instructions
Page 15
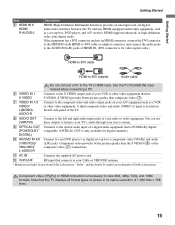
...Item 5 HDMI IN 6 HDMI/ R-AUDIO-L Getting Started Description HDMI (High-Definition Multimedia Interface) provides an uncompressed, all-digital audio/video interface between this TV displays all format types of picture in its native resolution of your VCR or other video equipment. Component video (YPBPR) or HDMI connection is only... video (7). 7 VIDEO IN 1/3 VIDEO/ L(MONO)AUDIO-R Connect to the composite video and audio output jacks on the left side panel of the TV. 8 AUDIO OUT (VAR/FIX) Connect to the left and right audio input jacks of a digital audio equipment that connects to the...
...Item 5 HDMI IN 6 HDMI/ R-AUDIO-L Getting Started Description HDMI (High-Definition Multimedia Interface) provides an uncompressed, all-digital audio/video interface between this TV displays all format types of picture in its native resolution of your VCR or other video equipment. Component video (YPBPR) or HDMI connection is only... video (7). 7 VIDEO IN 1/3 VIDEO/ L(MONO)AUDIO-R Connect to the composite video and audio output jacks on the left side panel of the TV. 8 AUDIO OUT (VAR/FIX) Connect to the left and right audio input jacks of a digital audio equipment that connects to the...
Operating Instructions
Page 16
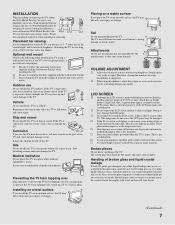
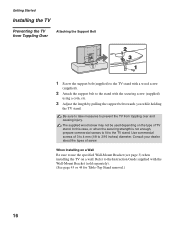
...with the securing screw (supplied) using a coin, etc. 3 Adjust the length by pulling the support belt towards you while holding the TV stand. Consult your dealer about the types of 3 to 4 mm (1/8 to use the specified Wall-Mount Bracket (see page 3) when installing the... TV on the type of TV stand. When Installing on a Wall Be sure to 3/16 inches) diameter. Refer to the TV stand. Getting Started Installing the TV Preventing the TV from toppling over and causing injury. Use commercial screws of screw.
...with the securing screw (supplied) using a coin, etc. 3 Adjust the length by pulling the support belt towards you while holding the TV stand. Consult your dealer about the types of 3 to 4 mm (1/8 to use the specified Wall-Mount Bracket (see page 3) when installing the... TV on the type of TV stand. When Installing on a Wall Be sure to 3/16 inches) diameter. Refer to the TV stand. Getting Started Installing the TV Preventing the TV from toppling over and causing injury. Use commercial screws of screw.
Operating Instructions
Page 17
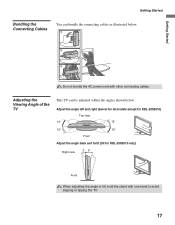
...shown below . 1 2 3 Do not bundle the AC power cord with one hand to avoid slipping or tipping the TV. 17 Adjust the angle left and right (swivel for all models except for KDL-23S2010) Top view 15° 15° 15° 15° Front Adjust the angle back and forth (...tilt for KDL-23S2010 only) Right view 3˚ 8˚ Front When adjusting the angle or tilt, hold the stand with other connecting cables. Adjusting the Viewing Angle of the TV This TV can bundle the connecting cables as illustrated below .
...shown below . 1 2 3 Do not bundle the AC power cord with one hand to avoid slipping or tipping the TV. 17 Adjust the angle left and right (swivel for all models except for KDL-23S2010) Top view 15° 15° 15° 15° Front Adjust the angle back and forth (...tilt for KDL-23S2010 only) Right view 3˚ 8˚ Front When adjusting the angle or tilt, hold the stand with other connecting cables. Adjusting the Viewing Angle of the TV This TV can bundle the connecting cables as illustrated below .
Operating Instructions
Page 18
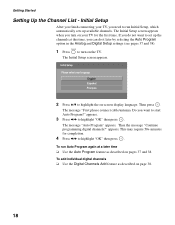
...; Use the Digital Channels Add feature as described on pages 37 and 38. The message "Auto Program" appears. appears. If you finish connecting your TV for completion. 4 Press B/b to highlight "OK" then press . Then press . Do you can do not want to set up available channels. Initial...for the first time. The Initial Setup screen appears. 2 Press V/v to turn on page 38. 18 POWER 1 Press to highlight the on the TV. The message "First please connect cable/antenna. To run Initial Setup, which automatically sets up the channels at a later time ❑ Use the ...
...; Use the Digital Channels Add feature as described on pages 37 and 38. The message "Auto Program" appears. appears. If you finish connecting your TV for completion. 4 Press B/b to highlight "OK" then press . Then press . Do you can do not want to set up available channels. Initial...for the first time. The Initial Setup screen appears. 2 Press V/v to turn on page 38. 18 POWER 1 Press to highlight the on the TV. The message "First please connect cable/antenna. To run Initial Setup, which automatically sets up the channels at a later time ❑ Use the ...
Operating Instructions
Page 19
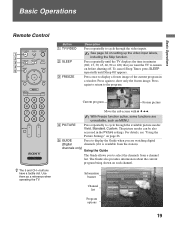
...1 Englsih Audio 2 English 65 HIST 68 SHOW C23.1 FAM Alt. Audio 19 Basic Operations Basic Operations Remote Control 1 2 3 4 5 Button 1 TV/VIDEO 2 SLEEP 3 FREEZE Description Press repeatedly to cycle through the available picture modes: Vivid, Standard, Custom. To cancel Sleep Timer, press SLEEP repeatedly until... the TV displays the time in minutes (Off, 15, 30, 45, 60, 90 or 120) that you to select the channels from the ...
...1 Englsih Audio 2 English 65 HIST 68 SHOW C23.1 FAM Alt. Audio 19 Basic Operations Basic Operations Remote Control 1 2 3 4 5 Button 1 TV/VIDEO 2 SLEEP 3 FREEZE Description Press repeatedly to cycle through the available picture modes: Vivid, Standard, Custom. To cancel Sleep Timer, press SLEEP repeatedly until... the TV displays the time in minutes (Off, 15, 30, 45, 60, 90 or 120) that you to select the channels from the ...
Operating Instructions
Page 20
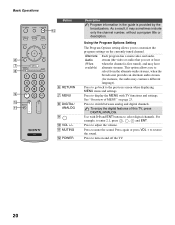
... number, without a program title or description. Using the Program Options Setting The Program Options setting allows you to turn on and off the TV. 20 Press to customize the program settings on page 23. Press to display the MENU with 0-9 and ENT buttons to the previous screen ...when displaying MENU items and settings. Use with TV functions and settings. qa MUTING qs POWER Description Program information in the guide is first tuned), and may have alternate streams. This option allows...
... number, without a program title or description. Using the Program Options Setting The Program Options setting allows you to turn on and off the TV. 20 Press to customize the program settings on page 23. Press to display the MENU with 0-9 and ENT buttons to the previous screen ...when displaying MENU items and settings. Use with TV functions and settings. qa MUTING qs POWER Description Program information in the guide is first tuned), and may have alternate streams. This option allows...

Operating Instructions
Page 21
...Original source Standard definition source High definition source m Wide Zoom Normal Full m Wide Zoom Normal This mode is associated with your current input: Analog TV, Digital TV, or External Inputs. (See page 26, 28, 31, 36 and 37.) Press to jump back and forth between two channels. Press once to... move the on-screen cursor. Press V/v/B/b to display the current channel number, channel label, time and Wide Mode settings. The TV alternates between the current channel and the last channel that is not available Full ql Zoom Zoom qa qf DISPLAY qg V/v/B/b qh TOOLS qj JUMP...
...Original source Standard definition source High definition source m Wide Zoom Normal Full m Wide Zoom Normal This mode is associated with your current input: Analog TV, Digital TV, or External Inputs. (See page 26, 28, 31, 36 and 37.) Press to jump back and forth between two channels. Press once to... move the on-screen cursor. Press V/v/B/b to display the current channel number, channel label, time and Wide Mode settings. The TV alternates between the current channel and the last channel that is not available Full ql Zoom Zoom qa qf DISPLAY qg V/v/B/b qh TOOLS qj JUMP...


