Operating Instructions
Page 2
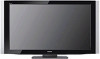
..., please contact your Sony dealer regarding this equipment. "BRAVIA" and , BRAVIA Theatre Sync and are designed to operate this TV. Safety s Operate the TV only on the cord...if the room temperature changes suddenly, the picture may be using the TV for installing the specified TV. Installing s The TV should be determined by one way. Licensing... to radio communications. Sony TV Model No. TruSurround XT, SRS and ( ) symbol are trademarks of Conformity Trade Name: SONY Model: KDL-40SL140/KDL-46SL140 Responsible Party: Sony Electronics Inc. Pursuant...
..., please contact your Sony dealer regarding this equipment. "BRAVIA" and , BRAVIA Theatre Sync and are designed to operate this TV. Safety s Operate the TV only on the cord...if the room temperature changes suddenly, the picture may be using the TV for installing the specified TV. Installing s The TV should be determined by one way. Licensing... to radio communications. Sony TV Model No. TruSurround XT, SRS and ( ) symbol are trademarks of Conformity Trade Name: SONY Model: KDL-40SL140/KDL-46SL140 Responsible Party: Sony Electronics Inc. Pursuant...
Operating Instructions
Page 3
...Source, and Setup 4 Picture Quality and Aspect Ratio 4 Getting Started 1. Setting Up the Channel List Initial Setup 18 Exploring Fun Features Using BRAVIA Theatre Sync™ with Control for Wall-Mounting 8 Installing the Wall-Mount Bracket 9 When Installing the TV Against a Wall or Enclosed... Provides a variety of BRAVIA® The Four Steps to the World of optional equipment connection diagrams. Customer Support United States http://www.sony.com/tvsupport Canada http://www.sony.ca/support On-line Registration United States http://productregistration.sony.com Canada http://www....
...Source, and Setup 4 Picture Quality and Aspect Ratio 4 Getting Started 1. Setting Up the Channel List Initial Setup 18 Exploring Fun Features Using BRAVIA Theatre Sync™ with Control for Wall-Mounting 8 Installing the Wall-Mount Bracket 9 When Installing the TV Against a Wall or Enclosed... Provides a variety of BRAVIA® The Four Steps to the World of optional equipment connection diagrams. Customer Support United States http://www.sony.com/tvsupport Canada http://www.sony.ca/support On-line Registration United States http://productregistration.sony.com Canada http://www....

Operating Instructions
Page 4
...Setup Along with your cable or satellite provider for purchasing this Sony BRAVIA® high-definition television. This manual explains basic setup connections (see on your BRAVIA TV is displayed on the sides. The 16:9 fills your new BRAVIA TV, you will notice a big difference. The Quick Setup Guide,...ratios (the width-to-height ratio of the TV to adjust the 4:3 image to 1080p only through HDMI input. 4 The picture quality may not be as sharp as the quality of your BRAVIA screen, maintaining a crisp, clear, vivid picture. 4:3 (standard-definition) source Most standard-...
...Setup Along with your cable or satellite provider for purchasing this Sony BRAVIA® high-definition television. This manual explains basic setup connections (see on your BRAVIA TV is displayed on the sides. The 16:9 fills your new BRAVIA TV, you will notice a big difference. The Quick Setup Guide,...ratios (the width-to-height ratio of the TV to adjust the 4:3 image to 1080p only through HDMI input. 4 The picture quality may not be as sharp as the quality of your BRAVIA screen, maintaining a crisp, clear, vivid picture. 4:3 (standard-definition) source Most standard-...
Operating Instructions
Page 13
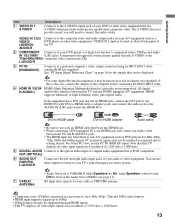
... equipment. you will need to a personal computer's video output connector using an HD15-HD15 cable (analog RGB, not supplied). Component video provides better picture quality than composite video. If the equipment has a DVI jack and not an HDMI jack, connect the DVI jack to the left side panel of... the signals that bears the HDMI logo. • When connecting a DVI-equipped PC to an HDMI jack, also connect an Audio cable between this TV displays all video input signals in the Audio Out is turn Off the level in a resolution of 1,920 dots × 1,080 lines. 13 L-AUDIO...
... equipment. you will need to a personal computer's video output connector using an HD15-HD15 cable (analog RGB, not supplied). Component video provides better picture quality than composite video. If the equipment has a DVI jack and not an HDMI jack, connect the DVI jack to the left side panel of... the signals that bears the HDMI logo. • When connecting a DVI-equipped PC to an HDMI jack, also connect an Audio cable between this TV displays all video input signals in the Audio Out is turn Off the level in a resolution of 1,920 dots × 1,080 lines. 13 L-AUDIO...
Operating Instructions
Page 14
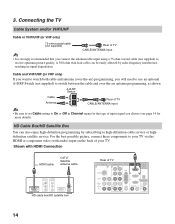
A-B RF Switch Cable Antenna A Rear of TV B CABLE/ANTENNA input • Be sure to set Cable setting to On or Off in signal degradation. For the best possible picture, connect these components to receive optimum picture quality. Shown with audio) input on the back of input signal you will need to use an optional...
A-B RF Switch Cable Antenna A Rear of TV B CABLE/ANTENNA input • Be sure to set Cable setting to On or Off in signal degradation. For the best possible picture, connect these components to receive optimum picture quality. Shown with audio) input on the back of input signal you will need to use an optional...
Operating Instructions
Page 16
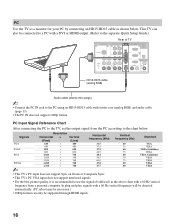
... input does not support Sync on Green or Composite Sync. • This TV's PC VGA input does not support interlaced signals. • For the best picture quality, it is recommended to the chart below . This TV can only be connected to a PC with a DVI or HDMI output. (Refer to the separate... Quick Setup Guide.) Rear of TV VIDEO IN 1 3 S VIDEO VIDEO L (MONO) AUDIO R COMPONENT ...
... input does not support Sync on Green or Composite Sync. • This TV's PC VGA input does not support interlaced signals. • For the best picture quality, it is recommended to the chart below . This TV can only be connected to a PC with a DVI or HDMI output. (Refer to the separate... Quick Setup Guide.) Rear of TV VIDEO IN 1 3 S VIDEO VIDEO L (MONO) AUDIO R COMPONENT ...
Operating Instructions
Page 18
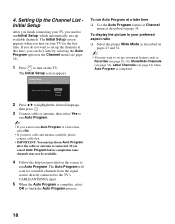
To display the picture in the Channel menu (see page 34) when Auto Program is connected. The Initial Setup screen appears when you turn on the TV. The Initial Setup screen appears. Setting Up the Channel List Initial Setup After you finish connecting your language: 2 Press V/v to ...Press to set up available channels. To run Auto Program. Initial Setup Press to finish the Auto Program process. 18 Please select your TV, you cancel Auto Program before completion some channels may want to turn on your preferred aspect ratio ❑ Select the proper Wide Mode ...
To display the picture in the Channel menu (see page 34) when Auto Program is connected. The Initial Setup screen appears when you turn on the TV. The Initial Setup screen appears. Setting Up the Channel List Initial Setup After you finish connecting your language: 2 Press V/v to ...Press to set up available channels. To run Auto Program. Initial Setup Press to finish the Auto Program process. 18 Please select your TV, you cancel Auto Program before completion some channels may want to turn on your preferred aspect ratio ❑ Select the proper Wide Mode ...
Operating Instructions
Page 19
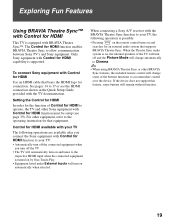
... External Inputs will turn off and the Picture Mode will change some buttons will change automatically to 17 or see page 39). Exploring Fun Features Using BRAVIA Theatre Sync™ with Control for HDMI This TV is supported. Only Sony equipment with Control for HDMI capability is ...equipped with BRAVIA Theatre Sync™. When the Theatre Sync audio system is turned...
... External Inputs will turn off and the Picture Mode will change some buttons will change automatically to 17 or see page 39). Exploring Fun Features Using BRAVIA Theatre Sync™ with Control for HDMI This TV is supported. Only Sony equipment with Control for HDMI capability is ...equipped with BRAVIA Theatre Sync™. When the Theatre Sync audio system is turned...
Operating Instructions
Page 21
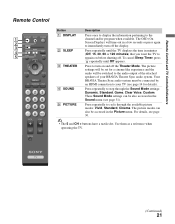
... until Off appears. Your BRAVIA Theatre Sync audio system must be connected by an HDMI connection to turn off the display. Remote Control and TV Controls/Indicators Remote Control 1 2 3 4 5 SOUND GUIDE TOOLS MENU Button 1 DISPLAY 2 SLEEP 3 THEATER 4 SOUND 5 PICTURE Description Press once to display...page 14 for a cinema-like experience and the audio will time out in the Picture menu. Press to your BRAVIA Theatre Sync audio system. Use them as a reference when operating the TV. (Continued) 21 Press repeatedly to immediately turn on before shutting off the Theater...
... until Off appears. Your BRAVIA Theatre Sync audio system must be connected by an HDMI connection to turn off the display. Remote Control and TV Controls/Indicators Remote Control 1 2 3 4 5 SOUND GUIDE TOOLS MENU Button 1 DISPLAY 2 SLEEP 3 THEATER 4 SOUND 5 PICTURE Description Press once to display...page 14 for a cinema-like experience and the audio will time out in the Picture menu. Press to your BRAVIA Theatre Sync audio system. Use them as a reference when operating the TV. (Continued) 21 Press repeatedly to immediately turn on before shutting off the Theater...

Operating Instructions
Page 24
... the equipment menu, if the equipment supports the function. Press to move the on setting up to view the list of External Inputs and TV mode. This feature lets you run Auto Program (see page 29 for details). wa CH +/- • Your Favorites list will alternate between...press and hold down either +/-. 24 To scan quickly through the inputs. Press repeatedly to view a channel at the same time as a PIP (picture in picture) screen (see pages 18 and 34). Press V/v/B/b to select/confirm an item. When antenna input is active and the broadcast includes Regional Digital ...
... the equipment menu, if the equipment supports the function. Press to move the on setting up to view the list of External Inputs and TV mode. This feature lets you run Auto Program (see page 29 for details). wa CH +/- • Your Favorites list will alternate between...press and hold down either +/-. 24 To scan quickly through the inputs. Press repeatedly to view a channel at the same time as a PIP (picture in picture) screen (see pages 18 and 34). Press V/v/B/b to select/confirm an item. When antenna input is active and the broadcast includes Regional Digital ...
Operating Instructions
Page 27
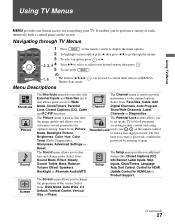
...The Screen menu allows you to provide External Inputs and Favorites list. Menu Descriptions ) can be used to control other devices in BRAVIA Shortcuts Picture Sound Screen The Shortcuts menu lets you select the The Channel menu is used to change audio. Select from : Wide Mode, ... Color, Hue, Color time you additional tune and change the proportions of tasks intuitively with a control panel on the screen. Using TV Menus Using TV Menus MENU provides one button access for according to Wide Select from: Favorites, Cable, Add Mode, Clock/Timers, Parental Channel Digital...
...The Screen menu allows you to provide External Inputs and Favorites list. Menu Descriptions ) can be used to control other devices in BRAVIA Shortcuts Picture Sound Screen The Shortcuts menu lets you select the The Channel menu is used to change audio. Select from : Wide Mode, ... Color, Hue, Color time you additional tune and change the proportions of tasks intuitively with a control panel on the screen. Using TV Menus Using TV Menus MENU provides one button access for according to Wide Select from: Favorites, Cable, Add Mode, Clock/Timers, Parental Channel Digital...
Operating Instructions
Page 28
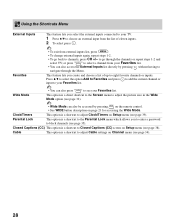
... a password to block channels (see page 35). Using the Shortcuts Menu External Inputs This feature lets you select the external inputs connected to your TV. 1 Press V/v to choose an external input from your Favorites list. • You can also be accessed by pressing INPUT without having to... navigate through the channels or repeat steps 1-2 and select TV; This option is a direct shortcut to the Screen menu to channels, press CH +/- to go back to adjust the picture size in the Wide Mode option (see your Favorites list. Favorites • To ...
... a password to block channels (see page 35). Using the Shortcuts Menu External Inputs This feature lets you select the external inputs connected to your TV. 1 Press V/v to choose an external input from your Favorites list. • You can also be accessed by pressing INPUT without having to... navigate through the channels or repeat steps 1-2 and select TV; This option is a direct shortcut to the Screen menu to channels, press CH +/- to go back to adjust the picture size in the Wide Mode option (see your Favorites list. Favorites • To ...
Operating Instructions
Page 29
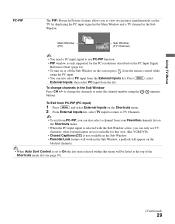
.... • To exit from PC-PIP, you can only see page 39). (Continued) 29 Using TV Menus PC-PIP The PIP (Picture In Picture) feature allows you to view two pictures simultaneously on the blocked channels. • When Auto Sort Control is set to On the last item selected within this view (like VCR...
.... • To exit from PC-PIP, you can only see page 39). (Continued) 29 Using TV Menus PC-PIP The PIP (Picture In Picture) feature allows you to view two pictures simultaneously on the blocked channels. • When Auto Sort Control is set to On the last item selected within this view (like VCR...
Operating Instructions
Page 30
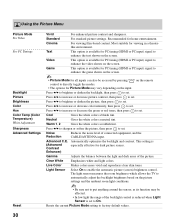
... On. Reset • Be sure not to put anything around the sensor, as its function may vary depending on the screen. For standard picture settings. This option is set to set . Warm 1, 2 Gives the white colors a reddish tint. Clear White Emphasizes white and light colors... on the picture settings and the ambient room light conditions. Automatically optimizes the backlight and contrast. The light sensor measures the room brightness which allows the TV to factory default values. 30 Neutral Gives the white colors a neutral tint. Resets the current Picture Mode setting ...
... On. Reset • Be sure not to put anything around the sensor, as its function may vary depending on the screen. For standard picture settings. This option is set to set . Warm 1, 2 Gives the white colors a reddish tint. Clear White Emphasizes white and light colors... on the picture settings and the ambient room light conditions. Automatically optimizes the backlight and contrast. The light sensor measures the room brightness which allows the TV to factory default values. 30 Neutral Gives the white colors a neutral tint. Resets the current Picture Mode setting ...
Operating Instructions
Page 32
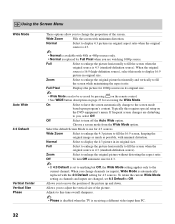
...is disabled when the TV is receiving a different video input than PC. 32 Normal Select to move the position of the picture up and down. When you change the proportion of the picture. Allows you to display the 4:3 picture in original size. Full Pixel Displays the picture for 4:3 sources. ...as much as channels and inputs are watching 1080p source. Typically this mode to you, select Off. Full Select to enlarge the picture horizontally to change channels (or inputs), Wide Mode is automatically replaced with minimum distortion. Using the Screen Menu Wide Mode Auto Wide...
...is disabled when the TV is receiving a different video input than PC. 32 Normal Select to move the position of the picture up and down. When you change the proportion of the picture. Allows you to display the 4:3 picture in original size. Full Pixel Displays the picture for 4:3 sources. ...as much as channels and inputs are watching 1080p source. Typically this mode to you, select Off. Full Select to enlarge the picture horizontally to change channels (or inputs), Wide Mode is automatically replaced with minimum distortion. Using the Screen Menu Wide Mode Auto Wide...

Operating Instructions
Page 33
Select to fill the screen. Wide Mode Wide Zoom Normal Full Zoom Fills the screen with minimum distortion. Using TV Menus (Continued) 33 Select to enlarge the picture to display the picture in its original aspect ratio. • Wide Mode can also be accessed by pressing on the remote control. • See WIDE button... on page 23 for PC timings and HDMI-PC (PC input) differ from all other input modes and are shown below. Select to enlarge the picture to fill the screen, while maintaining its original resolution and aspect ratio. Screen settings for accessing the Wide Mode.
Select to fill the screen. Wide Mode Wide Zoom Normal Full Zoom Fills the screen with minimum distortion. Using TV Menus (Continued) 33 Select to enlarge the picture to display the picture in its original aspect ratio. • Wide Mode can also be accessed by pressing on the remote control. • See WIDE button... on page 23 for PC timings and HDMI-PC (PC input) differ from all other input modes and are shown below. Select to enlarge the picture to fill the screen, while maintaining its original resolution and aspect ratio. Screen settings for accessing the Wide Mode.

Operating Instructions
Page 41
...) for more details. ❑ Perform the Auto Program to add receivable channels that are not presently in normal use of your Sony TV, please visit our website or call one channel. ❑ Perform the Auto Program to add available channels that Cable under Channel menu is... 41 Perform the Auto Program to add receivable channels that are not presently in the TV's channel's list (page 34). ❑ Make sure the power cord is connected securely. ❑ Turn on the remote control. Poor picture Double images or ghosts. ❑ Check antenna/cable connections. ❑ Check the ...
...) for more details. ❑ Perform the Auto Program to add receivable channels that are not presently in normal use of your Sony TV, please visit our website or call one channel. ❑ Perform the Auto Program to add available channels that Cable under Channel menu is... 41 Perform the Auto Program to add receivable channels that are not presently in the TV's channel's list (page 34). ❑ Make sure the power cord is connected securely. ❑ Turn on the remote control. Poor picture Double images or ghosts. ❑ Check antenna/cable connections. ❑ Check the ...

Operating Instructions
Page 42
...and play will enter to lock in a blurry picture or poor color. BRAVIA Theatre Sync Cannot find connected BRAVIA Theatre Sync HDMI device. Turn off the Auto Wide option in the Sound menu (page 31). The TV automatically will auto-detect the TV and correctly set up the PC timing. &#...10065; Turn the PC off. Audio noise. PC Input No Picture/No Signal. Noisy picture. If you change in room temperature may be broadcasting your TV and wait a few hours before powering on both the TV and the optional device compatible with BRAVIA Theatre Sync (page 19). ❑ Only one A/V receiver...
...and play will enter to lock in a blurry picture or poor color. BRAVIA Theatre Sync Cannot find connected BRAVIA Theatre Sync HDMI device. Turn off the Auto Wide option in the Sound menu (page 31). The TV automatically will auto-detect the TV and correctly set up the PC timing. &#...10065; Turn the PC off. Audio noise. PC Input No Picture/No Signal. Noisy picture. If you change in room temperature may be broadcasting your TV and wait a few hours before powering on both the TV and the optional device compatible with BRAVIA Theatre Sync (page 19). ❑ Only one A/V receiver...
Operating Instructions
Page 43
... sensor area clear from obstacles. ❑ Certain cable companies have selected a text option and no text is due to your TV's large screen and ability to SD definition content (commercials), the picture may be small with your program provider). ❑ Programs in the Show/Hide Channels setting (page 34). ❑ Select the...
... sensor area clear from obstacles. ❑ Certain cable companies have selected a text option and no text is due to your TV's large screen and ability to SD definition content (commercials), the picture may be small with your program provider). ❑ Programs in the Show/Hide Channels setting (page 34). ❑ Select the...
Operating Instructions
Page 45
... Program 18, 34 Auto Sort Control 39 Auto Wide 32 B Backlight 30, 31 Balance 31 Bass 31 BRAVIA Theatre Sync 19 Brightness 30 C Cable 28, 34 Cable holder 8 CABLE/ANTENNA input, described 13 Canadian Models... Parental Lock 28, 35 PC IN 13 PC-PIP 29 Phase 32 PIC OFF/TIMER LED 25 Picture 30 PICTURE button 21 Picture Mode 30 POWER button 22, 25 POWER LED 25 Product Support 39 R Rating 35 Remote Control 21... 31 T THEATER button 21 TOOLS button 24 Treble 31 Troubleshooting 41, 42, 43 Turning on/off the TV 22, 25 TV Rating 37 U U.S.A. button 22, 25 Volume Offset 31 W WIDE button 23 Wide Mode 28, 32...
... Program 18, 34 Auto Sort Control 39 Auto Wide 32 B Backlight 30, 31 Balance 31 Bass 31 BRAVIA Theatre Sync 19 Brightness 30 C Cable 28, 34 Cable holder 8 CABLE/ANTENNA input, described 13 Canadian Models... Parental Lock 28, 35 PC IN 13 PC-PIP 29 Phase 32 PIC OFF/TIMER LED 25 Picture 30 PICTURE button 21 Picture Mode 30 POWER button 22, 25 POWER LED 25 Product Support 39 R Rating 35 Remote Control 21... 31 T THEATER button 21 TOOLS button 24 Treble 31 Troubleshooting 41, 42, 43 Turning on/off the TV 22, 25 TV Rating 37 U U.S.A. button 22, 25 Volume Offset 31 W WIDE button 23 Wide Mode 28, 32...


