Operating Instructions
Page 5
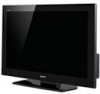
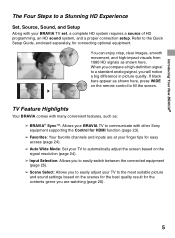
Introducing Your New BRAVIA® The Four Steps to a Stunning HD Experience Set, Source, Sound, and Setup Along with other Sony equipment supporting the Control for HDMI function (page 23). ➢ Favorites: Your favorite channels and inputs are watching (page 20). 5 When you ...If black bars appear as shown here. TV Feature Highlights Your BRAVIA comes with many convenient features, such as: ➢ BRAVIA® SyncTM: Allows your BRAVIA TV to communicate with your TV to the most suitable picture and sound settings based on the remote control to the Quick Setup Guide, enclosed ...
Introducing Your New BRAVIA® The Four Steps to a Stunning HD Experience Set, Source, Sound, and Setup Along with other Sony equipment supporting the Control for HDMI function (page 23). ➢ Favorites: Your favorite channels and inputs are watching (page 20). 5 When you ...If black bars appear as shown here. TV Feature Highlights Your BRAVIA comes with many convenient features, such as: ➢ BRAVIA® SyncTM: Allows your BRAVIA TV to communicate with your TV to the most suitable picture and sound settings based on the remote control to the Quick Setup Guide, enclosed ...
Operating Instructions
Page 21
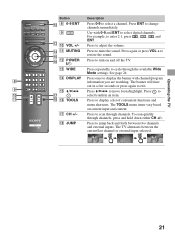
... and external inputs. Operating the TV 21 Press ENT to move focus/highlight. qf DISPLAY Press once to select a channel. The TOOLS menu items vary based on and off the TV. To scan quickly through channels. Button Description qs 8 0-9 ENT Press 0-9 to display the banner with 0-9 and ENT to restore the...
... and external inputs. Operating the TV 21 Press ENT to move focus/highlight. qf DISPLAY Press once to select a channel. The TOOLS menu items vary based on and off the TV. To scan quickly through channels. Button Description qs 8 0-9 ENT Press 0-9 to display the banner with 0-9 and ENT to restore the...
Operating Instructions
Page 24
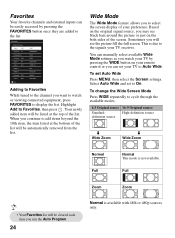
Based on the original signal source, you may see the picture fill the full screen. This is due to display the list. Favorites Add to Favorites ...
Based on the original signal source, you may see the picture fill the full screen. This is due to display the list. Favorites Add to Favorites ...
Operating Instructions
Page 26
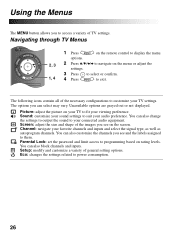
... audio equipment. Channel: navigate your TV settings. Setup: modify and customize a variety of TV settings. Parental Lock: set the password and limit access to programming based on the screen. Using the Menus The MENU button allows you see and the labels assigned to them.
... audio equipment. Channel: navigate your TV settings. Setup: modify and customize a variety of TV settings. Parental Lock: set the password and limit access to programming based on the screen. Using the Menus The MENU button allows you see and the labels assigned to them.
Operating Instructions
Page 27
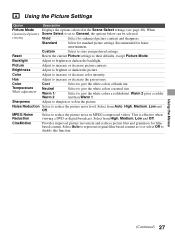
... Temperature White adjustment Cool Neutral Warm 1/ Warm 2 Select to disable this function. Select to reduce the picture noise level. Select Auto to represent original film-based content as is or select Off to give the white colors a neutral tint.
... Temperature White adjustment Cool Neutral Warm 1/ Warm 2 Select to disable this function. Select to reduce the picture noise level. Select Auto to represent original film-based content as is or select Off to give the white colors a neutral tint.
Operating Instructions
Page 31
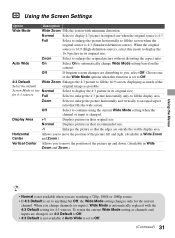
... Select On to enlarge the original picture without distorting the aspect ratio. Select to enlarge the 4:3 picture horizontally only, to you change Wide Mode setting based on the content.
... Select On to enlarge the original picture without distorting the aspect ratio. Select to enlarge the 4:3 picture horizontally only, to you change Wide Mode setting based on the content.
Operating Instructions
Page 34
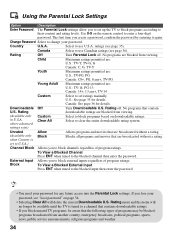
... broadcasts, political programs, sports, news, public service announcements, religious programs and weather. 34 Canada Select to set to U.S.A.) Channel Block Allows you to block programs based on the remote control to block external inputs regardless of program ratings. U.S.: See page 35 for details. ratings exist) Unrated Allow Allows programs and movies...
... broadcasts, political programs, sports, news, public service announcements, religious programs and weather. 34 Canada Select to set to U.S.A.) Channel Block Allows you to block programs based on the remote control to block external inputs regardless of program ratings. U.S.: See page 35 for details. ratings exist) Unrated Allow Allows programs and movies...
Operating Instructions
Page 35
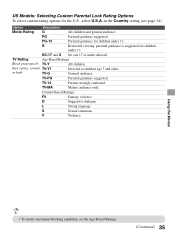
... Options To select custom rating options for children under allowed. their rating, content TV-Y7 or both TV-G Directed to children age 7 and older. Content-Based Ratings FV Fantasy violence. S Sexual situations. TV-PG Parental guidance suggested. General audience. TV-14 Parents strongly cautioned. NC-17 and X No one 17... or under 13. Using the Menus • To ensure maximum blocking capability, set the Age-Based Ratings. (Continued) 35 V Violence. TV-MA Mature audience only. TV Rating Age...
... Options To select custom rating options for children under allowed. their rating, content TV-Y7 or both TV-G Directed to children age 7 and older. Content-Based Ratings FV Fantasy violence. S Sexual situations. TV-PG Parental guidance suggested. General audience. TV-14 Parents strongly cautioned. NC-17 and X No one 17... or under 13. Using the Menus • To ensure maximum blocking capability, set the Age-Based Ratings. (Continued) 35 V Violence. TV-MA Mature audience only. TV Rating Age...
Operating Instructions
Page 45
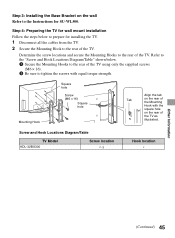
... the wall Refer to tighten the screws with equal torque strength. Screw and Hook Locations Diagram/Table TV Model KDL-32BX300 Screw location e, g Hook location c Other Information (Continued) 45 Step 3: Installing the Base Bracket on the rear of the TV as illustrated. Refer to the "Screw and Hook Locations Diagram/Table" shown...
... the wall Refer to tighten the screws with equal torque strength. Screw and Hook Locations Diagram/Table TV Model KDL-32BX300 Screw location e, g Hook location c Other Information (Continued) 45 Step 3: Installing the Base Bracket on the rear of the TV as illustrated. Refer to the "Screw and Hook Locations Diagram/Table" shown...

Operating Instructions
Page 46
Wall TV 3 Adjust the angle of the TV. 46 of the Mounting Hook. When installing the TV onto Base Bracket. Refer to the Instructions for SU-WL500. 4 Remove the screws guided by the arrow marks Do not remove any other screws from the TV. Screw location Hook location When installing the Mounting Hooks on the TV.
Wall TV 3 Adjust the angle of the TV. 46 of the Mounting Hook. When installing the TV onto Base Bracket. Refer to the Instructions for SU-WL500. 4 Remove the screws guided by the arrow marks Do not remove any other screws from the TV. Screw location Hook location When installing the Mounting Hooks on the TV.

Operating Instructions
Page 48
... four times that of the Base Plate Refer to the Instructions for SU-WL100. CAUTION The wall that the TV will be installed on the installation location Decide where you want to the TV installation dimensions table. Dimension Table Screen center point Unit: mm (inches) TV Model KDL-22BX300 TV Screen Length for... for the installation Open the Wall-Mount Bracket package and check the contents for SU-WL100. 48 Refer to install your TV. Step 4: Installing the Base Plate on the installation.
... four times that of the Base Plate Refer to the Instructions for SU-WL100. CAUTION The wall that the TV will be installed on the installation location Decide where you want to the TV installation dimensions table. Dimension Table Screen center point Unit: mm (inches) TV Model KDL-22BX300 TV Screen Length for... for the installation Open the Wall-Mount Bracket package and check the contents for SU-WL100. 48 Refer to install your TV. Step 4: Installing the Base Plate on the installation.
Operating Instructions
Page 49
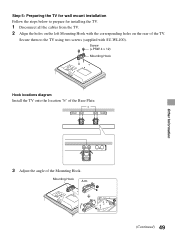
b Other Information 3 Adjust the angle of the Base Plate. Screw (+PSW 4 × 12) Mounting Hook Hook locations diagram Install the TV onto the location "b" of the Mounting Hook. Mounting Hook Arm (Continued) 49 Secure them to prepare for installing the TV. 1 Disconnect all the cables from the TV. 2 Align the holes on the left Mounting Hook with SU-WL100). Step 5: Preparing the TV for wall mount installation Follow the steps below to the TV using two screws (supplied with the corresponding holes on the rear of the TV.
b Other Information 3 Adjust the angle of the Base Plate. Screw (+PSW 4 × 12) Mounting Hook Hook locations diagram Install the TV onto the location "b" of the Mounting Hook. Mounting Hook Arm (Continued) 49 Secure them to prepare for installing the TV. 1 Disconnect all the cables from the TV. 2 Align the holes on the left Mounting Hook with SU-WL100). Step 5: Preparing the TV for wall mount installation Follow the steps below to the TV using two screws (supplied with the corresponding holes on the rear of the TV.

Operating Instructions
Page 50
... the right Mounting Hook with SU-WL100). For details on the cable connection, see "Connecting Other Equipment" on page 13. 2 Install the TV onto the Base Plate. • When using two screws (supplied with the corresponding holes on the rear of the TV. Screw (+PSW 4 × 12) Mounting Hook Step 6: Installing.... 50 Do not lift the Mounting Hook before the screws (two screws each for SU-WL100. 1 Connect the cables to the corresponding inputs on the Base Plate Refer to tighten the screws, the torque must be approximately 1.5 N·m (15 kgf·cm).
... the right Mounting Hook with SU-WL100). For details on the cable connection, see "Connecting Other Equipment" on page 13. 2 Install the TV onto the Base Plate. • When using two screws (supplied with the corresponding holes on the rear of the TV. Screw (+PSW 4 × 12) Mounting Hook Step 6: Installing.... 50 Do not lift the Mounting Hook before the screws (two screws each for SU-WL100. 1 Connect the cables to the corresponding inputs on the Base Plate Refer to tighten the screws, the torque must be approximately 1.5 N·m (15 kgf·cm).


