
Operating Instructions
Page 5
...apparatus, the apparatus has been exposed to rain or moisture, does not operate normally, or has been dropped. ❑ Be sure to observe the TV's "For Safety" section on or pinched particularly at plugs, convenience receptacles, and the point where they exit from the apparatus. 13) Unplug this...the apparatus. Servicing is required when the apparatus has been damaged in accordance with dry cloth. 7) Do not block any heat sources such as power-supply cord or plug is used, use caution when moving the cart/ apparatus combination to avoid injury from tip-over. 6) Clean only with the ...
...apparatus, the apparatus has been exposed to rain or moisture, does not operate normally, or has been dropped. ❑ Be sure to observe the TV's "For Safety" section on or pinched particularly at plugs, convenience receptacles, and the point where they exit from the apparatus. 13) Unplug this...the apparatus. Servicing is required when the apparatus has been damaged in accordance with dry cloth. 7) Do not block any heat sources such as power-supply cord or plug is used, use caution when moving the cart/ apparatus combination to avoid injury from tip-over. 6) Clean only with the ...
Operating Instructions
Page 13
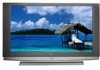
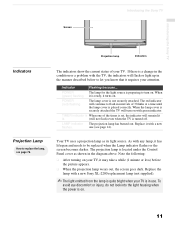
Introducing the Sony TV Introducing the Sony TV Screen Projection lamp POWER LAMP TIMER POWER Indicators Indicators Projection Lamp How to turn on with a new Sony XL-2200 replacement lamp (not supplied). ✍ The light emitted from the lamp is quite bright when your TV is in use. POWER The lamp for the light source is placed correctly. POWER (red) flashing The...
Introducing the Sony TV Introducing the Sony TV Screen Projection lamp POWER LAMP TIMER POWER Indicators Indicators Projection Lamp How to turn on with a new Sony XL-2200 replacement lamp (not supplied). ✍ The light emitted from the lamp is quite bright when your TV is in use. POWER The lamp for the light source is placed correctly. POWER (red) flashing The...
Operating Instructions
Page 25
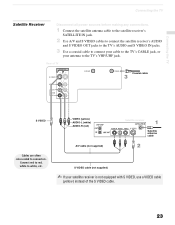
VIDEO (yellow) AUDIO-L (white) AUDIO-R (red) A/V cable (not supplied) Satellite receiver Satellite antenna cable S VIDEO cable (not supplied) ✍ If your antenna to white, etc. Connect red to red, white to the TV's VHF/UHF jack. Connecting the TV Connecting the TV Satellite Receiver Disconnect all power sources before making any connections. 1 Connect the satellite antenna cable...
VIDEO (yellow) AUDIO-L (white) AUDIO-R (red) A/V cable (not supplied) Satellite receiver Satellite antenna cable S VIDEO cable (not supplied) ✍ If your antenna to white, etc. Connect red to red, white to the TV's VHF/UHF jack. Connecting the TV Connecting the TV Satellite Receiver Disconnect all power sources before making any connections. 1 Connect the satellite antenna cable...

Operating Instructions
Page 26
... 480p/480i) 4 5 Y PB PR L AUDIO R AUDIO OUT (VAR/FIX) L AUDIO R Audio cable (not supplied) Cables are often color-coded to connectors. This TV displays all power sources before making any connections. 1 Connect the RF coaxial cable from the CATV or Satellite dish to provide sound. 24 Digital... cable box or satellite RF coaxial cable Y PB PR Component video cable (not supplied) AUDIO-L (white) AUDIO-R...
... 480p/480i) 4 5 Y PB PR L AUDIO R AUDIO OUT (VAR/FIX) L AUDIO R Audio cable (not supplied) Cables are often color-coded to connectors. This TV displays all power sources before making any connections. 1 Connect the RF coaxial cable from the CATV or Satellite dish to provide sound. 24 Digital... cable box or satellite RF coaxial cable Y PB PR Component video cable (not supplied) AUDIO-L (white) AUDIO-R...
Operating Instructions
Page 29
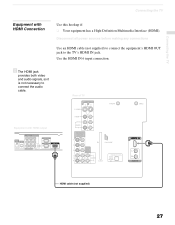
... z The HDMI jack provides both video and audio signals, so it is not necessary to the TV's HDMI IN jack. Disconnect all power sources before making any connections Use an HDMI cable (not supplied) to connect the equipment's HDMI OUT jack to connect the audio cable. Equipment with HDMI Connection Use this hookup...
... z The HDMI jack provides both video and audio signals, so it is not necessary to the TV's HDMI IN jack. Disconnect all power sources before making any connections Use an HDMI cable (not supplied) to connect the equipment's HDMI OUT jack to connect the audio cable. Equipment with HDMI Connection Use this hookup...
Operating Instructions
Page 34
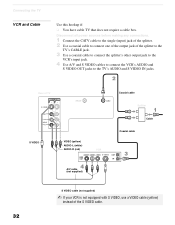
Disconnect all power sources before making any connections. 1 Connect the CATV cable to the single (input) jack of the splitter. 2 Use a coaxial cable to the TV's AUDIO and S VIDEO IN jacks. Rear of TV VIDEO IN 1 3 S VIDEO VIDEO L (MONO) AUDIO R VHF/UHF S VIDEO VIDEO (yellow) AUDIO-L (... (red) Coaxial cable CABLE Splitter Coaxial cable Cable VCR A/V cable (not supplied) S VIDEO cable (not supplied) ✍ If your VCR is not equipped with S VIDEO, use a VIDEO cable (yellow) instead of the splitter to the TV's CABLE jack. 3 Use a coaxial cable to connect the splitter's other ...
Disconnect all power sources before making any connections. 1 Connect the CATV cable to the single (input) jack of the splitter. 2 Use a coaxial cable to the TV's AUDIO and S VIDEO IN jacks. Rear of TV VIDEO IN 1 3 S VIDEO VIDEO L (MONO) AUDIO R VHF/UHF S VIDEO VIDEO (yellow) AUDIO-L (... (red) Coaxial cable CABLE Splitter Coaxial cable Cable VCR A/V cable (not supplied) S VIDEO cable (not supplied) ✍ If your VCR is not equipped with S VIDEO, use a VIDEO cable (yellow) instead of the splitter to the TV's CABLE jack. 3 Use a coaxial cable to connect the splitter's other ...
Operating Instructions
Page 37
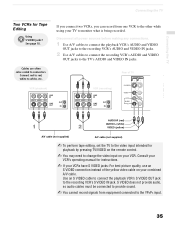
...cannot record signals from one VCR to the other while using your combined A/V cable. Rear of the yellow video cable on your TV to the YPBPR input. 35 Use an S VIDEO cable to connect the playback VCR's S VIDEO OUT jack to change the video... L (MONO) AUDIO R AUDIO-R (red) AUDIO-L (white) VIDEO (yellow) A/V cable (not supplied) A/V cable (not supplied) ✍ To perform tape editing, set the TV to the video input intended for Tape Editing Using S VIDEO jacks? Disconnect all power sources before making any connections. 1 Use A/V cables to connect the playback VCR's AUDIO and...
...cannot record signals from one VCR to the other while using your combined A/V cable. Rear of the yellow video cable on your TV to the YPBPR input. 35 Use an S VIDEO cable to connect the playback VCR's S VIDEO OUT jack to change the video... L (MONO) AUDIO R AUDIO-R (red) AUDIO-L (white) VIDEO (yellow) A/V cable (not supplied) A/V cable (not supplied) ✍ To perform tape editing, set the TV to the video input intended for Tape Editing Using S VIDEO jacks? Disconnect all power sources before making any connections. 1 Use A/V cables to connect the playback VCR's AUDIO and...
Operating Instructions
Page 38
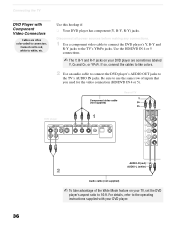
... ratio to 16:9. Disconnect all power sources before making any connections. 1 Use a component video cable to connect the DVD player's Y, B-Y and R-Y jacks to white, etc. Connect red to red, white to the TV's YPBPR jacks. For details, refer to the operating instructions supplied with Component Video Connectors Cables are...'s AUDIO OUT jacks to use the same row of the Wide Mode feature on your DVD player. DVD player Component video cable (not supplied) Rear of TV Y PB PR HD/DVD IN (1080i/720p/ 480p/480i) 4 5 Y PB PR L AUDIO R 36 AUDIO-R (red) AUDIO-L (white) ...
... ratio to 16:9. Disconnect all power sources before making any connections. 1 Use a component video cable to connect the DVD player's Y, B-Y and R-Y jacks to white, etc. Connect red to red, white to the TV's YPBPR jacks. For details, refer to the operating instructions supplied with Component Video Connectors Cables are...'s AUDIO OUT jacks to use the same row of the Wide Mode feature on your DVD player. DVD player Component video cable (not supplied) Rear of TV Y PB PR HD/DVD IN (1080i/720p/ 480p/480i) 4 5 Y PB PR L AUDIO R 36 AUDIO-R (red) AUDIO-L (white) ...
Operating Instructions
Page 39
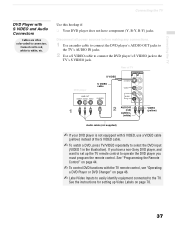
...does not have a non-Sony DVD player, and want to set up Video Labels on page 46. ✍ Label Video Inputs to easily identify equipment connected to the TV. See "Programming the ... Changer" on page 70. 37 Disconnect all power sources before making any connections. 1 Use an audio cable to connect the DVD player's AUDIO OUT jacks to the TV's AUDIO IN jacks. 2 Use a S VIDEO...white to the TV's S VIDEO jack. DVD player S VIDEO S VIDEO cable Rear of TV VIDEO IN 1 3 S VIDEO VIDEO L (MONO) AUDIO R AUDIO-R (red) AUDIO-L (white) VIDEO (yellow) Audio cable (not supplied) ✍ If...
...does not have a non-Sony DVD player, and want to set up Video Labels on page 46. ✍ Label Video Inputs to easily identify equipment connected to the TV. See "Programming the ... Changer" on page 70. 37 Disconnect all power sources before making any connections. 1 Use an audio cable to connect the DVD player's AUDIO OUT jacks to the TV's AUDIO IN jacks. 2 Use a S VIDEO...white to the TV's S VIDEO jack. DVD player S VIDEO S VIDEO cable Rear of TV VIDEO IN 1 3 S VIDEO VIDEO L (MONO) AUDIO R AUDIO-R (red) AUDIO-L (white) VIDEO (yellow) Audio cable (not supplied) ✍ If...

Operating Instructions
Page 40
...power sources before making any connections. For easy connection to the TV's AUDIO and S VIDEO IN jacks. ✍ If your camcorder is not equipped with S VIDEO, use a VIDEO cable (yellow) instead of TV Camcorder PlayStation VIDEO 2 INPUT S VIDEO VIDEO L (MONO) R AUDIO AUDIO-R (red) AUDIO-L (white) To A/V output A/V cable (not supplied...) VIDEO (yellow) S VIDEO S VIDEO cable (not supplied) To S VIDEO output 38...
...power sources before making any connections. For easy connection to the TV's AUDIO and S VIDEO IN jacks. ✍ If your camcorder is not equipped with S VIDEO, use a VIDEO cable (yellow) instead of TV Camcorder PlayStation VIDEO 2 INPUT S VIDEO VIDEO L (MONO) R AUDIO AUDIO-R (red) AUDIO-L (white) To A/V output A/V cable (not supplied...) VIDEO (yellow) S VIDEO S VIDEO cable (not supplied) To S VIDEO output 38...
Operating Instructions
Page 41
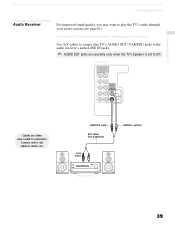
Disconnect all power sources before making any connections. Connect red to red, white to play the TV's audio through your stereo system (see page 61). AUDIO-R (red) A/V cable (not supplied) Line input AUDIO-L (white) Audio receiver 39 Use A/V cables to connect the TV's AUDIO OUT (VAR/FIX) jacks to the... audio receiver's audio LINE IN jacks. ✍ AUDIO OUT jacks are often color-coded to Off. Rear of TV HD/DVD IN (1080i/720p/...
Disconnect all power sources before making any connections. Connect red to red, white to play the TV's audio through your stereo system (see page 61). AUDIO-R (red) A/V cable (not supplied) Line input AUDIO-L (white) Audio receiver 39 Use A/V cables to connect the TV's AUDIO OUT (VAR/FIX) jacks to the... audio receiver's audio LINE IN jacks. ✍ AUDIO OUT jacks are often color-coded to Off. Rear of TV HD/DVD IN (1080i/720p/...

Operating Instructions
Page 78
...lamp receptacle. How to operate for about two minutes after turning the power off the power on the front of the used lamps follow the instructions below. ❑ Use a Sony XL-2200 replacement lamp (not supplied) for any other than replacement. Do not touch the lamp receptable ...once the lamp has been removed. ❑ When the lamp eventually burns out, you may cause fire or electrical shock. Do not touch the glass portion of the TV after unplugging the power...
...lamp receptacle. How to operate for about two minutes after turning the power off the power on the front of the used lamps follow the instructions below. ❑ Use a Sony XL-2200 replacement lamp (not supplied) for any other than replacement. Do not touch the lamp receptable ...once the lamp has been removed. ❑ When the lamp eventually burns out, you may cause fire or electrical shock. Do not touch the glass portion of the TV after unplugging the power...

Operating Instructions
Page 87
... cable ❑ Component video cable ❑ S VIDEO cable ❑ A/V cable ❑ Audio cable ❑ Optical cable ❑ TV Stand: SU-GW12 ❑ Lamp: XL-2200 Other Information 85 Other Information Power Consumption In Use 265 W In Standby Less than 15 W Dimensions (W × H × D) KDF-E55A20: (57 3/8 ×... 1/2 inches) (1,574 × 1,005 × 518 mm) Mass KDF-E55A20: 92.5 lb (42 kg) KDF-E60A20: 101.5 lb (46.1 kg) Supplied Accessories Remote Control RM-YD002 AA (R6) Batteries 2 supplied for remote control Design and specifications are approximate.
... cable ❑ Component video cable ❑ S VIDEO cable ❑ A/V cable ❑ Audio cable ❑ Optical cable ❑ TV Stand: SU-GW12 ❑ Lamp: XL-2200 Other Information 85 Other Information Power Consumption In Use 265 W In Standby Less than 15 W Dimensions (W × H × D) KDF-E55A20: (57 3/8 ×... 1/2 inches) (1,574 × 1,005 × 518 mm) Mass KDF-E55A20: 92.5 lb (42 kg) KDF-E60A20: 101.5 lb (46.1 kg) Supplied Accessories Remote Control RM-YD002 AA (R6) Batteries 2 supplied for remote control Design and specifications are approximate.


