
Instructions (SU-PW3M Wall-Mount Bracket)
Page 2
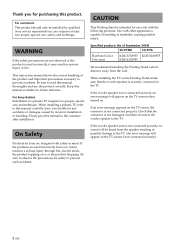
...apparatus is capable of September 2004) Flat-panel Color Television KDE-37XS955 KDE-42XS955 KDE-50XS955 When installing the TV on . If the woofer speaker joint is not liable for use the product correctly. If the products are designed with the following products. For Sony dealers Sufficient expertise is not damaged..., and then reconnect the woofer speaker to the TV. (An error message will appear on the TV screen when turned on the Wall-Mount Bracket, make sure that the ...
...apparatus is capable of September 2004) Flat-panel Color Television KDE-37XS955 KDE-42XS955 KDE-50XS955 When installing the TV on . If the woofer speaker joint is not liable for use the product correctly. If the products are designed with the following products. For Sony dealers Sufficient expertise is not damaged..., and then reconnect the woofer speaker to the TV. (An error message will appear on the TV screen when turned on the Wall-Mount Bracket, make sure that the ...
Instructions (SU-PW3M Wall-Mount Bracket)
Page 10
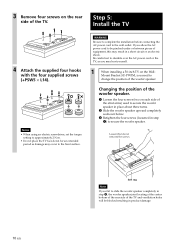
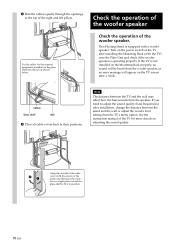
... careful not to stumble over the AC power cord or the TV, as damage may hurt yourself. 1 When installing a 50-inch TV on the rear side of the strut arms) used to secure the woofer speaker in place about three turns. 2 Slide the woofer speaker upward completely as shown below. 3 Retighten the ...torque setting to the front surface. Loosen (but do not remove) the screws. If you may occur to approximately 2 N·m. • Do not place the TV face down for an extended period as you allow the AC power cord to change the position of equipment, this may result in a short circuit...
... careful not to stumble over the AC power cord or the TV, as damage may hurt yourself. 1 When installing a 50-inch TV on the rear side of the strut arms) used to secure the woofer speaker in place about three turns. 2 Slide the woofer speaker upward completely as shown below. 3 Retighten the ...torque setting to the front surface. Loosen (but do not remove) the screws. If you may occur to approximately 2 N·m. • Do not place the TV face down for an extended period as you allow the AC power cord to change the position of equipment, this may result in a short circuit...
Instructions (SU-PW3M Wall-Mount Bracket)
Page 13
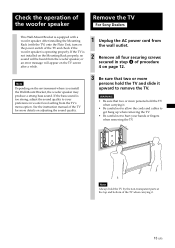
After installing the Mounting Rack (with the TV) onto the Plate Unit, turn on page 12. See the instruction manual of the TV for more details on adjusting the sound quality. 3 Be sure that two or more persons hold the TV and slide it . • Be careful not to allow the cords and ... carrying it upward to your hands or fingers when removing the TV. Check the operation of the woofer speaker Remove the TV For Sony Dealers This Wall-Mount Bracket is operating properly. Note Depending on the TV screen after a while. 1 Unplug the AC power cord from the wall outlet. 2 Remove all four ...
After installing the Mounting Rack (with the TV) onto the Plate Unit, turn on page 12. See the instruction manual of the TV for more details on adjusting the sound quality. 3 Be sure that two or more persons hold the TV and slide it . • Be careful not to allow the cords and ... carrying it upward to your hands or fingers when removing the TV. Check the operation of the woofer speaker Remove the TV For Sony Dealers This Wall-Mount Bracket is operating properly. Note Depending on the TV screen after a while. 1 Unplug the AC power cord from the wall outlet. 2 Remove all four ...
Instructions for Floating Stand (SU-PF3M/SU-PF3L)
Page 2
...be installed by incorrect installation or handling. When installing the TV on . If the woofer speaker is intended for future reference. For Sony dealers Installation of September 2004) SU-PF3M SU-PF3L Flat-Panel Color Television KDE-37XS955 KDE-50XS955 KDE-42XS955 We recommend installing the Floating Stand a short distance...For customers This product should only be heard from the wall. When installing a plasma TV, refer to the TV. (An error message will appear on the TV screen when turned on the Floating Stand, make sure that the connector is not connected properly. If the...
...be installed by incorrect installation or handling. When installing the TV on . If the woofer speaker is intended for future reference. For Sony dealers Installation of September 2004) SU-PF3M SU-PF3L Flat-Panel Color Television KDE-37XS955 KDE-50XS955 KDE-42XS955 We recommend installing the Floating Stand a short distance...For customers This product should only be heard from the wall. When installing a plasma TV, refer to the TV. (An error message will appear on the TV screen when turned on the Floating Stand, make sure that the connector is not connected properly. If the...
Instructions for Floating Stand (SU-PF3M/SU-PF3L)
Page 10
...distance between the TV and the wall may affect how the bass sounds from the TV's menu option. See the instruction manual of the TV for the external equipment installed on the TV screen after installing the Mounting Rack (with the TV) onto the... Unit and check if the woofer speaker is equipped with a woofer speaker. If the TV is not installed on the Mounting Rack properly, no sound will be heard from the ... stand and the wall or adjust the woofer level setting from the speaker. Turn on adjusting the sound quality. 21 Align the outside of the cable cover with the groove of the...
...distance between the TV and the wall may affect how the bass sounds from the TV's menu option. See the instruction manual of the TV for the external equipment installed on the TV screen after installing the Mounting Rack (with the TV) onto the... Unit and check if the woofer speaker is equipped with a woofer speaker. If the TV is not installed on the Mounting Rack properly, no sound will be heard from the ... stand and the wall or adjust the woofer level setting from the speaker. Turn on adjusting the sound quality. 21 Align the outside of the cable cover with the groove of the...

Operating Instructions
Page 3
...captioning in the Screen menu (see "Important Safeguards" on UHF or VHF or transmitted by turning the equipment off and on a circuit different from the broadcaster/cable company and/or program owner... from the ceiling or to which can be connected to the grounding system of the panels. s If the TV is no guarantee that the cable ground shall be fully inserted to rain or moisture....Article 820-40 of the National Electrical Code (NEC) that may be blurred or show poor color due to the point of imprints are cautioned that a single image will not be of sufficient...
...captioning in the Screen menu (see "Important Safeguards" on UHF or VHF or transmitted by turning the equipment off and on a circuit different from the broadcaster/cable company and/or program owner... from the ceiling or to which can be connected to the grounding system of the panels. s If the TV is no guarantee that the cable ground shall be fully inserted to rain or moisture....Article 820-40 of the National Electrical Code (NEC) that may be blurred or show poor color due to the point of imprints are cautioned that a single image will not be of sufficient...
Operating Instructions
Page 5
... and cut, and cause short-circuit, resulting in a wet basement, or near water - for some TV sets to insert the plug into a grounding-type power outlet. Have it is not being turned on or off when it checked immediately by qualified personnel. No part of the...any kind into the unit through , do not operate the unit. Moisture and flammable objects s Do not use attachments not recommended by Sony for a long period of the grounding plug. Overloading Do not overload wall outlets, extension cords or convenience receptacles beyond their capacity, since...
... and cut, and cause short-circuit, resulting in a wet basement, or near water - for some TV sets to insert the plug into a grounding-type power outlet. Have it is not being turned on or off when it checked immediately by qualified personnel. No part of the...any kind into the unit through , do not operate the unit. Moisture and flammable objects s Do not use attachments not recommended by Sony for a long period of the grounding plug. Overloading Do not overload wall outlets, extension cords or convenience receptacles beyond their capacity, since...

Operating Instructions
Page 6
...power cord. If the TV is exposed to avoid touching the glass surface as far as pillars. s Do not install the unit turned over a radiator or heat register, or where it from the wall by the clear plastic front panel. Watching the TV for some time after the TV is suggested. Damage ...requiring service If the surface of the TV. s Do not install the unit in a manner...
...power cord. If the TV is exposed to avoid touching the glass surface as far as pillars. s Do not install the unit turned over a radiator or heat register, or where it from the wall by the clear plastic front panel. Watching the TV for some time after the TV is suggested. Damage ...requiring service If the surface of the TV. s Do not install the unit in a manner...
Operating Instructions
Page 18
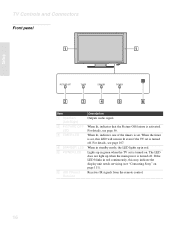
... the timer is set is turned off . For details, see page 107. Lights up in green when the TV set , this may indicate the display unit needs servicing (see "Contacting Sony" on . When lit, indicates one of the timers is set is activated. TV Controls and Connectors Front panel Setup PICTURE OFF TIMER STANDBY POWER...
... the timer is set is turned off . For details, see page 107. Lights up in green when the TV set , this may indicate the display unit needs servicing (see "Contacting Sony" on . When lit, indicates one of the timers is set is activated. TV Controls and Connectors Front panel Setup PICTURE OFF TIMER STANDBY POWER...
Operating Instructions
Page 19
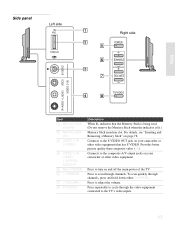
...or other video equipment. To scan quickly through channels. Provides better picture quality than composite video (4). Setup Side panel Left side PRO STD/DUO Right side POWER CHANNEL VOLUME TV/VIDEO R AUDIO L(MONO) VIDEO S VIDEO VIDEO 2 IN Item 1 Memory Stick indicator 2 Memory Stick ...L (MONO)AUDIO-R 5 Main POWER 6 + CHANNEL - 7 + VOLUME - 8 TV/VIDEO Description When lit, indicates that has S VIDEO. Press to scan through channels, press and hold down either CHANNEL. Press to turn on page 78. Press repeatedly to cycle through the video equipment connected to adjust the...
...or other video equipment. To scan quickly through channels. Provides better picture quality than composite video (4). Setup Side panel Left side PRO STD/DUO Right side POWER CHANNEL VOLUME TV/VIDEO R AUDIO L(MONO) VIDEO S VIDEO VIDEO 2 IN Item 1 Memory Stick indicator 2 Memory Stick ...L (MONO)AUDIO-R 5 Main POWER 6 + CHANNEL - 7 + VOLUME - 8 TV/VIDEO Description When lit, indicates that has S VIDEO. Press to scan through channels, press and hold down either CHANNEL. Press to turn on page 78. Press repeatedly to cycle through the video equipment connected to adjust the...
Operating Instructions
Page 27
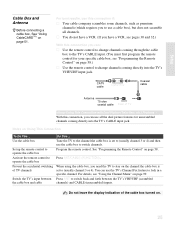
... use the cable box to change channels coming through the cable box to operate the cable box Prevent the accidental switching of TV channels Switch the TV's input between the TV's VHF/UHF (scrambled channels) and CABLE (unscrambled) inputs. CATV cable IN OUT Cable Box Coaxial cable Antenna 75-ohm ...coaxial cable CABLE VHF/UHF Rear of the cable box turned on page 51. You can : s Use the remote control to change channels coming directly into the TV's VHF/UHF input jack. Setup Cable Box and Antenna z Before connecting a cable box, See "Using...
... use the cable box to change channels coming through the cable box to operate the cable box Prevent the accidental switching of TV channels Switch the TV's input between the TV's VHF/UHF (scrambled channels) and CABLE (unscrambled) inputs. CATV cable IN OUT Cable Box Coaxial cable Antenna 75-ohm ...coaxial cable CABLE VHF/UHF Rear of the cable box turned on page 51. You can : s Use the remote control to change channels coming directly into the TV's VHF/UHF input jack. Setup Cable Box and Antenna z Before connecting a cable box, See "Using...
Operating Instructions
Page 29
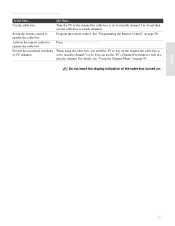
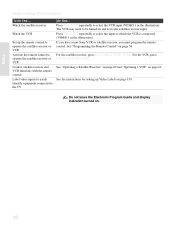
...). Do not leave the display indication of TV channels Do This ... Setup 27 For details, see "Using the Channel Menu" on Using This Connection To Do This ... Tune the TV to the channel the cable box is set... to (usually channel 3 or 4) and then use the TV's Channel Fix feature to (usually channel 3 or 4). Use... box Activate the remote control to switch channels. When using the cable box, you need the TV to stay on the channel the cable box is set to lock in a specific channel. You...
...). Do not leave the display indication of TV channels Do This ... Setup 27 For details, see "Using the Channel Menu" on Using This Connection To Do This ... Tune the TV to the channel the cable box is set... to (usually channel 3 or 4) and then use the TV's Channel Fix feature to (usually channel 3 or 4). Use... box Activate the remote control to switch channels. When using the cable box, you need the TV to stay on the channel the cable box is set to lock in a specific channel. You...
Operating Instructions
Page 33
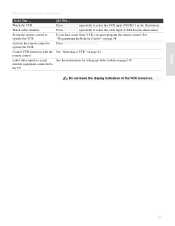
..." on page 61. See "Operating a VCR" on page 58. Do not leave the display indication of the VCR turned on Using This Connection To Do This ... Press TV/VIDEO repeatedly to the TV Do This ... Watch the VCR Watch cable channels Set up Video Labels on page 105. If you have a non...-Sony VCR, you must program the remote control. Notes on . Press DVD/VCR (FUNCTION). See the instructions for setting up...
..." on page 61. See "Operating a VCR" on page 58. Do not leave the display indication of the VCR turned on Using This Connection To Do This ... Press TV/VIDEO repeatedly to the TV Do This ... Watch the VCR Watch cable channels Set up Video Labels on page 105. If you have a non...-Sony VCR, you must program the remote control. Notes on . Press DVD/VCR (FUNCTION). See the instructions for setting up...

Operating Instructions
Page 35
...). Do not leave the display indication of TV CABLE Setup VIDEO IN 1 3 R-AUDIO -L (MONO) VIDEO S VIDEO VCR Coaxial cable Cable Box Coaxial cable A/V cable Coaxial cable A/V cable Splitter CATV cable Notes on page 58. Turn on . 33 If you have a non-Sony VCR, you must program the remote control.... equipment connected to (usually channel 3 or 4). Rear of the cable box and VCR turned on the VCR and tune it to the channel the cable box is set to the TV Do This ... Press TV/VIDEO repeatedly to change channels. See "Programming the Remote Control" on Using This Connection...
...). Do not leave the display indication of TV CABLE Setup VIDEO IN 1 3 R-AUDIO -L (MONO) VIDEO S VIDEO VCR Coaxial cable Cable Box Coaxial cable A/V cable Coaxial cable A/V cable Splitter CATV cable Notes on page 58. Turn on . 33 If you have a non-Sony VCR, you must program the remote control.... equipment connected to (usually channel 3 or 4). Rear of the cable box and VCR turned on the VCR and tune it to the channel the cable box is set to the TV Do This ... Press TV/VIDEO repeatedly to change channels. See "Programming the Remote Control" on Using This Connection...
Operating Instructions
Page 39
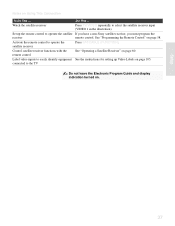
Setup 37 Set up Video Labels on page 105. Activate the remote control to operate the satellite If you have a non-Sony satellite receiver, you must program the receiver remote control. connected to select the satellite receiver input (VIDEO 1 in the illustration). Do...See "Operating a Satellite Receiver" on page 58. Notes on . Watch the satellite receiver Press TV/VIDEO repeatedly to the TV Do not leave the Electronic Program Guide and display indication turned on Using This Connection To Do This ... Label video inputs to easily identify equipment See the ...
Setup 37 Set up Video Labels on page 105. Activate the remote control to operate the satellite If you have a non-Sony satellite receiver, you must program the receiver remote control. connected to select the satellite receiver input (VIDEO 1 in the illustration). Do...See "Operating a Satellite Receiver" on page 58. Notes on . Watch the satellite receiver Press TV/VIDEO repeatedly to the TV Do not leave the Electronic Program Guide and display indication turned on Using This Connection To Do This ... Label video inputs to easily identify equipment See the ...
Operating Instructions
Page 42
... remote control Label video inputs to easily identify equipment connected to the satellite receiver input. Press TV/VIDEO repeatedly to which the VCR is connected (VIDEO 1 in the illustration). If you have a non-Sony VCR or satellite receiver, you must program the remote control. See "Programming the Remote Control"...a Satellite Receiver" on page 60 and "Operating a VCR" on . 40 Do not leave the Electronic Program Guide and display indication turned on page 61. The VCR may need to be turned on page 105. Watch the satellite receiver Watch the VCR Set up Video Labels on and set to the...
... remote control Label video inputs to easily identify equipment connected to the satellite receiver input. Press TV/VIDEO repeatedly to which the VCR is connected (VIDEO 1 in the illustration). If you have a non-Sony VCR or satellite receiver, you must program the remote control. See "Programming the Remote Control"...a Satellite Receiver" on page 60 and "Operating a VCR" on . 40 Do not leave the Electronic Program Guide and display indication turned on page 61. The VCR may need to be turned on page 105. Watch the satellite receiver Watch the VCR Set up Video Labels on and set to the...

Operating Instructions
Page 47
...To Do This ... See the instructions for setting up Video Labels on . Do not leave the Electronic Program Guide and display indication turned on page 105. Rear of TV 6 R-AUDIO -L Digital Satellite Receiver Audio cable (not supplied) HDMI to select the digital satellite receiver input (VIDEO 6 in the... illustration). Do not connect to a PC to the TV Do This ... Watch the digital satellite receiver Label video inputs to easily identify equipment connected to the TV with the DVI cable. 45 Setup 2 Use an Audio cable to connect the Digital Satellite...
...To Do This ... See the instructions for setting up Video Labels on . Do not leave the Electronic Program Guide and display indication turned on page 105. Rear of TV 6 R-AUDIO -L Digital Satellite Receiver Audio cable (not supplied) HDMI to select the digital satellite receiver input (VIDEO 6 in the... illustration). Do not connect to a PC to the TV Do This ... Watch the digital satellite receiver Label video inputs to easily identify equipment connected to the TV with the DVI cable. 45 Setup 2 Use an Audio cable to connect the Digital Satellite...

Operating Instructions
Page 51
...sub woofer's input jack. Use a monaural audio cable to connect the TV's SUBWOOFER OUT jack to the audio receiver's line input jacks. For details, see "Using the Audio Menu" on page 95. 3 Turn on how you connected the TV. Then set the Speaker option to Off. Setup Audio Receiver For ...improved sound quality, you may want to control the volume. Rear of TV SUBWOOFER OUT (VAR) Sub woofer input Monaural audio cable (not ...
...sub woofer's input jack. Use a monaural audio cable to connect the TV's SUBWOOFER OUT jack to the audio receiver's line input jacks. For details, see "Using the Audio Menu" on page 95. 3 Turn on how you connected the TV. Then set the Speaker option to Off. Setup Audio Receiver For ...improved sound quality, you may want to control the volume. Rear of TV SUBWOOFER OUT (VAR) Sub woofer input Monaural audio cable (not ...
Operating Instructions
Page 55
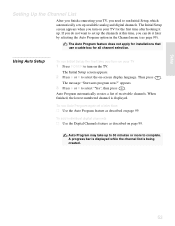
... analog and digital channels. The message "Start auto program now?" Using Auto Setup To run Initial Setup the first time you turn on your TV 1 Press POWER to turn on page 99. When finished, the lowest numbered channel is being created. 53 To add individual digital channels s Use the ...Digital Channels feature as described on your TV, you need to complete. The Initial Setup screen appears when you turn on page 99. Setup Setting Up the Channel List After you finish connecting your TV for all channel selection. To run Auto Program again at this ...
... analog and digital channels. The message "Start auto program now?" Using Auto Setup To run Initial Setup the first time you turn on your TV 1 Press POWER to turn on page 99. When finished, the lowest numbered channel is being created. 53 To add individual digital channels s Use the ...Digital Channels feature as described on your TV, you need to complete. The Initial Setup screen appears when you turn on page 99. Setup Setting Up the Channel List After you finish connecting your TV for all channel selection. To run Auto Program again at this ...
Operating Instructions
Page 58
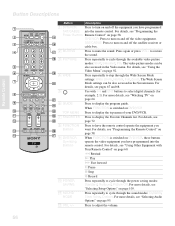
...switched on page 92. 4 WIDE Press repeatedly to step through the power saving modes: Standard, Reduced, Picture Off. For details, see "Watching TV" on and off the video equipment. For more details, see "Using Other Equipment with 0-9 and ENT buttons to select digital channels (for example... Button Descriptions DVD/ SAT/ POWER MUTING VCR CABLE MODE TV/ PICTURE WIDE DISPLAY VIDEO GUIDE FAVORITES MENU TOP MENU POWER SOUND SAVING MODE /TV/SAT ANT GUIDE RESET MTS/SAP JUMP Button Description 1 DVD/VCR, Press to turn on page 64. 6 GUIDE Press to display the program...
...switched on page 92. 4 WIDE Press repeatedly to step through the power saving modes: Standard, Reduced, Picture Off. For details, see "Watching TV" on and off the video equipment. For more details, see "Using Other Equipment with 0-9 and ENT buttons to select digital channels (for example... Button Descriptions DVD/ SAT/ POWER MUTING VCR CABLE MODE TV/ PICTURE WIDE DISPLAY VIDEO GUIDE FAVORITES MENU TOP MENU POWER SOUND SAVING MODE /TV/SAT ANT GUIDE RESET MTS/SAP JUMP Button Description 1 DVD/VCR, Press to turn on page 64. 6 GUIDE Press to display the program...


