Handbook
Page 13
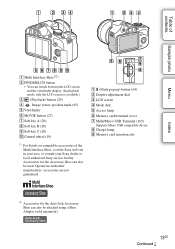
... A (20) H Soft key B (20) I Memory card insertion slot 2) Accessories for the Accessory Shoe can also be used. A (Flash pop-up) button (64) B Diopter-adjustment dial C LCD screen D Mode dial E Access lamp F Memory card/terminal cover G Multi/Micro USB Terminal (165) Supports Micro USB compatible device. Accessories for the Auto-lock Accessory... be attached using a Shoe Adaptor (sold separately). 13GB Continued r Operations with other manufactures' accessories are not guaranteed. Table of the Multi Interface Shoe, visit the Sony web site in your area, or consult your...
... A (20) H Soft key B (20) I Memory card insertion slot 2) Accessories for the Accessory Shoe can also be used. A (Flash pop-up) button (64) B Diopter-adjustment dial C LCD screen D Mode dial E Access lamp F Memory card/terminal cover G Multi/Micro USB Terminal (165) Supports Micro USB compatible device. Accessories for the Auto-lock Accessory... be attached using a Shoe Adaptor (sold separately). 13GB Continued r Operations with other manufactures' accessories are not guaranteed. Table of the Multi Interface Shoe, visit the Sony web site in your area, or consult your...

Handbook
Page 23
... Mode Flash Comp. Allows you to select the kind of the entire image. Image Size Allows you to be displayed on the LCD screen. Selects AVCHD or MP4. DRO/Auto HDR Picture Effect Creative Style Compensates for measuring the brightness. Selects the image size of... atmosphere. Table of flash light. Exposure Comp. Adjusts the amount of contents Sample photo Menu Auto Object Framing Soft Skin Effect Shooting Tip List LCD Display (DISP) Finder Display(DISP) DISP Button(Monitor) When shooting faces, close-up (macro) subjects, or subjects tracked by [Tracking Focus],...
... Mode Flash Comp. Allows you to select the kind of the entire image. Image Size Allows you to be displayed on the LCD screen. Selects AVCHD or MP4. DRO/Auto HDR Picture Effect Creative Style Compensates for measuring the brightness. Selects the image size of... atmosphere. Table of flash light. Exposure Comp. Adjusts the amount of contents Sample photo Menu Auto Object Framing Soft Skin Effect Shooting Tip List LCD Display (DISP) Finder Display(DISP) DISP Button(Monitor) When shooting faces, close-up (macro) subjects, or subjects tracked by [Tracking Focus],...

Handbook
Page 25
...ISO NR Lens Comp.: Shading Lens Comp.: Chro. Selects a method to release the shutter when there is no lens. Table of the LCD screen. Main Settings Menu start MOVIE Button Custom Key Settings Beep Language Date/Time Setup Area Setting Help Guide Display Power Save Power Saving ...Start Time LCD Brightness Viewfinder Bright. Compensates for each computer or USB device connected to preferentially-track a certain face or not when the camera detects ...
...ISO NR Lens Comp.: Shading Lens Comp.: Chro. Selects a method to release the shutter when there is no lens. Table of the LCD screen. Main Settings Menu start MOVIE Button Custom Key Settings Beep Language Date/Time Setup Area Setting Help Guide Display Power Save Power Saving ...Start Time LCD Brightness Viewfinder Bright. Compensates for each computer or USB device connected to preferentially-track a certain face or not when the camera detects ...
Handbook
Page 27
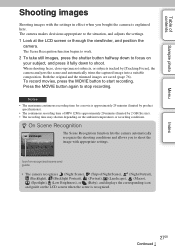
...halfway down to focus on your subject, and press it fully down to the situation, and adjusts the settings. 1 Look at the LCD screen or through the viewfinder, and position the camera. z On Scene Recognition The Scene Recognition function lets the camera automatically recognize the shooting...shooting faces, close-up (macro) subjects, or subjects tracked by 2 GB file size). • The recording time may shorten depending on the LCD screen when the scene is approximately 20 minutes (limited by [Tracking Focus], the camera analyzes the scene and automatically trims the captured image into a ...
...halfway down to focus on your subject, and press it fully down to the situation, and adjusts the settings. 1 Look at the LCD screen or through the viewfinder, and position the camera. z On Scene Recognition The Scene Recognition function lets the camera automatically recognize the shooting...shooting faces, close-up (macro) subjects, or subjects tracked by 2 GB file size). • The recording time may shorten depending on the LCD screen when the scene is approximately 20 minutes (limited by [Tracking Focus], the camera analyzes the scene and automatically trims the captured image into a ...

Handbook
Page 33
... and the background. Notes • The defocusing range available depends on the lens used. • The defocusing effect may not be noticeable, depending on the LCD screen. Menu Index 33GB
... and the background. Notes • The defocusing range available depends on the lens used. • The defocusing effect may not be noticeable, depending on the LCD screen. Menu Index 33GB

Handbook
Page 39
... (DISP)/Finder Display(DISP)]. Panorama recording/playback - [Slide Show] During shooting LCD Display (DISP) Graphic Display Shows basic shooting information. Display All Info. Shows only major items in a larger size. Does not show recording information. Shows recording ...
... (DISP)/Finder Display(DISP)]. Panorama recording/playback - [Slide Show] During shooting LCD Display (DISP) Graphic Display Shows basic shooting information. Display All Info. Shows only major items in a larger size. Does not show recording information. Shows recording ...

Handbook
Page 40
... the screen display modes to recording information. Index 40GB Continued r Histogram Displays the luminance distribution graphically, in addition to be available You can select which LCD screen display modes can be selected in shooting mode with [DISP Button(Monitor)] (page 79). Histogram Displays the luminance distribution graphically. No Disp. Finder Display...
... the screen display modes to recording information. Index 40GB Continued r Histogram Displays the luminance distribution graphically, in addition to be available You can select which LCD screen display modes can be selected in shooting mode with [DISP Button(Monitor)] (page 79). Histogram Displays the luminance distribution graphically. No Disp. Finder Display...

Handbook
Page 57
... the camera at the edge of the subject. 5 Press the shutter button fully down. 6 Pan the camera to the end, following the guidance on the LCD screen. Table of contents Sweep Panorama Allows you want to set the brightness and focus, and then press the shutter button halfway down. 4 Keep the...
... the camera at the edge of the subject. 5 Press the shutter button fully down. 6 Pan the camera to the end, following the guidance on the LCD screen. Table of contents Sweep Panorama Allows you want to set the brightness and focus, and then press the shutter button halfway down. 4 Keep the...

Handbook
Page 58
... indicator shows the displayed area of the control wheel while panoramic images are being displayed. Subjects with little contrast such as the indication on the LCD screen. [Sweep Panorama] is recommended that you can lock the focus and exposure. In such case, adjust the frame composition so that are too close...
... indicator shows the displayed area of the control wheel while panoramic images are being displayed. Subjects with little contrast such as the indication on the LCD screen. [Sweep Panorama] is recommended that you can lock the focus and exposure. In such case, adjust the frame composition so that are too close...

Handbook
Page 59
... [ISO 100] in [Flash Mode]. When you shoot an image using the camera's fastest shutter speed, the screen may display uneven exposure, depending on the LCD screen may differ from the actual image being shot. • When using an A-mount lens (sold separately), you can adjust the shutter speed and aperture...
... [ISO 100] in [Flash Mode]. When you shoot an image using the camera's fastest shutter speed, the screen may display uneven exposure, depending on the LCD screen may differ from the actual image being shot. • When using an A-mount lens (sold separately), you can adjust the shutter speed and aperture...

Handbook
Page 61
The aperture is recommended. • The brightness of the image on the LCD screen may display uneven exposure, depending on the shooting screen blinks. When you can shoot as if they are stopped. Although you want to (Shutter ...
The aperture is recommended. • The brightness of the image on the LCD screen may display uneven exposure, depending on the shooting screen blinks. When you can shoot as if they are stopped. Although you want to (Shutter ...

Handbook
Page 62
.... (Depth of field becomes shallower.) Larger F-value (narrowing down the flash. • If proper exposure cannot be obtained after setup, the shutter speed on the LCD screen may differ from the actual image being shot. • When using an A-mount lens (sold separately), you do not fire the flash, push down...
.... (Depth of field becomes shallower.) Larger F-value (narrowing down the flash. • If proper exposure cannot be obtained after setup, the shutter speed on the LCD screen may differ from the actual image being shot. • When using an A-mount lens (sold separately), you do not fire the flash, push down...

Handbook
Page 69
... between the subject and the background is invalid. • You cannot use [Tracking Focus] with the subject to the screen, the camera focuses on the LCD screen. The ambient light changes. • When [Tracking Focus] is activated, the custom setting of the screen. The subject is dark. - You can set whether...
... between the subject and the background is invalid. • You cannot use [Tracking Focus] with the subject to the screen, the camera focuses on the LCD screen. The ambient light changes. • When [Tracking Focus] is activated, the custom setting of the screen. The subject is dark. - You can set whether...

Handbook
Page 70
...), or [Digital Zoom] (page 115). 1 When using an image process. (The default setting is set with the [Zoom] feature of the camera depends on the LCD screen changes as follows, according to the selected zoom feature. Table of contents Sample photo Zoom With the [Zoom] feature of the camera, the camera...
...), or [Digital Zoom] (page 115). 1 When using an image process. (The default setting is set with the [Zoom] feature of the camera depends on the LCD screen changes as follows, according to the selected zoom feature. Table of contents Sample photo Zoom With the [Zoom] feature of the camera, the camera...

Handbook
Page 109
... allow you may seem too dark or too bright. The images are always displayed with effects of the subject, as the subject appears on the LCD screen. 1 MENU t [Setup] t [Live View Display] t desired setting. Table of contents Sample photo Live View Display Sets whether or not to concentrate on the composition...
... allow you may seem too dark or too bright. The images are always displayed with effects of the subject, as the subject appears on the LCD screen. 1 MENU t [Setup] t [Live View Display] t desired setting. Table of contents Sample photo Live View Display Sets whether or not to concentrate on the composition...

Handbook
Page 110
... image will not be displayed in the vertical position even if [Playback Display] is displayed, an unprocessed image may be displayed temporarily, depending on the LCD screen right after the shooting. Menu Index 110GB Table of contents Sample photo Auto Review You can change the displayed time. 1 MENU t [Setup] t [Auto Review...
... image will not be displayed in the vertical position even if [Playback Display] is displayed, an unprocessed image may be displayed temporarily, depending on the LCD screen right after the shooting. Menu Index 110GB Table of contents Sample photo Auto Review You can change the displayed time. 1 MENU t [Setup] t [Auto Review...

Handbook
Page 126
... the targeted person disappears from the screen while the camera is tracking him /her , and then returns to the screen, the camera tracks on the LCD screen, the camera tracks the body, but when the face is set to [Off] and cannot be reset. Table of contents Sample photo Face Priority...
... the targeted person disappears from the screen while the camera is tracking him /her , and then returns to the screen, the camera tracks on the LCD screen, the camera tracks the body, but when the face is set to [Off] and cannot be reset. Table of contents Sample photo Face Priority...

Handbook
Page 140
... setting. Follows the setting of [Power Saving Start Time]. If you do not operate the camera for a given period of time, the brightness of the LCD screen is not being operated to [10 Sec]. Table of contents Power Save You can shorten the waiting time until the camera is turned off...
... setting. Follows the setting of [Power Saving Start Time]. If you do not operate the camera for a given period of time, the brightness of the LCD screen is not being operated to [10 Sec]. Table of contents Power Save You can shorten the waiting time until the camera is turned off...

Handbook
Page 142
Sample photo Menu Index 142GB Sets the brightness appropriately for shooting outdoors. Table of contents LCD Brightness You can adjust the brightness of -2 to adjust the brightness within the range of the LCD screen. 1 MENU t [Setup] t [LCD Brightness] t desired setting. Manual Sunny Weather Allows you to +2.
Sample photo Menu Index 142GB Sets the brightness appropriately for shooting outdoors. Table of contents LCD Brightness You can adjust the brightness of -2 to adjust the brightness within the range of the LCD screen. 1 MENU t [Setup] t [LCD Brightness] t desired setting. Manual Sunny Weather Allows you to +2.

Handbook
Page 143
Auto Manual Adjusts the brightness automatically. Sample photo Menu Index 143GB Adjusts the brightness of contents Viewfinder Bright. Allows you to adjust the brightness within the range of -1 to the viewfinder. 2 MENU t [Setup] t [Viewfinder Bright.] 3 Look through the viewfinder and select the desired setting. You can select whether to adjust the brightness automatically or manually. 1 Press the FINDER/LCD button to switch the screen display to +1. Table of the Electronic Viewfinder.
Auto Manual Adjusts the brightness automatically. Sample photo Menu Index 143GB Adjusts the brightness of contents Viewfinder Bright. Allows you to adjust the brightness within the range of -1 to the viewfinder. 2 MENU t [Setup] t [Viewfinder Bright.] 3 Look through the viewfinder and select the desired setting. You can select whether to adjust the brightness automatically or manually. 1 Press the FINDER/LCD button to switch the screen display to +1. Table of the Electronic Viewfinder.