
Instruction Manual
Page 1
... med utskiftbart objektiv/Bruksanvisning NO Digitalkamera med udskifteligt objektiv/Betjeningsvejledning DK ILCA-68 © 2016 Sony Corporation Printed in Thailand 4-590-091-31(1) A-mount "Help Guide" (Web manual) Refer to "Help Guide" for in-depth instructions on the many functions of the camera. « Manuel d'aide » (Manuel en ligne) Consultez le « Manuel...
... med utskiftbart objektiv/Bruksanvisning NO Digitalkamera med udskifteligt objektiv/Betjeningsvejledning DK ILCA-68 © 2016 Sony Corporation Printed in Thailand 4-590-091-31(1) A-mount "Help Guide" (Web manual) Refer to "Help Guide" for in-depth instructions on the many functions of the camera. « Manuel d'aide » (Manuel en ligne) Consultez le « Manuel...

Instruction Manual
Page 2
"Help Guide" is an on the product) in -depth instructions on your Sony dealer regarding this product. GB 2 English A-mount Learning more about the camera ("Help Guide") Owner's Record Record the model and serial number (which are located on -line manual. ILCASerial No. Refer to it for the power ... adaptor of the proper configuration for in the space provided below. You can read the "Help Guide" on the many functions of the camera. URL: http://rd1.sony.net/help/ilc/1610/ h_zz/ WARNING To reduce fire or shock hazard, do not expose the unit to these numbers whenever you call...
"Help Guide" is an on the product) in -depth instructions on your Sony dealer regarding this product. GB 2 English A-mount Learning more about the camera ("Help Guide") Owner's Record Record the model and serial number (which are located on -line manual. ILCASerial No. Refer to it for the power ... adaptor of the proper configuration for in the space provided below. You can read the "Help Guide" on the many functions of the camera. URL: http://rd1.sony.net/help/ilc/1610/ h_zz/ WARNING To reduce fire or shock hazard, do not expose the unit to these numbers whenever you call...
Instruction Manual
Page 7
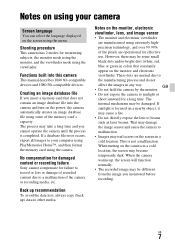
... color) that does not contain an image database file into this camera This manual describes 1080 60i-compatible devices and 1080 50i-compatible devices. No compensation for damaged content or recording failure Sony cannot compensate for effective use Notes on the monitor and electronic viewfinder.... However, there may be some of the camera or recording media, etc. GB • Do not hold the camera by the monitor. • Do not expose the camera to the manufacturing...
... color) that does not contain an image database file into this camera This manual describes 1080 60i-compatible devices and 1080 50i-compatible devices. No compensation for damaged content or recording failure Sony cannot compensate for effective use Notes on the monitor and electronic viewfinder.... However, there may be some of the camera or recording media, etc. GB • Do not hold the camera by the monitor. • Do not expose the camera to the manufacturing...

Instruction Manual
Page 8
...or nausea. A message will be displayed on the screen before continuing to a computer, download and use the software PlayMemories Home from using your camera Notes on recording for long periods of time • Depending on the individuals, so you may feel uncomfortable, refrain from the following website:... http://www.sony.net/pm/ Notes on the power without letting the camera and battery cool enough, the power may turn off or you may be slightly distorted near the corners of...
...or nausea. A message will be displayed on the screen before continuing to a computer, download and use the software PlayMemories Home from using your camera Notes on recording for long periods of time • Depending on the individuals, so you may feel uncomfortable, refrain from the following website:... http://www.sony.net/pm/ Notes on the power without letting the camera and battery cool enough, the power may turn off or you may be slightly distorted near the corners of...
Instruction Manual
Page 9
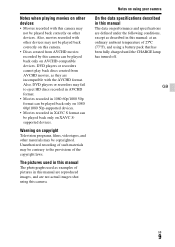
...created from AVCHD movies, as described in this manual: at an ordinary ambient temperature of the copyright laws. Notes on using your camera On the data specifications described in this manual The data on performance and specifications are not actual images shot using a battery pack that... of pictures in XAVC S format can be copyrighted. DVD players or recorders cannot play back discs created from AVCHD movies recorded by this camera. Notes when playing movies on other devices • Movies recorded with the AVCHD format. Also, movies recorded with other materials may be ...
...created from AVCHD movies, as described in this manual: at an ordinary ambient temperature of the copyright laws. Notes on using your camera On the data specifications described in this manual The data on performance and specifications are not actual images shot using a battery pack that... of pictures in XAVC S format can be copyrighted. DVD players or recorders cannot play back discs created from AVCHD movies recorded by this camera. Notes when playing movies on other devices • Movies recorded with the AVCHD format. Also, movies recorded with other materials may be ...
Instruction Manual
Page 10
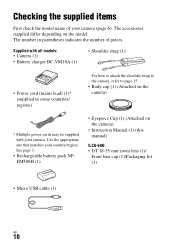
... your country/region. Use the appropriate one that matches your camera (page 6). See page 3. • Rechargeable battery pack NPFM500H (1) • Eyepiece Cup (1) (Attached on the camera) * Multiple power cords may be supplied with your camera. The number in some countries/ regions) For how to ...attach the shoulder strap to the camera, refer to page 15. • Body cap (1) (Attached on the camera) • Instruction Manual (1) (this manual) ILCA-68K: • DT 18-55 mm zoom lens (1)/ Front lens cap (1)/Packaging lid (1) •...
... your country/region. Use the appropriate one that matches your camera (page 6). See page 3. • Rechargeable battery pack NPFM500H (1) • Eyepiece Cup (1) (Attached on the camera) * Multiple power cords may be supplied with your camera. The number in some countries/ regions) For how to ...attach the shoulder strap to the camera, refer to page 15. • Body cap (1) (Attached on the camera) • Instruction Manual (1) (this manual) ILCA-68K: • DT 18-55 mm zoom lens (1)/ Front lens cap (1)/Packaging lid (1) •...

Instruction Manual
Page 11
... button (30, 35) L Mode dial (35) M (Flash pop-up ) button to use the flash. • When not using the flash, press it back into the camera body.
... button (30, 35) L Mode dial (35) M (Flash pop-up ) button to use the flash. • When not using the flash, press it back into the camera body.

Instruction Manual
Page 15
C Speaker GB D DC IN terminal • When connecting the ACPW10AM AC Adaptor (sold separately) to the DC IN terminal on the camera. E HDMI micro jack F Multi/Micro USB Terminal* • Supports Micro USB compatible device. Sides/Bottom Identifying parts A Hooks for shoulder strap &#...8226; Attach both ends of the AC Adaptor to the camera, turn the camera off automatically. B Microphone jack • When an external microphone is connected, the internal microphone is supplied by the...
C Speaker GB D DC IN terminal • When connecting the ACPW10AM AC Adaptor (sold separately) to the DC IN terminal on the camera. E HDMI micro jack F Multi/Micro USB Terminal* • Supports Micro USB compatible device. Sides/Bottom Identifying parts A Hooks for shoulder strap &#...8226; Attach both ends of the AC Adaptor to the camera, turn the camera off automatically. B Microphone jack • When an external microphone is connected, the internal microphone is supplied by the...
Instruction Manual
Page 16
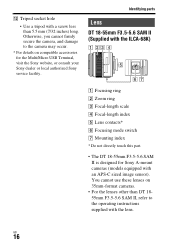
You cannot use these lenses on compatible accessories for Sony A-mount cameras (models equipped with the ILCA-68K) A Focusing ring B Zoom ring C Focal-length scale D Focal-length index E Lens contacts* F Focusing mode switch G Mounting index * Do not directly touch this part. • ...
You cannot use these lenses on compatible accessories for Sony A-mount cameras (models equipped with the ILCA-68K) A Focusing ring B Zoom ring C Focal-length scale D Focal-length index E Lens contacts* F Focusing mode switch G Mounting index * Do not directly touch this part. • ...
Instruction Manual
Page 17
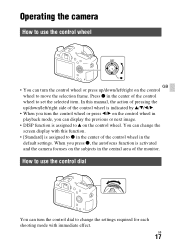
When you press z, the autofocus function is activated and the camera focuses on the subjects in the central area of the control wheel is indicated by v/V/b/B. • When you turn the control wheel or press b/B on ... the center of the control wheel in the center of the control wheel to change the screen display with immediate effect. Functions list Operating the camera How to use the control dial You can turn the control dial to set the selected item. You can change the settings required for each...
When you press z, the autofocus function is activated and the camera focuses on the subjects in the central area of the control wheel is indicated by v/V/b/B. • When you turn the control wheel or press b/B on ... the center of the control wheel in the center of the control wheel to change the screen display with immediate effect. Functions list Operating the camera How to use the control dial You can turn the control dial to set the selected item. You can change the settings required for each...

Instruction Manual
Page 19
MENU t (Setup) t [Tile Menu] t [On] GB 19 Functions that can be selected using the MENU button You can set up the basic settings for the camera as a whole, or execute functions such as shooting, playback, or other operations. 1 Press MENU button to display the menu screen. 2 Select the desired setting item ...
MENU t (Setup) t [Tile Menu] t [On] GB 19 Functions that can be selected using the MENU button You can set up the basic settings for the camera as a whole, or execute functions such as shooting, playback, or other operations. 1 Press MENU button to display the menu screen. 2 Select the desired setting item ...

Instruction Manual
Page 20
MENU button t (Custom Settings) t [Custom Key Settings] t Select the desired button assigned to which [In-Camera Guide] is assigned. GB 20 t [InCamera Guide] Press the MENU button and use [Custom Key Settings] to assign In-Camera Guide to the desired button. Using the In-Camera Guide You can use the control wheel to select a MENU item whose explanation you want to read, and then press the button to the function. The In-Camera Guide displays explanations for the currently selected menu function or setting.
MENU button t (Custom Settings) t [Custom Key Settings] t Select the desired button assigned to which [In-Camera Guide] is assigned. GB 20 t [InCamera Guide] Press the MENU button and use [Custom Key Settings] to assign In-Camera Guide to the desired button. Using the In-Camera Guide You can use the control wheel to select a MENU item whose explanation you want to read, and then press the button to the function. The In-Camera Guide displays explanations for the currently selected menu function or setting.

Instruction Manual
Page 21
... battery pack until it . The InfoLITHIUM battery pack can also be charged even when it has not been fully charged. Preparing the camera Charging the battery pack When using the camera for the first time, be sure to shoot, charge the battery pack again before shooting. 1 Insert the battery pack into the...
... battery pack until it . The InfoLITHIUM battery pack can also be charged even when it has not been fully charged. Preparing the camera Charging the battery pack When using the camera for the first time, be sure to shoot, charge the battery pack again before shooting. 1 Insert the battery pack into the...

Instruction Manual
Page 24
... remove the memory card Check that has functions for exchanging information related to drop the battery pack. Be careful not to operating conditions with your camera. Inserting the battery pack/memory card (sold separately) 5 Insert a memory card. • With the notched corner facing as illustrated, insert the memory card until it...
... remove the memory card Check that has functions for exchanging information related to drop the battery pack. Be careful not to operating conditions with your camera. Inserting the battery pack/memory card (sold separately) 5 Insert a memory card. • With the notched corner facing as illustrated, insert the memory card until it...

Instruction Manual
Page 25
... Battery level High "Battery exhausted." Capacity of movies, refer to pages 41 to operate correctly. For memory cards produced by manufacturers other than Sony, consult the manufacturers of 4 GB. The divided files can be divided into a single file using Memory Stick Micro media or microSD memory ...cards with this camera, make sure to record XAVC S movies over extended periods of the following conditions: - Notes • When an SDHC memory card is ...
... Battery level High "Battery exhausted." Capacity of movies, refer to pages 41 to operate correctly. For memory cards produced by manufacturers other than Sony, consult the manufacturers of 4 GB. The divided files can be divided into a single file using Memory Stick Micro media or microSD memory ...cards with this camera, make sure to record XAVC S movies over extended periods of the following conditions: - Notes • When an SDHC memory card is ...

Instruction Manual
Page 26
...lens. • When changing the lens, change the lens quickly somewhere away from dusty locations to put the lens on the lens and camera. • Hold the camera with the lens facing down to prevent dust from entering into the locked position. • Be sure to keep dust or debris from ... the front lens cap from the front of the lens. Orange index marks 3 While pushing the lens lightly toward the camera, turn the lens clockwise until it clicks into the camera. Front lens cap Body cap Packaging lid 2 Mount the lens by aligning the orange index marks (mounting indexes) on straight...
...lens. • When changing the lens, change the lens quickly somewhere away from dusty locations to put the lens on the lens and camera. • Hold the camera with the lens facing down to prevent dust from entering into the locked position. • Be sure to keep dust or debris from ... the front lens cap from the front of the lens. Orange index marks 3 While pushing the lens lightly toward the camera, turn the lens clockwise until it clicks into the camera. Front lens cap Body cap Packaging lid 2 Mount the lens by aligning the orange index marks (mounting indexes) on straight...

Instruction Manual
Page 27
... attaching it stops. GB 27 Lens release button 2 Attach the caps to the front and rear of the lens and the body cap to the camera. • Before you use a lens for which a tripod socket is provided, attach the lens onto the tripod using the tripod socket provided to change the... dusty locations when attaching/ removing a lens. However, always make sure to help balance the weight of the lens. • When carrying the camera with a lens attached, hold both the camera and the lens firmly. • Do not hold the part of the image sensor (the part that is not supplied with the...
... attaching it stops. GB 27 Lens release button 2 Attach the caps to the front and rear of the lens and the body cap to the camera. • Before you use a lens for which a tripod socket is provided, attach the lens onto the tripod using the tripod socket provided to change the... dusty locations when attaching/ removing a lens. However, always make sure to help balance the weight of the lens. • When carrying the camera with a lens attached, hold both the camera and the lens firmly. • Do not hold the part of the image sensor (the part that is not supplied with the...

Instruction Manual
Page 28
... 28 To cancel the date and time setting operation Press the MENU button. Setting the date and time When you turn on the camera for the first time or after you initialize the functions, the screen to set the date and time appears. 1 Set the power switch to ON ...to turn the camera off, set the power switch to OFF. 2 Check that [Enter] is selected on the screen, then press z on the control wheel. 3 Select a desired geographic location...
... 28 To cancel the date and time setting operation Press the MENU button. Setting the date and time When you turn on the camera for the first time or after you initialize the functions, the screen to set the date and time appears. 1 Set the power switch to ON ...to turn the camera off, set the power switch to OFF. 2 Check that [Enter] is selected on the screen, then press z on the control wheel. 3 Select a desired geographic location...
Instruction Manual
Page 29
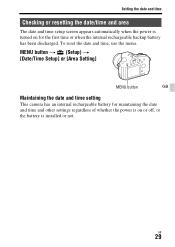
To reset the date and time, use the menu. MENU button t (Setup) t [Date/Time Setup] or [Area Setting] MENU button GB Maintaining the date and time setting This camera has an internal rechargeable battery for maintaining the date and time and other settings regardless of whether the power is on or off, or the battery is turned on for the first time or when the internal rechargeable backup battery has been discharged. GB 29 Setting the date and time Checking or resetting the date/time and area The date and time setup screen appears automatically when the power is installed or not.
To reset the date and time, use the menu. MENU button t (Setup) t [Date/Time Setup] or [Area Setting] MENU button GB Maintaining the date and time setting This camera has an internal rechargeable battery for maintaining the date and time and other settings regardless of whether the power is on or off, or the battery is turned on for the first time or when the internal rechargeable backup battery has been discharged. GB 29 Setting the date and time Checking or resetting the date/time and area The date and time setup screen appears automatically when the power is installed or not.

Instruction Manual
Page 30
...to [Auto], when shooting faces, close-up (macro) subjects, or subjects tracked by [Lockon AF], the camera analyzes the scene and automatically trims the captured image into the viewfinder and hold the camera. Both the original and the trimmed images will be saved. indicator GB 30 When using a zoom lens, ...Press the shutter button halfway down to shoot an image. • If [Auto Obj. Shooting and viewing images Shooting still images In auto mode, the camera analyzes the subject and allows you to shoot with the appropriate settings. 1 Set the power switch to ON to turn on the...
...to [Auto], when shooting faces, close-up (macro) subjects, or subjects tracked by [Lockon AF], the camera analyzes the scene and automatically trims the captured image into the viewfinder and hold the camera. Both the original and the trimmed images will be saved. indicator GB 30 When using a zoom lens, ...Press the shutter button halfway down to shoot an image. • If [Auto Obj. Shooting and viewing images Shooting still images In auto mode, the camera analyzes the subject and allows you to shoot with the appropriate settings. 1 Set the power switch to ON to turn on the...


