Operating Instructions
Page 3
...USE THEREOF. Trademarks • "Memory Stick" and are trademarks of Sony Corporation. • "LPEC" is the trademark of Sony Corporation. • IBM and PC/AT are registered trademarks of International Business Machines Corporation. • Microsoft, Windows and Outlook are trademarks of Microsoft...make any modification to any time without prior written approval from Sony Corporation. and other IC recorders. The "Digital Voice Editor" uses software modules as shown below: Microsoft® DirectX® Media Runtime ©2001 Microsoft Corporation. The software described herein may...
...USE THEREOF. Trademarks • "Memory Stick" and are trademarks of Sony Corporation. • "LPEC" is the trademark of Sony Corporation. • IBM and PC/AT are registered trademarks of International Business Machines Corporation. • Microsoft, Windows and Outlook are trademarks of Microsoft...make any modification to any time without prior written approval from Sony Corporation. and other IC recorders. The "Digital Voice Editor" uses software modules as shown below: Microsoft® DirectX® Media Runtime ©2001 Microsoft Corporation. The software described herein may...
Operating Instructions
Page 4
... a "Memory Stick" into the IC Recorder 10 Basic Operations Recording Messages 12 Recording as a New Message 15 Adding an Overwrite Recording 15 Using Convenient Functions while Recording 16 Recording with an External Microphone or Other Equipment .... 18 Recording with an External Stereo Microphone 18 Recording from Other Equipment 19 Recording with Other Equipment 19 Playing Back Messages 20 Using the Display Window...
... a "Memory Stick" into the IC Recorder 10 Basic Operations Recording Messages 12 Recording as a New Message 15 Adding an Overwrite Recording 15 Using Convenient Functions while Recording 16 Recording with an External Microphone or Other Equipment .... 18 Recording with an External Stereo Microphone 18 Recording from Other Equipment 19 Recording with Other Equipment 19 Playing Back Messages 20 Using the Display Window...
Operating Instructions
Page 7
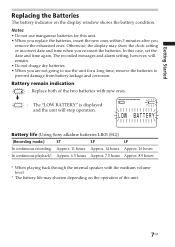
...will remain. • Do not charge dry batteries. • When you re-insert the batteries. Battery life (Using Sony alkaline batteries LR03 (SG)) (Recording mode:) ST SP LP In continuous recording: Approx. 11 hours Approx. 14 hours Approx. 16 hours In continuous playback*: Approx. 6.5 hours Approx. 7.5 hours ... long time, remove the batteries to prevent damage from battery leakage and corrosion. Otherwise, the display may shorten depending on the display window shows the battery condition. Notes • Do not use the unit for this case, set the date and time again. Battery ...
...will remain. • Do not charge dry batteries. • When you re-insert the batteries. Battery life (Using Sony alkaline batteries LR03 (SG)) (Recording mode:) ST SP LP In continuous recording: Approx. 11 hours Approx. 14 hours Approx. 16 hours In continuous playback*: Approx. 6.5 hours Approx. 7.5 hours ... long time, remove the batteries to prevent damage from battery leakage and corrosion. Otherwise, the display may shorten depending on the display window shows the battery condition. Notes • Do not use the unit for this case, set the date and time again. Battery ...

Operating Instructions
Page 8
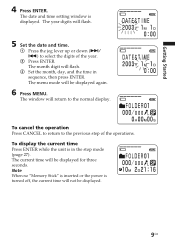
Press down (>/ .) to select "DATE&TIME". 8GB Step 2: Setting the Clock You need to set the clock to ON. Clock setting display appears when you insert battery for the first time, or when you insert battery after the unit has been without battery for a certain period of time. The IC recorder is turned on. 2 Press MENU. The menu mode will be displayed in the display window. 3 Press the jog lever up (>). In this case, proceed from step 4. MENU ENTER CANCEL POWER Jog lever Press up or down (.). 1 Slide POWER to use the alarm function or record the date and time.
Press down (>/ .) to select "DATE&TIME". 8GB Step 2: Setting the Clock You need to set the clock to ON. Clock setting display appears when you insert battery for the first time, or when you insert battery after the unit has been without battery for a certain period of time. The IC recorder is turned on. 2 Press MENU. The menu mode will be displayed in the display window. 3 Press the jog lever up (>). In this case, proceed from step 4. MENU ENTER CANCEL POWER Jog lever Press up or down (.). 1 Slide POWER to use the alarm function or record the date and time.
Operating Instructions
Page 9
...the month, day, and the time in the stop mode (page 27). The year digits will return to select the digits of the operations. The month digit will be displayed again. 6 Press MENU. Note When no "Memory Stick" is inserted or the power is displayed. Getting Started 4 Press ENTER. The current... time will not be displayed for three seconds. To cancel the operation Press CANCEL to return to the previous step of the year. 2 Press ENTER. The date and time setting window is ...
...the month, day, and the time in the stop mode (page 27). The year digits will return to select the digits of the operations. The month digit will be displayed again. 6 Press MENU. Note When no "Memory Stick" is inserted or the power is displayed. Getting Started 4 Press ENTER. The current... time will not be displayed for three seconds. To cancel the operation Press CANCEL to return to the previous step of the year. 2 Press ENTER. The date and time setting window is ...
Operating Instructions
Page 11
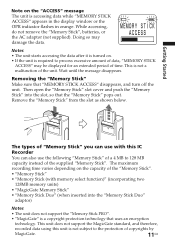
... the "Memory Stick" slot cover and push the "Memory Stick" into the "Memory Stick Duo" adaptor) Notes • The unit does not support the "Memory Stick PRO". • "MagicGate" is required to the protection of the unit. This is accessing data while "MEMORY STICK ACCESS" appears in the display window or the OPR indicator flashes in orange. The maximum recording time varies...
... the "Memory Stick" slot cover and push the "Memory Stick" into the "Memory Stick Duo" adaptor) Notes • The unit does not support the "Memory Stick PRO". • "MagicGate" is required to the protection of the unit. This is accessing data while "MEMORY STICK ACCESS" appears in the display window or the OPR indicator flashes in orange. The maximum recording time varies...
Operating Instructions
Page 16
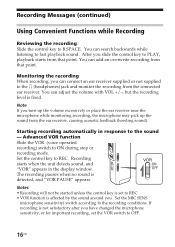
...the volume excessively or place the ear receiver near the microphone while monitoring recording, the microphone may pick up the sound from the connected ear receiver. Starting recording automatically in the display window. The recording pauses when no sound is set the VOR switch to REC. •...Set the control key to ON during stop or recording mode. Advanced VOR function Slide the VOR (voice operated recording) switch to REC. Notes • Recording will not be started unless the control key is detected, and "VOR PAUSE" appears. Recording starts when the unit detects sound, and "...
...the volume excessively or place the ear receiver near the microphone while monitoring recording, the microphone may pick up the sound from the connected ear receiver. Starting recording automatically in the display window. The recording pauses when no sound is set the VOR switch to REC. •...Set the control key to ON during stop or recording mode. Advanced VOR function Slide the VOR (voice operated recording) switch to REC. Notes • Recording will not be started unless the control key is detected, and "VOR PAUSE" appears. Recording starts when the unit detects sound, and "...
Operating Instructions
Page 17
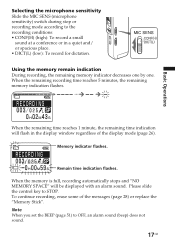
.... Basic Operations Selecting the microphone sensitivity Slide the MIC SENS (microphone sensitivity) switch during stop or recording mode according to the recording conditions: • CONF(H) (high): To record a small sound at a conference or in the display window regardless of the messages (page 28) or replace the "Memory Stick". When the remaining recording time reaches 5 minutes, the remaining...
.... Basic Operations Selecting the microphone sensitivity Slide the MIC SENS (microphone sensitivity) switch during stop or recording mode according to the recording conditions: • CONF(H) (high): To record a small sound at a conference or in the display window regardless of the messages (page 28) or replace the "Memory Stick". When the remaining recording time reaches 5 minutes, the remaining...
Operating Instructions
Page 24
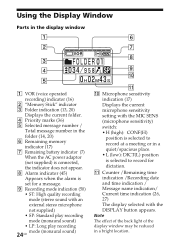
Note The effect of the back light of the display window may be reduced in a quiet/spacious place. • L (low): DICT(L) position is set for dictation. Using the Display Window Parts in the display window 1 VOR (voice operated recording) indicator (16) 2 "Memory Stick" indicator 3 Folder indication (13, 20) Displays the current folder. 4 Priority marks (36) 5 Selected message number...
Note The effect of the back light of the display window may be reduced in a quiet/spacious place. • L (low): DICT(L) position is set for dictation. Using the Display Window Parts in the display window 1 VOR (voice operated recording) indicator (16) 2 "Memory Stick" indicator 3 Folder indication (13, 20) Displays the current folder. 4 Priority marks (36) 5 Selected message number...

Operating Instructions
Page 25
... mode such as the 3rd message of the message being recorded or played back, and playback counter are displayed in the window. The current setting is being recorded as DPC play, the mode flashes in the display. xRemain indications When the battery or memory runs out, the remain indications flash in the display. xError...
... mode such as the 3rd message of the message being recorded or played back, and playback counter are displayed in the window. The current setting is being recorded as DPC play, the mode flashes in the display. xRemain indications When the battery or memory runs out, the remain indications flash in the display. xError...

Operating Instructions
Page 27
Every thing on the display will be displayed. 1 On Sleep display mode If the unit is in the display window. The current time will be displayed with the clock icon ( ) for more than STOP, "MOVE CONTROL KEY TO STOP POSITION" also flashes. 27GB If you ...
Every thing on the display will be displayed. 1 On Sleep display mode If the unit is in the display window. The current time will be displayed with the clock icon ( ) for more than STOP, "MOVE CONTROL KEY TO STOP POSITION" also flashes. 27GB If you ...

Operating Instructions
Page 33
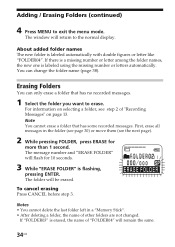
The new folder creation window will be added. "NEW FOLDER" will flash and a folder will be displayed. 2 Press the jog lever up or down (>/ .) to select "YES", and then press ENTER. You can also delete unnecessary folders. You can add the maximum of the IC recorder (page 61). Note... The maximum number of folders you cannot add any folder because of the system limitations of 340 folders . MENU FOLDER ENTER CANCEL ERASE Jog lever (>/.) Editing Messages Adding Folders 1 Press MENU. "FOLDER FULL" is displayed in the display window when you can...
The new folder creation window will be added. "NEW FOLDER" will flash and a folder will be displayed. 2 Press the jog lever up or down (>/ .) to select "YES", and then press ENTER. You can also delete unnecessary folders. You can add the maximum of the IC recorder (page 61). Note... The maximum number of folders you cannot add any folder because of the system limitations of 340 folders . MENU FOLDER ENTER CANCEL ERASE Jog lever (>/.) Editing Messages Adding Folders 1 Press MENU. "FOLDER FULL" is displayed in the display window when you can...
Operating Instructions
Page 34
... for 10 seconds. 3 While "ERASE FOLDER" is erased, the name of other folders are not changed. The window will be erased. Note You cannot erase a folder that has no recorded messages. 1 Select the folder you want to exit the menu mode. The message number and "ERASE FOLDER" will...letter among the folder names, the new one is labeled automatically with double figures or letter like "FOLDER04". First, erase all messages in a "Memory Stick". • After deleting a folder, the name of "FOLDER04" will flash for more than 1 second. Erasing Folders You can change the folder name (...
... for 10 seconds. 3 While "ERASE FOLDER" is erased, the name of other folders are not changed. The window will be erased. Note You cannot erase a folder that has no recorded messages. 1 Select the folder you want to exit the menu mode. The message number and "ERASE FOLDER" will...letter among the folder names, the new one is labeled automatically with double figures or letter like "FOLDER04". First, erase all messages in a "Memory Stick". • After deleting a folder, the name of "FOLDER04" will flash for more than 1 second. Erasing Folders You can change the folder name (...

Operating Instructions
Page 36
...in the order of priority mark(s) (v) while "PRIORITY" is finished and the messages will flash on the display window. 3 Press the jog lever up or down (>/ .) to select the number of recording. You can renumber the messages in playback mode. The setting is flashing. 4 Press ENTER. Priority Mark Function... Usually the recorded messages are four levels, "vvv" (the most important), "vv", "v", and no priority mark. Adding Priority Mark(s) - By adding priority marks (v) to mark. 2...
...in the order of priority mark(s) (v) while "PRIORITY" is finished and the messages will flash on the display window. 3 Press the jog lever up or down (>/ .) to select the number of recording. You can renumber the messages in playback mode. The setting is flashing. 4 Press ENTER. Priority Mark Function... Usually the recorded messages are four levels, "vvv" (the most important), "vv", "v", and no priority mark. Adding Priority Mark(s) - By adding priority marks (v) to mark. 2...
Operating Instructions
Page 38
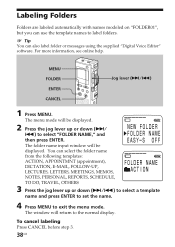
... or messages using the supplied "Digital Voice Editor" software. The window will be displayed. 2 Press the jog lever up or down (>/ .) to select "FOLDER NAME," and then press ENTER. The menu mode will be displayed. MENU FOLDER ENTER CANCEL Jog lever (>/.) 1 Press MENU. The folder name input window will return to the normal display...
... or messages using the supplied "Digital Voice Editor" software. The window will be displayed. 2 Press the jog lever up or down (>/ .) to select "FOLDER NAME," and then press ENTER. The menu mode will be displayed. MENU FOLDER ENTER CANCEL Jog lever (>/.) 1 Press MENU. The folder name input window will return to the normal display...

Operating Instructions
Page 41
... ENTER. The menu mode will remain in Message 2 Continued 41GB The overwrite mode selection window is displayed. • OVER: The portion left after the overwrite recording will be displayed. 2 Press the jog lever up or down (>/ .) to a previously recorded message. Other Functions MENU ENTER CANCEL Jog lever (>/.) 1 Press MENU. Stopping point for the...
... ENTER. The menu mode will remain in Message 2 Continued 41GB The overwrite mode selection window is displayed. • OVER: The portion left after the overwrite recording will be displayed. 2 Press the jog lever up or down (>/ .) to a previously recorded message. Other Functions MENU ENTER CANCEL Jog lever (>/.) 1 Press MENU. Stopping point for the...

Operating Instructions
Page 42
The window returns to exit the menu mode. Starting point of the previous step. 42GB The normal display appears. When you add an overwrite recording (page 15), the recording will be added in Message 2 3 Press the jog lever up or down (>/ .) to select "OVER" ... press ENTER. 4 Press MENU to that of the overwrite Stopping point for the overwrite recording recording The remaining portion in Message 2 Message 1 Message 2 Message 3 Message 1 Message 2 Message 3 Added overwrite recording in the selected overwrite mode. To cancel setting Press CANCEL. Setting the Overwrite Mode (...
The window returns to exit the menu mode. Starting point of the previous step. 42GB The normal display appears. When you add an overwrite recording (page 15), the recording will be added in Message 2 3 Press the jog lever up or down (>/ .) to select "OVER" ... press ENTER. 4 Press MENU to that of the overwrite Stopping point for the overwrite recording recording The remaining portion in Message 2 Message 1 Message 2 Message 3 Message 1 Message 2 Message 3 Added overwrite recording in the selected overwrite mode. To cancel setting Press CANCEL. Setting the Overwrite Mode (...

Operating Instructions
Page 43
... alarm without playing back a message. Note When the clock is not set or no messages are recorded, you want to "ON", "ALARM ON" will be displayed in the display window. The menu mode will be displayed in the display window. 2 Press the jog lever up or down (>/ .) to select "ALARM OFF". Continued 43GB...
... alarm without playing back a message. Note When the clock is not set or no messages are recorded, you want to "ON", "ALARM ON" will be displayed in the display window. The menu mode will be displayed in the display window. 2 Press the jog lever up or down (>/ .) to select "ALARM OFF". Continued 43GB...

Operating Instructions
Page 44
The month digits will flash. 2 Press the jog lever up or down (>/ .) to select "DAILY". To play back on a ...to select the day of the week ("SUN" for Sunday to select "ON". The year digits will flash. 3 Set the month, day, and the time in the display window. 3 Set the alarm date and time. Then press ENTER. 44GB Playing Back a Message ...at the same time every day Press the jog lever up or down (>/.) to select the year digits and press ENTER. Then press ENTER....
The month digits will flash. 2 Press the jog lever up or down (>/ .) to select "DAILY". To play back on a ...to select the day of the week ("SUN" for Sunday to select "ON". The year digits will flash. 3 Set the month, day, and the time in the display window. 3 Set the alarm date and time. Then press ENTER. 44GB Playing Back a Message ...at the same time every day Press the jog lever up or down (>/.) to select the year digits and press ENTER. Then press ENTER....

Operating Instructions
Page 45
... the playback starts Press CANCEL while the alarm sound is heard. Other Functions 5 Press the jog lever up or down (>/ .) to select the hour digits, and press ENTER. The display returns to PLAY. When the set date and time comes At the set time, the alarm will flash in step...the alarm will sound). During alarm playback, "ALARM" will sound for only the alarm). 6 Press ENTER. The minute digit will be played back (If you have selected "BEEP ONLY" in the display window. 1To listen to the same message again Slide the control key to the normal display. The setting is selected...
... the playback starts Press CANCEL while the alarm sound is heard. Other Functions 5 Press the jog lever up or down (>/ .) to select the hour digits, and press ENTER. The display returns to PLAY. When the set date and time comes At the set time, the alarm will flash in step...the alarm will sound). During alarm playback, "ALARM" will sound for only the alarm). 6 Press ENTER. The minute digit will be played back (If you have selected "BEEP ONLY" in the display window. 1To listen to the same message again Slide the control key to the normal display. The setting is selected...


