Operating Instructions
Page 4
... 48 the DPC function 43 Changing the Playback Settings 45 Selecting the playback mode 45 Making the human voice clearer - the LCF function 31 Starting to record automatically in response to Be Used in the Display Window 15 Preventing Accidental Operation (HOLD 17 Locking the buttons 17 Unlocking the buttons 17 Basic Operations...
... 48 the DPC function 43 Changing the Playback Settings 45 Selecting the playback mode 45 Making the human voice clearer - the LCF function 31 Starting to record automatically in response to Be Used in the Display Window 15 Preventing Accidental Operation (HOLD 17 Locking the buttons 17 Unlocking the buttons 17 Basic Operations...
Operating Instructions
Page 6
Disconnecting the IC recorder from the AC outlet 96 Precautions 97 Specifications 99 System requirements 99 Design and specifications 100 Battery life 103 Troubleshooting Troubleshooting 105 Error Messages 112 System Limitations 115 Display Window Guide 116 Index 119 Trademarks 122 6 GB
Disconnecting the IC recorder from the AC outlet 96 Precautions 97 Specifications 99 System requirements 99 Design and specifications 100 Battery life 103 Troubleshooting Troubleshooting 105 Error Messages 112 System Limitations 115 Display Window Guide 116 Index 119 Trademarks 122 6 GB
Operating Instructions
Page 7
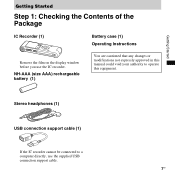
Getting Started Getting Started Step 1: Checking the Contents of the Package IC Recorder (1) Battery case (1) Operating Instructions Remove the film on the display window before you use the supplied USB connection support cable. 7GB Stereo headphones (1) USB connection support cable (1) If the IC recorder cannot be connected to operate this manual could void your authority to a computer directly, use the IC recorder. NH-AAA (size AAA) rechargeable battery (1) You are cautioned that any changes or modifications not expressly approved in this equipment.
Getting Started Getting Started Step 1: Checking the Contents of the Package IC Recorder (1) Battery case (1) Operating Instructions Remove the film on the display window before you use the supplied USB connection support cable. 7GB Stereo headphones (1) USB connection support cable (1) If the IC recorder cannot be connected to operate this manual could void your authority to a computer directly, use the IC recorder. NH-AAA (size AAA) rechargeable battery (1) You are cautioned that any changes or modifications not expressly approved in this equipment.
Operating Instructions
Page 8
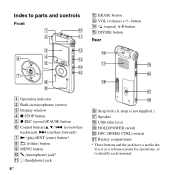
... operations, or to parts and controls Front L ERASE button M VOL (volume) +*/- button N (repeat) A-B button O DIVIDE button Rear A Operation indicator B Built-in microphones (stereo) C Display window D x STOP button E z REC (record)/PAUSE button F Control button (v, V / . (review/fast backward), > (cue/fast forward)) G N (play)/ENT (enter) button* H (folder) button I MENU button J m (microphone) jack* K i (headphone) jack 8 GB...
... operations, or to parts and controls Front L ERASE button M VOL (volume) +*/- button N (repeat) A-B button O DIVIDE button Rear A Operation indicator B Built-in microphones (stereo) C Display window D x STOP button E z REC (record)/PAUSE button F Control button (v, V / . (review/fast backward), > (cue/fast forward)) G N (play)/ENT (enter) button* H (folder) button I MENU button J m (microphone) jack* K i (headphone) jack 8 GB...
Operating Instructions
Page 9
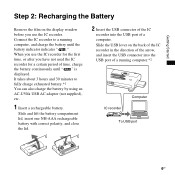
... lid, insert one NH-AAA rechargeable battery with correct polarity, and close the lid. 2 Insert the USB connector of the IC recorder into the USB port of time, charge the battery continuously until the battery indicator indicates " ." Slide the USB lever on the display... window before you use the IC recorder for the first time, or after you use the IC recorder. It takes about 3 hours and 30 minutes to a running computer.*2 IC recorder Computer To USB port 9GB
... lid, insert one NH-AAA rechargeable battery with correct polarity, and close the lid. 2 Insert the USB connector of the IC recorder into the USB port of time, charge the battery continuously until the battery indicator indicates " ." Slide the USB lever on the display... window before you use the IC recorder for the first time, or after you use the IC recorder. It takes about 3 hours and 30 minutes to a running computer.*2 IC recorder Computer To USB port 9GB
Operating Instructions
Page 10
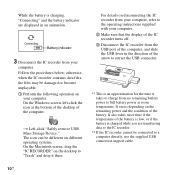
On the Windows screen, left-click the icon at room temperature. Follow the procedures below; It also takes more time if the temperature of the battery is low, ..." and drop it takes to charge from your computer. The icon can be different on different operating systems. On the Macintosh screen, drag the "IC RECORDER" on the remaining power and the condition of the arrow to retract the USB connector. *1 This is an approximation for the time it there. otherwise...
On the Windows screen, left-click the icon at room temperature. Follow the procedures below; It also takes more time if the temperature of the battery is low, ..." and drop it takes to charge from your computer. The icon can be different on different operating systems. On the Macintosh screen, drag the "IC RECORDER" on the remaining power and the condition of the arrow to retract the USB connector. *1 This is an approximation for the time it there. otherwise...
Operating Instructions
Page 13
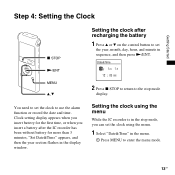
... the first time, or when you can set the clock to enter the menu mode. 13GB Setting the clock using the menu While the IC recorder is in sequence, and then press N/ENT. Clock setting display appears when you insert battery for more than 3 minutes, "Set Date&Time" appears, ...and then the year section flashes in the display window. 2 Press x STOP to return to the stop mode, you insert a battery after recharging the battery 1 Press v or V on the control button ...
... the first time, or when you can set the clock to enter the menu mode. 13GB Setting the clock using the menu While the IC recorder is in sequence, and then press N/ENT. Clock setting display appears when you insert battery for more than 3 minutes, "Set Date&Time" appears, ...and then the year section flashes in the display window. 2 Press x STOP to return to the stop mode, you insert a battery after recharging the battery 1 Press v or V on the control button ...
Operating Instructions
Page 14
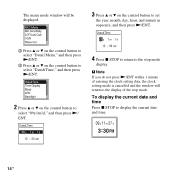
... return to the display of entering the clock setting data, the clock setting mode is cancelled and the window will be displayed. 3 Press v or V on the control button to set the year, month, day, hour, and minute in sequence, and then press N/ENT. 2 Press v ...
... return to the display of entering the clock setting data, the clock setting mode is cancelled and the window will be displayed. 3 Press v or V on the control button to set the year, month, day, hour, and minute in sequence, and then press N/ENT. 2 Press v ...
Operating Instructions
Page 15
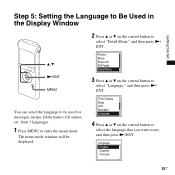
v, V N/ENT MENU 3 Press v or V on the control button to enter the menu mode. from 3 languages. 1 Press MENU to select "Language," and then press N/ ENT. The menu mode window will be displayed. 4 Press v or V on the control button to select "Detail Menu," and then press N/ ENT. You can select the language to use, and then press N/ENT. 15GB Getting Started Step 5: Setting the Language to Be Used in the Display Window 2 Press v or V on the control button to select the language that you want to be used for messages, menus, folder names, file names, etc.
v, V N/ENT MENU 3 Press v or V on the control button to enter the menu mode. from 3 languages. 1 Press MENU to select "Language," and then press N/ ENT. The menu mode window will be displayed. 4 Press v or V on the control button to select "Detail Menu," and then press N/ ENT. You can select the language to use, and then press N/ENT. 15GB Getting Started Step 5: Setting the Language to Be Used in the Display Window 2 Press v or V on the control button to select the language that you want to be used for messages, menus, folder names, file names, etc.
Operating Instructions
Page 18
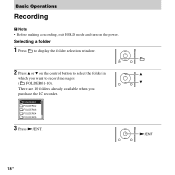
N/ENT 18 GB V There are 10 folders already available when you want to record messages ( FOLDER01-10). Selecting a folder 1 Press to display the folder selection window. 2 Press v or V on the power. Basic Operations Recording P Note • Before making a recording, exit HOLD mode and turn on the control button to select the folder in v which you purchase the IC recorder. 3 Press N/ENT.
N/ENT 18 GB V There are 10 folders already available when you want to record messages ( FOLDER01-10). Selecting a folder 1 Press to display the folder selection window. 2 Press v or V on the power. Basic Operations Recording P Note • Before making a recording, exit HOLD mode and turn on the control button to select the folder in v which you purchase the IC recorder. 3 Press N/ENT.
Operating Instructions
Page 20
... 99 messages in the display window. z Tips • Messages recorded using this IC recorder will be sure to fast playback sound. release pause and resume Press z REC/PAUSE again. During recording pause, the operation indicator flashes in red and " " flashes in each folder. • Before you start recording, we recommend you pause recording, recording pause is automatically released and...
... 99 messages in the display window. z Tips • Messages recorded using this IC recorder will be sure to fast playback sound. release pause and resume Press z REC/PAUSE again. During recording pause, the operation indicator flashes in red and " " flashes in each folder. • Before you start recording, we recommend you pause recording, recording pause is automatically released and...
Operating Instructions
Page 27
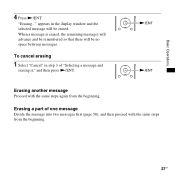
..., the remaining messages will advance and be renumbered so that there will be no space between messages. To cancel erasing 1 Select "Cancel" in the display window and the selected message will be erased. Erasing a part of "Selecting a message and erasing it," and then press N/ENT. Basic Operations 4 Press N/ENT...
..., the remaining messages will advance and be renumbered so that there will be no space between messages. To cancel erasing 1 Select "Cancel" in the display window and the selected message will be erased. Erasing a part of "Selecting a message and erasing it," and then press N/ENT. Basic Operations 4 Press N/ENT...
Operating Instructions
Page 28
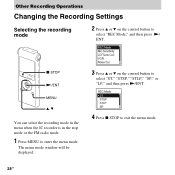
x STOP N/ENT MENU v, V You can select the recording mode in the menu when the IC recorder is in the stop mode or the FM radio mode. 1 Press MENU to exit the menu mode. 28 GB The menu mode window will be displayed. 3 Press v or V on the control button to select "REC Mode," and then press N/ ENT. Other Recording Operations Changing the Recording Settings Selecting the recording mode 2 Press v or V on the control button to select "ST," "STSP," "STLP," "SP," or "LP," and then press N/ENT. 4 Press x STOP to enter the menu mode.
x STOP N/ENT MENU v, V You can select the recording mode in the menu when the IC recorder is in the stop mode or the FM radio mode. 1 Press MENU to exit the menu mode. 28 GB The menu mode window will be displayed. 3 Press v or V on the control button to select "REC Mode," and then press N/ ENT. Other Recording Operations Changing the Recording Settings Selecting the recording mode 2 Press v or V on the control button to select "ST," "STSP," "STLP," "SP," or "LP," and then press N/ENT. 4 Press x STOP to enter the menu mode.
Operating Instructions
Page 29
... ST or STSP mode. The menu mode window will be displayed. 29GB Other Recording Operations ST High-quality stereo recording mode (44.1 kHz/192 kbps) You can record with monaural sound. The recording mode is recording. 1 Press MENU to "ST" when you purchase the IC recorder. SP Standard play stereo recording mode (22.05 kHz/48 kbps) You...
... ST or STSP mode. The menu mode window will be displayed. 29GB Other Recording Operations ST High-quality stereo recording mode (44.1 kHz/192 kbps) You can record with monaural sound. The recording mode is recording. 1 Press MENU to "ST" when you purchase the IC recorder. SP Standard play stereo recording mode (22.05 kHz/48 kbps) You...
Operating Instructions
Page 31
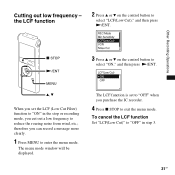
...LCF function Set "LCF(Low Cut)" to exit the menu mode. therefore you purchase the IC recorder. 4 Press x STOP to "OFF" in the stop or recording mode, you cut out a low frequency to enter the menu mode. Other Recording Operations x STOP N/ENT MENU v, V When you set to "OFF" when you can... record a message more clearly. 1 Press MENU to reduce the roaring noise from wind, etc.; the LCF function 2 Press v or V on the control button to select "LCF(Low Cut)," and then press N/ENT. The menu mode window will be displayed. 3 Press v or V on the...
...LCF function Set "LCF(Low Cut)" to exit the menu mode. therefore you purchase the IC recorder. 4 Press x STOP to "OFF" in the stop or recording mode, you cut out a low frequency to enter the menu mode. Other Recording Operations x STOP N/ENT MENU v, V When you set to "OFF" when you can... record a message more clearly. 1 Press MENU to reduce the roaring noise from wind, etc.; the LCF function 2 Press v or V on the control button to select "LCF(Low Cut)," and then press N/ENT. The menu mode window will be displayed. 3 Press v or V on the...
Operating Instructions
Page 32
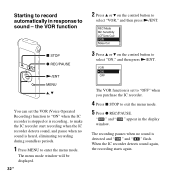
...mode window will be displayed. 32 GB The VOR function is set the VOR (Voice Operated Recording) function to "ON" when the IC recorder is stopped or is recording, to make the IC recorder start recording when the IC recorder ...detects sound, and pause when no sound is heard, eliminating recording during soundless periods. 1 Press MENU to exit the menu mode. 5 Press z REC/PAUSE. " " and " " appear in response to sound - The recording pauses when no sound is detected and " " and " " flash...
...mode window will be displayed. 32 GB The VOR function is set the VOR (Voice Operated Recording) function to "ON" when the IC recorder is stopped or is recording, to make the IC recorder start recording when the IC recorder ...detects sound, and pause when no sound is heard, eliminating recording during soundless periods. 1 Press MENU to exit the menu mode. 5 Press z REC/PAUSE. " " and " " appear in response to sound - The recording pauses when no sound is detected and " " and " " flash...
Operating Instructions
Page 36
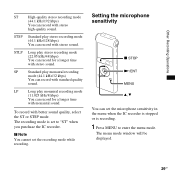
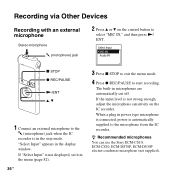
...appears in microphones are automatically cut off. If "Select Input" is automatically supplied to the microphone from the IC recorder. z Recommended microphones You can use the Sony ECM-CS10, ECM-CZ10, ECM-DS70P, ECM-DS30P electret condenser microphone (not supplied). When a plug in power... select "MIC IN," and then press N/ ENT. The built-in the display window. m (microphone) jack x STOP z REC/PAUSE N/ENT v, V 1 Connect an external microphone to the m (microphone) jack when the IC recorder is not strong enough, adjust the microphone sensitivity on the control button to start...
...appears in microphones are automatically cut off. If "Select Input" is automatically supplied to the microphone from the IC recorder. z Recommended microphones You can use the Sony ECM-CS10, ECM-CZ10, ECM-DS70P, ECM-DS30P electret condenser microphone (not supplied). When a plug in power... select "MIC IN," and then press N/ ENT. The built-in the display window. m (microphone) jack x STOP z REC/PAUSE N/ENT v, V 1 Connect an external microphone to the m (microphone) jack when the IC recorder is not strong enough, adjust the microphone sensitivity on the control button to start...
Operating Instructions
Page 38
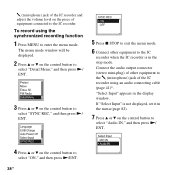
... to select "SYNC REC," and then press N/ ENT. 5 Press x STOP to exit the menu mode. 6 Connect other equipment to the IC recorder when the IC recorder is in the display window. "Select Input" appears in the stop mode. Connect the audio output connector (stereo mini-plug) of other equipment to the m (microphone) jack...
... to select "SYNC REC," and then press N/ ENT. 5 Press x STOP to exit the menu mode. 6 Connect other equipment to the IC recorder when the IC recorder is in the display window. "Select Input" appears in the stop mode. Connect the audio output connector (stereo mini-plug) of other equipment to the m (microphone) jack...
Operating Instructions
Page 39
... may not operate properly due to a difference in the audio input level. The IC recorder starts recording again as a new message when sound is detected for more than 2 seconds, and " " flashes. The menu mode window will be displayed. 2 Press v or V on the control button to select "Detail Menu," and then press N/ ENT. 3 Press v or...
... may not operate properly due to a difference in the audio input level. The IC recorder starts recording again as a new message when sound is detected for more than 2 seconds, and " " flashes. The menu mode window will be displayed. 2 Press v or V on the control button to select "Detail Menu," and then press N/ ENT. 3 Press v or...
Operating Instructions
Page 40
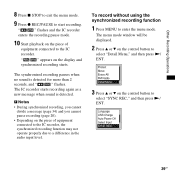
... GB If "Select Input" is not displayed, set it in microphones are automatically cut off and the sound from the connected equipment is recorded. 10 Start playback on the control button to select "Audio IN," and then press N/ ENT. 5 Press x STOP to exit the menu mode. 6 Connect other... equipment to the m (microphone) jack of other equipment to the IC recorder when the IC recorder is in the display window. "Select Input" appears in the stop mode. Connect the audio output connector (stereo mini-plug) of the IC...
... GB If "Select Input" is not displayed, set it in microphones are automatically cut off and the sound from the connected equipment is recorded. 10 Start playback on the control button to select "Audio IN," and then press N/ ENT. 5 Press x STOP to exit the menu mode. 6 Connect other... equipment to the m (microphone) jack of other equipment to the IC recorder when the IC recorder is in the display window. "Select Input" appears in the stop mode. Connect the audio output connector (stereo mini-plug) of the IC...


