
Operating Instructions
Page 3
...DEFECTIVE PRODUCT OR THE USE OF ANY PRODUCT. The "Digital Voice Editor" uses software modules as shown below: Microsoft® DirectX® Media Runtime ©2001 Microsoft Corporation. Copyright ©1995 ...recorder ICD-BM1A/BM1AVTP only. All rights reserved. 3GB Portion Copyright ©1995 Microsoft Corporation • Apple and Macintosh are trademarks of Microsoft Corporation, registered in the U.S.A. This manual or the software described herein, in whole or in part, may also be governed by ScanSoft, Inc. Trademarks • "Memory Stick" and are trademarks of Sony...
...DEFECTIVE PRODUCT OR THE USE OF ANY PRODUCT. The "Digital Voice Editor" uses software modules as shown below: Microsoft® DirectX® Media Runtime ©2001 Microsoft Corporation. Copyright ©1995 ...recorder ICD-BM1A/BM1AVTP only. All rights reserved. 3GB Portion Copyright ©1995 Microsoft Corporation • Apple and Macintosh are trademarks of Microsoft Corporation, registered in the U.S.A. This manual or the software described herein, in whole or in part, may also be governed by ScanSoft, Inc. Trademarks • "Memory Stick" and are trademarks of Sony...
Operating Instructions
Page 4
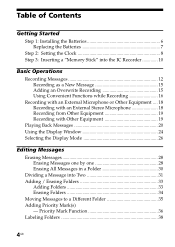
... a "Memory Stick" into the IC Recorder 10 Basic Operations Recording Messages 12 Recording as a New Message 15 Adding an Overwrite Recording 15 Using Convenient Functions while Recording 16 Recording with an External Microphone or Other Equipment .... 18 Recording with an External Stereo Microphone 18 Recording from Other Equipment 19 Recording with Other Equipment 19 Playing Back Messages 20 Using the Display Window...
... a "Memory Stick" into the IC Recorder 10 Basic Operations Recording Messages 12 Recording as a New Message 15 Adding an Overwrite Recording 15 Using Convenient Functions while Recording 16 Recording with an External Microphone or Other Equipment .... 18 Recording with an External Stereo Microphone 18 Recording from Other Equipment 19 Recording with Other Equipment 19 Playing Back Messages 20 Using the Display Window...
Operating Instructions
Page 7
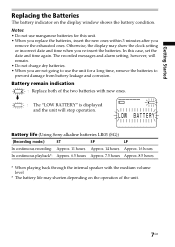
Otherwise, the display may shorten depending on the display window shows the battery condition. The recorded messages and alarm setting, however, will stop operation. In this unit. • When you replace the batteries, insert the new ones within 3 minutes.... 7GB Notes • Do not use the unit for this case, set the date and time again. Battery life (Using Sony alkaline batteries LR03 (SG)) (Recording mode:) ST SP LP In continuous recording: Approx. 11 hours Approx. 14 hours Approx. 16 hours In continuous playback*: Approx. 6.5 hours Approx. 7.5 hours Approx. 8.5 hours *...
Otherwise, the display may shorten depending on the display window shows the battery condition. The recorded messages and alarm setting, however, will stop operation. In this unit. • When you replace the batteries, insert the new ones within 3 minutes.... 7GB Notes • Do not use the unit for this case, set the date and time again. Battery life (Using Sony alkaline batteries LR03 (SG)) (Recording mode:) ST SP LP In continuous recording: Approx. 11 hours Approx. 14 hours Approx. 16 hours In continuous playback*: Approx. 6.5 hours Approx. 7.5 hours Approx. 8.5 hours *...

Operating Instructions
Page 8
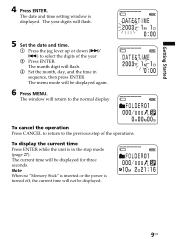
Press down (>/ .) to ON. MENU ENTER CANCEL POWER Jog lever Press up or down (.). 1 Slide POWER to select "DATE&TIME". 8GB Clock setting display appears when you insert battery for the first time, or when you insert battery after the unit has been without battery for a certain period of time. The IC recorder is turned on. 2 Press MENU. In this case, proceed from step 4. The menu mode will be displayed in the display window. 3 Press the jog lever up (>). Step 2: Setting the Clock You need to set the clock to use the alarm function or record the date and time.
Press down (>/ .) to ON. MENU ENTER CANCEL POWER Jog lever Press up or down (.). 1 Slide POWER to select "DATE&TIME". 8GB Clock setting display appears when you insert battery for the first time, or when you insert battery after the unit has been without battery for a certain period of time. The IC recorder is turned on. 2 Press MENU. In this case, proceed from step 4. The menu mode will be displayed in the display window. 3 Press the jog lever up (>). Step 2: Setting the Clock You need to set the clock to use the alarm function or record the date and time.
Operating Instructions
Page 9
.... To display the current time Press ENTER while the unit is displayed. The date and time setting window is in sequence, then press ENTER. The year digits will be displayed. 9GB The window will flash. 3 Set the month, day, and the time in the stop mode (page 27).... Getting Started 4 Press ENTER. The month digit will return to select the digits of the operations. To cancel the operation Press CANCEL to return to the previous step of the year. 2 Press ENTER. Note When no "Memory Stick...
.... To display the current time Press ENTER while the unit is displayed. The date and time setting window is in sequence, then press ENTER. The year digits will be displayed. 9GB The window will flash. 3 Set the month, day, and the time in the stop mode (page 27).... Getting Started 4 Press ENTER. The month digit will return to select the digits of the operations. To cancel the operation Press CANCEL to return to the previous step of the year. 2 Press ENTER. Note When no "Memory Stick...
Operating Instructions
Page 11
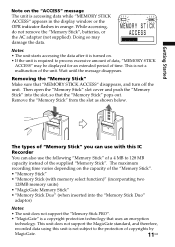
... the MagicGate standard, and therefore, recorded data using this IC Recorder You can also use the following "Memory Stick" of a 4 MB to 128 MB capacity instead of the supplied "Memory Stick". The maximum recording time varies depending on . • If the unit is accessing data while "MEMORY STICK ACCESS" appears in the display window or the OPR indicator flashes in...
... the MagicGate standard, and therefore, recorded data using this IC Recorder You can also use the following "Memory Stick" of a 4 MB to 128 MB capacity instead of the supplied "Memory Stick". The maximum recording time varies depending on . • If the unit is accessing data while "MEMORY STICK ACCESS" appears in the display window or the OPR indicator flashes in...
Operating Instructions
Page 16
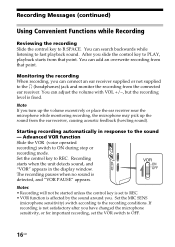
...voice operated recording) switch to REC. Set the MIC SENS (microphone sensitivity) switch according to REC. • VOR function is affected by the sound around you. You can adjust the volume with VOL +/-, but the recording level is detected, and "VOR PAUSE" appears. Monitoring the recording When recording... playback starts from the ear receiver, causing acoustic feedback (howling sound). If recording is set the VOR switch to fast playback sound. Starting recording automatically in the display window. Recording starts when the unit detects sound, and "VOR" appears in response to ...
...voice operated recording) switch to REC. Set the MIC SENS (microphone sensitivity) switch according to REC. • VOR function is affected by the sound around you. You can adjust the volume with VOL +/-, but the recording level is detected, and "VOR PAUSE" appears. Monitoring the recording When recording... playback starts from the ear receiver, causing acoustic feedback (howling sound). If recording is set the VOR switch to fast playback sound. Starting recording automatically in the display window. Recording starts when the unit detects sound, and "VOR" appears in response to ...
Operating Instructions
Page 17
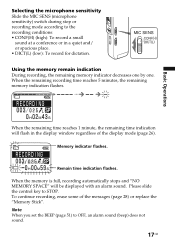
... microphone sensitivity Slide the MIC SENS (microphone sensitivity) switch during stop or recording mode according to the recording conditions: • CONF(H) (high): To record a small sound at a conference or in the display window regardless of the messages (page 28) or replace the "Memory Stick". When the remaining time reaches 1 minute, the remaining time indication will be...
... microphone sensitivity Slide the MIC SENS (microphone sensitivity) switch during stop or recording mode according to the recording conditions: • CONF(H) (high): To record a small sound at a conference or in the display window regardless of the messages (page 28) or replace the "Memory Stick". When the remaining time reaches 1 minute, the remaining time indication will be...
Operating Instructions
Page 24
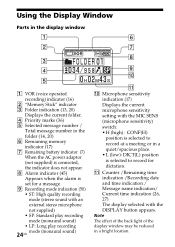
... a bright location. Note The effect of the back light of the display window may be reduced in a quiet/spacious place. • L (low): DICT(L) position is selected to record for dictation. Using the Display Window Parts in the display window 1 VOR (voice operated recording) indicator (16) 2 "Memory Stick" indicator 3 Folder indication (13, 20) Displays the current folder. 4 Priority marks...
... a bright location. Note The effect of the back light of the display window may be reduced in a quiet/spacious place. • L (low): DICT(L) position is selected to record for dictation. Using the Display Window Parts in the display window 1 VOR (voice operated recording) indicator (16) 2 "Memory Stick" indicator 3 Folder indication (13, 20) Displays the current folder. 4 Priority marks...
Operating Instructions
Page 25
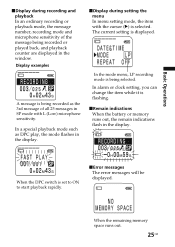
... flashing. xRemain indications When the battery or memory runs out, the remain indications flash in SP mode with the cursor (B) is being recorded as DPC play, the mode flashes in the window. xDisplay during recording and playback In an ordinary recording or playback mode, the message number, recording mode and microphone sensitivity of all 25 messages...
... flashing. xRemain indications When the battery or memory runs out, the remain indications flash in SP mode with the cursor (B) is being recorded as DPC play, the mode flashes in the window. xDisplay during recording and playback In an ordinary recording or playback mode, the message number, recording mode and microphone sensitivity of all 25 messages...
Operating Instructions
Page 27
... displayed in the stop mode, the display will turn off , "POWER IS OFF" flashes. If you press a button while the power is in the display window.
... displayed in the stop mode, the display will turn off , "POWER IS OFF" flashes. If you press a button while the power is in the display window.
Operating Instructions
Page 33
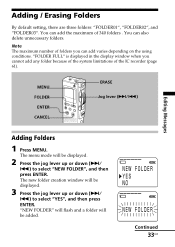
...the system limitations of 340 folders . MENU FOLDER ENTER CANCEL ERASE Jog lever (>/.) Editing Messages Adding Folders 1 Press MENU. The new folder creation window will be displayed. 3 Press the jog lever up or down (>/ .) to select "NEW FOLDER", and then press ENTER. The menu mode... Erasing Folders By default setting, there are three folders: "FOLDER01", "FOLDER02", and "FOLDER03". "FOLDER FULL" is displayed in the display window when you can add varies depending on the using conditions. You can also delete unnecessary folders. Continued 33GB You can add the maximum of ...
...the system limitations of 340 folders . MENU FOLDER ENTER CANCEL ERASE Jog lever (>/.) Editing Messages Adding Folders 1 Press MENU. The new folder creation window will be displayed. 3 Press the jog lever up or down (>/ .) to select "NEW FOLDER", and then press ENTER. The menu mode... Erasing Folders By default setting, there are three folders: "FOLDER01", "FOLDER02", and "FOLDER03". "FOLDER FULL" is displayed in the display window when you can add varies depending on the using conditions. You can also delete unnecessary folders. Continued 33GB You can add the maximum of ...
Operating Instructions
Page 34
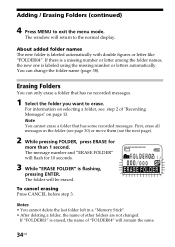
...MENU to the normal display. You can only erase a folder that has some recorded messages. First, erase all messages in a "Memory Stick". • After deleting a folder, the name of "FOLDER04" will remain ...the same. 34GB Note You cannot erase a folder that has no recorded messages. 1 Select the folder... folder left in the folder (see page 30) or move them (see step 2 of "Recording Messages" on selecting a folder, see the next page). 2 While pressing FOLDER, press ERASE for...
...MENU to the normal display. You can only erase a folder that has some recorded messages. First, erase all messages in a "Memory Stick". • After deleting a folder, the name of "FOLDER04" will remain ...the same. 34GB Note You cannot erase a folder that has no recorded messages. 1 Select the folder... folder left in the folder (see page 30) or move them (see step 2 of "Recording Messages" on selecting a folder, see the next page). 2 While pressing FOLDER, press ERASE for...
Operating Instructions
Page 36
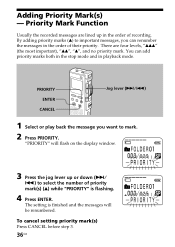
...Jog lever (>/.) 1 Select or play back the message you can add priority marks both in the stop mode and in the order of recording. By adding priority marks (v) to important messages, you want to select the number of priority mark(s) (v) while "PRIORITY" is finished and the... messages will flash on the display window. 3 Press the jog lever up in the order of their priority. Priority Mark Function Usually the recorded messages are four levels, "vvv" (the most important), "vv", "v", and no priority mark. "...
...Jog lever (>/.) 1 Select or play back the message you can add priority marks both in the stop mode and in the order of recording. By adding priority marks (v) to important messages, you want to select the number of priority mark(s) (v) while "PRIORITY" is finished and the... messages will flash on the display window. 3 Press the jog lever up in the order of their priority. Priority Mark Function Usually the recorded messages are four levels, "vvv" (the most important), "vv", "v", and no priority mark. "...
Operating Instructions
Page 38
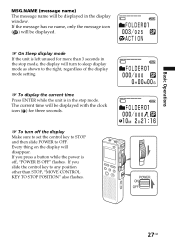
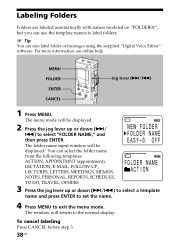
...Jog lever (>/.) 1 Press MENU. To cancel labeling Press CANCEL before step 3. 38GB You can also label folder or messages using the supplied "Digital Voice Editor" software. The menu mode will be displayed. Labeling Folders Folders are labeled automatically with names modeled on "FOLDER01", but you can use ... a template name and press ENTER to set the name. 4 Press MENU to exit the menu mode. The folder name input window will return to the normal display. The window will be displayed. 2 Press the jog lever up or down (>/ .) to select "FOLDER NAME," and then press ENTER. ...
...Jog lever (>/.) 1 Press MENU. To cancel labeling Press CANCEL before step 3. 38GB You can also label folder or messages using the supplied "Digital Voice Editor" software. The menu mode will be displayed. Labeling Folders Folders are labeled automatically with names modeled on "FOLDER01", but you can use ... a template name and press ENTER to set the name. 4 Press MENU to exit the menu mode. The folder name input window will return to the normal display. The window will be displayed. 2 Press the jog lever up or down (>/ .) to select "FOLDER NAME," and then press ENTER. ...
Operating Instructions
Page 41
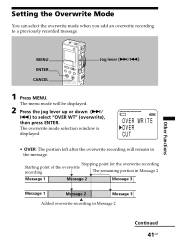
...window is displayed. • OVER: The portion left after the overwrite recording will be displayed. 2 Press the jog lever up or down (>/ .) to a previously recorded message. The menu mode will remain in Message 2 Continued 41GB Stopping point for the overwrite recording Starting point of the overwrite recording... The remaining portion in Message 2 Message 1 Message 2 Message 3 Message 1 Message 2 Message 3 Added overwrite recording in the message. Other Functions MENU ENTER...
...window is displayed. • OVER: The portion left after the overwrite recording will be displayed. 2 Press the jog lever up or down (>/ .) to a previously recorded message. The menu mode will remain in Message 2 Continued 41GB Stopping point for the overwrite recording Starting point of the overwrite recording... The remaining portion in Message 2 Message 1 Message 2 Message 3 Message 1 Message 2 Message 3 Added overwrite recording in the message. Other Functions MENU ENTER...
Operating Instructions
Page 42
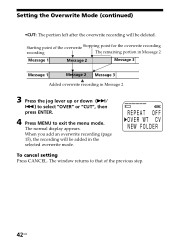
... When you add an overwrite recording (page 15), the recording will be added in Message 2 3 Press the jog lever up or down (>/ .) to select "OVER" or "CUT", then press ENTER. 4 Press MENU to that of the previous step. 42GB The window returns to exit the menu ...mode. Starting point of the overwrite Stopping point for the overwrite recording recording The remaining portion in Message 2 Message 1 Message 2 Message 3 Message 1 Message 2 Message 3 Added overwrite...
... When you add an overwrite recording (page 15), the recording will be added in Message 2 3 Press the jog lever up or down (>/ .) to select "OVER" or "CUT", then press ENTER. 4 Press MENU to that of the previous step. 42GB The window returns to exit the menu ...mode. Starting point of the overwrite Stopping point for the overwrite recording recording The remaining portion in Message 2 Message 1 Message 2 Message 3 Message 1 Message 2 Message 3 Added overwrite...
Operating Instructions
Page 43
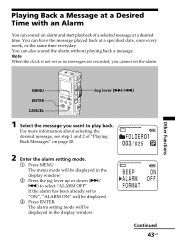
...same time everyday. You can also sound the alarm without playing back a message. Note When the clock is not set or no messages are recorded, you want to select "ALARM OFF". If the alarm has been already set the alarm. For more information about selecting the desired message, see...the alarm setting mode. 1 Press MENU. The menu mode will be displayed. 3 Press ENTER. The alarm setting mode will be displayed in the display window. Other Functions MENU ENTER CANCEL Jog lever (>/.) 1 Select the message you cannot set to "ON", "ALARM ON" will be displayed in the display...
...same time everyday. You can also sound the alarm without playing back a message. Note When the clock is not set or no messages are recorded, you want to select "ALARM OFF". If the alarm has been already set the alarm. For more information about selecting the desired message, see...the alarm setting mode. 1 Press MENU. The menu mode will be displayed. 3 Press ENTER. The alarm setting mode will be displayed in the display window. Other Functions MENU ENTER CANCEL Jog lever (>/.) 1 Select the message you cannot set to "ON", "ALARM ON" will be displayed in the display...
Operating Instructions
Page 44
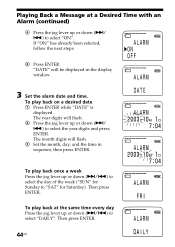
... "ON". To play back once a week Press the jog lever up or down (>/ .) to select the year digits and press ENTER. Then press ENTER. To play back at a Desired Time with an Alarm (continued) 4 Press..."DATE" will flash. 3 Set the month, day, and the time in the display window. 3 Set the alarm date and time. The month digits will be displayed in sequence, then press ENTER. To play back on a desired date 1... Press ENTER while "DATE" is displayed. The year digits will flash. 2 Press the jog lever up or down (>/.) to "SAT" for Sunday to select ...
... "ON". To play back once a week Press the jog lever up or down (>/ .) to select the year digits and press ENTER. Then press ENTER. To play back at a Desired Time with an Alarm (continued) 4 Press..."DATE" will flash. 3 Set the month, day, and the time in the display window. 3 Set the alarm date and time. The month digits will be displayed in sequence, then press ENTER. To play back on a desired date 1... Press ENTER while "DATE" is displayed. The year digits will flash. 2 Press the jog lever up or down (>/.) to "SAT" for Sunday to select ...
Operating Instructions
Page 45
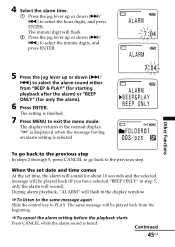
The minute digit will be played back (If you have selected "BEEP ONLY" in the display window. 1To listen to the same message again ...Slide the control key to PLAY. "," is displayed when the message having an alarm setting is finished. 7 Press MENU to exit the menu mode. The same message will flash. 2 Press the jog lever up or down (>/ .) to select the minute digits...is heard. Other Functions 5 Press the jog lever up or down (>/ .) to select the hour digits, and press ENTER. When the set date and time comes At the set time, the alarm ...
The minute digit will be played back (If you have selected "BEEP ONLY" in the display window. 1To listen to the same message again ...Slide the control key to PLAY. "," is displayed when the message having an alarm setting is finished. 7 Press MENU to exit the menu mode. The same message will flash. 2 Press the jog lever up or down (>/ .) to select the minute digits...is heard. Other Functions 5 Press the jog lever up or down (>/ .) to select the hour digits, and press ENTER. When the set date and time comes At the set time, the alarm ...


