Operating Instructions
Page 1
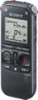
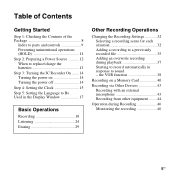
© 2011 Sony Corporation Printed in China IC Recorder Operating Instructions ICD-AX412 4-265-821-11(2) Getting Started Basic Operations Other Recording Operations Other Playback Operations Editing Files About the Menu Function Utilizing Your Computer Additional Information Troubleshooting Index
© 2011 Sony Corporation Printed in China IC Recorder Operating Instructions ICD-AX412 4-265-821-11(2) Getting Started Basic Operations Other Recording Operations Other Playback Operations Editing Files About the Menu Function Utilizing Your Computer Additional Information Troubleshooting Index
Operating Instructions
Page 2
... FCC technical regulations. Owner's Record The model number is located at the rear panel and the serial number is no guarantee that interference will not occur in a particular installation. These limits are cautioned that may not comply with part 15 of Conformity Trade Name : SONY Model : ICD-AX412 Responsible Party : Sony Electronics Inc. If this...
... FCC technical regulations. Owner's Record The model number is located at the rear panel and the serial number is no guarantee that interference will not occur in a particular installation. These limits are cautioned that may not comply with part 15 of Conformity Trade Name : SONY Model : ICD-AX412 Responsible Party : Sony Electronics Inc. If this...
Operating Instructions
Page 3
... of the text and characters, the text shown on the IC recorder may not be displayed properly on the types of a separate user license agreement. • This software is for the IC recorder ICD-AX412. Use of the music beyond those restriction is prohibited. Content information... is written in this limit requires permission of the copyright holders. • Sony is not responsible for incomplete recording/ downloading or damaged data due to problems of ...
... of the text and characters, the text shown on the IC recorder may not be displayed properly on the types of a separate user license agreement. • This software is for the IC recorder ICD-AX412. Use of the music beyond those restriction is prohibited. Content information... is written in this limit requires permission of the copyright holders. • Sony is not responsible for incomplete recording/ downloading or damaged data due to problems of ...
Operating Instructions
Page 5
... other equipment ........44 Operation during playback 37 Starting to record automatically in the Display Window 17 Basic Operations Recording 18 Listening 24 Erasing 29 Other Recording Operations Changing the Recording Settings 32 Selecting a recording scene for each situation 32 Adding a recording to sound - the VOR function 38 Recording on 14 Turning the power off 14 Step 4: Setting...
... other equipment ........44 Operation during playback 37 Starting to record automatically in the Display Window 17 Basic Operations Recording 18 Listening 24 Erasing 29 Other Recording Operations Changing the Recording Settings 32 Selecting a recording scene for each situation 32 Adding a recording to sound - the VOR function 38 Recording on 14 Turning the power off 14 Step 4: Setting...
Operating Instructions
Page 6
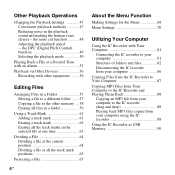
... a File 64 Dividing a file at the current position 64 Dividing a file at a Desired Time with an Alarm 53 Playback via Other Devices 56 Recording with other equipment ........56 Editing Files Arranging Files in a Folder 57 Moving a file to a different folder ........57 Copying a file to the other ... Settings 70 Utilizing Your Computer Using the IC Recorder with Your Computer 81 Connecting the IC recorder to your computer 81 Structure of folders and files 82 Disconnecting the IC recorder from your computer 86 Copying Files from the IC Recorder to Your Computer 87 Copying MP3 Files from...
... a File 64 Dividing a file at the current position 64 Dividing a file at a Desired Time with an Alarm 53 Playback via Other Devices 56 Recording with other equipment ........56 Editing Files Arranging Files in a Folder 57 Moving a file to a different folder ........57 Copying a file to the other ... Settings 70 Utilizing Your Computer Using the IC Recorder with Your Computer 81 Connecting the IC recorder to your computer 81 Structure of folders and files 82 Disconnecting the IC recorder from your computer 86 Copying Files from the IC Recorder to Your Computer 87 Copying MP3 Files from...
Operating Instructions
Page 7
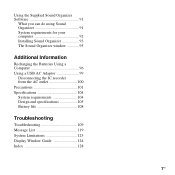
Using the Supplied Sound Organizer Software 91 What you can do using Sound Organizer 91 System requirements for your computer 92 Installing Sound Organizer 93 The Sound Organizer window 95 Additional Information Recharging the Batteries Using a Computer 96 Using a USB AC Adaptor 99 Disconnecting the IC recorder from the AC outlet 100 Precautions 101 Specifications 104 System requirements 104 Design and specifications 105 Battery life 108 Troubleshooting Troubleshooting 109 Message List 119 System Limitations 123 Display Window Guide 124 Index 128 7GB
Using the Supplied Sound Organizer Software 91 What you can do using Sound Organizer 91 System requirements for your computer 92 Installing Sound Organizer 93 The Sound Organizer window 95 Additional Information Recharging the Batteries Using a Computer 96 Using a USB AC Adaptor 99 Disconnecting the IC recorder from the AC outlet 100 Precautions 101 Specifications 104 System requirements 104 Design and specifications 105 Battery life 108 Troubleshooting Troubleshooting 109 Message List 119 System Limitations 123 Display Window Guide 124 Index 128 7GB
Operating Instructions
Page 8
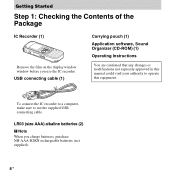
... equipment. LR03 (size AAA) alkaline batteries (2) P Note When you use the supplied USB connecting cable. Getting Started Step 1: Checking the Contents of the Package IC Recorder (1) Remove the film on the display window window before you charge batteries, purchase NH-AAA-B2KN rechargeable batteries (not supplied). 8 GB USB connecting cable (1) Carrying...-ROM) (1) Operating Instructions You are cautioned that any changes or modifications not expressly approved in this manual could void your authority to use the IC recorder.
... equipment. LR03 (size AAA) alkaline batteries (2) P Note When you use the supplied USB connecting cable. Getting Started Step 1: Checking the Contents of the Package IC Recorder (1) Remove the film on the display window window before you charge batteries, purchase NH-AAA-B2KN rechargeable batteries (not supplied). 8 GB USB connecting cable (1) Carrying...-ROM) (1) Operating Instructions You are cautioned that any changes or modifications not expressly approved in this manual could void your authority to use the IC recorder.
Operating Instructions
Page 9
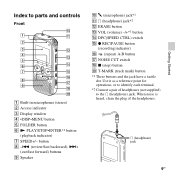
...+/- button H -. (review/fast backward), >+ (cue/fast forward) buttons I Speaker J m (microphone) jack*1 K i (headphone) jack*2 L ERASE button M VOL (volume) -/+*1 button N DPC(SPEED CTRL) switch O z REC/PAUSE button (recording indicator) P (repeat) A-B button Q NOISE CUT switch R x (stop) button S T-MARK (track mark) button *1 These buttons and the jack have a tactile dot.
...+/- button H -. (review/fast backward), >+ (cue/fast forward) buttons I Speaker J m (microphone) jack*1 K i (headphone) jack*2 L ERASE button M VOL (volume) -/+*1 button N DPC(SPEED CTRL) switch O z REC/PAUSE button (recording indicator) P (repeat) A-B button Q NOISE CUT switch R x (stop) button S T-MARK (track mark) button *1 These buttons and the jack have a tactile dot.

Operating Instructions
Page 10
Rear T Stand You can open the stand and set the IC recorder at a more upright angle when recording on a table. U Battery compartment V (USB) connector W M2™/microSD memory card slot X HOLD•POWER ON/OFF switch Y Strap hole (A strap is not supplied.) 10 GB
Rear T Stand You can open the stand and set the IC recorder at a more upright angle when recording on a table. U Battery compartment V (USB) connector W M2™/microSD memory card slot X HOLD•POWER ON/OFF switch Y Strap hole (A strap is not supplied.) 10 GB

Operating Instructions
Page 11
...HOLD) You can stop the alarm playback by pressing any button when the HOLD function is activated during recording, all the button operations are disabled. To release the IC recorder from the HOLD status Getting Started Slide the HOLD•POWER ON/OFF switch in order to prevent ...unintentional operations when you press any button. (You cannot stop recording, cancel the HOLD function first. To stop normal playback.) 11GB P Note When the HOLD function is activated. Slide the HOLD•POWER...
...HOLD) You can stop the alarm playback by pressing any button when the HOLD function is activated during recording, all the button operations are disabled. To release the IC recorder from the HOLD status Getting Started Slide the HOLD•POWER ON/OFF switch in order to prevent ...unintentional operations when you press any button. (You cannot stop recording, cancel the HOLD function first. To stop normal playback.) 11GB P Note When the HOLD function is activated. Slide the HOLD•POWER...
Operating Instructions
Page 12
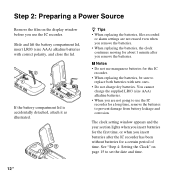
... you remove the batteries. • When replacing the batteries, the clock continues moving for about 1 minute after you insert batteries after the IC recorder has been without batteries for a certain period of time. If the battery compartment lid is accidentally detached, attach it as illustrated. Slide and lift...when you insert batteries for the first time, or when you remove the batteries. P Notes • Do not use manganese batteries for this IC recorder. • When replacing the batteries, be sure to set the date and time. 12 GB You cannot charge the supplied LR03 (size AAA) ...
... you remove the batteries. • When replacing the batteries, the clock continues moving for about 1 minute after you insert batteries after the IC recorder has been without batteries for a certain period of time. If the battery compartment lid is accidentally detached, attach it as illustrated. Slide and lift...when you insert batteries for the first time, or when you remove the batteries. P Notes • Do not use manganese batteries for this IC recorder. • When replacing the batteries, be sure to set the date and time. 12 GB You cannot charge the supplied LR03 (size AAA) ...
Operating Instructions
Page 13
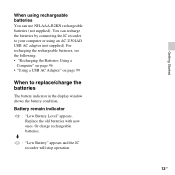
m : "Low Battery" appears and the IC recorder will stop operation. 13GB Replace the old batteries with new ones. You can use NH-AAA-B2KN rechargeable batteries (not supplied). For recharging the rechargeable ... • "Using a USB AC Adaptor" on page 99 When to your computer or using rechargeable batteries You can recharge the batteries by connecting the IC recorder to replace/charge the batteries The battery indicator in the display window shows the battery condition. Battery remain indicator : "Low Battery Level" appears. Or charge...
m : "Low Battery" appears and the IC recorder will stop operation. 13GB Replace the old batteries with new ones. You can use NH-AAA-B2KN rechargeable batteries (not supplied). For recharging the rechargeable ... • "Using a USB AC Adaptor" on page 99 When to your computer or using rechargeable batteries You can recharge the batteries by connecting the IC recorder to replace/charge the batteries The battery indicator in the display window shows the battery condition. Battery remain indicator : "Low Battery Level" appears. Or charge...
Operating Instructions
Page 14
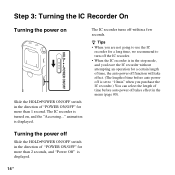
... HOLD•POWER ON/OFF switch in the stop mode, and you leave the IC recorder without attempting an operation for a certain length of time, the auto power off function ...of time before auto power off is displayed. animation is set to "10min" when you purchase the IC recorder.) You can select the length of time before auto power off within a few seconds. Turning the power ...off Slide the HOLD•POWER ON/OFF switch in the menu (page 80). The IC recorder turns off takes effect in the direction of "POWER ON/OFF" for more than 2 seconds, and "Power Off...
... HOLD•POWER ON/OFF switch in the stop mode, and you leave the IC recorder without attempting an operation for a certain length of time, the auto power off function ...of time before auto power off is displayed. animation is set to "10min" when you purchase the IC recorder.) You can select the length of time before auto power off within a few seconds. Turning the power ...off Slide the HOLD•POWER ON/OFF switch in the menu (page 80). The IC recorder turns off takes effect in the direction of "POWER ON/OFF" for more than 2 seconds, and "Power Off...
Operating Instructions
Page 15
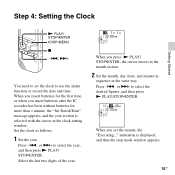
...-MENU x -., >+ You need to set the minute, the "Executing..." When you insert batteries for the first time, or when you insert batteries after the IC recorder has been without batteries for more than 1 minute, the "Set Date&Time" message appears, and the year section is displayed, and then the stop mode... desired figures, and then press N PLAY/STOP•ENTER. When you press N PLAY/ STOP•ENTER, the cursor moves to use the alarm function or record the date and time. Set the clock as follows: 1 Set the year. or >+ to select the year, and then press N PLAY/ STOP•ENTER. When...
...-MENU x -., >+ You need to set the minute, the "Executing..." When you insert batteries for the first time, or when you insert batteries after the IC recorder has been without batteries for more than 1 minute, the "Set Date&Time" message appears, and the year section is displayed, and then the stop mode... desired figures, and then press N PLAY/STOP•ENTER. When you press N PLAY/ STOP•ENTER, the cursor moves to use the alarm function or record the date and time. Set the clock as follows: 1 Set the year. or >+ to select the year, and then press N PLAY/ STOP•ENTER. When...
Operating Instructions
Page 16
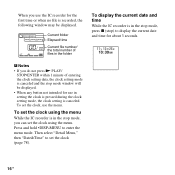
... setting the clock is pressed during the clock setting mode, the clock setting is canceled. To set the clock using the menu While the IC recorder is recorded, the following window may be displayed. • When any button not intended for about 3 seconds. Then select "Detail Menu," then "Date&Time" to enter... N PLAY/ STOP•ENTER within 1 minute of files in the folder To display the current date and time While the IC recorder is in the stop mode, you use the IC recorder for the first time or when no file is in the stop mode, press x (stop mode window will be displayed.
... setting the clock is pressed during the clock setting mode, the clock setting is canceled. To set the clock using the menu While the IC recorder is recorded, the following window may be displayed. • When any button not intended for about 3 seconds. Then select "Detail Menu," then "Date&Time" to enter... N PLAY/ STOP•ENTER within 1 minute of files in the folder To display the current date and time While the IC recorder is in the stop mode, you use the IC recorder for the first time or when no file is in the stop mode, press x (stop mode window will be displayed.

Operating Instructions
Page 18
... the folder in which you make a trial recording first, or monitor the recording (page 46). Starting to record 1 Slide the HOLD•POWER ON/OFF switch towards the center to check the battery indicator (page 13). • Noise may be recorded if an object, such as your finger, ...etc., accidentally rubs or scratches the IC recorder during recording. Basic Operations Recording P Notes • Before making a recording, be sure to release the IC recorder from the HOLD status (page 11). z Tip Before...
... the folder in which you make a trial recording first, or monitor the recording (page 46). Starting to record 1 Slide the HOLD•POWER ON/OFF switch towards the center to check the battery indicator (page 13). • Noise may be recorded if an object, such as your finger, ...etc., accidentally rubs or scratches the IC recorder during recording. Basic Operations Recording P Notes • Before making a recording, be sure to release the IC recorder from the HOLD status (page 11). z Tip Before...

Operating Instructions
Page 19
Basic Operations 3 Place the IC recorder so that the built-in microphones face the direction of the source to be recorded. zTip You can open the stand on the rear and set the IC recorder at a more upright angle when recording on a table. When the stand is accidently detached, attach it as illustrated. 19GB
Basic Operations 3 Place the IC recorder so that the built-in microphones face the direction of the source to be recorded. zTip You can open the stand on the rear and set the IC recorder at a more upright angle when recording on a table. When the stand is accidently detached, attach it as illustrated. 19GB

Operating Instructions
Page 20
The recording indicator lights in red. (When "LED" is set to "OFF" in the folder zTip You can switch the elapsed time display to press and hold z REC/PAUSE while recording. The new file will be automatically recorded after the last recorded file. Elapsed time of the current recording File number of the file being recorded/the total number of recorded files in the menu (page 77), the indicator does not light.) You do not need to remaining time, or another display by pressing •DISP-MENU(page 27). z REC/ PAUSE (recording indicator) 20 GB 4 Press z REC/PAUSE in the stop mode.
The recording indicator lights in red. (When "LED" is set to "OFF" in the folder zTip You can switch the elapsed time display to press and hold z REC/PAUSE while recording. The new file will be automatically recorded after the last recorded file. Elapsed time of the current recording File number of the file being recorded/the total number of recorded files in the menu (page 77), the indicator does not light.) You do not need to remaining time, or another display by pressing •DISP-MENU(page 27). z REC/ PAUSE (recording indicator) 20 GB 4 Press z REC/PAUSE in the stop mode.
Operating Instructions
Page 21
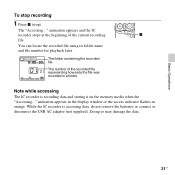
...damage the data. 21GB While the IC recorder is recording data and storing it on the memory media when the "Accessing..." animation appears in the display window or the access indicator flashes in a folder. You can locate the recorded file using its folder name and file ...number for playback later. The folder containing the recorded file The number of the current recording x file. Basic Operations To stop recording 1 Press x (stop). The "Accessing..." Note while accessing The IC recorder is accessing data, do not remove the batteries or connect or ...
...damage the data. 21GB While the IC recorder is recording data and storing it on the memory media when the "Accessing..." animation appears in the display window or the access indicator flashes in a folder. You can locate the recorded file using its folder name and file ...number for playback later. The folder containing the recorded file The number of the current recording x file. Basic Operations To stop recording 1 Press x (stop). The "Accessing..." Note while accessing The IC recorder is accessing data, do not remove the batteries or connect or ...
Operating Instructions
Page 22
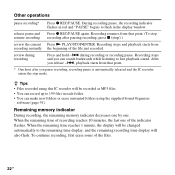
... from that point. (To stop resume recording recording after you can record up to fast playback sound. To continue recording, first erase some of the file just recorded. Other operations pause recording* Press z REC/PAUSE. during recording Press and hold -. Recording stops and you pause recording, recording pause is automatically released and the IC recorder enters the stop ).) review the current...
... from that point. (To stop resume recording recording after you can record up to fast playback sound. To continue recording, first erase some of the file just recorded. Other operations pause recording* Press z REC/PAUSE. during recording Press and hold -. Recording stops and you pause recording, recording pause is automatically released and the IC recorder enters the stop ).) review the current...


