Operating Instructions
Page 1
Serial No HVR-MRC1 2008 Sony Corporation Record the serial number in the space provided below. Model No. 3-290-149-11(1) Memory Recording Unit Operating Instructions Owner's record The model number and the serial number are located at the name plate on the left of the unit. HVR- Refer to these numbers whenever you call upon your Sony dealer regarding this product.
Serial No HVR-MRC1 2008 Sony Corporation Record the serial number in the space provided below. Model No. 3-290-149-11(1) Memory Recording Unit Operating Instructions Owner's record The model number and the serial number are located at the name plate on the left of the unit. HVR- Refer to these numbers whenever you call upon your Sony dealer regarding this product.
Operating Instructions
Page 2
... of contents Overview 3 Names of parts 4 Memory Recording Unit / i.LINK Cradle 4 LCD screen display 5 Using in VIDEO mode 6 Connecting this unit to this unit 9 Recording images (POWER switch at the ON side 9 Playback the image recorded on the License ANY USE OF THIS PRODUCT OTHER THAN...trademark of Apple Inc. and other countries. • CompactFlash is a trademark of Sony Corporation. • i.LINK and are trademarks of Sony Corporation. • HDV and the HDV logo are trademarks of Sony Corporation and Victor Company of Japan, Ltd. • Microsoft, Windows, Windows Vista ...
... of contents Overview 3 Names of parts 4 Memory Recording Unit / i.LINK Cradle 4 LCD screen display 5 Using in VIDEO mode 6 Connecting this unit to this unit 9 Recording images (POWER switch at the ON side 9 Playback the image recorded on the License ANY USE OF THIS PRODUCT OTHER THAN...trademark of Apple Inc. and other countries. • CompactFlash is a trademark of Sony Corporation. • i.LINK and are trademarks of Sony Corporation. • HDV and the HDV logo are trademarks of Sony Corporation and Victor Company of Japan, Ltd. • Microsoft, Windows, Windows Vista ...
Operating Instructions
Page 3
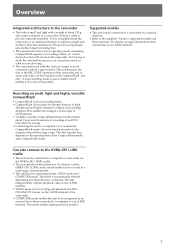
...an i.LINK terminal. Can also connect to the HVRA-CR1 i.LINK cradle • The unit can output a record command without a cable to provide camcorder mobility. Supported models • This unit can be connected to a camcorder via a special interface. • Refer to the supplied...altitude and are highly resistant to impact such as operating mode, remaining CompactFlash capacity or recording format, etc. This enables recording in a wide range of environments. • This unit has two operating modes, VIDEO mode and COMPUTER mode. Overview Integrated architecture to the camcorder...
...an i.LINK terminal. Can also connect to the HVRA-CR1 i.LINK cradle • The unit can output a record command without a cable to provide camcorder mobility. Supported models • This unit can be connected to a camcorder via a special interface. • Refer to the supplied...altitude and are highly resistant to impact such as operating mode, remaining CompactFlash capacity or recording format, etc. This enables recording in a wide range of environments. • This unit has two operating modes, VIDEO mode and COMPUTER mode. Overview Integrated architecture to the camcorder...
Operating Instructions
Page 4
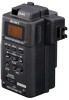
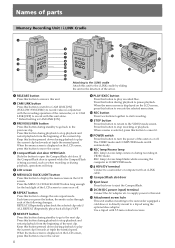
... to the previous clip. qs POWER switch Press this button to turn the power of this unit on or off . 7 REPEAT button Press this button to change the auto repeat mode. Names of parts Memory Recording Unit / i.LINK Cradle 1 qg 5 6 7 qf 2 qh 8 3 9 q; 4 qa qj qk qs qd Attaching to... button to switch to CAM LINK [ON] (FOLLOW/SYNCHRO) to record video in conjunction with the recording operation of the camcorder, or to CAM LINK [OFF] to record with this unit alone. * Default setting is being accessed, such as when recording or during playback, operations will stop. 5 LCD screen 6 MENU/...
... to the previous clip. qs POWER switch Press this button to turn the power of this unit on or off . 7 REPEAT button Press this button to change the auto repeat mode. Names of parts Memory Recording Unit / i.LINK Cradle 1 qg 5 6 7 qf 2 qh 8 3 9 q; 4 qa qj qk qs qd Attaching to... button to switch to CAM LINK [ON] (FOLLOW/SYNCHRO) to record video in conjunction with the recording operation of the camcorder, or to CAM LINK [OFF] to record with this unit alone. * Default setting is being accessed, such as when recording or during playback, operations will stop. 5 LCD screen 6 MENU/...
Operating Instructions
Page 5
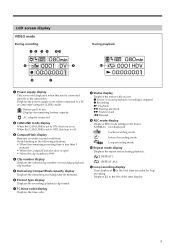
LCD screen display VIDEO mode During recording 12 3 4 5qa 9 6 During playback q; 8 7 1 Power supply display This icon is not displayed when this unit is connected directly to a PC or camcorder using the i.LINK cradle. AC adapter connected 2 CAM LINK mode display When the CAM LINK... is set to OFF, this icon is on and playback/recording is stopped z Recording N Playback u Pausing playback M Fast-forward m ...
LCD screen display VIDEO mode During recording 12 3 4 5qa 9 6 During playback q; 8 7 1 Power supply display This icon is not displayed when this unit is connected directly to a PC or camcorder using the i.LINK cradle. AC adapter connected 2 CAM LINK mode display When the CAM LINK... is set to OFF, this icon is on and playback/recording is stopped z Recording N Playback u Pausing playback M Fast-forward m ...
Operating Instructions
Page 6
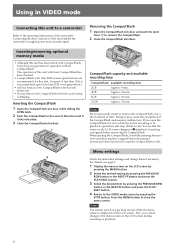
... cause the CompactFlash to fall. 3 2 Menu settings Check the individual settings and change to the menu screen on the LCD screen during recording or playback. 6 For details, see page 7. 1 Display the menu screen on the LCD screen. Doing so may cause mis-recognition... Return to supply power and a stream signal. Inserting/removing optional memory media • Although this unit has been tested with CompactFlash, Sony does not guarantee its operation with this unit before removing the CompactFlash. Notes Do not repeatedly insert or remove the CompactFlash over a short amount ...
... cause the CompactFlash to fall. 3 2 Menu settings Check the individual settings and change to the menu screen on the LCD screen during recording or playback. 6 For details, see page 7. 1 Display the menu screen on the LCD screen. Doing so may cause mis-recognition... Return to supply power and a stream signal. Inserting/removing optional memory media • Although this unit has been tested with CompactFlash, Sony does not guarantee its operation with this unit before removing the CompactFlash. Notes Do not repeatedly insert or remove the CompactFlash over a short amount ...
Operating Instructions
Page 7
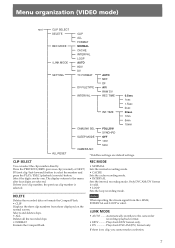
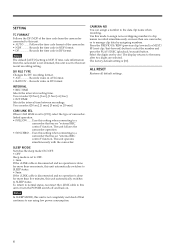
... button. CLIP SELECT You can select the clip number directly. REC MODE • NORMAL Sets the normal recording mode. • CACHE Sets the cache recording mode. • INTERVAL Sets the interval recording mode. If there is no clip number, the previous clip number is no clip, you cannot make a... back HDV format only. • DV Plays back DVCAM (DV) format only. Selects and deletes clips. • ALL Deletes all the recorded clips. • FORMAT Formats the CompactFlash. Notes When inputting the stream signal from those displayed on the normal screen. Menu organization (VIDEO mode...
... button. CLIP SELECT You can select the clip number directly. REC MODE • NORMAL Sets the normal recording mode. • CACHE Sets the cache recording mode. • INTERVAL Sets the interval recording mode. If there is no clip number, the previous clip number is no clip, you cannot make a... back HDV format only. • DV Plays back DVCAM (DV) format only. Selects and deletes clips. • ALL Deletes all the recorded clips. • FORMAT Formats the CompactFlash. Notes When inputting the stream signal from those displayed on the normal screen. Menu organization (VIDEO mode...
Operating Instructions
Page 8
... for more than five minutes, this setting when connecting to the data clip name when recording. Notes The default [AUTO] setting is [00]. The factory default setting is NDF. The unit follows the camcorder operation. • SYNCHRO ... SLEEP MODE Switches the sleep mode ON/OFF...], [1.5sec] or [2sec]. • INT.TIME Selects the interval time between recordings. Uses this unit automatically switches to manage clip data by one. DV FILE TYPE Changes the DV recording format. • AVI Records video in DV format. Select the digits one by assigning numbers. You can select...
... for more than five minutes, this setting when connecting to the data clip name when recording. Notes The default [AUTO] setting is [00]. The factory default setting is NDF. The unit follows the camcorder operation. • SYNCHRO ... SLEEP MODE Switches the sleep mode ON/OFF...], [1.5sec] or [2sec]. • INT.TIME Selects the interval time between recordings. Uses this unit automatically switches to manage clip data by one. DV FILE TYPE Changes the DV recording format. • AVI Records video in DV format. Select the digits one by assigning numbers. You can select...
Operating Instructions
Page 9
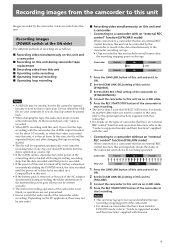
...; The above Step 3 is for about 20 minutes but this clip is operated as follows: x Recording video simultaneously on this unit and a camcorder x Recording on this unit during camcorder tape replacement x Recording video from the camcorder to this unit Images recorded by the camcorder can be any audio. For details on another camcorder you want to connect...
...; The above Step 3 is for about 20 minutes but this clip is operated as follows: x Recording video simultaneously on this unit and a camcorder x Recording on this unit during camcorder tape replacement x Recording video from the camcorder to this unit Images recorded by the camcorder can be any audio. For details on another camcorder you want to connect...
Operating Instructions
Page 10
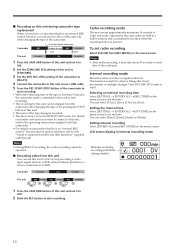
... or by pressing the STOP button of this unit. • The noise of the camcorder. Interval recording mode Records a series of video and audio captured by this unit can use this unit to start recording. • The recording by the camcorder are held in interval recording mode Remains on during recording and blinks during camcorder tape replacement When connected...
... or by pressing the STOP button of this unit. • The noise of the camcorder. Interval recording mode Records a series of video and audio captured by this unit can use this unit to start recording. • The recording by the camcorder are held in interval recording mode Remains on during recording and blinks during camcorder tape replacement When connected...
Operating Instructions
Page 11
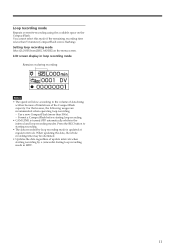
...11 Format a CompactFlash before starting recording by loop recording mode is less than 300x). - When updating the data, the whole recording time may be shortened. • Updates the data regardless of the CompactFlash capacity. Loop recording mode Repeats overwrite-recording using the available space on ...the menu screen. For that reason, the following usages are recommended when operating loop recording; - Press the REC button to starting recording. • The data recorded by a camcorder during recording Notes • The speed will slow according to the volume of data being ...
...11 Format a CompactFlash before starting recording by loop recording mode is less than 300x). - When updating the data, the whole recording time may be shortened. • Updates the data regardless of the CompactFlash capacity. Loop recording mode Repeats overwrite-recording using the available space on ...the menu screen. For that reason, the following usages are recommended when operating loop recording; - Press the REC button to starting recording. • The data recorded by a camcorder during recording Notes • The speed will slow according to the volume of data being ...
Operating Instructions
Page 12
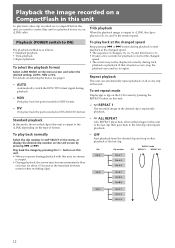
...of the last clip. To set repeat mode Display or on the LCD screen by pressing the REPEAT button on this unit. Standard playback In this mode, the recorded clip in this unit is as follows. • Standard playback • Trick playback • Repeat playback To select the playback format Select... 0.5 second at the changed speed Keep pressing . ALL REPEAT ALL REPEAT plays back all or one clip in this unit. - Playback the image recorded on a CompactFlash in this unit To play back normally Select the clip number in CLIP SELECT of the menu, or display the desired clip number on...
...of the last clip. To set repeat mode Display or on the LCD screen by pressing the REPEAT button on this unit. Standard playback In this mode, the recorded clip in this unit is as follows. • Standard playback • Trick playback • Repeat playback To select the playback format Select... 0.5 second at the changed speed Keep pressing . ALL REPEAT ALL REPEAT plays back all or one clip in this unit. - Playback the image recorded on a CompactFlash in this unit To play back normally Select the clip number in CLIP SELECT of the menu, or display the desired clip number on...
Operating Instructions
Page 13
... video camera operation part on the tape.) Tips If there is no tape in the HVR-Z7/S270, you can start or stop recording the image on this unit operates as follows. Time code value always advances. • TC MAKE ........ The internal time code of the HVR- Time code of this TC...-Z7/S270 Tapeless external REC control Even if there is no tape in the SYNCHRONUS or RELAY settings, you can start or stop recording the image on a CompactFlash in this unit, the time REC RUN code value advances code value from the preset time advances from 00:00:00:01. When starting...
... video camera operation part on the tape.) Tips If there is no tape in the HVR-Z7/S270, you can start or stop recording the image on this unit operates as follows. Time code value always advances. • TC MAKE ........ The internal time code of the HVR- Time code of this TC...-Z7/S270 Tapeless external REC control Even if there is no tape in the SYNCHRONUS or RELAY settings, you can start or stop recording the image on a CompactFlash in this unit, the time REC RUN code value advances code value from the preset time advances from 00:00:00:01. When starting...
Operating Instructions
Page 14
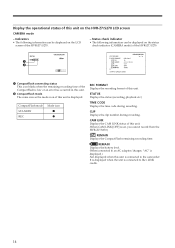
...S270. - STATUS Displays the status (recording, playback etc.) TIME CODE Displays the time code during recording. CompactFlash mode STANDBY REC Mode icon x z REC FORMAT Displays the recording format of this unit. (When CAM LINK [OFF] is set, you cannot record from the HVR-Z7/S270.) REMAIN ...2 1 CompactFlash connecting status This icon blinks when the remaining recording time of the CompactFlash is low or an error has occurred in this unit. 2 CompactFlash mode The same icon as the mode icon of this unit is displayed. Indicators • The following information can be displayed...
...S270. - STATUS Displays the status (recording, playback etc.) TIME CODE Displays the time code during recording. CompactFlash mode STANDBY REC Mode icon x z REC FORMAT Displays the recording format of this unit. (When CAM LINK [OFF] is set, you cannot record from the HVR-Z7/S270.) REMAIN ...2 1 CompactFlash connecting status This icon blinks when the remaining recording time of the CompactFlash is low or an error has occurred in this unit. 2 CompactFlash mode The same icon as the mode icon of this unit is displayed. Indicators • The following information can be displayed...
Operating Instructions
Page 15
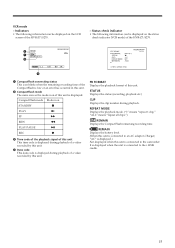
... Mode icon STANDBY x PLAY N FF M REW m PLAY PAUSE u REC z 3 Time code of the playback signal of a video recorded by this unit. 4 Data code This data code is connected to the i.LINK cradle. 15 Status check indicator • The following information can be displayed...clip," "ALL" means "repeat all clips.") REMAIN Displays the CompactFlash remaining recording time. It is displayed when the unit is displayed.) Not displayed when this unit. VCR mode - REMAIN Displays the battery level. (When this unit is connected to an AC adaptor/charger, "AC" is connected to ...
... Mode icon STANDBY x PLAY N FF M REW m PLAY PAUSE u REC z 3 Time code of the playback signal of a video recorded by this unit. 4 Data code This data code is connected to the i.LINK cradle. 15 Status check indicator • The following information can be displayed...clip," "ALL" means "repeat all clips.") REMAIN Displays the CompactFlash remaining recording time. It is displayed when the unit is displayed.) Not displayed when this unit. VCR mode - REMAIN Displays the battery level. (When this unit is connected to an AC adaptor/charger, "AC" is connected to ...

Operating Instructions
Page 16
...mode Connecting to a computer You can still be operated with the battery pack attached. 2 Connect this unit to the computer via the optional i.LINK cable. 3 Slide the POWER switch of this unit to COMPUTER mode, the following screen is not assured if the above OS has been upgraded. For...later) / Windows Vista Standard installation is recommended. For Macintosh users • OS: Mac OS X (v10.3 or later) 16 Operation is displayed on this unit as a file in HDV or DV format to a nonlinear editing system or computer. 1 Attach the HVRA-CR1 i.LINK cradle and optional AC adaptor to ...
...mode Connecting to a computer You can still be operated with the battery pack attached. 2 Connect this unit to the computer via the optional i.LINK cable. 3 Slide the POWER switch of this unit to COMPUTER mode, the following screen is not assured if the above OS has been upgraded. For...later) / Windows Vista Standard installation is recommended. For Macintosh users • OS: Mac OS X (v10.3 or later) 16 Operation is displayed on this unit as a file in HDV or DV format to a nonlinear editing system or computer. 1 Attach the HVRA-CR1 i.LINK cradle and optional AC adaptor to ...
Operating Instructions
Page 18
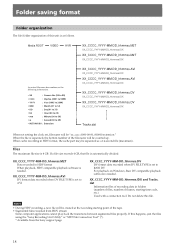
... frames, starting point of the tape. • Segmented files recorded from the Sony support page 18 Folder saving format Folder organization The file/folder organization of this unit is as a 14-second file (maximum). Do not delete this happens, join the files using the "Sony Recording Unit Utility" or "M2T File Connection Tool" (*). * Available from HDV...
... frames, starting point of the tape. • Segmented files recorded from the Sony support page 18 Folder saving format Folder organization The file/folder organization of this unit is as a 14-second file (maximum). Do not delete this happens, join the files using the "Sony Recording Unit Utility" or "M2T File Connection Tool" (*). * Available from HDV...
Operating Instructions
Page 20
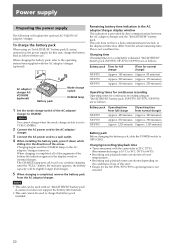
... between the AC adaptor/charger and the "InfoLITHIUM" battery pack. Remaining battery time indication in the direction of this unit, charge the battery back as follows. Battery pack Operating time from full charge (Operating time from the actual remaining time...F770 Approx. 230 minutes (Approx. 170 minutes) NP-F970 Approx. 310 minutes (Approx. 250 minutes) Operating times for continuous recording Operating times for continuous recording using an "InfoLITHIUM" battery pack (L-series, optional) as the power supply for a completely exhausted "InfoLITHIUM" battery pack (NP...
... between the AC adaptor/charger and the "InfoLITHIUM" battery pack. Remaining battery time indication in the direction of this unit, charge the battery back as follows. Battery pack Operating time from full charge (Operating time from the actual remaining time...F770 Approx. 230 minutes (Approx. 170 minutes) NP-F970 Approx. 310 minutes (Approx. 250 minutes) Operating times for continuous recording Operating times for continuous recording using an "InfoLITHIUM" battery pack (L-series, optional) as the power supply for a completely exhausted "InfoLITHIUM" battery pack (NP...
Operating Instructions
Page 21
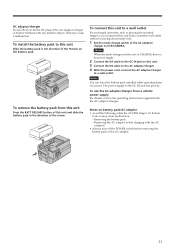
...in the direction of the AC adaptor/ charger to the operating instructions supplied with the AC adaptor/charger. Notes You can operate this unit from this unit Press the BATT RELEASE button of the AC adaptor/charger or battery terminal with the AC adaptor) • Always turn off the ...POWER switch before removing the battery pack or the AC adaptor. 21 To connect this unit to a wall outlet For prolonged operation, such as playing the recorded images, you can leave the battery pack installed while operating from a vehicle power supply For details, refer to ...
...in the direction of the AC adaptor/ charger to the operating instructions supplied with the AC adaptor/charger. Notes You can operate this unit from this unit Press the BATT RELEASE button of the AC adaptor/charger or battery terminal with the AC adaptor) • Always turn off the ...POWER switch before removing the battery pack or the AC adaptor. 21 To connect this unit to a wall outlet For prolonged operation, such as playing the recorded images, you can leave the battery pack installed while operating from a vehicle power supply For details, refer to ...
Operating Instructions
Page 22
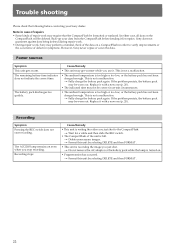
... or replaced. t Delete unnecessary images. t Format this unit by selecting DELETE and then FORMAT. 22 Back-up your Sony dealer. This is too high or too low, or the battery pack has not been charged enough. Cause/Remedy • This unit is recording the image you just shot to verify improvements or... the occurrence of the unit is too high or too low, ...
... or replaced. t Delete unnecessary images. t Format this unit by selecting DELETE and then FORMAT. 22 Back-up your Sony dealer. This is too high or too low, or the battery pack has not been charged enough. Cause/Remedy • This unit is recording the image you just shot to verify improvements or... the occurrence of the unit is too high or too low, ...


