
Operation Guide
Page 2
When recording in your camcorder You can use in DVCAM format, Sony recommends that has the following markings. Types of "Memory Stick" you can use any type of memory card except "Memory Stick Duo." • "Memory Stick PRO Duo" can be used with your camcorder.) "Memory Stick" (You ... • You cannot use in your camcorder Your camcorder is adopted in BS (broadcast satellite) digital and terrestrial digital HDTV broadcastings and in HDV, DVCAM and DV formats. When recording in HDV/DV format, Sony recommends that you can use any "Memory Stick" that you use mini DV ...
When recording in your camcorder You can use in DVCAM format, Sony recommends that has the following markings. Types of "Memory Stick" you can use any type of memory card except "Memory Stick Duo." • "Memory Stick PRO Duo" can be used with your camcorder.) "Memory Stick" (You ... • You cannot use in your camcorder Your camcorder is adopted in BS (broadcast satellite) digital and terrestrial digital HDTV broadcastings and in HDV, DVCAM and DV formats. When recording in HDV/DV format, Sony recommends that you can use any "Memory Stick" that you use mini DV ...

Operation Guide
Page 3
...LCD panel, viewfinder, and lens • A menu item that is grayed out is not dustproof, dripproof or waterproof. Squeezing the terminals into your camcorder's jacks may be some tiny black points and/or bright points (white, red, blue, or green in use . Black point White, red, ... way. See "About handling of the manufacturing process and do not affect the recording in a malfunction of the pixels are normal results of your camcorder" (p. 125). • Do not connect cables to the sun or strong light source for effective use . These points are operational for extended ...
...LCD panel, viewfinder, and lens • A menu item that is grayed out is not dustproof, dripproof or waterproof. Squeezing the terminals into your camcorder's jacks may be some tiny black points and/or bright points (white, red, blue, or green in use . Black point White, red, ... way. See "About handling of the manufacturing process and do not affect the recording in a malfunction of the pixels are normal results of your camcorder" (p. 125). • Do not connect cables to the sun or strong light source for effective use . These points are operational for extended ...

Operation Guide
Page 4
...8226; Illustrations of the LCD screen and the viewfinder used in this manual Features available for the DV SP format only. To view your camcorder if necessary (p. 21). • Design and specifications of recording media and other materials may be notable in each local language are used ...on the screen or in the HDV format cannot be copyrighted. In this case, a message appears on this camcorder prior to an ASSIGN button. Check the contents of the camcorder, storage media, etc. • TV color systems differ depending on the recording conditions. The function that ...
...8226; Illustrations of the LCD screen and the viewfinder used in this manual Features available for the DV SP format only. To view your camcorder if necessary (p. 21). • Design and specifications of recording media and other materials may be notable in each local language are used ...on the screen or in the HDV format cannot be copyrighted. In this case, a message appears on this camcorder prior to an ASSIGN button. Check the contents of the camcorder, storage media, etc. • TV color systems differ depending on the recording conditions. The function that ...
Operation Guide
Page 5
... microphone and the lens hood with lens cover 10 Step 3: Charging the battery pack 13 Step 4: Turning the power on and holding your camcorder properly .....17 Step 5: Adjusting the LCD panel and viewfinder 18 Step 6: Setting the date and time 20 Changing the language setting 21 Step... 7: Inserting a tape or a "Memory Stick Duo 22 Recording/Playback Recording 24 Changing the settings of your camcorder recordings 28 Adjusting the zoom 28 Adjusting the focus manually 29 Adjusting the image brightness 30 Adjusting to natural color (White balance 33 ...
... microphone and the lens hood with lens cover 10 Step 3: Charging the battery pack 13 Step 4: Turning the power on and holding your camcorder properly .....17 Step 5: Adjusting the LCD panel and viewfinder 18 Step 6: Setting the date and time 20 Changing the language setting 21 Step... 7: Inserting a tape or a "Memory Stick Duo 22 Recording/Playback Recording 24 Changing the settings of your camcorder recordings 28 Adjusting the zoom 28 Adjusting the focus manually 29 Adjusting the image brightness 30 Adjusting to natural color (White balance 33 ...

Operation Guide
Page 6
... Playing the picture on a TV 58 Using the Menu Using the menu items 64 Menu items 66 (CAMERA SET) menu 69 Settings to adjust your camcorder to the recording conditions (GAIN SETUP/ BACK LIGHT/STEADYSHOT, etc.) (AUDIO SET) menu 77 Settings for the audio recording (DV AU.MODE (DV Audio mode...
... Playing the picture on a TV 58 Using the Menu Using the menu items 64 Menu items 66 (CAMERA SET) menu 69 Settings to adjust your camcorder to the recording conditions (GAIN SETUP/ BACK LIGHT/STEADYSHOT, etc.) (AUDIO SET) menu 77 Settings for the audio recording (DV AU.MODE (DV Audio mode...

Operation Guide
Page 7
Additional Information Using your camcorder abroad 118 Maintenance and precautions 119 HDV format and recording/playback 119 Compatibility of the DVCAM/DV formats 120 About the "Memory Stick 122 About the "InfoLITHIUM" battery pack 123 About i.LINK 124 About x.v.Color 125 About handling of your camcorder 125 Specifications 129 Quick Reference Identifying parts and controls 134 Indicators for the LCD screen and viewfinder 140 Index ...143 7
Additional Information Using your camcorder abroad 118 Maintenance and precautions 119 HDV format and recording/playback 119 Compatibility of the DVCAM/DV formats 120 About the "Memory Stick 122 About the "InfoLITHIUM" battery pack 123 About i.LINK 124 About x.v.Color 125 About handling of your camcorder 125 Specifications 129 Quick Reference Identifying parts and controls 134 Indicators for the LCD screen and viewfinder 140 Index ...143 7
Operation Guide
Page 8
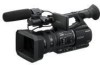
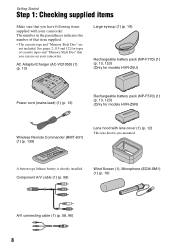
.../Charger (AC-VQ1050) (1) (p. 13) Large eyecup (1) (p. 19) Rechargeable battery pack (NP-F770) (1) (p. 13, 123) (Only for models HVR-Z5U) Power cord (mains lead) (1) (p. 13) Rechargeable battery pack (NP-F570) (1) (p. 13, 123) (Only for types of that you have ... (ECM-XM1) (1) (p. 10) A/V connecting cable (1) (p. 58, 96) 8 See pages 2, 119 and 122 for models HVR-Z5N) Wireless Remote Commander (RMT-831) (1) (p. 139) Lens hood with your camcorder. A button-type lithium battery is pre-mounted. Getting Started Step 1: Checking supplied items Make sure that you can use on...
.../Charger (AC-VQ1050) (1) (p. 13) Large eyecup (1) (p. 19) Rechargeable battery pack (NP-F770) (1) (p. 13, 123) (Only for models HVR-Z5U) Power cord (mains lead) (1) (p. 13) Rechargeable battery pack (NP-F570) (1) (p. 13, 123) (Only for types of that you have ... (ECM-XM1) (1) (p. 10) A/V connecting cable (1) (p. 58, 96) 8 See pages 2, 119 and 122 for models HVR-Z5N) Wireless Remote Commander (RMT-831) (1) (p. 139) Lens hood with your camcorder. A button-type lithium battery is pre-mounted. Getting Started Step 1: Checking supplied items Make sure that you can use on...

Operation Guide
Page 12
PUSH (lens hood release) button Align the marks on the lens hood to those on the camcorder, and turn the lens hood in the illustration while pressing the PUSH (lens hood release) button. To remove the lens hood with lens cover Turn ...
PUSH (lens hood release) button Align the marks on the lens hood to those on the camcorder, and turn the lens hood in the illustration while pressing the PUSH (lens hood release) button. To remove the lens hood with lens cover Turn ...

Operation Guide
Page 13
... off until the battery mark with the supplied AC Adaptor/Charger. To attach the battery pack Press the battery pack against the back of your camcorder and slide it in the display window when the normal charge of the AC Adaptor/Charger, press it down, and slide it down. After charging...
... off until the battery mark with the supplied AC Adaptor/Charger. To attach the battery pack Press the battery pack against the back of your camcorder and slide it in the display window when the normal charge of the AC Adaptor/Charger, press it down, and slide it down. After charging...
Operation Guide
Page 14
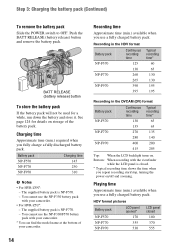
... pack NP-F570 NP-F770 NP-F970 Charging time 145 230 310 b Notes • For HVR-Z5N*: - Charging time Approximate time (min.) required when you use the NP-F330 battery pack with your camcorder. 14 Recording time Approximate time (min.) available when you repeat recording start/stop, turning the power... 135 65 NP-F770 270 135 280 140 NP-F970 400 200 415 205 Top: When the LCD backlight turns on storage of your camcorder. • For HVR-Z5U*: - HDV format pictures Battery pack NP-F570 NP-F770 NP-F970 LCD panel opened* 170 355 530 LCD panel closed . * Typical recording...
... pack NP-F570 NP-F770 NP-F970 Charging time 145 230 310 b Notes • For HVR-Z5N*: - Charging time Approximate time (min.) required when you use the NP-F330 battery pack with your camcorder. 14 Recording time Approximate time (min.) available when you repeat recording start/stop, turning the power... 135 65 NP-F770 270 135 280 140 NP-F970 400 200 415 205 Top: When the LCD backlight turns on storage of your camcorder. • For HVR-Z5U*: - HDV format pictures Battery pack NP-F570 NP-F770 NP-F970 LCD panel opened* 170 355 530 LCD panel closed . * Typical recording...

Operation Guide
Page 15
... depending on . On the AC Adaptor/Charger • Use the nearby wall outlet when using your camcorder. • Do not use the AC Adaptor/Charger placed in low temperatures. • The recording ...415) against the back of your camcorder with the camcorder at 25 °C (77 °F). 10 to 30 °C (50 °F to 86 °F) is worn-out. • Sony recommends that you use an NP-...F970 battery pack when you use the AC Adaptor/Charger to OFF. • The Battery Info (p. 55) will not be shorter when you use your camcorder in the battery...
... depending on . On the AC Adaptor/Charger • Use the nearby wall outlet when using your camcorder. • Do not use the AC Adaptor/Charger placed in low temperatures. • The recording ...415) against the back of your camcorder with the camcorder at 25 °C (77 °F). 10 to 30 °C (50 °F to 86 °F) is worn-out. • Sony recommends that you use an NP-...F970 battery pack when you use the AC Adaptor/Charger to OFF. • The Battery Info (p. 55) will not be shorter when you use your camcorder in the battery...

Operation Guide
Page 16
Step 3: Charging the battery pack (Continued) • Do not short-circuit the DC plug of the AC Adaptor/Charger or battery terminal with any metallic objects. This may cause a malfunction. • Even if your camcorder is turned off, AC power (house current) is still supplied to it while connected to the wall outlet (wall socket) via the AC Adaptor/Charger. 16
Step 3: Charging the battery pack (Continued) • Do not short-circuit the DC plug of the AC Adaptor/Charger or battery terminal with any metallic objects. This may cause a malfunction. • Even if your camcorder is turned off, AC power (house current) is still supplied to it while connected to the wall outlet (wall socket) via the AC Adaptor/Charger. 16

Operation Guide
Page 17
... To record or play or edit pictures. Step 4: Turning the power on and holding your camcorder once you set the POWER switch to CAMERA or VCR while you turn off the power Slide the POWER switch to OFF while pressing the ... appear on the LCD screen for the first time, the [CLOCK SET] screen appears (p. 20). 2 Hold the camcorder properly. Getting Started POWER switch 1 Slide the POWER switch to the respective positions. When you use your camcorder for a few seconds when you press the green button. 3 Ensure a good grip, then fasten the grip...
... To record or play or edit pictures. Step 4: Turning the power on and holding your camcorder once you set the POWER switch to CAMERA or VCR while you turn off the power Slide the POWER switch to OFF while pressing the ... appear on the LCD screen for the first time, the [CLOCK SET] screen appears (p. 20). 2 Hold the camcorder properly. Getting Started POWER switch 1 Slide the POWER switch to the respective positions. When you use your camcorder for a few seconds when you press the green button. 3 Ensure a good grip, then fasten the grip...

Operation Guide
Page 18
... INFO button z Tips • You can see primary colors shimmering in a normal image. The image will be recorded in the viewfinder when you move your camcorder in the viewfinder, set [VF POWERMODE] to [ON](p. 84). • To display images in black and white in bright conditions or when you want to...
... INFO button z Tips • You can see primary colors shimmering in a normal image. The image will be recorded in the viewfinder when you move your camcorder in the viewfinder, set [VF POWERMODE] to [ON](p. 84). • To display images in black and white in bright conditions or when you want to...

Operation Guide
Page 20
... SET --:--:--:-- Y M D 2008 - If you do not set the date and time, [CLOCK SET] screen appears every time you do not use your camcorder for about 3 months, the built-in rechargeable battery gets discharged and the date and time settings may be cleared from the memory. z Tips • If... AM. For midnight, set the clock for the first time. Y M D 2008 - Step 6: Setting the date and time Set the date and time when using your camcorder or change the POWER switch positions. JAN - 1 12 : 00 AM [ MENU ] : CANCEL 4 Set [Y] (year) by turning the SEL/PUSH EXEC dial, then...
... SET --:--:--:-- Y M D 2008 - If you do not set the date and time, [CLOCK SET] screen appears every time you do not use your camcorder for about 3 months, the built-in rechargeable battery gets discharged and the date and time settings may be cleared from the memory. z Tips • If... AM. For midnight, set the clock for the first time. Y M D 2008 - Step 6: Setting the date and time Set the date and time when using your camcorder or change the POWER switch positions. JAN - 1 12 : 00 AM [ MENU ] : CANCEL 4 Set [Y] (year) by turning the SEL/PUSH EXEC dial, then...

Operation Guide
Page 23
... careful with the "Memory Stick Duo" from popping out and dropping. 23 Do not shake or knock your camcorder is reading/writing data. b Notes • When the access lamp is lit or flashing, your camcorder, turn the power off, eject the "Memory Stick Duo," or remove the battery pack. Getting Started 2 Insert...
... careful with the "Memory Stick Duo" from popping out and dropping. 23 Do not shake or knock your camcorder is reading/writing data. b Notes • When the access lamp is lit or flashing, your camcorder, turn the power off, eject the "Memory Stick Duo," or remove the battery pack. Getting Started 2 Insert...

Operation Guide
Page 24
Do the following steps to CAMERA while pressing the green button. Recording/Playback Recording REC START/ STOP button B Recording lamp Recording lamp Lens hood ASSIGN 7/ PHOTO button POWER switch REC START/STOP button A Your camcorder records movies on tape and still images on "Memory Stick Duo." Press and hold the green button when you slide the POWER switch from OFF. 24 The factory setting is HDV format ([REC FORMAT], p. 85). 1 Open the shutter of the lens hood. 2 Slide the POWER switch to record movies. • This camcorder can record movies in HDV or DVCAM (DV) format.
Do the following steps to CAMERA while pressing the green button. Recording/Playback Recording REC START/ STOP button B Recording lamp Recording lamp Lens hood ASSIGN 7/ PHOTO button POWER switch REC START/STOP button A Your camcorder records movies on tape and still images on "Memory Stick Duo." Press and hold the green button when you slide the POWER switch from OFF. 24 The factory setting is HDV format ([REC FORMAT], p. 85). 1 Open the shutter of the lens hood. 2 Slide the POWER switch to record movies. • This camcorder can record movies in HDV or DVCAM (DV) format.

Operation Guide
Page 26
... the screen during movie recording. Recording in HDV format: 1.2M - Playing back in DVCAM (DV) format (4:3): 0.9M - z Tips • See page 142 for Sony "Memory Stick Duo." When [SCAN TYPE] is slower than 1/48 (p. 85, 86) 26 - While using [SMTH SLW REC] - Recording in DVCAM (DV) format... 12000 15000 4GB 6300 8500 23500 29500 8GB 12500 17000 48000 60000 16GB 25500 34500 97500 122000 b Notes • Specifications are both saved on your camcorder. 1 Assign [PHOTO] to the ASSIGN 7/ PHOTO button (p. 46). 2 Set the POWER switch to VCR. 3 Press the N (play) button to search...
... the screen during movie recording. Recording in HDV format: 1.2M - Playing back in DVCAM (DV) format (4:3): 0.9M - z Tips • See page 142 for Sony "Memory Stick Duo." When [SCAN TYPE] is slower than 1/48 (p. 85, 86) 26 - While using [SMTH SLW REC] - Recording in DVCAM (DV) format... 12000 15000 4GB 6300 8500 23500 29500 8GB 12500 17000 48000 60000 16GB 25500 34500 97500 122000 b Notes • Specifications are both saved on your camcorder. 1 Assign [PHOTO] to the ASSIGN 7/ PHOTO button (p. 46). 2 Set the POWER switch to VCR. 3 Press the N (play) button to search...

Operation Guide
Page 27
Recording/Playback • Camera data stored on the tape will not be copied to the "Memory Stick Duo." • You cannot store a still image during using your camcorder with [PB ZOOM] set to [ON] (p. 93). 27
Recording/Playback • Camera data stored on the tape will not be copied to the "Memory Stick Duo." • You cannot store a still image during using your camcorder with [PB ZOOM] set to [ON] (p. 93). 27

Operation Guide
Page 28
...the handle zoom switch B to zoom in or out. Wide view: (Wide angle) Close view: (Telephoto) z Tips • The minimum distance required between your camcorder and the subject for focus is set [FOCUS MACRO] to OFF. • You cannot change the zoom speed of the power zoom lever D may also...D, the operation sound of the zoom lever D with the handle zoom switch B. z Tips • When you set the handle zoom switch B to keep your camcorder recordings Adjusting the zoom . b Notes • You cannot use the handle zoom lever A when the handle zoom switch B is about 1 cm (about 13/32...
...the handle zoom switch B to zoom in or out. Wide view: (Wide angle) Close view: (Telephoto) z Tips • The minimum distance required between your camcorder and the subject for focus is set [FOCUS MACRO] to OFF. • You cannot change the zoom speed of the power zoom lever D may also...D, the operation sound of the zoom lever D with the handle zoom switch B. z Tips • When you set the handle zoom switch B to keep your camcorder recordings Adjusting the zoom . b Notes • You cannot use the handle zoom lever A when the handle zoom switch B is about 1 cm (about 13/32...


