Operation Guide
Page 1
http://www.sony.net/ Printed on 70% or more recycled paper using VOC (Volatile Organic Compound) -free vegetable oil based ink. Printed in Japan GB Digital HD Video Camera Recorder 4-114-858-11(1) Digital HD Video Camera Recorder Operating Guide Before operating the unit, please read this manual thoroughly, and retain it for future reference HVR-Z5E/Z5P © 2008 Sony Corporation
http://www.sony.net/ Printed on 70% or more recycled paper using VOC (Volatile Organic Compound) -free vegetable oil based ink. Printed in Japan GB Digital HD Video Camera Recorder 4-114-858-11(1) Digital HD Video Camera Recorder Operating Guide Before operating the unit, please read this manual thoroughly, and retain it for future reference HVR-Z5E/Z5P © 2008 Sony Corporation

Operation Guide
Page 2
... are recorded and played back on use Types of cassette you use mini DV cassettes. Read this first Before operating this unit, please read this manual thoroughly, and retain it in your camcorder.) b Notes • You cannot use any "Memory Stick" that you can use any type of memory...; "Memory Stick PRO Duo" can be used with your camcorder.) "Memory Stick" (You cannot use it for future reference. When recording in DVCAM format, Sony recommends that you can use in your camcorder You can use in your camcorder Your camcorder is adopted in BS (broadcast satellite) digital and terrestrial...
... are recorded and played back on use Types of cassette you use mini DV cassettes. Read this first Before operating this unit, please read this manual thoroughly, and retain it in your camcorder.) b Notes • You cannot use any "Memory Stick" that you can use any type of memory...; "Memory Stick PRO Duo" can be used with your camcorder.) "Memory Stick" (You cannot use it for future reference. When recording in DVCAM format, Sony recommends that you can use in your camcorder You can use in your camcorder Your camcorder is adopted in BS (broadcast satellite) digital and terrestrial...
Operation Guide
Page 4
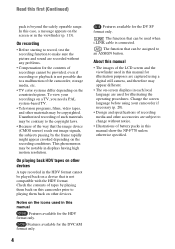
...back on the countries/regions. On recording • Before starting to record, test the recording function to an ASSIGN button. About this manual • The images of tapes by the frame rapidly might appear crooked depending on a device that can be provided, even if ... sound are captured using your recordings on other accessories are used in this manual for illustration purposes are recorded without notice. • Illustrations of such materials may be notable in this manual show the NP-F770 unless otherwise specified. Unauthorized recording of battery packs in...
...back on the countries/regions. On recording • Before starting to record, test the recording function to an ASSIGN button. About this manual • The images of tapes by the frame rapidly might appear crooked depending on a device that can be provided, even if ... sound are captured using your recordings on other accessories are used in this manual for illustration purposes are recorded without notice. • Illustrations of such materials may be notable in this manual show the NP-F770 unless otherwise specified. Unauthorized recording of battery packs in...
Operation Guide
Page 5
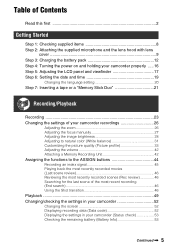
... a tape or a "Memory Stick Duo 21 Recording/Playback Recording 23 Changing the settings of your camcorder recordings 26 Adjusting the zoom 26 Adjusting the focus manually 27 Adjusting the image brightness 28 Adjusting to natural color (White balance 31 Customizing the picture quality (Picture profile 33 Adjusting the volume 42 Attaching...
... a tape or a "Memory Stick Duo 21 Recording/Playback Recording 23 Changing the settings of your camcorder recordings 26 Adjusting the zoom 26 Adjusting the focus manually 27 Adjusting the image brightness 28 Adjusting to natural color (White balance 31 Customizing the picture quality (Picture profile 33 Adjusting the volume 42 Attaching...
Operation Guide
Page 8
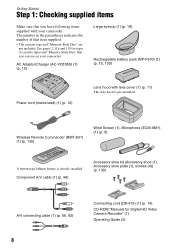
... camcorder. Component A/V cable (1) (p. 56) Accessory shoe kit (Accessory shoe (1), Accessory shoe plate (1), screws (4)) (p. 130) A/V connecting cable (1) (p. 56, 93) 8 Connecting cord (DK-415) (1) (p. 14) CD-ROM "Manuals for types of that you have following items supplied with lens cover (1) (p. 11) This lens hood is already installed. See pages 2, 116 and 119 for...
... camcorder. Component A/V cable (1) (p. 56) Accessory shoe kit (Accessory shoe (1), Accessory shoe plate (1), screws (4)) (p. 130) A/V connecting cable (1) (p. 56, 93) 8 Connecting cord (DK-415) (1) (p. 14) CD-ROM "Manuals for types of that you have following items supplied with lens cover (1) (p. 11) This lens hood is already installed. See pages 2, 116 and 119 for...
Operation Guide
Page 27
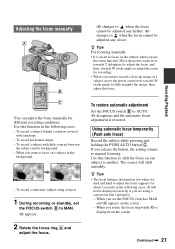
... is easier to focus on a subject in the background. - Continued , 27 Adjusting the focus manually 9 changes to when the focus cannot be adjusted any farther. 9 changes to manual focusing. To restore automatic adjustment Set the FOCUS switch B to AUTO. 9 disappears and the automatic... record horizontal stripes. - z Tips • The focal distance information (for different recording conditions. Recording/Playback You can adjust the focus manually for when it is restored. When you are using a tripod. 1 During recording or standby, set the FOCUS switch to fully magnify ...
... is easier to focus on a subject in the background. - Continued , 27 Adjusting the focus manually 9 changes to when the focus cannot be adjusted any farther. 9 changes to manual focusing. To restore automatic adjustment Set the FOCUS switch B to AUTO. 9 disappears and the automatic... record horizontal stripes. - z Tips • The focal distance information (for different recording conditions. Recording/Playback You can adjust the focus manually for when it is restored. When you are using a tripod. 1 During recording or standby, set the FOCUS switch to fully magnify ...
Operation Guide
Page 28
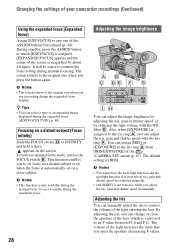
...Expanded focus) Assign [EXP.FOCUS] to INFINITY and hold it there. It will be easier to the iris ring A, you can manually adjust the iris to manual focus mode, release the FOCUS switch B. b Notes • This function is not available during the automatic focus. 28 Adjusting the... image brightness You can change or close subject. It is only available during manual focusing. The screen returns to which is automatically set on the screen. By adjusting the iris, you open the aperture (decreasing F value...
...Expanded focus) Assign [EXP.FOCUS] to INFINITY and hold it there. It will be easier to the iris ring A, you can manually adjust the iris to manual focus mode, release the FOCUS switch B. b Notes • This function is not available during the automatic focus. 28 Adjusting the... image brightness You can change or close subject. It is only available during manual focusing. The screen returns to which is automatically set on the screen. By adjusting the iris, you open the aperture (decreasing F value...
Operation Guide
Page 29
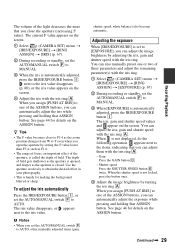
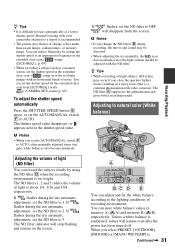
...screen. 1 Select (CAMERA SET) menu t [IRIS/EXPOSURE] t [RING ASSIGN] t [IRIS] (p. 67). 2 During recording or standby, set the AUTO/MANUAL switch F to obtain the desired effect in your photography. • This is closed. You can adjust the iris, gain and shutter speed with the iris... ring. 1 Select (CAMERA SET) menu t [IRIS/EXPOSURE] t [RING ASSIGN] t [EXPOSURE] (p. 67) 2 During recording or standby, set the AUTO/MANUAL switch F to the iris value. Gain Press the GAIN button C. - Shutter speed Press the SHUTTER SPEED button E twice. Continued , 29 Recording/Playback When you ...
...screen. 1 Select (CAMERA SET) menu t [IRIS/EXPOSURE] t [RING ASSIGN] t [IRIS] (p. 67). 2 During recording or standby, set the AUTO/MANUAL switch F to obtain the desired effect in your photography. • This is closed. You can adjust the iris, gain and shutter speed with the iris... ring. 1 Select (CAMERA SET) menu t [IRIS/EXPOSURE] t [RING ASSIGN] t [EXPOSURE] (p. 67) 2 During recording or standby, set the AUTO/MANUAL switch F to the iris value. Gain Press the GAIN button C. - Shutter speed Press the SHUTTER SPEED button E twice. Continued , 29 Recording/Playback When you ...

Operation Guide
Page 30
...the extended clear scan ( ). To readjust the shutter speed, do not want to use the AGC (automatic gain control). 1 Set the AUTO/MANUAL switch F to MANUAL during recording or standby. 2 When the gain is displayed on the screen. 3 Set the gain switch H to adjust the shutter speed. ...4. The gain value disappears, or appears next to those values. The larger the value on how to H, M or L. You can adjust the shutter speed manually. b Notes • When you press the SHUTTER SPEED button E while is automatically adjusted, press the GAIN button C. See step 2 in "Adjusting the shutter...
...the extended clear scan ( ). To readjust the shutter speed, do not want to use the AGC (automatic gain control). 1 Set the AUTO/MANUAL switch F to MANUAL during recording or standby. 2 When the gain is displayed on the screen. 3 Set the gain switch H to adjust the shutter speed. ...4. The gain value disappears, or appears next to those values. The larger the value on how to H, M or L. You can adjust the shutter speed manually. b Notes • When you press the SHUTTER SPEED button E while is automatically adjusted, press the GAIN button C. See step 2 in "Adjusting the shutter...
Operation Guide
Page 31
... in the extended clear scan ( ) range ([ECS FREQ.], p. 69). • When recording a subject such as a monitor screen, set the AUTO/MANUAL switch F to obtain images with video cameras). When you set the shutter speed in the extended clear scan ( ) range in a fuzzy focus (this ... speed value disappears, or appears next to focus automatically at a lower shutter speed. If flashes during the iris automatic adjustment, set the AUTO/MANUAL switch F to about 1/4, 1/16 and 1/64, respectively. If flashes during the iris automatic adjustment, set the ND filter to the lighting...
... in the extended clear scan ( ) range ([ECS FREQ.], p. 69). • When recording a subject such as a monitor screen, set the AUTO/MANUAL switch F to obtain images with video cameras). When you set the shutter speed in the extended clear scan ( ) range in a fuzzy focus (this ... speed value disappears, or appears next to focus automatically at a lower shutter speed. If flashes during the iris automatic adjustment, set the AUTO/MANUAL switch F to about 1/4, 1/16 and 1/64, respectively. If flashes during the iris automatic adjustment, set the ND filter to the lighting...
Operation Guide
Page 32
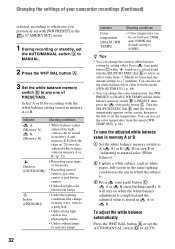
... stored in A or B. You can change the color temperature. To adjust the white balance automatically Press the WHT BAL button A or set the AUTO/MANUAL switch D to +7 (reddish). A or B starts flashing rapidly. Press (one push) button C while (outdoor) is . 3 Press (one push...B) • White balance values adjusted for recording with [WB PRESET] in the (CAMERA SET) menu. 1 During recording or standby, set the AUTO/MANUAL switch D to MANUAL. 2 Press the WHT BAL button A. 3 Set the white balance memory switch B to natural color (White balance)." 2 Capture a white subject, such...
... stored in A or B. You can change the color temperature. To adjust the white balance automatically Press the WHT BAL button A or set the AUTO/MANUAL switch D to +7 (reddish). A or B starts flashing rapidly. Press (one push) button C while (outdoor) is . 3 Press (one push...B) • White balance values adjusted for recording with [WB PRESET] in the (CAMERA SET) menu. 1 During recording or standby, set the AUTO/MANUAL switch D to MANUAL. 2 Press the WHT BAL button A. 3 Set the white balance memory switch B to natural color (White balance)." 2 Capture a white subject, such...

Operation Guide
Page 33
... Recording/Playback To cancel the picture profile recording Select [OFF] in [PP1] through [PP6] as [GAMMA] and [DETAIL]. b Notes • When you set the AUTO/MANUAL switch D to AUTO, other manual adjustments (iris, gain, and shutter speed) also become automatic.
... Recording/Playback To cancel the picture profile recording Select [OFF] in [PP1] through [PP6] as [GAMMA] and [DETAIL]. b Notes • When you set the AUTO/MANUAL switch D to AUTO, other manual adjustments (iris, gain, and shutter speed) also become automatic.
Operation Guide
Page 36
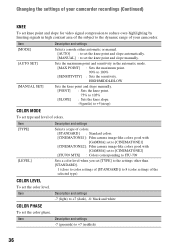
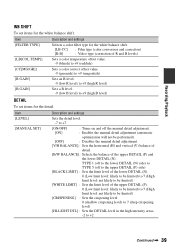
... : Sets the maximum point. 90% to +7 (reddish) 36 Item [MODE] [AUTO SET] [MANUAL SET] Description and settings Selects a mode either automatic or manual. [AUTO] : to set the knee point and slope automatically. [MANUAL] : to the dynamic range of colors. Item Description and settings -7 (light) to +5(steep) COLOR... MODE To set type and level of your camcorder. HIGH/MIDDLE/LOW Sets the knee point and slope manually. [POINT] : Sets the knee point. 75% to 105% [SLOPE] : Sets the knee slope. -5(gentle) to +7 (dark), -8: black and...
... : Sets the maximum point. 90% to +7 (reddish) 36 Item [MODE] [AUTO SET] [MANUAL SET] Description and settings Selects a mode either automatic or manual. [AUTO] : to set the knee point and slope automatically. [MANUAL] : to the dynamic range of colors. Item Description and settings -7 (light) to +5(steep) COLOR... MODE To set type and level of your camcorder. HIGH/MIDDLE/LOW Sets the knee point and slope manually. [POINT] : Sets the knee point. 75% to 105% [SLOPE] : Sets the knee slope. -5(gentle) to +7 (dark), -8: black and...
Operation Guide
Page 38
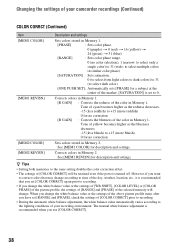
...] of the picture profile, the settings of [RANGE] and [PHASE] of the selected memory will be retained even if the power is turned off. The manual white balance adjustment is recommended when you change . Changing the settings of your recording environment. Corrects colors in Memory 1. [R GAIN] : Corrects the redness of the...
...] of the picture profile, the settings of [RANGE] and [PHASE] of the selected memory will be retained even if the power is turned off. The manual white balance adjustment is recommended when you change . Changing the settings of your recording environment. Corrects colors in Memory 1. [R GAIN] : Corrects the redness of the...
Operation Guide
Page 39
... items for the white balance shift. TYPE 1 (off to the lower DETAIL (N) side) to TYPE 5 (off the manual detail adjustment. [ON] : Enables the manual detail adjustment (automatic optimization will not be limited) [CRISPENING] : Sets the crispening level. 0 (shallow crispening level) to... DETAIL (P). 0 (Low limit level: likely to be limited) to 7 (High limit level: not likely to be performed). [OFF] : Disables the manual detail adjustment. [V/H BALANCE] : Sets the horizontal (H) and vertical (V) balance of detail. [B/W BALANCE]: Selects the balance of R and B levels) Sets...
... items for the white balance shift. TYPE 1 (off to the lower DETAIL (N) side) to TYPE 5 (off the manual detail adjustment. [ON] : Enables the manual detail adjustment (automatic optimization will not be limited) [CRISPENING] : Sets the crispening level. 0 (shallow crispening level) to... DETAIL (P). 0 (Low limit level: likely to be limited) to 7 (High limit level: not likely to be performed). [OFF] : Disables the manual detail adjustment. [V/H BALANCE] : Sets the horizontal (H) and vertical (V) balance of detail. [B/W BALANCE]: Selects the balance of R and B levels) Sets...
Operation Guide
Page 42
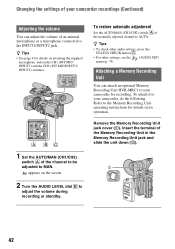
... to your camcorder recordings (Continued) Adjusting the volume You can attach an optional Memory Recording Unit HVR-MRC1 to the INPUT1/INPUT2 jack. To restore automatic adjustment Set the AUTO/MAN (CH1/CH2) switch A of the manually adjusted channel to MAN. z Tips • See page 9 for recording. Changing the settings of your...
... to your camcorder recordings (Continued) Adjusting the volume You can attach an optional Memory Recording Unit HVR-MRC1 to the INPUT1/INPUT2 jack. To restore automatic adjustment Set the AUTO/MAN (CH1/CH2) switch A of the manually adjusted channel to MAN. z Tips • See page 9 for recording. Changing the settings of your...
Operation Guide
Page 47
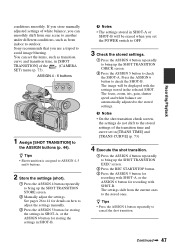
... check the SHOT-A. b Notes • On the shot transition check screen, the settings do not shift to bring up the SHOT TRANSITION STORE screen. 2 Manually adjust the settings. ASSIGN 4 - 6 buttons 1 Assign [SHOT TRANSITION] to check the SHOT-B. b Notes • The settings stored in [TRANS TIME]..., shutter speed and white balance are automatically adjusted to cancel the shot transition. Sony recommends that you set in SHOT-A or SHOT-B will be erased when you use a tripod to adjust the settings manually. 3 Press the ASSIGN 5 button for storing the settings in SHOT-A, or ...
... check the SHOT-A. b Notes • On the shot transition check screen, the settings do not shift to bring up the SHOT TRANSITION STORE screen. 2 Manually adjust the settings. ASSIGN 4 - 6 buttons 1 Assign [SHOT TRANSITION] to check the SHOT-B. b Notes • The settings stored in [TRANS TIME]..., shutter speed and white balance are automatically adjusted to cancel the shot transition. Sony recommends that you set in SHOT-A or SHOT-B will be erased when you use a tripod to adjust the settings manually. 3 Press the ASSIGN 5 button for storing the settings in SHOT-A, or ...
Operation Guide
Page 52
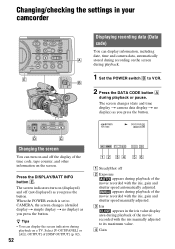
... 1 Set the POWER switch B to VCR. 2 Press the DATA CODE button A during playback of the movie recorded with the iris, gain and shutter speed manually adjusted. C Iris appears in your camcorder Displaying recording data (Data code) You can display the screen indicators during playback on the screen. D Gain The screen...value. Press the DISPLAY/BATT INFO button E. The screen indicators turn on (displayed) and off the display of the movie recorded with the iris manually adjusted to CAMERA, the screen changes (detailed display t simple display t no display) as you press the button.
... 1 Set the POWER switch B to VCR. 2 Press the DATA CODE button A during playback of the movie recorded with the iris, gain and shutter speed manually adjusted. C Iris appears in your camcorder Displaying recording data (Data code) You can display the screen indicators during playback on the screen. D Gain The screen...value. Press the DISPLAY/BATT INFO button E. The screen indicators turn on (displayed) and off the display of the movie recorded with the iris manually adjusted to CAMERA, the screen changes (detailed display t simple display t no display) as you press the button.
Operation Guide
Page 56
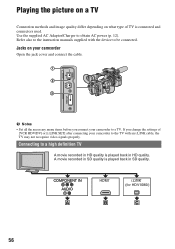
... obtain AC power (p. 12). Refer also to a high definition TV A movie recorded in HD quality is played back in HD quality. Connecting to the instruction manuals supplied with an i.LINK cable, the TV may not recognize video signals properly. COMPONENT IN AUDIO A HHDDMMI I ii..LLIINNKK (for HDV1080i) B C 56
... obtain AC power (p. 12). Refer also to a high definition TV A movie recorded in HD quality is played back in HD quality. Connecting to the instruction manuals supplied with an i.LINK cable, the TV may not recognize video signals properly. COMPONENT IN AUDIO A HHDDMMI I ii..LLIINNKK (for HDV1080i) B C 56
Operation Guide
Page 58
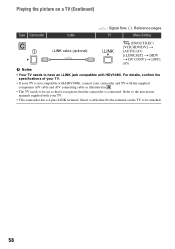
... with HDV1080i, connect your camcorder and TV with the supplied component A/V cable and A/V connecting cable as illustrated in . • The TV needs to the instruction manuals supplied with HDV1080i. Playing the picture on the TV to be set so that it recognizes that fits the terminal on a TV (Continued) Type Camcorder...
... with HDV1080i, connect your camcorder and TV with the supplied component A/V cable and A/V connecting cable as illustrated in . • The TV needs to the instruction manuals supplied with HDV1080i. Playing the picture on the TV to be set so that it recognizes that fits the terminal on a TV (Continued) Type Camcorder...


