
Operation Guide
Page 2
...use any "Memory Stick" that you can use in your camcorder You can use any type of "Memory Stick" you use standard size DVCAM cassettes or mini DVCAM cassettes. When recording in HDV/DV format, Sony recommends that has the following markings. Read this first Before ...operating this unit, please read this manual thoroughly, and retain it in your camcorder Your camcorder is adopted in BS (broadcast satellite) digital and terrestrial digital...
...use any "Memory Stick" that you can use in your camcorder You can use any type of "Memory Stick" you use standard size DVCAM cassettes or mini DVCAM cassettes. When recording in HDV/DV format, Sony recommends that has the following markings. Read this first Before ...operating this unit, please read this manual thoroughly, and retain it in your camcorder Your camcorder is adopted in BS (broadcast satellite) digital and terrestrial digital...

Operation Guide
Page 3
... technology, so over 99.99% of the manufacturing process and do not affect the recording in any problems. Continued , 3 Do not expose your camcorder's viewfinder, lens, or LCD screen to the sun or strong light source for effective use . See "About handling of your...panel, viewfinder, and lens • A menu item that appear constantly on the viewfinder or lens and damage the internal parts of your camcorder. Squeezing the terminals into your camcorder's jacks may be some tiny black points and/or bright points (white, red, blue, or green in color) that is grayed out...
... technology, so over 99.99% of the manufacturing process and do not affect the recording in any problems. Continued , 3 Do not expose your camcorder's viewfinder, lens, or LCD screen to the sun or strong light source for effective use . See "About handling of your...panel, viewfinder, and lens • A menu item that appear constantly on the viewfinder or lens and damage the internal parts of your camcorder. Squeezing the terminals into your camcorder's jacks may be some tiny black points and/or bright points (white, red, blue, or green in color) that is grayed out...

Operation Guide
Page 4
... DVCAM format only. On playing back HDV tapes on other devices A tape recorded in the HDV format cannot be notable in Germany, and Sony Corporation, and produces superior images. MTF= Modulation Transfer Function. Features available for the DV SP format only. Also, the lens for video ...cameras and offers a quality typical of the camcorder, storage media, etc. • TV color systems differ depending on the recording conditions. To view your recordings on a TV, you need an ...
... DVCAM format only. On playing back HDV tapes on other devices A tape recorded in the HDV format cannot be notable in Germany, and Sony Corporation, and produces superior images. MTF= Modulation Transfer Function. Features available for the DV SP format only. Also, the lens for video ...cameras and offers a quality typical of the camcorder, storage media, etc. • TV color systems differ depending on the recording conditions. To view your recordings on a TV, you need an ...

Operation Guide
Page 5
... 1: Checking supplied items 8 Step 2: Attaching the supplied items 9 Step 3: Preparing a power supply 15 Step 4: Turning the power on and holding your camcorder properly .....17 Step 5: Adjusting the viewfinder and LCD panel 18 Step 6: Setting the date and time 20 Step 7: Inserting a tape or a "Memory ...Stick Duo 22 Recording/Playback Recording 25 Changing the settings of your camcorder recordings 29 Adjusting the zoom 29 Adjusting the focus manually 30 Adjusting the exposure 32 Adjusting to natural color (White balance 34 Adjusting...
... 1: Checking supplied items 8 Step 2: Attaching the supplied items 9 Step 3: Preparing a power supply 15 Step 4: Turning the power on and holding your camcorder properly .....17 Step 5: Adjusting the viewfinder and LCD panel 18 Step 6: Setting the date and time 20 Step 7: Inserting a tape or a "Memory ...Stick Duo 22 Recording/Playback Recording 25 Changing the settings of your camcorder recordings 29 Adjusting the zoom 29 Adjusting the focus manually 30 Adjusting the exposure 32 Adjusting to natural color (White balance 34 Adjusting...

Operation Guide
Page 6
Table of Contents (Continued) Using the Menu Using the menu items 62 Menu items 64 (CAMERA SET) menu 67 Settings to adjust your camcorder to the recording conditions (GAIN SETUP/BACK LIGHT/STEADYSHOT, etc.) (AUDIO SET) menu 74 Settings for the audio recording (HDV 2CH/4CH/XLR SET, etc.) (...
Table of Contents (Continued) Using the Menu Using the menu items 62 Menu items 64 (CAMERA SET) menu 67 Settings to adjust your camcorder to the recording conditions (GAIN SETUP/BACK LIGHT/STEADYSHOT, etc.) (AUDIO SET) menu 74 Settings for the audio recording (HDV 2CH/4CH/XLR SET, etc.) (...

Operation Guide
Page 7
Additional Information Maintenance and precautions 107 HDV format and recording/playback 107 Compatibility of the DVCAM/DV formats 108 About the "Memory Stick 110 About i.LINK 111 About x.v.Color 112 About handling of your camcorder 113 Specifications 117 Quick Reference Identifying parts and controls 121 Indicators for the LCD screen and viewfinder 128 Index ...132 7
Additional Information Maintenance and precautions 107 HDV format and recording/playback 107 Compatibility of the DVCAM/DV formats 108 About the "Memory Stick 110 About i.LINK 111 About x.v.Color 112 About handling of your camcorder 113 Specifications 117 Quick Reference Identifying parts and controls 121 Indicators for the LCD screen and viewfinder 128 Index ...132 7

Operation Guide
Page 8
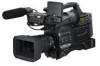
See pages 2, 107 and 110 for Digital HD Video Camera Recorder" (1) Operating Guide (This manual) (1) Lens hood with your camcorder. Memory Recording Unit (HVR-MRC1) (1) (p. 13), Wind Screen (1), Microphone (ECM-XM1) (1) (p. 11) Accessory shoe kit (Accessory shoe (1), Accessory shoe plate (1), screws (4)) (p. 121) i.LINK Cradle (HVRA-CR1) (1) (p. 14) Shoulder belt (1) (p. ... lens (VCL-412BWS) (1) (p. 9) This lens is pre-mounted. Large eyecup (1) (p. 18) 8 Getting Started Step 1: Checking supplied items Make sure that you can use on your camcorder.
See pages 2, 107 and 110 for Digital HD Video Camera Recorder" (1) Operating Guide (This manual) (1) Lens hood with your camcorder. Memory Recording Unit (HVR-MRC1) (1) (p. 13), Wind Screen (1), Microphone (ECM-XM1) (1) (p. 11) Accessory shoe kit (Accessory shoe (1), Accessory shoe plate (1), screws (4)) (p. 121) i.LINK Cradle (HVRA-CR1) (1) (p. 14) Shoulder belt (1) (p. ... lens (VCL-412BWS) (1) (p. 9) This lens is pre-mounted. Large eyecup (1) (p. 18) 8 Getting Started Step 1: Checking supplied items Make sure that you can use on your camcorder.
Operation Guide
Page 9
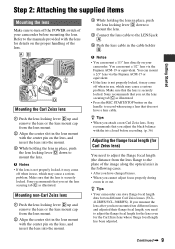
...the cable holder B. Continued , 9 Getting Started Step 2: Attaching the supplied items Mounting the lens Make sure to turn off the POWER switch of your camcorder. b Notes • You can mount a 2/3" lens via the Fujinon ACM-19 or equivalent. z Tips • When you cannot adjust focus properly ...focal length (for ten different Carl Zeiss lenses (VCL412BWS/VCL-308BWS). Make sure that you set the lens securing tab C as illustrated. Sony recommends that the lens is securely locked. Mounting the Carl Zeiss lens 1 Push the lens locking lever D up and remove the lens or...
...the cable holder B. Continued , 9 Getting Started Step 2: Attaching the supplied items Mounting the lens Make sure to turn off the POWER switch of your camcorder. b Notes • You can mount a 2/3" lens via the Fujinon ACM-19 or equivalent. z Tips • When you cannot adjust focus properly ...focal length (for ten different Carl Zeiss lenses (VCL412BWS/VCL-308BWS). Make sure that you set the lens securing tab C as illustrated. Sony recommends that the lens is securely locked. Mounting the Carl Zeiss lens 1 Push the lens locking lever D up and remove the lens or...

Operation Guide
Page 10
... length adjustment test chart A about 2-3 meters (7-10 feet) away. If the adjustment fails, [Could not adjust.] appears on the screen. Zoom in and set your camcorder to locate the center of the chart in the center of the screen. 3 Set the ZOOM switch F to SERVO. 4 Select [AUTO ADJUST] in focus, then...
... length adjustment test chart A about 2-3 meters (7-10 feet) away. If the adjustment fails, [Could not adjust.] appears on the screen. Zoom in and set your camcorder to locate the center of the chart in the center of the screen. 3 Set the ZOOM switch F to SERVO. 4 Select [AUTO ADJUST] in focus, then...

Operation Guide
Page 11
... MODE 1 Attach the wind screen B to theAUDIO INPUT1 (L) jack D. PUSH (lens hood release) button Align the marks on the lens hood to those on the camcorder, and turn the lens hood in the microphone holder C with the model name facing upward, close the cover, and shut the clamp. 3 Connect the plug...
... MODE 1 Attach the wind screen B to theAUDIO INPUT1 (L) jack D. PUSH (lens hood release) button Align the marks on the lens hood to those on the camcorder, and turn the lens hood in the microphone holder C with the model name facing upward, close the cover, and shut the clamp. 3 Connect the plug...

Operation Guide
Page 13
... RELEASE lever of the arrow while pressing here. To remove the shoulder strap Pull in the same way. Continued , 13 For details, refer to your camcorder as illustrated. Attaching Memory Recording Unit Attach the Memory Recording Unit to the shoulder strap fitting on the other clip to your...
... RELEASE lever of the arrow while pressing here. To remove the shoulder strap Pull in the same way. Continued , 13 For details, refer to your camcorder as illustrated. Attaching Memory Recording Unit Attach the Memory Recording Unit to the shoulder strap fitting on the other clip to your...
Operation Guide
Page 15
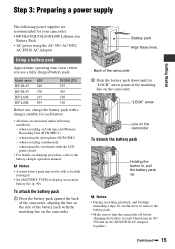
... you use , charge the battery pack with the matching line on charging procedure, refer to turn the camcorder off before changing the battery (except when using the microphone (ECM-XM1) - when recording on the camcorder To detach the battery pack Holding the button in, pull LOCK the battery pack up. b Notes •...-L80S 295 DVCAM (DV) 255 385 230 310 Before use a fully charged battery pack. "LOCK" arrow LOCK Line on both tape and Memory Recording Unit (HVR-MRC1) - when using the viewfinder with the LCD panel closed • For details on the...
... you use , charge the battery pack with the matching line on charging procedure, refer to turn the camcorder off before changing the battery (except when using the microphone (ECM-XM1) - when recording on the camcorder To detach the battery pack Holding the button in, pull LOCK the battery pack up. b Notes •...-L80S 295 DVCAM (DV) 255 385 230 310 Before use a fully charged battery pack. "LOCK" arrow LOCK Line on both tape and Memory Recording Unit (HVR-MRC1) - when using the viewfinder with the LCD panel closed • For details on the...

Operation Guide
Page 16
... from the battery pack to the AC Adaptor connected to the DC IN 12V connector of the camcorder (p. 16). to an AC power source Avoiding breaks in the same way as shown in the... battery pack with the AC-550) Power switch on To use the AC-550 AC Adaptor Connect the camcorder to the camcorder operation by using an AC Adaptor. 1 Turn the AC-550 AC Adaptor on. 16 Step 3: Preparing... (Continued) Using an AC Adaptor To use the AC-DN10 AC Adaptor Mount an AC-DN10 on the camcorder in operation due to an exhausted battery When the battery pack is becoming exhausted, you can supply up to...
... from the battery pack to the AC Adaptor connected to the DC IN 12V connector of the camcorder (p. 16). to an AC power source Avoiding breaks in the same way as shown in the... battery pack with the AC-550) Power switch on To use the AC-550 AC Adaptor Connect the camcorder to the camcorder operation by using an AC Adaptor. 1 Turn the AC-550 AC Adaptor on. 16 Step 3: Preparing... (Continued) Using an AC Adaptor To use the AC-DN10 AC Adaptor Mount an AC-DN10 on the camcorder in operation due to an exhausted battery When the battery pack is becoming exhausted, you can supply up to...

Operation Guide
Page 17
... record pictures. b Notes • If warning messages appear on the LCD screen for the first time, [CLOCK SET] screen appears (p. 20). 2 Hold the camcorder properly. To turn on your camcorder once you use your camcorder properly To record or play or edit pictures. Getting Started Step 4: Turning the power on and holding your... camcorder for a few seconds when you turn off the power Set the POWER switch to OFF. b Notes • The current date and time appears on the ...
... record pictures. b Notes • If warning messages appear on the LCD screen for the first time, [CLOCK SET] screen appears (p. 20). 2 Hold the camcorder properly. To turn on your camcorder once you use your camcorder properly To record or play or edit pictures. Getting Started Step 4: Turning the power on and holding your... camcorder for a few seconds when you turn off the power Set the POWER switch to OFF. b Notes • The current date and time appears on the ...

Operation Guide
Page 20
.... 1 Push the MENU/STATUS switch to step 4 when you set the date and time, [CLOCK SET] screen appears every time you do not use your camcorder or change the CAMERA/VCR switch position. CLOCK SET --:--:--:-- Step 6: Setting the date and time GAIN HML OUTPUT BARS CAM OFF ON DCC WHT BAL... PRST A B STATUS MENU Set the date and time when using this camcorder for about 3 months, the built-in rechargeable battery gets discharged and the date and time settings may be cleared from the memory. Y M D 2008 - In that...
.... 1 Push the MENU/STATUS switch to step 4 when you set the date and time, [CLOCK SET] screen appears every time you do not use your camcorder or change the CAMERA/VCR switch position. CLOCK SET --:--:--:-- Step 6: Setting the date and time GAIN HML OUTPUT BARS CAM OFF ON DCC WHT BAL... PRST A B STATUS MENU Set the date and time when using this camcorder for about 3 months, the built-in rechargeable battery gets discharged and the date and time settings may be cleared from the memory. Y M D 2008 - In that...

Operation Guide
Page 22
Guides Mini-size cassette match marks 22 Check for tape slack before inserting the cassette. Press the center of the arrow, open lever in your camcorder" on page 2. 1 Set the POWER switch to ON. 2 While sliding the open the cassette lid. Open lever 3 Insert the cassette with the..."Types of cassette you can use in the direction of the cassette. Step 7: Inserting a tape or a "Memory Stick Duo" Cassette tape The camcorder can use standard-size and mini-size DVCAM/DV cassettes. REC/SAVE switch To insert a mini-size cassette Insert the cassette with the cassette window...
Guides Mini-size cassette match marks 22 Check for tape slack before inserting the cassette. Press the center of the arrow, open lever in your camcorder" on page 2. 1 Set the POWER switch to ON. 2 While sliding the open the cassette lid. Open lever 3 Insert the cassette with the..."Types of cassette you can use in the direction of the cassette. Step 7: Inserting a tape or a "Memory Stick Duo" Cassette tape The camcorder can use standard-size and mini-size DVCAM/DV cassettes. REC/SAVE switch To insert a mini-size cassette Insert the cassette with the cassette window...

Operation Guide
Page 23
... may cause it . If your insert a cassette forcibly, the cassette may not be inserted incorrectly. • When inserting a cassette, put the camcorder on a horizontal and stable surface. • When inserting a mini DV cassette tape, strong light entering the slot may become bent or otherwise damaged... if you attempt to be inserted in the cassette compartment. Holding the side of the camcorder may cause a malfunction such as with the cassette turned backside front so the reel holes face the cassette holder window or with , or...
... may cause it . If your insert a cassette forcibly, the cassette may not be inserted incorrectly. • When inserting a cassette, put the camcorder on a horizontal and stable surface. • When inserting a mini DV cassette tape, strong light entering the slot may become bent or otherwise damaged... if you attempt to be inserted in the cassette compartment. Holding the side of the camcorder may cause a malfunction such as with the cassette turned backside front so the reel holes face the cassette holder window or with , or...

Operation Guide
Page 24
... the "Memory Stick Duo" into the slot in the right direction until it clicks. b Notes • When the access lamp is lit or flashing, your camcorder, turn the power off, eject the "Memory Stick Duo," or remove the battery pack. Do not shake or knock your... camcorder is reading/writing data. Access lamp b Notes • If you insert the "Memory Stick Duo" into the Memory Stick Duo slot in the wrong direction, ...
... the "Memory Stick Duo" into the slot in the right direction until it clicks. b Notes • When the access lamp is lit or flashing, your camcorder, turn the power off, eject the "Memory Stick Duo," or remove the battery pack. Do not shake or knock your... camcorder is reading/writing data. Access lamp b Notes • If you insert the "Memory Stick Duo" into the Memory Stick Duo slot in the wrong direction, ...

Operation Guide
Page 25
... FORMAT] p. 80). 1 Open the shutter of the lens hood. 2 Set the POWER switch to ON and the CAMERA/VCR switch to record movies. • This camcorder can record movies in HDV or DVCAM (DV) format. CAMERA POWER ON OFF VCR Continued , 25 Recording/Playback Recording Recording lamp REC START/STOP button... C Recording lamp TALLY switch Recording/Playback Lens hood REC START/ STOP button A CAMERA/VCR switch POWER switch REC START/ STOP button B Your camcorder records movies on tape and still images on "Memory Stick Duo." Do the following steps to CAMERA.
... FORMAT] p. 80). 1 Open the shutter of the lens hood. 2 Set the POWER switch to ON and the CAMERA/VCR switch to record movies. • This camcorder can record movies in HDV or DVCAM (DV) format. CAMERA POWER ON OFF VCR Continued , 25 Recording/Playback Recording Recording lamp REC START/STOP button... C Recording lamp TALLY switch Recording/Playback Lens hood REC START/ STOP button A CAMERA/VCR switch POWER switch REC START/ STOP button B Your camcorder records movies on tape and still images on "Memory Stick Duo." Do the following steps to CAMERA.

Operation Guide
Page 27
... still images 1 Assign [PHOTO] to an ASSIGN button. 2 Press the ASSIGN button to which is higher than 35W. z Tips • See page 130 for Sony "Memory Stick Duo." Capacity of the "Memory Stick Duo" (MB) and the number of which [PHOTO] is completed. Continued , 27 b Notes • Do ...-W maximum power consumption) as follows: 1 Mount the video light on the accessory shoe on the handle of your camcorder. 2 Connect the connector of the video light to the LIGHT connector of your camcorder, Assign [PHOTO] to any one of ASSIGN buttons (p. 48). 1 Set the POWER switch to ON and the...
... still images 1 Assign [PHOTO] to an ASSIGN button. 2 Press the ASSIGN button to which is higher than 35W. z Tips • See page 130 for Sony "Memory Stick Duo." Capacity of the "Memory Stick Duo" (MB) and the number of which [PHOTO] is completed. Continued , 27 b Notes • Do ...-W maximum power consumption) as follows: 1 Mount the video light on the accessory shoe on the handle of your camcorder. 2 Connect the connector of the video light to the LIGHT connector of your camcorder, Assign [PHOTO] to any one of ASSIGN buttons (p. 48). 1 Set the POWER switch to ON and the...


