
Operation Guide
Page 2
... not support the Cassette Memory function (p. 107). When recording in HDV/DV format, Sony recommends that you can use in your camcorder You can be used with "Memory Stick" compatible equipment, insert the "Memory Stick Duo" into the Memory Stick Duo Adaptor. 2 ...Stick Duo" (This size can use standard size DV cassettes or mini DV cassettes. When recording in DVCAM format, Sony recommends that has the following markings. Read this first Before operating this unit, please read this manual thoroughly, and retain it in your camcorder.) b Notes • You cannot use standard...
... not support the Cassette Memory function (p. 107). When recording in HDV/DV format, Sony recommends that you can use in your camcorder You can be used with "Memory Stick" compatible equipment, insert the "Memory Stick Duo" into the Memory Stick Duo Adaptor. 2 ...Stick Duo" (This size can use standard size DV cassettes or mini DV cassettes. When recording in DVCAM format, Sony recommends that has the following markings. Read this first Before operating this unit, please read this manual thoroughly, and retain it in your camcorder.) b Notes • You cannot use standard...

Operation Guide
Page 4
...of such materials may be notable in Germany, and Sony Corporation, and produces superior images. Check the contents of tapes by playing them back on this camcorder prior to playing them back on other accessories are captured using your camcorder is T -coated to an ASSIGN button. The ...function that can be copyrighted. Change the screen language before using a digital still camera, and therefore may be assigned to suppress unwanted reflections and faithfully reproduce colors. It adopts the MTF measurement system for the DV SP...
...of such materials may be notable in Germany, and Sony Corporation, and produces superior images. Check the contents of tapes by playing them back on this camcorder prior to playing them back on other accessories are captured using your camcorder is T -coated to an ASSIGN button. The ...function that can be copyrighted. Change the screen language before using a digital still camera, and therefore may be assigned to suppress unwanted reflections and faithfully reproduce colors. It adopts the MTF measurement system for the DV SP...

Operation Guide
Page 7
Additional Information Maintenance and precautions 107 HDV format and recording/playback 107 Compatibility of the DVCAM/DV formats 108 About the "Memory Stick 110 About i.LINK 111 About x.v.Color 112 About handling of your camcorder 113 Specifications 117 Quick Reference Identifying parts and controls 121 Indicators for the LCD screen and viewfinder 128 Index ...132 7
Additional Information Maintenance and precautions 107 HDV format and recording/playback 107 Compatibility of the DVCAM/DV formats 108 About the "Memory Stick 110 About i.LINK 111 About x.v.Color 112 About handling of your camcorder 113 Specifications 117 Quick Reference Identifying parts and controls 121 Indicators for the LCD screen and viewfinder 128 Index ...132 7

Operation Guide
Page 13
... the same way. Attaching Memory Recording Unit Attach the Memory Recording Unit to your camcorder as illustrated. HDV/DV jack (6-pin) b Notes • You cannot use the HDV/DV jack when the Memory Recording Unit is attached to your camcorder. Getting Started 2 Fit the other side of the grip in the direction of the...
... the same way. Attaching Memory Recording Unit Attach the Memory Recording Unit to your camcorder as illustrated. HDV/DV jack (6-pin) b Notes • You cannot use the HDV/DV jack when the Memory Recording Unit is attached to your camcorder. Getting Started 2 Fit the other side of the grip in the direction of the...
Operation Guide
Page 15
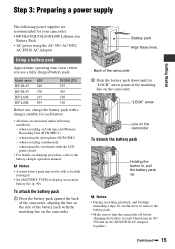
... the battery pack down until its "LOCK" arrow points at the matching line on the camcorder. Model name HDV BP-GL65 240 BP-GL95 370 BP-L60S 215 BP-L80S 295 DVCAM (DV) 255 385 230 310 Before use a fully charged battery pack. Battery pack LOCK Align these lines. b ...battery pack. • Make sure to display an accurate battery life (p. 90). "LOCK" arrow LOCK Line on both tape and Memory Recording Unit (HVR-MRC1) - Step 3: Preparing a power supply Getting Started The following power supplies are recommended for each battery. • All times are measured under following...
... the battery pack down until its "LOCK" arrow points at the matching line on the camcorder. Model name HDV BP-GL65 240 BP-GL95 370 BP-L60S 215 BP-L80S 295 DVCAM (DV) 255 385 230 310 Before use a fully charged battery pack. Battery pack LOCK Align these lines. b ...battery pack. • Make sure to display an accurate battery life (p. 90). "LOCK" arrow LOCK Line on both tape and Memory Recording Unit (HVR-MRC1) - Step 3: Preparing a power supply Getting Started The following power supplies are recommended for each battery. • All times are measured under following...

Operation Guide
Page 22
...cassette window (on the front) facing outward. Step 7: Inserting a tape or a "Memory Stick Duo" Cassette tape The camcorder can use standard-size and mini-size DVCAM/DV cassettes. Guides Mini-size cassette match marks 22 For details about usable cassette, see "Types of cassette you can use in... your camcorder" on page 2. 1 Set the POWER switch to ON. 2 While sliding the open the cassette lid. Check ...
...cassette window (on the front) facing outward. Step 7: Inserting a tape or a "Memory Stick Duo" Cassette tape The camcorder can use standard-size and mini-size DVCAM/DV cassettes. Guides Mini-size cassette match marks 22 For details about usable cassette, see "Types of cassette you can use in... your camcorder" on page 2. 1 Set the POWER switch to ON. 2 While sliding the open the cassette lid. Check ...

Operation Guide
Page 23
...bent or otherwise damaged if you attempt to be inserted incorrectly. • When inserting a cassette, put the camcorder on a horizontal and stable surface. • When inserting a mini DV cassette tape, strong light entering the slot may cause a malfunction such as with the cassette turned backside front so...inserted completely or gets stuck when being inserting, take out the cassette by mistake may cause a malfunction. • Internal parts of the camcorder may cause it clicks. Holding the side of the lid. To eject a cassette Follow the procedure above, and take out the cassette and...
...bent or otherwise damaged if you attempt to be inserted incorrectly. • When inserting a cassette, put the camcorder on a horizontal and stable surface. • When inserting a mini DV cassette tape, strong light entering the slot may cause a malfunction such as with the cassette turned backside front so...inserted completely or gets stuck when being inserting, take out the cassette by mistake may cause a malfunction. • Internal parts of the camcorder may cause it clicks. Holding the side of the lid. To eject a cassette Follow the procedure above, and take out the cassette and...

Operation Guide
Page 25
... START/STOP button C Recording lamp TALLY switch Recording/Playback Lens hood REC START/ STOP button A CAMERA/VCR switch POWER switch REC START/ STOP button B Your camcorder records movies on tape and still images on "Memory Stick Duo." CAMERA POWER ON OFF VCR Continued , 25 Do the following steps to CAMERA. The... FORMAT] p. 80). 1 Open the shutter of the lens hood. 2 Set the POWER switch to ON and the CAMERA/VCR switch to record movies. • This camcorder can record movies in HDV or DVCAM...
... START/STOP button C Recording lamp TALLY switch Recording/Playback Lens hood REC START/ STOP button A CAMERA/VCR switch POWER switch REC START/ STOP button B Your camcorder records movies on tape and still images on "Memory Stick Duo." CAMERA POWER ON OFF VCR Continued , 25 Do the following steps to CAMERA. The... FORMAT] p. 80). 1 Open the shutter of the lens hood. 2 Set the POWER switch to ON and the CAMERA/VCR switch to record movies. • This camcorder can record movies in HDV or DVCAM...

Operation Guide
Page 26
z Tips • When recording in DVCAM (DV) format, you can switch the aspect ratio to OFF. Release the HOLD lever to 16:9. Recording (Continued) 3 Press the REC START/STOP button A (or B, C). When ...; For low angle recording, the REC START/STOP button on page 128. • To turn off the rear recording lamp, set the TALLY switch to 4:3 ([DV WIDE REC] p. 82). • You can change the screen display during recording (p. 58). • Indicators displayed on the screen during recording. zREC REC 00:04...
z Tips • When recording in DVCAM (DV) format, you can switch the aspect ratio to OFF. Release the HOLD lever to 16:9. Recording (Continued) 3 Press the REC START/STOP button A (or B, C). When ...; For low angle recording, the REC START/STOP button on page 128. • To turn off the rear recording lamp, set the TALLY switch to 4:3 ([DV WIDE REC] p. 82). • You can change the screen display during recording (p. 58). • Indicators displayed on the screen during recording. zREC REC 00:04...

Operation Guide
Page 27
...Notes • Specifications are as a still image. Recording in HDV format/DVCAM (DV) format (16:9): 1.2M - appears when the recording is higher than 35W. You can capture an image in your camcorder. z Tips • Image sizes of still images are for indicators that appear ...DV) format (4:3): VGA To store still images captured from movies on a tape on "Memory Stick Duo" You can capture still images during recording. Be sure to insert a recorded tape and a "Memory Stick Duo" in a movie and record it on a "Memory Stick Duo" as follows: - z Tips • See page 130 for Sony...
...Notes • Specifications are as a still image. Recording in HDV format/DVCAM (DV) format (16:9): 1.2M - appears when the recording is higher than 35W. You can capture an image in your camcorder. z Tips • Image sizes of still images are for indicators that appear ...DV) format (4:3): VGA To store still images captured from movies on a tape on "Memory Stick Duo" You can capture still images during recording. Be sure to insert a recorded tape and a "Memory Stick Duo" in a movie and record it on a "Memory Stick Duo" as follows: - z Tips • See page 130 for Sony...

Operation Guide
Page 31
You cannot use the automatic adjustment functions in [HDV PROGRE.] or [DV PROGRE.] of the (IN/ OUT REC) menu is magnified by about 3 seconds in the following cases: - b Notes • You cannot use the expanded focus when [... easier to the mode B position. If you to set the PEAKING switch to the manual focus mode. This function enables you release the button, your camcorder returns to ON, the detail of an expanded image displayed during manual focusing. Enhancing image detail for about 2.0 times.
You cannot use the automatic adjustment functions in [HDV PROGRE.] or [DV PROGRE.] of the (IN/ OUT REC) menu is magnified by about 3 seconds in the following cases: - b Notes • You cannot use the expanded focus when [... easier to the mode B position. If you to set the PEAKING switch to the manual focus mode. This function enables you release the button, your camcorder returns to ON, the detail of an expanded image displayed during manual focusing. Enhancing image detail for about 2.0 times.

Operation Guide
Page 33
...turn on the shutter speed mode and the setting of the (CAMERA SET) menu (p. 67). The lamps above the respective switches will flash when your camcorder cannot detect the ND filter positions (1/2/3/4). The larger the value on the screen. b Notes • If you do not want to use the AGC .... 1 During recording or standby, set for each GAIN switch position from [GAIN SETUP] of [SCAN TYPE] ( (IN/OUT REC) menu t [HDV PROGRE.] or [DV PROGRE.]). Adjusting the shutter speed You can set the shutter speed to H, M or L. Check the ND filter position. The ND icon does not flash during...
...turn on the shutter speed mode and the setting of the (CAMERA SET) menu (p. 67). The lamps above the respective switches will flash when your camcorder cannot detect the ND filter positions (1/2/3/4). The larger the value on the screen. b Notes • If you do not want to use the AGC .... 1 During recording or standby, set for each GAIN switch position from [GAIN SETUP] of [SCAN TYPE] ( (IN/OUT REC) menu t [HDV PROGRE.] or [DV PROGRE.]). Adjusting the shutter speed You can set the shutter speed to H, M or L. Check the ND filter position. The ND icon does not flash during...

Operation Guide
Page 34
... standby, set the SHUTTER switch I to SEL a few times to set to auto mode, or set up your camcorder recordings (Continued) SCAN TYPE Manual mode ECS mode SLS mode [24], [24A]* 1/48 - 1/10000 (sec.) ...(sec.) * Not available in memory A ( A) and memory B ( B), respectively. You can store white balance values in [DV PROGRE.] ** The range for [60] is fixed to 1/60 when you set [SCAN TYPE] to [24] or [24A].... flickering by setting the shutter speed to an appropriate frequency in the ECS mode. Sony recommends that you record subjects such as a tripod, and manually adjust the focus....
... standby, set the SHUTTER switch I to SEL a few times to set to auto mode, or set up your camcorder recordings (Continued) SCAN TYPE Manual mode ECS mode SLS mode [24], [24A]* 1/48 - 1/10000 (sec.) ...(sec.) * Not available in memory A ( A) and memory B ( B), respectively. You can store white balance values in [DV PROGRE.] ** The range for [60] is fixed to 1/60 when you set [SCAN TYPE] to [24] or [24A].... flickering by setting the shutter speed to an appropriate frequency in the ECS mode. Sony recommends that you record subjects such as a tripod, and manually adjust the focus....

Operation Guide
Page 45
...input from the AUDIO INPUT4 jack. IN4: Records the audio input from the AUDIO INPUT3 jack. z Tips • Sony recommends that you can adjust the volume of a microphone connected to the AUDIO INPUT1 (L) jack through the AUDIO INPUT4...MODE Select the recording audio input to be recorded on the audio track of a tape. If your camcorder to record the left-side sound in CH1 and the rightside sound in the respective channels. 2 ... audio level manually for the audio input to CH1 and automatically for DVCAM (DV), p. 74) of the (AUDIO SET) menu. Center: Records the audio input from [HDV 2CH/4CH] (for...
...input from the AUDIO INPUT4 jack. IN4: Records the audio input from the AUDIO INPUT3 jack. z Tips • Sony recommends that you can adjust the volume of a microphone connected to the AUDIO INPUT1 (L) jack through the AUDIO INPUT4...MODE Select the recording audio input to be recorded on the audio track of a tape. If your camcorder to record the left-side sound in CH1 and the rightside sound in the respective channels. 2 ... audio level manually for the audio input to CH1 and automatically for DVCAM (DV), p. 74) of the (AUDIO SET) menu. Center: Records the audio input from [HDV 2CH/4CH] (for...

Operation Guide
Page 56
...not be displayed correctly when you play back a DV format tape on your want to VCR. 2 Press the MEMORY/INDEX button. 101-0050 1 / 19 101 3 Select a still image using the MEMORY -/+ button. Playback (Continued) b Notes • Your camcorder automatically goes into a stopped state when it is... in pause for more than 3 minutes. • The screen may temporarily go blank losing images and sound when signals switch between HDV and DVCAM (DV) during playback of a tape in which HDV ...
...not be displayed correctly when you play back a DV format tape on your want to VCR. 2 Press the MEMORY/INDEX button. 101-0050 1 / 19 101 3 Select a still image using the MEMORY -/+ button. Playback (Continued) b Notes • Your camcorder automatically goes into a stopped state when it is... in pause for more than 3 minutes. • The screen may temporarily go blank losing images and sound when signals switch between HDV and DVCAM (DV) during playback of a tape in which HDV ...

Operation Guide
Page 59
...8226; An accurate shutter speed may not be displayed in the same area when you play back the tape on your camcorder on the screen. Displaying the settings in your camcorder (Status check) You can check the settings of the following sequence: AUDIO t OUTPUT t ASSIGN t EXT DEVICE (when... an external device is set to VCR, the display changes in the following items. • Audio setup such as microphone volume level (p. 74) • Output signal setup ([VCR HDV/DV],...
...8226; An accurate shutter speed may not be displayed in the same area when you play back the tape on your camcorder on the screen. Displaying the settings in your camcorder (Status check) You can check the settings of the following sequence: AUDIO t OUTPUT t ASSIGN t EXT DEVICE (when... an external device is set to VCR, the display changes in the following items. • Audio setup such as microphone volume level (p. 74) • Output signal setup ([VCR HDV/DV],...

Operation Guide
Page 60
When using the VIDEO OUT jack, set the VIDEO OUT switch to a monitor or recorder without an HDV/DV jack, use audio and video cables as below. Monitor/Recorder To audio To SDI To S video To i.LINK To video To component input jack jack ...jack input jack input jack input jack 60 VIDEO OUT switch HDV/DV HDV/ DV jack Component video cable (optional) Video cable (optional) i.LINK cable (optional) DC IN 12V DC OUT 12V LANC AUDIO INPUT3 AUDIO INPUT4 S VIDEO HD...
When using the VIDEO OUT jack, set the VIDEO OUT switch to a monitor or recorder without an HDV/DV jack, use audio and video cables as below. Monitor/Recorder To audio To SDI To S video To i.LINK To video To component input jack jack ...jack input jack input jack input jack 60 VIDEO OUT switch HDV/DV HDV/ DV jack Component video cable (optional) Video cable (optional) i.LINK cable (optional) DC IN 12V DC OUT 12V LANC AUDIO INPUT3 AUDIO INPUT4 S VIDEO HD...
Operation Guide
Page 61
... connected to an external device via the i.LINK jack, the output signal is set your monitor to recognize your camcorder when connecting them from the HDV/DV jack to the external device, you change the [SDI/CMPNT] settings in [VIDEO OUT] of the (IN/OUT REC) menu during playback, the ...details on the quality of the i.LINK signal in the device connected to your camcorder via the HDV/DV jack, the audio is appropriate for receiving an SDI video signal. - Video signals inputted from the HDV/DV jack of your camcorder need to set to [AUTO] (default setting) before connecting an i.LINK cable....
... connected to an external device via the i.LINK jack, the output signal is set your monitor to recognize your camcorder when connecting them from the HDV/DV jack to the external device, you change the [SDI/CMPNT] settings in [VIDEO OUT] of the (IN/OUT REC) menu during playback, the ...details on the quality of the i.LINK signal in the device connected to your camcorder via the HDV/DV jack, the audio is appropriate for receiving an SDI video signal. - Video signals inputted from the HDV/DV jack of your camcorder need to set to [AUTO] (default setting) before connecting an i.LINK cable....

Operation Guide
Page 64
...z - z - z - z - z - z - z - z - z - z - z - HDV 2CH/4CH DV AU.MODE AU.LMT CH1,2 AU.LMT CH3,4 XLR SET z - z - z - z - Position of CAMERA/VCR switch: ... RESPONSE AT IRIS LMT FLCKR REDUCE CNTRST ENHCR BACK LIGHT SPOTLIGHT STEADYSHOT AF ASSIST FOCUS MACRO HANDLE ZOOM D.EXTENDER FADER SMTH SLW REC INTERVAL REC DV FRAME REC SHOT TRANSITION S.TRANS/F.MARK x.v.Color COLOR BAR FLANGE BACK (AUDIO SET) menu (p. 74) z - z - z - z - z - z - z - z - z - z - z - z - z - z - z -...
...z - z - z - z - z - z - z - z - z - z - z - HDV 2CH/4CH DV AU.MODE AU.LMT CH1,2 AU.LMT CH3,4 XLR SET z - z - z - z - Position of CAMERA/VCR switch: ... RESPONSE AT IRIS LMT FLCKR REDUCE CNTRST ENHCR BACK LIGHT SPOTLIGHT STEADYSHOT AF ASSIST FOCUS MACRO HANDLE ZOOM D.EXTENDER FADER SMTH SLW REC INTERVAL REC DV FRAME REC SHOT TRANSITION S.TRANS/F.MARK x.v.Color COLOR BAR FLANGE BACK (AUDIO SET) menu (p. 74) z - z - z - z - z - z - z - z - z - z - z - z - z - z - z -...

Operation Guide
Page 65
...) menu (p. 85) TC PRESET TC COUNTUP UB PRESET TC FORMAT TC RUN TC MAKE TC LINK UB TIME REC UB-DATE/TC-TIME CAMERA z z z z z z z z z z z z z z z z z z z - z z z z z z z z z z z z z z z z z VCR z z z z z z z - z z z - DV PROGRE. z z Continued , 65 Using the Menu z - - z z z z z z - Position of CAMERA/VCR switch: (DISPLAY SET) menu (p. 76) ZEBRA HISTOGRAM PEAKING MARKER CAM LEVELING EXP.FOCUS TYPE CAM... SHUTTER DISP LCD COLOR LCD BL LEVEL VF B.LIGHT VF COLOR LETTER SIZE REMAINING DISP OUTPUT (IN/OUT REC) menu (p. 80) REC FORMAT VCR HDV/DV HDV PROGRE. z -
...) menu (p. 85) TC PRESET TC COUNTUP UB PRESET TC FORMAT TC RUN TC MAKE TC LINK UB TIME REC UB-DATE/TC-TIME CAMERA z z z z z z z z z z z z z z z z z z z - z z z z z z z z z z z z z z z z z VCR z z z z z z z - z z z - DV PROGRE. z z Continued , 65 Using the Menu z - - z z z z z z - Position of CAMERA/VCR switch: (DISPLAY SET) menu (p. 76) ZEBRA HISTOGRAM PEAKING MARKER CAM LEVELING EXP.FOCUS TYPE CAM... SHUTTER DISP LCD COLOR LCD BL LEVEL VF B.LIGHT VF COLOR LETTER SIZE REMAINING DISP OUTPUT (IN/OUT REC) menu (p. 80) REC FORMAT VCR HDV/DV HDV PROGRE. z -

