
Operating Instructions
Page 2
... electrical shock, do not attempt to which can radiate radio frequency energy and, if not installed and used in this manual could void your Sony dealer regarding this Sony DVD Player/Video Cassette Recorder. CAUTION The use it for about three hours before operating the unit. • Do not install...outlet on the apparatus. As the laser beam used in the literature accompanying the appliance. Before operating this player, please read this manual thoroughly and retain it from the wall outlet if you call upon your authority to radio or television reception, which the receiver ...
... electrical shock, do not attempt to which can radiate radio frequency energy and, if not installed and used in this manual could void your Sony dealer regarding this Sony DVD Player/Video Cassette Recorder. CAUTION The use it for about three hours before operating the unit. • Do not install...outlet on the apparatus. As the laser beam used in the literature accompanying the appliance. Before operating this player, please read this manual thoroughly and retain it from the wall outlet if you call upon your authority to radio or television reception, which the receiver ...

Operating Instructions
Page 4
Table of contents 2 WARNING 2 Welcome! 2 General Precautions 3 Important Safety Instructions 3 DVD Precautions 6 About this manual 6 This player can play the following discs 7 Notes about discs Getting Started 8 Step 1 : Unpacking 9 Step 2 : Setting up the remote commander 12 Step 3 : ... 39 Recording TV programs using the timer 42 Checking/changing/canceling timer settings Advanced Hookups 44 A/V Receiver hookup 46 S-Video/Component Video hookup DVD Settings and Adjustements 48 Audio Setup 51 Screen Setup 4 Table of contents 54 Setting the display or sound track language 56 Parental Control (...
Table of contents 2 WARNING 2 Welcome! 2 General Precautions 3 Important Safety Instructions 3 DVD Precautions 6 About this manual 6 This player can play the following discs 7 Notes about discs Getting Started 8 Step 1 : Unpacking 9 Step 2 : Setting up the remote commander 12 Step 3 : ... 39 Recording TV programs using the timer 42 Checking/changing/canceling timer settings Advanced Hookups 44 A/V Receiver hookup 46 S-Video/Component Video hookup DVD Settings and Adjustements 48 Audio Setup 51 Screen Setup 4 Table of contents 54 Setting the display or sound track language 56 Parental Control (...

Operating Instructions
Page 6
...message "Playback prohibited by area restrictions. 00V 00Hz 00W NO. This system is used in this manual is described below: Icon Meaning Functions available for DVD VIDEOs and DVD-RWs/ DVD-Rs in video mode or DVD+RWs/DVD+Rs Functions available for VIDEO CDs, Super VCDs or CD-Rs/ CD-RWs in video CD...tape or a sticker still left on it. 6 About this manual Region code Your player has a region code printed on the back of the unit and only will also play the following discs Format of discs DVD VIDEO VIDEO CD Music CD The "DVD VIDEO" logo is prohibited by area limitations." X SLV-DXXXX...
...message "Playback prohibited by area restrictions. 00V 00Hz 00W NO. This system is used in this manual is described below: Icon Meaning Functions available for DVD VIDEOs and DVD-RWs/ DVD-Rs in video mode or DVD+RWs/DVD+Rs Functions available for VIDEO CDs, Super VCDs or CD-Rs/ CD-RWs in video CD...tape or a sticker still left on it. 6 About this manual Region code Your player has a region code printed on the back of the unit and only will also play the following discs Format of discs DVD VIDEO VIDEO CD Music CD The "DVD VIDEO" logo is prohibited by area limitations." X SLV-DXXXX...

Operating Instructions
Page 15
The clock is completed, the current time appears in the AC power cord for 5 seconds or more with the DVD-VCR power turned off. To add or disable channels manually, see "Step 4 : Selecting a language" on page 19. Notes • If you connect the AC power cord before the antenna ...If the clock is plugged into an AC outlet. If this happens, see "Using Manual Clock Set" on the DVD-VCR or remote commander during Auto preset. • Auto preset starts automatically only when you purchase the DVD-VCR. • Auto preset can be incorrectly set using a time signal provided by pressing ...
The clock is completed, the current time appears in the AC power cord for 5 seconds or more with the DVD-VCR power turned off. To add or disable channels manually, see "Step 4 : Selecting a language" on page 19. Notes • If you connect the AC power cord before the antenna ...If the clock is plugged into an AC outlet. If this happens, see "Using Manual Clock Set" on the DVD-VCR or remote commander during Auto preset. • Auto preset starts automatically only when you purchase the DVD-VCR. • Auto preset can be incorrectly set using a time signal provided by pressing ...
Operating Instructions
Page 17
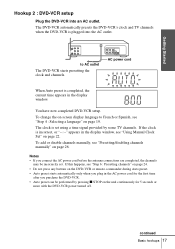
... the display window. The clock is plugged into an AC outlet. The DVD-VCR automatically presets the DVD-VCR's clock and TV channels when the DVD-VCR is set . If this happens, see "Presetting/disabling channels manually" on page 19. To add or disable channels manually, see "Step 6 : Presetting channels" on page 24. • Do not press any...
... the display window. The clock is plugged into an AC outlet. The DVD-VCR automatically presets the DVD-VCR's clock and TV channels when the DVD-VCR is set . If this happens, see "Presetting/disabling channels manually" on page 19. To add or disable channels manually, see "Step 6 : Presetting channels" on page 24. • Do not press any...

Operating Instructions
Page 20
...in your area is in your area are not yet sending time signals, set the TV to the DVD-VCR using a cable box, turn it on. • To control the DVD-VCR, set the clock. Stop the DVD playback. 1 Press SET UP. The Auto Clock Set feature works only if a channel in play mode...broadcasts. The "CLOCK SET/ADJUST" menu appears. 20 Setting the clock When using A/V connections, set the time manually (page 22). Your DVDVCR can pick up this time signal to automatically set TV / DVD·VIDEO to DVD·VIDEO on the DVD-VCR and your TV is connected to video input. • If the...
...in your area is in your area are not yet sending time signals, set the TV to the DVD-VCR using a cable box, turn it on. • To control the DVD-VCR, set the clock. Stop the DVD playback. 1 Press SET UP. The Auto Clock Set feature works only if a channel in play mode...broadcasts. The "CLOCK SET/ADJUST" menu appears. 20 Setting the clock When using A/V connections, set the time manually (page 22). Your DVDVCR can pick up this time signal to automatically set TV / DVD·VIDEO to DVD·VIDEO on the DVD-VCR and your TV is connected to video input. • If the...

Operating Instructions
Page 22
... the "SETUP MENU." SET UP V/v/B/b ENTER O RETURN 1 Press SET UP. If so, set the clock manually (page 22). • If there are only a few channels in your TV is connected to the DVD-VCR using the timer, you must set the clock accurately. • The clock display appears when VIDEO mode... signals, setting the clock automatically may take up to about 20 minutes, set the clock manually (page 22). • If you made Hookup 3, make sure you leave the cable box on the DVD-VCR and your area. Using Manual Clock Set Before you start... • Turn on . • To record TV programs using ...
... the "SETUP MENU." SET UP V/v/B/b ENTER O RETURN 1 Press SET UP. If so, set the clock manually (page 22). • If there are only a few channels in your TV is connected to the DVD-VCR using the timer, you must set the clock accurately. • The clock display appears when VIDEO mode... signals, setting the clock automatically may take up to about 20 minutes, set the clock manually (page 22). • If you made Hookup 3, make sure you leave the cable box on the DVD-VCR and your area. Using Manual Clock Set Before you start... • Turn on . • To record TV programs using ...

Operating Instructions
Page 23
Notes • To record TV programs using the timer, you must set the minutes. 6 Set the month, day, and year in the same way as the minutes. Setting the clock 23 Getting Started 3 Press V/v to select "Manual," then press ENTER. 4 Press V/v to set the hour. 5 Press b to select the minutes and press V/v to save the clock setting. The day of the week is set automatically. 7 Press O RETURN to set the clock accurately. • The clock display appears when VIDEO mode is selected with no tape inserted or when the DVD-VCR is turned off.
Notes • To record TV programs using the timer, you must set the minutes. 6 Set the month, day, and year in the same way as the minutes. Setting the clock 23 Getting Started 3 Press V/v to select "Manual," then press ENTER. 4 Press V/v to set the hour. 5 Press b to select the minutes and press V/v to save the clock setting. The day of the week is set automatically. 7 Press O RETURN to set the clock accurately. • The clock display appears when VIDEO mode is selected with no tape inserted or when the DVD-VCR is turned off.

Operating Instructions
Page 24
... 2 Press V/v/B/b to "3CH" or "4CH" in play mode, you preset the receivable channels in your TV. Step 6 : Presetting channels This DVD-VCR is in "OPTION SETUP" menu (page 89). When using manual presetting methods (page 26). Then, if there are any unwanted channels, disable them directly using a cable box, turn it on. •...
... 2 Press V/v/B/b to "3CH" or "4CH" in play mode, you preset the receivable channels in your TV. Step 6 : Presetting channels This DVD-VCR is in "OPTION SETUP" menu (page 89). When using manual presetting methods (page 26). Then, if there are any unwanted channels, disable them directly using a cable box, turn it on. •...

Operating Instructions
Page 26
...box, turn it on. • To control the DVD-VCR, set TV / DVD·VIDEO to DVD·VIDEO on the DVD-VCR and your TV is connected to the DVD-VCR using A/V connections, set the TV to video input. • If the DVD player is in "OPTION SETUP" menu (page 89...select (Channel Setup) then press ENTER. Stop the DVD playback. CH +/- V/v/B/b ENTER 2 Press V/v/B/b to select "Channel add/delete," then press ENTER. 26 Presetting channels The "SETUP MENU" appears. Number buttons SET UP 1 Press SET UP. Presetting/disabling channels manually Before you start... • Turn on the ...
...box, turn it on. • To control the DVD-VCR, set TV / DVD·VIDEO to DVD·VIDEO on the DVD-VCR and your TV is connected to the DVD-VCR using A/V connections, set the TV to video input. • If the DVD player is in "OPTION SETUP" menu (page 89...select (Channel Setup) then press ENTER. Stop the DVD playback. CH +/- V/v/B/b ENTER 2 Press V/v/B/b to select "Channel add/delete," then press ENTER. 26 Presetting channels The "SETUP MENU" appears. Number buttons SET UP 1 Press SET UP. Presetting/disabling channels manually Before you start... • Turn on the ...

Operating Instructions
Page 85
... and reinsert it. Tracking meter Note • The auto tracking adjustment cannot be guaranteed to display the tracking meter. Adjusting the picture (tracking) Although the VCR automatically adjusts the tracking when playing a tape, distortion may occur if the recording is in the LP mode on other...
... and reinsert it. Tracking meter Note • The auto tracking adjustment cannot be guaranteed to display the tracking meter. Adjusting the picture (tracking) Although the VCR automatically adjusts the tracking when playing a tape, distortion may occur if the recording is in the LP mode on other...
Operating Instructions
Page 94
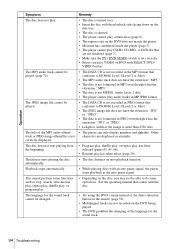
...; The JPEG image file does not have the extension ".MP3." • The data is not formatted in JPEG format that are not recorded on the DVD does not match the player. • Moisture has condensed inside the player (page 3). • The player cannot play . You cannot perform some operations. ... of the image is more than 4720 dots. • The player can only display numbers and alphabet. See the operating manual that comes with the disc. • Try using the DVD's menu instead of the MP3 audio album/ track or JPEG image album/file is skewed. • The player cannot play...
...; The JPEG image file does not have the extension ".MP3." • The data is not formatted in JPEG format that are not recorded on the DVD does not match the player. • Moisture has condensed inside the player (page 3). • The player cannot play . You cannot perform some operations. ... of the image is more than 4720 dots. • The player can only display numbers and alphabet. See the operating manual that comes with the disc. • Try using the DVD's menu instead of the MP3 audio album/ track or JPEG image album/file is skewed. • The player cannot play...
Operating Instructions (HT-DDW650)
Page 2
...cautioned that any changes or modification not expressly approved in this manual could void your authority to operate this equipment. This equipment generates, uses, and can be determined by one or more of Digital Theater Systems, Inc. However, there is no guarantee that provides guidelines...close to the point of it correctly as practical. Reorient or relocate the receiving antenna. - As an ENERGY STAR® partner, Sony Corporation has determined that to which can radiate radio frequency energy and, if not installed and used in a particular installation. Consult the...
...cautioned that any changes or modification not expressly approved in this manual could void your authority to operate this equipment. This equipment generates, uses, and can be determined by one or more of Digital Theater Systems, Inc. However, there is no guarantee that provides guidelines...close to the point of it correctly as practical. Reorient or relocate the receiving antenna. - As an ENERGY STAR® partner, Sony Corporation has determined that to which can radiate radio frequency energy and, if not installed and used in a particular installation. Consult the...
Operating Instructions (HT-DDW650)
Page 4
About This Manual The HT-DDW650 consists of your remote, see pages 35 - 39. You can also use of : - For details on the receiver. Receiver STR-K650P - Note for the supplied remote For RM-PP65 The >10/11 and 12 buttons on the receiver. Speaker system • Front/surround speakers SS-MSP75 • Center speaker SS-CNP75 • Sub woofer SA-WMSP85 Tip The instructions in this manual describe the controls on the use the controls on the supplied remote if they have the same or similar names as those on the remote are not available. 4US
About This Manual The HT-DDW650 consists of your remote, see pages 35 - 39. You can also use of : - For details on the receiver. Receiver STR-K650P - Note for the supplied remote For RM-PP65 The >10/11 and 12 buttons on the receiver. Speaker system • Front/surround speakers SS-MSP75 • Center speaker SS-CNP75 • Sub woofer SA-WMSP85 Tip The instructions in this manual describe the controls on the use the controls on the supplied remote if they have the same or similar names as those on the remote are not available. 4US


