
Operating Instructions
Page 5
... sound field (Theatre/Theater Mode Sync) ........38 Enjoying optimum sound field for the selected scene (Scene Select 38 Advanced Settings Reassigning the input button on the remote control 38 Using the setting menu 39 Additional Information Precautions 44 Troubleshooting 45 Specifications 49 Index 51 Enjoying Surround Sound Selecting the sound field 32...
... sound field (Theatre/Theater Mode Sync) ........38 Enjoying optimum sound field for the selected scene (Scene Select 38 Advanced Settings Reassigning the input button on the remote control 38 Using the setting menu 39 Additional Information Precautions 44 Troubleshooting 45 Specifications 49 Index 51 Enjoying Surround Sound Selecting the sound field 32...
Operating Instructions
Page 6
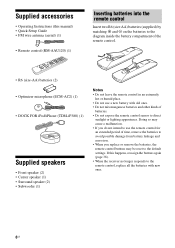
Doing so may be reset to the default settings. Supplied accessories • Operating Instructions (this happens, reassign the buttons again (page 38). • When the receiver no longer responds to the remote control, replace ...
Doing so may be reset to the default settings. Supplied accessories • Operating Instructions (this happens, reassign the buttons again (page 38). • When the receiver no longer responds to the remote control, replace ...
Operating Instructions
Page 7
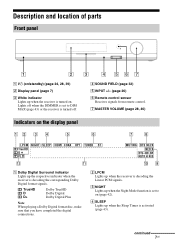
... signals. B LPCM Lights up when the receiver is decoding the corresponding Dolby Digital format signals. D SLEEP Lights up when the Sleep Timer is set to on (page 42). TrueHD D D+ Dolby TrueHD Dolby Digital Dolby Digital Plus Note When playing a Dolby Digital format disc, make sure that... A ?/1 (on/standby) (page 24, 28, 39) B Display panel (page 7) C White indicator Lights up when the receiver is turned off when the DIMMER is set to DIM MAX (page 43) or the receiver is turned on. Lights off . continued 7US D SOUND FIELD (page 32) E INPUT +/- (page 26) F Remote ...
... signals. B LPCM Lights up when the receiver is decoding the corresponding Dolby Digital format signals. D SLEEP Lights up when the Sleep Timer is set to on (page 42). TrueHD D D+ Dolby TrueHD Dolby Digital Dolby Digital Plus Note When playing a Dolby Digital format disc, make sure that... A ?/1 (on/standby) (page 24, 28, 39) B Display panel (page 7) C White indicator Lights up when the receiver is turned off when the DIMMER is set to DIM MAX (page 43) or the receiver is turned on. Lights off . continued 7US D SOUND FIELD (page 32) E INPUT +/- (page 26) F Remote ...

Operating Instructions
Page 8
...indicator when the receiver is decoding the corresponding DTS format signals. J DTS-HD indicator Lights up when DTS Neo:6 Cinema/Music decoder is set to indicate the current status of the radio station (page 29). PL Dolby Pro Logic PLII Dolby Pro Logic II 8US E Input ... being input through the OPT IN jack (page 18). - L Dolby Pro Logic indicator Lights up to "AUTO" and the source signal is set to indicate the current input. This matrix surround decoding technology can enhance input signals. G MUTING Lights up when the muting function is selected. DTS...
...indicator when the receiver is decoding the corresponding DTS format signals. J DTS-HD indicator Lights up when DTS Neo:6 Cinema/Music decoder is set to indicate the current status of the radio station (page 29). PL Dolby Pro Logic PLII Dolby Pro Logic II 8US E Input ... being input through the OPT IN jack (page 18). - L Dolby Pro Logic indicator Lights up to "AUTO" and the source signal is set to indicate the current input. This matrix surround decoding technology can enhance input signals. G MUTING Lights up when the muting function is selected. DTS...
Operating Instructions
Page 10
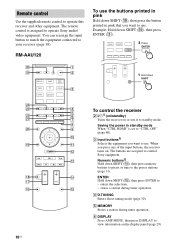
...are assigned to use the buttons printed in pink Hold down SHIFT To control the receiver B ?/11) (on/standby) Turns the receiver on or sets it to view information on . enters the selections. - stores a station during tuner operation. TUNER DMPORT 2 Press ENTER wh wg BD/DVD ...M qd .X x> qk qf qj qh qg 1 Hold down SHIFT (O), then press the button printed in standby mode When "CTRL HDMI" is assigned to operate Sony audio/ video equipment. D D.TUNING Enters direct tuning mode (page 30). E MEMORY Stores a station during tuner operation. F DISPLAY Press AMP MENU, then press ...
...are assigned to use the buttons printed in pink Hold down SHIFT To control the receiver B ?/11) (on/standby) Turns the receiver on or sets it to view information on . enters the selections. - stores a station during tuner operation. TUNER DMPORT 2 Press ENTER wh wg BD/DVD ...M qd .X x> qk qf qj qh qg 1 Hold down SHIFT (O), then press the button printed in standby mode When "CTRL HDMI" is assigned to operate Sony audio/ video equipment. D D.TUNING Enters direct tuning mode (page 30). E MEMORY Stores a station during tuner operation. F DISPLAY Press AMP MENU, then press ...

Operating Instructions
Page 11
...function of the Digital CATV terminal. F DISPLAY Displays information related to select 2.1, press 2, CLEAR, and 1. J , V/v/B/b Press V/v/B /b to select the settings, then press to restore the sound. N SOUND FIELD +2)/- Adjust the volume level of more than the TV programs. Notes • Be sure to activate... (A) changes automatically each time you switch to perform a selected operation. Use the tactile dots as references when operating the receiver. To control a Sony TV Hold down TV 2 Press TV CH + A TV ?/1 (on/standby) Turns the TV on the input signal or content from the connected...
...function of the Digital CATV terminal. F DISPLAY Displays information related to select 2.1, press 2, CLEAR, and 1. J , V/v/B/b Press V/v/B /b to select the settings, then press to restore the sound. N SOUND FIELD +2)/- Adjust the volume level of more than the TV programs. Notes • Be sure to activate... (A) changes automatically each time you switch to perform a selected operation. Use the tactile dots as references when operating the receiver. To control a Sony TV Hold down TV 2 Press TV CH + A TV ?/1 (on/standby) Turns the TV on the input signal or content from the connected...
Operating Instructions
Page 14
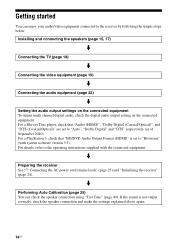
...the receiver See "7: Connecting the AC power cord (mains lead)" (page 23) and "Initializing the receiver" (page 24). If the sound is set to the receiver by following the simple steps below. For a PlayStation 3, check that "Audio (HDMI)", "Dolby Digital (Coaxial/Optical)", and "DTS (...Coaxial/Optical)" are set to the operating instructions supplied with system software version 3.5). Installing and connecting the speakers (page 15, 17) m Connecting the TV (page 18)...
...the receiver See "7: Connecting the AC power cord (mains lead)" (page 23) and "Initializing the receiver" (page 24). If the sound is set to the receiver by following the simple steps below. For a PlayStation 3, check that "Audio (HDMI)", "Dolby Digital (Coaxial/Optical)", and "DTS (...Coaxial/Optical)" are set to the operating instructions supplied with system software version 3.5). Installing and connecting the speakers (page 15, 17) m Connecting the TV (page 18)...
Operating Instructions
Page 18
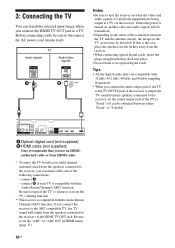
... connecting optical digital cords, insert the plugs straight until they click into place. • Do not bend or tie optical digital cords. Be sure to set the sound output jack of the receiver to the receiver via the receiver. connect A. - Before connecting cords, be transmitted. • Depending on the status... DC5V 1 A MAX DMPORT HDMI GAME IN BD/DVD IN SAT/CATV IN ARC TV OUT A Optical digital cord (not supplied) B HDMI cable (not supplied) Sony recommends that you connect the receiver to the ARC compatible TV, the TV sound will be sure to a TV via the HDMI TV OUT jack...
... connecting optical digital cords, insert the plugs straight until they click into place. • Do not bend or tie optical digital cords. Be sure to set the sound output jack of the receiver to the receiver via the receiver. connect A. - Before connecting cords, be transmitted. • Depending on the status... DC5V 1 A MAX DMPORT HDMI GAME IN BD/DVD IN SAT/CATV IN ARC TV OUT A Optical digital cord (not supplied) B HDMI cable (not supplied) Sony recommends that you connect the receiver to the ARC compatible TV, the TV sound will be sure to a TV via the HDMI TV OUT jack...
Operating Instructions
Page 19
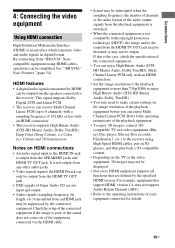
.... • You can enjoy High Bitrate Audio (DTSHD Master Audio, Dolby TrueHD), Multi Channel Linear PCM only with an HDMI connection. • Set the image resolution of the playback equipment to more than 720p/1080i to enjoy High Bitrate Audio (DTS-HD Master Audio, Dolby TrueHD). •...equipment before you can enjoy Multi Channel Linear PCM. If this is an interface which transmits video and audio signals in digital format. By connecting Sony "BRAVIA" Synccompatible equipment using High Speed HDMI cables, put on 3D glasses, and then play back a 3D-compatible content. • Depending ...
.... • You can enjoy High Bitrate Audio (DTSHD Master Audio, Dolby TrueHD), Multi Channel Linear PCM only with an HDMI connection. • Set the image resolution of the playback equipment to more than 720p/1080i to enjoy High Bitrate Audio (DTS-HD Master Audio, Dolby TrueHD). •...equipment before you can enjoy Multi Channel Linear PCM. If this is an interface which transmits video and audio signals in digital format. By connecting Sony "BRAVIA" Synccompatible equipment using High Speed HDMI cables, put on 3D glasses, and then play back a 3D-compatible content. • Depending ...
Operating Instructions
Page 21
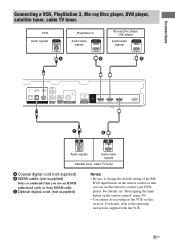
... cable TV tuner. For details, refer to control your DVD player. C Optical digital cord (not supplied) Notes • Be sure to change the default setting of the BD/ DVD input button on the VCR via this receiver. For details, see "Reassigning the input button on the remote control" (page 38...). • You cannot do recording on the remote control so that you can use an HDMI authorized cable or Sony HDMI cable. VCR Audio signals PlayStation 3 Audio/video signals HDMI Blu-ray Disc player, DVD player Audio/video signals HDMI A B B OPT IN OPT ...
... cable TV tuner. For details, refer to control your DVD player. C Optical digital cord (not supplied) Notes • Be sure to change the default setting of the BD/ DVD input button on the VCR via this receiver. For details, see "Reassigning the input button on the remote control" (page 38...). • You cannot do recording on the remote control so that you can use an HDMI authorized cable or Sony HDMI cable. VCR Audio signals PlayStation 3 Audio/video signals HDMI Blu-ray Disc player, DVD player Audio/video signals HDMI A B B OPT IN OPT ...
Operating Instructions
Page 24
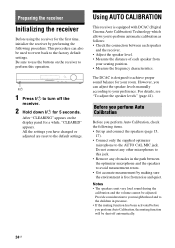
...a while, "CLEARED" appears. The DCAC is designed to avoid measurement errors. • Get accurate measurement by performing the following items. • Set up and connect the speakers (page 15, 17). • Connect only the supplied optimizer microphone to the AUTO CAL MIC jack. Before you perform... Auto Calibration Before you have changed or adjusted are reset to the factory default settings. Do not connect any obstacles in presence. • If the muting function has been activated before you can also be adjusted. ...
...a while, "CLEARED" appears. The DCAC is designed to avoid measurement errors. • Get accurate measurement by performing the following items. • Set up and connect the speakers (page 15, 17). • Connect only the supplied optimizer microphone to the AUTO CAL MIC jack. Before you perform... Auto Calibration Before you have changed or adjusted are reset to the factory default settings. Do not connect any obstacles in presence. • If the muting function has been activated before you can also be adjusted. ...

Operating Instructions
Page 25
... face the speaker towards the optimizer microphone, you will take approximately 30 seconds to the AUTO CAL MIC jack. 2 Set up the optimizer microphone. continued 25US Measurement starts in 5 seconds. Preparing the receiver 1: Setting up the Auto Calibration SPEAKERS FRONT R FRONT L SUR R SUR L SUBWOOFER CENTER OPT IN OPT IN COAX IN TV...
... face the speaker towards the optimizer microphone, you will take approximately 30 seconds to the AUTO CAL MIC jack. 2 Set up the optimizer microphone. continued 25US Measurement starts in 5 seconds. Preparing the receiver 1: Setting up the Auto Calibration SPEAKERS FRONT R FRONT L SUR R SUR L SUBWOOFER CENTER OPT IN OPT IN COAX IN TV...
Operating Instructions
Page 26
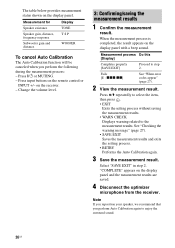
...View the measurement result. See "Checking the warning message" (page 27). • SAVE EXIT Saves the measurement results and exits the setting process. • RETRY Performs the Auto Calibration again. 3 Save the measurement result. Measurement for Speaker existance Speaker gain, distance, frequency ...is completed, the result appears on the receiver. - Press V/v repeatedly to select the item, then press . • EXIT Exits the setting process without saving the measurement results. • WARN CHECK Displays warning related to the measurement results. Press ?/1 or MUTING. - on the...
...View the measurement result. See "Checking the warning message" (page 27). • SAVE EXIT Saves the measurement results and exits the setting process. • RETRY Performs the Auto Calibration again. 3 Save the measurement result. Measurement for Speaker existance Speaker gain, distance, frequency ...is completed, the result appears on the receiver. - Press V/v repeatedly to select the item, then press . • EXIT Exits the setting process without saving the measurement results. • WARN CHECK Displays warning related to the measurement results. Press ?/1 or MUTING. - on the...
Operating Instructions
Page 27
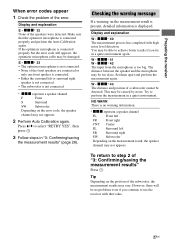
.... 27US Press V/v to achieve better results if you continue to perform the measurement in a quiet environment. Display and explanation W - You may be caused by noise. Set them apart and perform the measurement again. Display and explanation E - xxx* 40 The measurement process has completed with that the optimizer microphone is no problems...
.... 27US Press V/v to achieve better results if you continue to perform the measurement in a quiet environment. Display and explanation W - You may be caused by noise. Set them apart and perform the measurement again. Display and explanation E - xxx* 40 The measurement process has completed with that the optimizer microphone is no problems...
Operating Instructions
Page 32
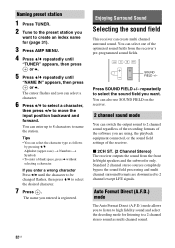
.... Standard 2 channel stereo sources completely bypass the sound field processing and multi channel surround formats are using, the playback equipment connected, or the sound field settings of the optimized sound fields from the front left/right speakers and the subwoofer only. The name you want to create an index name for...
.... Standard 2 channel stereo sources completely bypass the sound field processing and multi channel surround formats are using, the playback equipment connected, or the sound field settings of the optimized sound fields from the front left/right speakers and the subwoofer only. The name you want to create an index name for...
Operating Instructions
Page 33
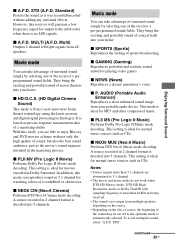
...the feeling of a mastering studio. x GAMING (Gaming) Reproduces powerful and realistic sound, suited for normal stereo sources such as CDs. This setting is ideal for movies encoded in 5.1 channel for normal stereo sources such as CDs. continued 33US STD (A.F.D. However, this receiver will generate ...a low frequency signal for MP3 and other compressed music. It is ideal for output to the subwoofer when there is Sony's new innovative home theater technology using the latest acoustic and digital signal processing technologies. In addition, this mode, you are able to...
...the feeling of a mastering studio. x GAMING (Gaming) Reproduces powerful and realistic sound, suited for normal stereo sources such as CDs. This setting is ideal for movies encoded in 5.1 channel for normal stereo sources such as CDs. continued 33US STD (A.F.D. However, this receiver will generate ...a low frequency signal for MP3 and other compressed music. It is ideal for output to the subwoofer when there is Sony's new innovative home theater technology using the latest acoustic and digital signal processing technologies. In addition, this mode, you are able to...
Operating Instructions
Page 35
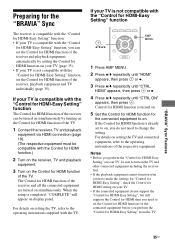
... equipment, refer to the operating instructions supplied with the TV. If your TV is not compatible with the "Control for HDMI-Easy Setting" function, set the Control for HDMI function of the receiver, playback equipment and TV individually (page 35). The Control for HDMI function of the ...repeatedly until "CTRL HDMI" appears, then press or b. 4 Press V/v repeatedly until "CTRL ON" appears, then press . When the setup is turned on. 5 Set the Control for HDMI function for HDMI function of the receiver and all the connected equipment are turned on simultaneously. If the Control for HDMI...
... equipment, refer to the operating instructions supplied with the TV. If your TV is not compatible with the "Control for HDMI-Easy Setting" function, set the Control for HDMI function of the receiver, playback equipment and TV individually (page 35). The Control for HDMI function of the ...repeatedly until "CTRL HDMI" appears, then press or b. 4 Press V/v repeatedly until "CTRL ON" appears, then press . When the setup is turned on. 5 Set the Control for HDMI function for HDMI function of the receiver and all the connected equipment are turned on simultaneously. If the Control for HDMI...
Operating Instructions
Page 36
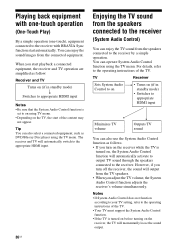
... activate to output TV sound through the speakers connected to the receiver. Notes • If System Audio Control does not function according to your TV setting, refer to the operating instructions of the TV. • Your TV must support the System Audio Control function. • If the TV is turned on... before turning on (if in standby mode) r Switches to appropriate HDMI input Notes • Be sure that the System Audio Control function is set to on using TV menu. • Depending on , the System Audio Control function will output from the connected equipment. TV Receiver...
... activate to output TV sound through the speakers connected to the receiver. Notes • If System Audio Control does not function according to your TV setting, refer to the operating instructions of the TV. • Your TV must support the System Audio Control function. • If the TV is turned on... before turning on (if in standby mode) r Switches to appropriate HDMI input Notes • Be sure that the System Audio Control function is set to on using TV menu. • Depending on , the System Audio Control function will output from the connected equipment. TV Receiver...
Operating Instructions
Page 37
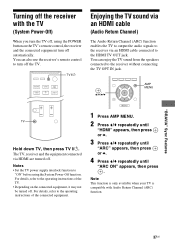
..." Sync Features 37US For details, refer to "ON" before using the POWER button on the connected equipment, it may not be turned off . Notes • Set the TV power supply interlock function to the operating instructions of the connected equipment. Note This function is only available when your TV is compatible...
..." Sync Features 37US For details, refer to "ON" before using the POWER button on the connected equipment, it may not be turned off . Notes • Set the TV power supply interlock function to the operating instructions of the connected equipment. Note This function is only available when your TV is compatible...
Operating Instructions
Page 38
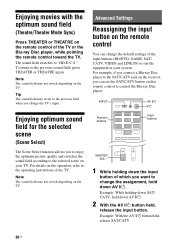
... which you can change the TV's input. Note The sound field may not switch depending on the TV. Advanced Settings Reassigning the input button on the remote control You can set the SAT/CATV button on this remote control to change the assignment, hold down AV ?/1. Note The sound field may not...
... which you can change the TV's input. Note The sound field may not switch depending on the TV. Advanced Settings Reassigning the input button on the remote control You can set the SAT/CATV button on this remote control to change the assignment, hold down AV ?/1. Note The sound field may not...


