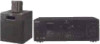

Operating Instructions
Page 2
... the ENERGY STAR® guidelines for help. Refer servicing to turn off and unplug the receiver. 2 These limits are cautioned that this equipment. As an ENERGY STAR® partner, Sony Corporation has determined that any solid object or liquid fall into an outlet on a circuit... different from that interference will fit into the outlet, contact your local power supply. And don't place lighted candles on the receiver. • To prevent fire...
... the ENERGY STAR® guidelines for help. Refer servicing to turn off and unplug the receiver. 2 These limits are cautioned that this equipment. As an ENERGY STAR® partner, Sony Corporation has determined that any solid object or liquid fall into an outlet on a circuit... different from that interference will fit into the outlet, contact your local power supply. And don't place lighted candles on the receiver. • To prevent fire...

Operating Instructions
Page 3
... shown on certain types of Digital Theater Systems, Inc. You can also use any question or problem concerning your receiver, please consult your nearest Sony dealer. If howling occurs Reposition the speakers or turn it to the area code, are trademarks of the rear panel...30 minutes. "Dolby", "Pro Logic" and the double-D symbol a are clearly indicate in the text, for making the task easier. This receiver incorporates Dolby* Digital and Pro Logic Surround and the DTS** Digital Surround System. * Manufactured under license from Dolby Laboratories. Copyright 1996, 2000...
... shown on certain types of Digital Theater Systems, Inc. You can also use any question or problem concerning your receiver, please consult your nearest Sony dealer. If howling occurs Reposition the speakers or turn it to the area code, are trademarks of the rear panel...30 minutes. "Dolby", "Pro Logic" and the double-D symbol a are clearly indicate in the text, for making the task easier. This receiver incorporates Dolby* Digital and Pro Logic Surround and the DTS** Digital Surround System. * Manufactured under license from Dolby Laboratories. Copyright 1996, 2000...

Operating Instructions
Page 4
... avoid hum and noise. • When connecting an audio/video cord, be sure to match the color-coded pins to the appropriate jacks on the receiver. ] } } ] z When to yellow; When using the remote, point it at the remote sensor g on the components: yellow (video) to replace batteries... Under normal conditions, the batteries should last for the components you received the following items with new ones. Before you get started • Turn off the power to all components before you actually connect them to...
... avoid hum and noise. • When connecting an audio/video cord, be sure to match the color-coded pins to the appropriate jacks on the receiver. ] } } ] z When to yellow; When using the remote, point it at the remote sensor g on the components: yellow (video) to replace batteries... Under normal conditions, the batteries should last for the components you received the following items with new ones. Before you get started • Turn off the power to all components before you actually connect them to...

Operating Instructions
Page 5
...the AM terminals FM 75Ω COAXIAL terminal Notes on antenna hookups • To prevent noise pickup, keep the AM loop antenna away from the receiver and other components. • Be sure to fully extend the FM wire antenna. • After connecting the FM wire antenna, keep it against .... To prevent a gas explosion, do not connect the ground wire to an outdoor antenna, ground it as horizontal as shown below. Outdoor FM antenna Receiver ANTENNA AM FM 75Ω COAXIAL Ground wire (not supplied) To ground Important If you have poor FM reception Use a 75-ohm coaxial cable ...
...the AM terminals FM 75Ω COAXIAL terminal Notes on antenna hookups • To prevent noise pickup, keep the AM loop antenna away from the receiver and other components. • Be sure to fully extend the FM wire antenna. • After connecting the FM wire antenna, keep it against .... To prevent a gas explosion, do not connect the ground wire to an outdoor antenna, ground it as horizontal as shown below. Outdoor FM antenna Receiver ANTENNA AM FM 75Ω COAXIAL Ground wire (not supplied) To ground Important If you have poor FM reception Use a 75-ohm coaxial cable ...

Operating Instructions
Page 7
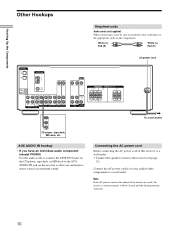
... your TV's audio output jacks to the TV/ SAT AUDIO IN jacks on the receiver and apply sound effects to the appropriate jacks on the receiver. In this case, do not connect the TV's video output jack to the receiver as shown above. 7 If you are connecting a separate TV tuner (or satellite tuner...
... your TV's audio output jacks to the TV/ SAT AUDIO IN jacks on the receiver and apply sound effects to the appropriate jacks on the receiver. In this case, do not connect the TV's video output jack to the receiver as shown above. 7 If you are connecting a separate TV tuner (or satellite tuner...

Operating Instructions
Page 8
... AUDIO IN SUB VIDEO WOOFER SPEAKERS IMPEDANCE USE 8 - 16Ω SURROUND R L CENTER FRONT R L R L R L * When making connections as the Sony MOD-RF1 (not supplied). TUNING + LEVEL SURR EQ MEMORY SHIFT FM MODE FM AM SET UP NAME CINEMA STUDIO EX A B C ENTER SOUND FIELD A.F.D. MODE...optical and coaxial digital input jacks on the components. MUTING Note When making digital audio connections to a DVD player, connect to the receiver's OPTICAL or COAXIAL DVD/LD IN jack. DVD or LD player (etc.)* OUTPUT VIDEO OUT OUTPUT DIGITAL OPTICAL OUTPUT DIGITAL COAXIAL ...
... AUDIO IN SUB VIDEO WOOFER SPEAKERS IMPEDANCE USE 8 - 16Ω SURROUND R L CENTER FRONT R L R L R L * When making connections as the Sony MOD-RF1 (not supplied). TUNING + LEVEL SURR EQ MEMORY SHIFT FM MODE FM AM SET UP NAME CINEMA STUDIO EX A B C ENTER SOUND FIELD A.F.D. MODE...optical and coaxial digital input jacks on the components. MUTING Note When making digital audio connections to a DVD player, connect to the receiver's OPTICAL or COAXIAL DVD/LD IN jack. DVD or LD player (etc.)* OUTPUT VIDEO OUT OUTPUT DIGITAL OPTICAL OUTPUT DIGITAL COAXIAL ...

Operating Instructions
Page 9
...CD TUNER AUX MASTER VOLUME + PRESET - MODE 2CH EQUALIZER MULTI CH IN - Alternatively, the MULTI CH IN jacks can connect them directly to the receiver to enjoy the sound of your DVD player is also equipped with MULTI CH IN jacks. TUNING + LEVEL SURR EQ MEMORY SHIFT FM MODE FM...If your surround speakers and sub woofer from the DVD player or multichannel decoder. Hooking Up the Components MULTI CH IN Hookups Although this receiver incorporates a multi channel decoder, it is equipped with MULTI CH OUTPUT jacks, you can be used to connect an external multi channel decoder.
...CD TUNER AUX MASTER VOLUME + PRESET - MODE 2CH EQUALIZER MULTI CH IN - Alternatively, the MULTI CH IN jacks can connect them directly to the receiver to enjoy the sound of your DVD player is also equipped with MULTI CH IN jacks. TUNING + LEVEL SURR EQ MEMORY SHIFT FM MODE FM...If your surround speakers and sub woofer from the DVD player or multichannel decoder. Hooking Up the Components MULTI CH IN Hookups Although this receiver incorporates a multi channel decoder, it is equipped with MULTI CH OUTPUT jacks, you can be used to connect an external multi channel decoder.
Operating Instructions
Page 10
.... Note If the AC power cord is disconnected for about one week, the receiver's entire memory will start. 10 Connect the AC power cord(s) of this receiver to a wall outlet: • Connect the speaker system to the receiver (see page 12). Connecting the AC power cord Before connecting the AC power ... supplied) When connecting a cord, be cleared and the demonstration will be sure to match the color-coded pins to the appropriate jacks on the receiver so that you have an individual audio component (except PHONO) Use the audio cords to connect the LINE OUT jacks on the CD player, tape...
.... Note If the AC power cord is disconnected for about one week, the receiver's entire memory will start. 10 Connect the AC power cord(s) of this receiver to a wall outlet: • Connect the speaker system to the receiver (see page 12). Connecting the AC power cord Before connecting the AC power ... supplied) When connecting a cord, be cleared and the demonstration will be sure to match the color-coded pins to the appropriate jacks on the receiver so that you have an individual audio component (except PHONO) Use the audio cords to connect the LINE OUT jacks on the CD player, tape...

Operating Instructions
Page 11
... TUNER AUX MASTER VOLUME + PRESET - Jog dial: Use to adjust the setting of buttons and control used to set up your speaker system to the receiver, how to position each parameter. 11 Hooking Up and Setting Up the Speaker System Hooking Up and Setting Up the Speaker System This chapter describes...
... TUNER AUX MASTER VOLUME + PRESET - Jog dial: Use to adjust the setting of buttons and control used to set up your speaker system to the receiver, how to position each parameter. 11 Hooking Up and Setting Up the Speaker System Hooking Up and Setting Up the Speaker System This chapter describes...

Operating Instructions
Page 13
... cord does not touch another speaker terminal or the stripped end of the speaker cord Stripped speaker cord is currently displayed on the receiver, the speaker may damage the receiver. To prevent this happens, check the speaker connection again. If no sound is heard from a speaker while outputting a test tone or a ...test tone is output from a speaker other due to check that you turn down the volume before you turn off the receiver. 13 Hooking Up and Setting Up the Speaker System To avoid short-circuiting the speakers Short-circuiting of insulation.
... cord does not touch another speaker terminal or the stripped end of the speaker cord Stripped speaker cord is currently displayed on the receiver, the speaker may damage the receiver. To prevent this happens, check the speaker connection again. If no sound is heard from a speaker while outputting a test tone or a ...test tone is output from a speaker other due to check that you turn down the volume before you turn off the receiver. 13 Hooking Up and Setting Up the Speaker System To avoid short-circuiting the speakers Short-circuiting of insulation.

Operating Instructions
Page 14
... four seconds. This procedure is not necessary if the demonstration activates when you have hooked up the speakers and turned on the power, clear the receiver's memory. TUNING + LEVEL SURR EQ MEMORY SHIFT FM MODE FM AM SET UP NAME CINEMA STUDIO EX A B C ENTER SOUND FIELD A.F.D. Then, ...VIDEO DVD/LD TV/SAT MD/TAPE CD TUNER AUX MASTER VOLUME + PRESET - Performing initial setup operations Before you want to clear the receiver's memory, do the following message appears in the display: "NOW DEMONSTRATION MODE IF YOU FINISH DEMONSTRATION PLEASE PRESS POWER KEY WHILE THIS ...
... four seconds. This procedure is not necessary if the demonstration activates when you have hooked up the speakers and turned on the power, clear the receiver's memory. TUNING + LEVEL SURR EQ MEMORY SHIFT FM MODE FM AM SET UP NAME CINEMA STUDIO EX A B C ENTER SOUND FIELD A.F.D. Then, ...VIDEO DVD/LD TV/SAT MD/TAPE CD TUNER AUX MASTER VOLUME + PRESET - Performing initial setup operations Before you want to clear the receiver's memory, do the following message appears in the display: "NOW DEMONSTRATION MODE IF YOU FINISH DEMONSTRATION PLEASE PRESS POWER KEY WHILE THIS ...

Operating Instructions
Page 15
... Front SMALL Center SMALL Rear SMALL Woofer YES You cannot change the configuration if you change the speaker system, choose NORM. When you use Sony's Micro Satellite speakers, select MICRO SP. SP. (Normal Speaker) to optimize the sound balance. The setting is stored automatically. 5 Repeat ...the side, depending on the receiver. 2 Press SET UP. 3 Press the cursor buttons ( or ) to select the parameter you want to adjust. 4 Turn the jog dial to select the setting you B A A 45° C C 90° Specifying the speaker parameters For HT-DDW830, the speaker size and ...
... Front SMALL Center SMALL Rear SMALL Woofer YES You cannot change the configuration if you change the speaker system, choose NORM. When you use Sony's Micro Satellite speakers, select MICRO SP. SP. (Normal Speaker) to optimize the sound balance. The setting is stored automatically. 5 Repeat ...the side, depending on the receiver. 2 Press SET UP. 3 Press the cursor buttons ( or ) to select the parameter you want to adjust. 4 Turn the jog dial to select the setting you B A A 45° C C 90° Specifying the speaker parameters For HT-DDW830, the speaker size and ...

Operating Instructions
Page 18
... position than the front speakers. For example, setting the center speaker distance 3~6 feet (1~2 m) closer than the front speakers. Note This receiver incorporates a new test tone with a frequency centered at the same time Rotate MASTER VOLUME on the remote. 18 on the remote again ...MENU to select the surround parameter. Hooking Up and Setting Up the Speaker System Multi Channel Surround Setup z About speaker distances This receiver allows you to adjust the volume of each speaker sounds the same when you cannot obtain a satisfactory surround effect because the surround...
... position than the front speakers. For example, setting the center speaker distance 3~6 feet (1~2 m) closer than the front speakers. Note This receiver incorporates a new test tone with a frequency centered at the same time Rotate MASTER VOLUME on the remote. 18 on the remote again ...MENU to select the surround parameter. Hooking Up and Setting Up the Speaker System Multi Channel Surround Setup z About speaker distances This receiver allows you to adjust the volume of each speaker sounds the same when you cannot obtain a satisfactory surround effect because the surround...

Operating Instructions
Page 19
...8226; Although these adjustments can also be made via the front panel using the LEVEL menu (when the test tone is output, the receiver switches to the LEVEL menu automatically), we recommend that increasing the center and surround speaker levels produces a better blend between the front ... the foundation for each speaker Let's assume that you begin playing the programme source. 1 Turn on the receiver and select the programme source. 2 Press POWER on the receiver. POWER indicator First, turn the volume of the soundstage. When you make further adjustments while listening to playback...
...8226; Although these adjustments can also be made via the front panel using the LEVEL menu (when the test tone is output, the receiver switches to the LEVEL menu automatically), we recommend that increasing the center and surround speaker levels produces a better blend between the front ... the foundation for each speaker Let's assume that you begin playing the programme source. 1 Turn on the receiver and select the programme source. 2 Press POWER on the receiver. POWER indicator First, turn the volume of the soundstage. When you make further adjustments while listening to playback...

Operating Instructions
Page 20
... Connect a pair of headphones to the PHONES jack to verify that you connected (e.g., CD player or tape deck). 3 Turn on both the receiver and the component. If both the receiver and all components are turned on. , Check that the volume level on the display is not set to VOL MIN by turning...used for the connection is (are fully inserted into the jacks on the component and start playing it. 4 Rotate MASTER VOLUME to turn on the receiver. 2 Press a function button to select a component (program source) that sound is output from the headphones, the front speaker may not be connected to ...
... Connect a pair of headphones to the PHONES jack to verify that you connected (e.g., CD player or tape deck). 3 Turn on both the receiver and the component. If both the receiver and all components are turned on. , Check that the volume level on the display is not set to VOL MIN by turning...used for the connection is (are fully inserted into the jacks on the component and start playing it. 4 Rotate MASTER VOLUME to turn on the receiver. 2 Press a function button to select a component (program source) that sound is output from the headphones, the front speaker may not be connected to ...

Operating Instructions
Page 21
... is the same as follows: v Index name of the display. Index name does not appear when only blank spaces have assigned one to turn the receiver on the front panel. When you have been entered, or it is selected. 3 DIMMER button Press repeatedly to adjust the brightness of the component or...
... is the same as follows: v Index name of the display. Index name does not appear when only blank spaces have assigned one to turn the receiver on the front panel. When you have been entered, or it is selected. 3 DIMMER button Press repeatedly to adjust the brightness of the component or...

Operating Instructions
Page 22
... B or C sound field (page 27). 7 Use the SOUND FIELD buttons to memorize a preset station. button / indicator Press to set the receiver to output sound from only the front (left and right) speakers. 22 TUNING + LEVEL SURR EQ MEMORY SHIFT FM MODE FM AM SET UP ...NAME CINEMA STUDIO EX A B C ENTER SOUND FIELD A.F.D. SHIFT button Selects a memory page for preset stations. For details, see "Receiving Broadcasts" starting from page 36. TUNING + - A.F.D. MODE button / indicator Press to activate the sound field selection mode (page 26). 2CH button / indicator...
... B or C sound field (page 27). 7 Use the SOUND FIELD buttons to memorize a preset station. button / indicator Press to set the receiver to output sound from only the front (left and right) speakers. 22 TUNING + LEVEL SURR EQ MEMORY SHIFT FM MODE FM AM SET UP ...NAME CINEMA STUDIO EX A B C ENTER SOUND FIELD A.F.D. SHIFT button Selects a memory page for preset stations. For details, see "Receiving Broadcasts" starting from page 36. TUNING + - A.F.D. MODE button / indicator Press to activate the sound field selection mode (page 26). 2CH button / indicator...

Operating Instructions
Page 25
... about the sound modes, see pages 27 - 29. See "MultiChannel Surround setup" starting on page 15 to set up the receiver to enjoy surround sound. Enjoying Surround Sound This chapter describes how to set the speaker parameters before enjoying surround sound. To fully enjoy... surround sound, you were in movie theaters. The receiver contains a variety of your home. In addition to decoding the surround sound, some of the Sony Digital Cinema Sound digital signal processing technology. The virtual sound modes contain compelling applications ...
... about the sound modes, see pages 27 - 29. See "MultiChannel Surround setup" starting on page 15 to set up the receiver to enjoy surround sound. Enjoying Surround Sound This chapter describes how to set the speaker parameters before enjoying surround sound. To fully enjoy... surround sound, you were in movie theaters. The receiver contains a variety of your home. In addition to decoding the surround sound, some of the Sony Digital Cinema Sound digital signal processing technology. The virtual sound modes contain compelling applications ...

Operating Instructions
Page 26
..., EQ or SET UP buttons. Jog dial: Use to customize the surround parameters in the current sound field. button: Press to set the receiver to automatically detect the type of buttons used to enjoy surround sound LEVEL button: Press to . 1 Press MODE. You can identify Dolby Surround... 1 SPEAKERS PHONES DISPLAY DIMMER MULTI CHANNEL DECODING INPUT MODE VIDEO DVD/LD TV/SAT MD/TAPE CD TUNER AUX MASTER VOLUME + PRESET - z The receiver memorizes the last sound field selected for each sound field. z You can enjoy surround sound simply by looking at the packaging Dolby Digital discs are...
..., EQ or SET UP buttons. Jog dial: Use to customize the surround parameters in the current sound field. button: Press to set the receiver to automatically detect the type of buttons used to enjoy surround sound LEVEL button: Press to . 1 Press MODE. You can identify Dolby Surround... 1 SPEAKERS PHONES DISPLAY DIMMER MULTI CHANNEL DECODING INPUT MODE VIDEO DVD/LD TV/SAT MD/TAPE CD TUNER AUX MASTER VOLUME + PRESET - z The receiver memorizes the last sound field selected for each sound field. z You can enjoy surround sound simply by looking at the packaging Dolby Digital discs are...

Operating Instructions
Page 30
... letters light up when dynamic range compression is NOT set to OFF and the A.F.D. qd SP. qa L F E L F E will light up when using the receiver to tune in order to OFF. 30 qs SW Lights up when sub woofer selection is set to ANALOG (see 8 on page 23). 4 MPEG Lights... Understanding the Multi-Channel Surround Displays qs qd 1 2 34 5 a DIGITAL PRO LOGIC DTS MPEG STEREO MONO SW SP. DIGITAL This indicator lights up when the receiver is decoding signals recorded in the Dolby Digital format. 2 PRO LOGIC Lights up to playback the channels. OFF OPT COAX D.RANGE EQ LCR L F E SL ...
... letters light up when dynamic range compression is NOT set to OFF and the A.F.D. qd SP. qa L F E L F E will light up when using the receiver to tune in order to OFF. 30 qs SW Lights up when sub woofer selection is set to ANALOG (see 8 on page 23). 4 MPEG Lights... Understanding the Multi-Channel Surround Displays qs qd 1 2 34 5 a DIGITAL PRO LOGIC DTS MPEG STEREO MONO SW SP. DIGITAL This indicator lights up when the receiver is decoding signals recorded in the Dolby Digital format. 2 PRO LOGIC Lights up to playback the channels. OFF OPT COAX D.RANGE EQ LCR L F E SL ...


