Limited Warranty (U.S. Only)
Page 1
..., misuse, limitations of technology, or modification of or to its original packaging or packaging affording an equal degree of product ("Parts Warranty"), Sony will not be defective. Please refer to the End User License Agreements included with the Product. 4-557-172-03 General Stereo/Hifi Components/Tape Decks ® CD Players/Mini Disc Players/Audio Systems Hifi Audio LIMITED WARRANTY (U.S.
..., misuse, limitations of technology, or modification of or to its original packaging or packaging affording an equal degree of product ("Parts Warranty"), Sony will not be defective. Please refer to the End User License Agreements included with the Product. 4-557-172-03 General Stereo/Hifi Components/Tape Decks ® CD Players/Mini Disc Players/Audio Systems Hifi Audio LIMITED WARRANTY (U.S.

Operating Instructions
Page 2
... outlet. Model No. HT-CT260/HT-CT260HP Serial No. Important Safety Instructions 1) Read these instructions. 2) Keep these instructions. 3) Heed all warnings. 4) Follow all instructions. 5) Do not use only. Owner's Record The model and serial numbers are provided for replacement of the obsolete outlet. 10) Protect the power cord from the mains, connect the unit to dripping or splashing, and do not place objects filled with battery-installed to...
... outlet. Model No. HT-CT260/HT-CT260HP Serial No. Important Safety Instructions 1) Read these instructions. 2) Keep these instructions. 3) Heed all warnings. 4) Follow all instructions. 5) Do not use only. Owner's Record The model and serial numbers are provided for replacement of the obsolete outlet. 10) Protect the power cord from the mains, connect the unit to dripping or splashing, and do not place objects filled with battery-installed to...

Operating Instructions
Page 3
... by turning the equipment off and on, the user is connected. - When a cart is subject to the following FCC statement applies only to the version of this model manufactured for sale in a residential installation. For the Sound Bar (SA-CT260) For the wireless transceiver (EZW-RT50) This device complies with the limits for a Class B digital device, pursuant to Part 15...
... by turning the equipment off and on, the user is connected. - When a cart is subject to the following FCC statement applies only to the version of this model manufactured for sale in a residential installation. For the Sound Bar (SA-CT260) For the wireless transceiver (EZW-RT50) This device complies with the limits for a Class B digital device, pursuant to Part 15...
Operating Instructions
Page 5
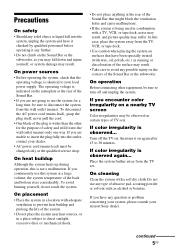
... use any question or problem concerning your system, please consult your local power supply. On operation Before connecting other for a long time, be observed on the corners of the Sound Bar that the operating voltage is not a malfunction. On heat buildup Although the system heats up during operation, this case, place the system away from the TV set , then turn...
... use any question or problem concerning your system, please consult your local power supply. On operation Before connecting other for a long time, be observed on the corners of the Sound Bar that the operating voltage is not a malfunction. On heat buildup Although the system heats up during operation, this case, place the system away from the TV set , then turn...

Operating Instructions
Page 6
.... Bluetooth wireless technology is commonly used between two devices, but a single device can operate the units involved within a range of capabilities for various Bluetooth product capabilities. Product includes software. © DTS, Inc. You do not need to place the devices face to a standard set of about 10 meters. Copyrights This model incorporates Dolby* Digital and Pro Logic Sound and the DTS** Digital Surround System...
.... Bluetooth wireless technology is commonly used between two devices, but a single device can operate the units involved within a range of capabilities for various Bluetooth product capabilities. Product includes software. © DTS, Inc. You do not need to place the devices face to a standard set of about 10 meters. Copyrights This model incorporates Dolby* Digital and Pro Logic Sound and the DTS** Digital Surround System...

Operating Instructions
Page 7
... of the characteristics of the Bluetooth device make it impossible to use the same frequency band (2.4 GHz). Since this system may interfere with the Bluetooth specification prescribed by this system and Bluetooth mobile phone or Bluetooth device when you to connect, or may occur. When using your Bluetooth device near a device with a Bluetooth connection • Locations where a wireless LAN is installed • Around microwave ovens...
... of the characteristics of the Bluetooth device make it impossible to use the same frequency band (2.4 GHz). Since this system may interfere with the Bluetooth specification prescribed by this system and Bluetooth mobile phone or Bluetooth device when you to connect, or may occur. When using your Bluetooth device near a device with a Bluetooth connection • Locations where a wireless LAN is installed • Around microwave ovens...

Operating Instructions
Page 9
... 19 Connecting the AC power cord (mains lead 22 Setting up the Wireless System 22 Setting up the sound output of the connected equipment 23 Playback Options Operating the system using the supplied remote control ........ 24 Bluetooth Function Using the Bluetooth function ...... 25 Surround Function Enjoying the surround effect ...... 29 Advanced Settings Controlling connected equipment with the remote control ......... 30 Setting manufacturer of controllable TVs 31 Settings and adjustments using the amplifier menu 33 Additional Information Troubleshooting 38 Specifications 40 Index...
... 19 Connecting the AC power cord (mains lead 22 Setting up the Wireless System 22 Setting up the sound output of the connected equipment 23 Playback Options Operating the system using the supplied remote control ........ 24 Bluetooth Function Using the Bluetooth function ...... 25 Surround Function Enjoying the surround effect ...... 29 Advanced Settings Controlling connected equipment with the remote control ......... 30 Setting manufacturer of controllable TVs 31 Settings and adjustments using the amplifier menu 33 Additional Information Troubleshooting 38 Specifications 40 Index...

Operating Instructions
Page 15
... details on /standby) B INPUT +/- TV VOL TV CH A ?/1 (on night mode, see page 35. * The N and VOL + buttons have a tactile dot. Note • Point the remote control towards the remote control sensor ( ) of connected equipment. When the system is operated, the display is turned off. E MUTING F VOL +*/- G AMP MENU (page 33) H C, X, x, c or Press C, X, x or c to select the menu items. Then press to adjust the volume. The factory setting is toggled...
... details on /standby) B INPUT +/- TV VOL TV CH A ?/1 (on night mode, see page 35. * The N and VOL + buttons have a tactile dot. Note • Point the remote control towards the remote control sensor ( ) of connected equipment. When the system is operated, the display is turned off. E MUTING F VOL +*/- G AMP MENU (page 33) H C, X, x, c or Press C, X, x or c to select the menu items. Then press to adjust the volume. The factory setting is toggled...

Operating Instructions
Page 19
... the remote control can control the TV, appropriate operation may not be obtained, because of the interference between the direct command from the TV. Note • Be sure to install the Sound Bar. of the AMP menu to ON. continued 19US Installing the Sound Bar • Installing the Sound Bar on a rack • Installing the Sound Bar on a wall (page 20) Getting Started Note on the rear panel...
... the remote control can control the TV, appropriate operation may not be obtained, because of the interference between the direct command from the TV. Note • Be sure to install the Sound Bar. of the AMP menu to ON. continued 19US Installing the Sound Bar • Installing the Sound Bar on a rack • Installing the Sound Bar on a wall (page 20) Getting Started Note on the rear panel...

Operating Instructions
Page 22
..., see "Activating wireless transmission between the Sound Bar and subwoofer. - Setting up the Wireless System The Sound Bar transmits sound from a subwoofer whose ?/1 indicator stays lit in standby mode. For details, see "Installing the supplied wireless transceivers" (page 16). 2 Press ?/1 to the system. Connecting the AC power cord (mains lead) Before connecting the AC power cord (mains lead) of the Sound Bar and the subwoofer to a wall outlet (mains), connect all the...
..., see "Activating wireless transmission between the Sound Bar and subwoofer. - Setting up the Wireless System The Sound Bar transmits sound from a subwoofer whose ?/1 indicator stays lit in standby mode. For details, see "Installing the supplied wireless transceivers" (page 16). 2 Press ?/1 to the system. Connecting the AC power cord (mains lead) Before connecting the AC power cord (mains lead) of the Sound Bar and the subwoofer to a wall outlet (mains), connect all the...

Operating Instructions
Page 24
Playback Options Operating the system using the supplied remote control TV VOL TV CH ?/1 INPUT +/- to minimum. Input source Playable equipment ANALOG Device connected to the COAXIAL jack 24US Input source OPTICAL COAXIAL Playable equipment Device connected to the OPTICAL jack Device connected to the ANALOG jack BT AU Device connected with the Bluetooth 3 Adjust the volume by pressing VOL +/-. In this case, turn the volume of the Sound Bar. VOL +/- 1 Turn on the front panel display of...
Playback Options Operating the system using the supplied remote control TV VOL TV CH ?/1 INPUT +/- to minimum. Input source Playable equipment ANALOG Device connected to the COAXIAL jack 24US Input source OPTICAL COAXIAL Playable equipment Device connected to the OPTICAL jack Device connected to the ANALOG jack BT AU Device connected with the Bluetooth 3 Adjust the volume by pressing VOL +/-. In this case, turn the volume of the Sound Bar. VOL +/- 1 Turn on the front panel display of...

Operating Instructions
Page 25
... system automatically sets pairing with the INPUT +/- The system is selected with it. attempting to music from your Bluetooth device. Use the procedure below to be connected must support A2DP (Advanced Audio Distribution Profile). Once a pairing operation is to default. However, repeat of the connected devices, refer to the operating instructions supplied with each other beforehand. Pairing automatically If "BT AU" is Flashes in blue to...
... system automatically sets pairing with the INPUT +/- The system is selected with it. attempting to music from your Bluetooth device. Use the procedure below to be connected must support A2DP (Advanced Audio Distribution Profile). Once a pairing operation is to default. However, repeat of the connected devices, refer to the operating instructions supplied with each other beforehand. Pairing automatically If "BT AU" is Flashes in blue to...
Operating Instructions
Page 29
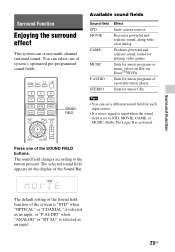
... the SOUND FIELD buttons. Press one of system's optimized pre-programmed sound fields. Produces powerful and realistic sound, suited for music CDs. Suits for music programs of the system is "STD" when "OPTICAL" or "COAXIAL" is selected as an input, or "P.AUDIO" when "ANALOG" or "BT AU" is activated. Surround Function The default setting of the Sound field function of a portable music player Suits for playing video games. You can create multi-channel surround sound. Surround Function Enjoying the surround...
... the SOUND FIELD buttons. Press one of system's optimized pre-programmed sound fields. Produces powerful and realistic sound, suited for music CDs. Suits for music programs of the system is "STD" when "OPTICAL" or "COAXIAL" is selected as an input, or "P.AUDIO" when "ANALOG" or "BT AU" is activated. Surround Function The default setting of the Sound field function of a portable music player Suits for playing video games. You can create multi-channel surround sound. Surround Function Enjoying the surround...
Operating Instructions
Page 33
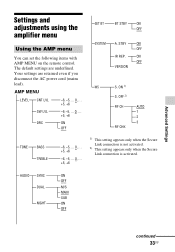
Advanced Settings Settings and adjustments using the amplifier menu Using the AMP menu You can set the following items with AMP MENU on the remote control. ON 1) S. STBY ON OFF IR REP. AMP MENU LEVEL CNT LVL -6, -5, ... 0, ... +5, +6 SW LVL -6, -5, ... 0, ... +5, +6 DRC ON OFF SET BT BT STBY ON OFF SYSTEM A. OFF 2) RF CH RF CHK AUTO 1 2 3 TONE BASS TREBLE -6, -5, ... 0, ... +5, +6 -6, -5, ... 0, ... +5, +6 1) This setting appears only when the Secure Link connection is not activated. 2) This setting appears only when...
Advanced Settings Settings and adjustments using the amplifier menu Using the AMP menu You can set the following items with AMP MENU on the remote control. ON 1) S. STBY ON OFF IR REP. AMP MENU LEVEL CNT LVL -6, -5, ... 0, ... +5, +6 SW LVL -6, -5, ... 0, ... +5, +6 DRC ON OFF SET BT BT STBY ON OFF SYSTEM A. OFF 2) RF CH RF CHK AUTO 1 2 3 TONE BASS TREBLE -6, -5, ... 0, ... +5, +6 -6, -5, ... 0, ... +5, +6 1) This setting appears only when the Secure Link connection is not activated. 2) This setting appears only when...
Operating Instructions
Page 34
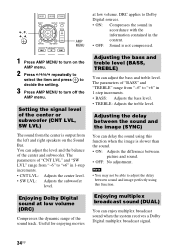
Setting the signal level of the sound track. Adjusting the delay between picture and sound. • OFF: No adjustment. Enjoying Dolby Digital sound at low volume. You can adjust the bass and treble level. The parameters of "BASS" and "TREBLE" range from "-6" to turn on the Sound Bar. MENU • OFF: Sound is not compressed. 1 Press AMP MENU to turn off the AMP menu. Enjoying multiplex broadcast sound (DUAL) You can delay the sound using this function when the image is slower than...
Setting the signal level of the sound track. Adjusting the delay between picture and sound. • OFF: No adjustment. Enjoying Dolby Digital sound at low volume. You can adjust the bass and treble level. The parameters of "BASS" and "TREBLE" range from "-6" to turn on the Sound Bar. MENU • OFF: Sound is not compressed. 1 Press AMP MENU to turn off the AMP menu. Enjoying multiplex broadcast sound (DUAL) You can delay the sound using this function when the image is slower than...

Operating Instructions
Page 35
... the remote control can control the TV, appropriate operation may not be set IR REP. STBY) You can listen to Dolby Digital sound at a low volume level using DRC (page 34). Relaying the command from the right speaker. Note • To receive a Dolby Digital signal, you need to connect a digital satellite tuner to the Sound Bar with Bluetooth connection. • ON: Bluetooth standby mode is enabled. • OFF: Bluetooth standby mode is disabled. Tip • You can reduce power consumption. Auto Standby function (A. Notes...
... the remote control can control the TV, appropriate operation may not be set IR REP. STBY) You can listen to Dolby Digital sound at a low volume level using DRC (page 34). Relaying the command from the right speaker. Note • To receive a Dolby Digital signal, you need to connect a digital satellite tuner to the Sound Bar with Bluetooth connection. • ON: Bluetooth standby mode is enabled. • OFF: Bluetooth standby mode is disabled. Tip • You can reduce power consumption. Auto Standby function (A. Notes...

Operating Instructions
Page 36
...". • On some TVs, this case, move the Sound Bar to set IR REP. Proceed to ensure the subwoofer is turned on the front panel display. 5 Press AMP MENU. The AMP menu turns off . 36US Cancelling the Secure Link function (S. The AMP menu turns off . In this function does not work. Activating wireless transmission between specific units (S. "SUCCEED" appears on the subwoofer lights in amber. OFF," then press or c. 4 "RELEASE" appears...
...". • On some TVs, this case, move the Sound Bar to set IR REP. Proceed to ensure the subwoofer is turned on the front panel display. 5 Press AMP MENU. The AMP menu turns off . 36US Cancelling the Secure Link function (S. The AMP menu turns off . In this function does not work. Activating wireless transmission between specific units (S. "SUCCEED" appears on the subwoofer lights in amber. OFF," then press or c. 4 "RELEASE" appears...

Operating Instructions
Page 38
... subwoofer. No sound or only a very low-level sound of the connected equipment is connected to the digital input jacks of this system, check the audio setting (settings for the sound field, surround sound processing may not work . The surround effect may not work effectively (page 29). The sound is connected securely. Check the status of the system and the connected equipment are fully inserted. POWER The power is not turned on the input signal and the setting...
... subwoofer. No sound or only a very low-level sound of the connected equipment is connected to the digital input jacks of this system, check the audio setting (settings for the sound field, surround sound processing may not work . The surround effect may not work effectively (page 29). The sound is connected securely. Check the status of the system and the connected equipment are fully inserted. POWER The power is not turned on the input signal and the setting...
Operating Instructions
Page 40
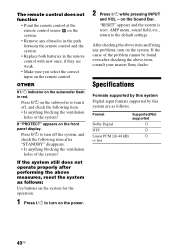
... is reset. AMP menu, sound field, etc., return to turn on the power. 2 Press ?/1 while pressing INPUT and VOL - Specifications Formats supported by this system Digital input formats supported by this system are weak. • Make sure you select the correct input on the subwoofer to the default settings. If "PROTECT" appears on the Sound Bar. If the system still does not operate properly after performing the above item, consult your nearest Sony dealer...
... is reset. AMP menu, sound field, etc., return to turn on the power. 2 Press ?/1 while pressing INPUT and VOL - Specifications Formats supported by this system Digital input formats supported by this system are weak. • Make sure you select the correct input on the subwoofer to the default settings. If "PROTECT" appears on the Sound Bar. If the system still does not operate properly after performing the above item, consult your nearest Sony dealer...

Operating Instructions
Page 41
...) POWER OUTPUT (reference) Front L/Front R: 85 W (per channel at 3 ohms, 1 kHz) Inputs ANALOG OPTICAL COAXIAL Bluetooth section Communication system Bluetooth Specification version 2.1 + EDR (Enhanced Data Rate) Output Bluetooth Specification Power Class 2 Maximum communication range Line of sight approx. 10 m1) Frequency band 2.4 GHz band (2.4000 GHz - 2.4835 GHz) Modulation method FHSS (Freq Hopping Spread Spectrum) Compatible Bluetooth profiles2) A2DP (Advanced Audio Distribution Profile) AVRCP 1.3 (Audio Video Remote Control Profile) Supported Codecs3...
...) POWER OUTPUT (reference) Front L/Front R: 85 W (per channel at 3 ohms, 1 kHz) Inputs ANALOG OPTICAL COAXIAL Bluetooth section Communication system Bluetooth Specification version 2.1 + EDR (Enhanced Data Rate) Output Bluetooth Specification Power Class 2 Maximum communication range Line of sight approx. 10 m1) Frequency band 2.4 GHz band (2.4000 GHz - 2.4835 GHz) Modulation method FHSS (Freq Hopping Spread Spectrum) Compatible Bluetooth profiles2) A2DP (Advanced Audio Distribution Profile) AVRCP 1.3 (Audio Video Remote Control Profile) Supported Codecs3...


