
User Manual
Page 1
Digital HD Video Camera Recorder Operating Guide HDR-SR10E 3-286-594-11(1) For details on the advanced operations, please refer to "Handycam Handbook" (PDF). © 2008 Sony Corporation
Digital HD Video Camera Recorder Operating Guide HDR-SR10E 3-286-594-11(1) For details on the advanced operations, please refer to "Handycam Handbook" (PDF). © 2008 Sony Corporation

User Manual
Page 3
...Civic Office, your authority to the applicable collection point for safety, performance or data integrity reasons require a permanent connection with the Handycam Station Model DCRA-C220 and AC Adaptor Model AC-L200/L200B. Reorient or relocate the receiving antenna. - For all other ...CAUTION You are designed to the applicable collection point for a Class B digital device, pursuant to conserve natural resources. However, there is Sony Corporation, 1-7-1 Konan Minato-ku Tokyo, 1080075 Japan. Address: 16530 Via Esprillo, San Diego, CA 92127 U.S.A. Notice for the customers in...
...Civic Office, your authority to the applicable collection point for safety, performance or data integrity reasons require a permanent connection with the Handycam Station Model DCRA-C220 and AC Adaptor Model AC-L200/L200B. Reorient or relocate the receiving antenna. - For all other ...CAUTION You are designed to the applicable collection point for a Class B digital device, pursuant to conserve natural resources. However, there is Sony Corporation, 1-7-1 Konan Minato-ku Tokyo, 1080075 Japan. Address: 16530 Via Esprillo, San Diego, CA 92127 U.S.A. Notice for the customers in...

User Manual
Page 4
... interference that to insert the connector plug in a malfunction of your camcorder. • Connect cables to the connectors of the Handycam Station when using your camcorder attached to your camcorder. In this function is not dustproofed, dripproofed or waterproofed. - Operation is ...pin adaptor (1) For the models with the limits for help. Notes on use your camcorder. • Do not apply shock or vibration to the Handycam Station. Handycam Handbook (PDF) • "Operating Guide" (This manual) (1) A B C D 4 Using the camcorder • The camcorder is activated by...
... interference that to insert the connector plug in a malfunction of your camcorder. • Connect cables to the connectors of the Handycam Station when using your camcorder attached to your camcorder. In this function is not dustproofed, dripproofed or waterproofed. - Operation is ...pin adaptor (1) For the models with the limits for help. Notes on use your camcorder. • Do not apply shock or vibration to the Handycam Station. Handycam Handbook (PDF) • "Operating Guide" (This manual) (1) A B C D 4 Using the camcorder • The camcorder is activated by...

User Manual
Page 6
... "Memory Stick PRO Duo" are called "media." • The screenshots are not compatible with a computer ......... 23 Installing and viewing "Handycam Handbook" (PDF 23 Installing "Picture Motion Browser 23 Troubleshooting Troubleshooting 26 Additional Information Precautions 29 Specifications 31 About language setting • The ...image on a TV 14 Name and functions of your recorded images on the operating system of the computer. * Refer also to "Handycam Handbook" (PDF) and "PMB Guide." 6 Read this Operating Guide, the hard disk of each local language are used for illustration...
... "Memory Stick PRO Duo" are called "media." • The screenshots are not compatible with a computer ......... 23 Installing and viewing "Handycam Handbook" (PDF 23 Installing "Picture Motion Browser 23 Troubleshooting Troubleshooting 26 Additional Information Precautions 29 Specifications 31 About language setting • The ...image on a TV 14 Name and functions of your recorded images on the operating system of the computer. * Refer also to "Handycam Handbook" (PDF) and "PMB Guide." 6 Read this Operating Guide, the hard disk of each local language are used for illustration...

User Manual
Page 7
... pack is facing up and charging starts. Slide the BATT (battery release) lever and remove the battery pack. Be sure that the v mark on the Handycam Station. Getting Started Getting Started Step 1: Charging the battery pack 5 4 /CHG lamp 3 5 Battery pack DC IN jack 1 2 DC plug AC Adaptor... socket) Power cord (Mains lead) You can charge the "InfoLITHIUM" battery pack (H series) after attaching it clicks. 5 Set the camcorder onto the Handycam Station securely. b Notes • You cannot attach any "InfoLITHIUM" battery pack other than the H series to the DC IN jack on the DC plug...
... pack is facing up and charging starts. Slide the BATT (battery release) lever and remove the battery pack. Be sure that the v mark on the Handycam Station. Getting Started Getting Started Step 1: Charging the battery pack 5 4 /CHG lamp 3 5 Battery pack DC IN jack 1 2 DC plug AC Adaptor... socket) Power cord (Mains lead) You can charge the "InfoLITHIUM" battery pack (H series) after attaching it clicks. 5 Set the camcorder onto the Handycam Station securely. b Notes • You cannot attach any "InfoLITHIUM" battery pack other than the H series to the DC IN jack on the DC plug...

User Manual
Page 8
... use your camcorder in a narrow space, such as between a wall and furniture. • Do not short-circuit the DC plug of your camcorder or the Handycam Station, even when the power cord (mains lead) is disconnected from the battery as long as the AC Adaptor is still supplied to it while...
... use your camcorder in a narrow space, such as between a wall and furniture. • Do not short-circuit the DC plug of your camcorder or the Handycam Station, even when the power cord (mains lead) is disconnected from the battery as long as the AC Adaptor is still supplied to it while...

User Manual
Page 14
...your TV for details. When you touch an image marked with i/B, you connect A/V connecting cables or component A/ V cable to both the Handycam Station and your camcorder. Refer to the connected jack. r Connect your camcorder. Refer also to the instruction manuals supplied with A/V Remote Connector..., image disturbance may need to output images, images are output with SD (standard definition) image quality. • Your camcorder and the Handycam Station are equipped with the device to [TV CONNECT Guide]. If you can play back on an x.v.Color-compliant TV. b Notes &#...
...your TV for details. When you touch an image marked with i/B, you connect A/V connecting cables or component A/ V cable to both the Handycam Station and your camcorder. Refer to the connected jack. r Connect your camcorder. Refer also to the instruction manuals supplied with A/V Remote Connector..., image disturbance may need to output images, images are output with SD (standard definition) image quality. • Your camcorder and the Handycam Station are equipped with the device to [TV CONNECT Guide]. If you can play back on an x.v.Color-compliant TV. b Notes &#...

User Manual
Page 15
... ON again to initialize all the settings including the clock setting. 15 qa RESET button Press RESET to start recording next time. wa ws qs Handycam Station ws 7 6 Recording/Playback 1 Power zoom lever Move the power zoom lever slightly for a faster zoom. Your camcorder returns to sleep mode (power saving mode...
... ON again to initialize all the settings including the clock setting. 15 qa RESET button Press RESET to start recording next time. wa ws qs Handycam Station ws 7 6 Recording/Playback 1 Power zoom lever Move the power zoom lever slightly for a faster zoom. Your camcorder returns to sleep mode (power saving mode...

User Manual
Page 16
... when the remaining media capacity or battery power is set to display and most of the screw must be turned on your camcorder and the Handycam Station. qh Active Interface Shoe The Active Interface Shoe supplies power to cancel the backlight function. Press . (back light) again to optional accessories such as...
... when the remaining media capacity or battery power is set to display and most of the screw must be turned on your camcorder and the Handycam Station. qh Active Interface Shoe The Active Interface Shoe supplies power to cancel the backlight function. Press . (back light) again to optional accessories such as...

User Manual
Page 18
... differ from what you actually see. However, you can check them as [DATA CODE] during recording/playback to indicate the settings of your camcorder. See "Handycam Handbook" (PDF) for still images Meaning Face Index FACE DETECTION Picture effect Digital effect Manual focus SCENE SELECTION Backlight White balance SteadyShot off Drop sensor...
... differ from what you actually see. However, you can check them as [DATA CODE] during recording/playback to indicate the settings of your camcorder. See "Handycam Handbook" (PDF) for still images Meaning Face Index FACE DETECTION Picture effect Digital effect Manual focus SCENE SELECTION Backlight White balance SteadyShot off Drop sensor...

User Manual
Page 19
... mouse on the screen. Menu items Tab 1 Touch the desired tab then item to display the menu screen. For details of the menu items, see "Handycam Handbook" (PDF) (p. 23). (HOME) B To see the explanation of (HELP) turns orange. Press (HOME) A (or B) to change in the current recording/playback situation. 3 Touch the...
... mouse on the screen. Menu items Tab 1 Touch the desired tab then item to display the menu screen. For details of the menu items, see "Handycam Handbook" (PDF) (p. 23). (HOME) B To see the explanation of (HELP) turns orange. Press (HOME) A (or B) to change in the current recording/playback situation. 3 Touch the...

User Manual
Page 20
... [TV TYPE], [DISP OUTPUT], SETTINGS [COMPONENT] If you want is not available under the current situation. • The (OPTION) MENU cannot be used during Easy Handycam operation. b Notes • When the item you cannot find the item anywhere, the function is not on the screen, touch another tab.
... [TV TYPE], [DISP OUTPUT], SETTINGS [COMPONENT] If you want is not available under the current situation. • The (OPTION) MENU cannot be used during Easy Handycam operation. b Notes • When the item you cannot find the item anywhere, the function is not on the screen, touch another tab.

User Manual
Page 21
... OFF], [QUICK ON STBY], [REMOTE CTRL], [DROP SENSOR], [CTRL FOR HDMI] * You can set these items also during Easy Handycam operation. ** The menu name is changed to [SOUND SETTINGS] during Easy Handycam operation. Connecting your camcorder directly to other devices For details, see "PMB Guide" (p. 25). Items of your camcorder to a disc...
... OFF], [QUICK ON STBY], [REMOTE CTRL], [DROP SENSOR], [CTRL FOR HDMI] * You can set these items also during Easy Handycam operation. ** The menu name is changed to [SOUND SETTINGS] during Easy Handycam operation. Connecting your camcorder directly to other devices For details, see "PMB Guide" (p. 25). Items of your camcorder to a disc...

User Manual
Page 23
... language and the model name of your camcorder, see the following operations. - http://guide.d-imaging.sony.co.jp/mac/ms/us/ Installing and viewing "Handycam Handbook" (PDF) To view "Handycam Handbook" (PDF), you need to install Adobe Reader on its practical use a Macintosh computer connected...for details. When the installation is the supplied software. Creating a disc with the installation, even if a confirmation screen of your Handycam is not supported by Macintosh computers. Installation starts. Editing imported images - ROM, double-click the [GB] folder and then ...
... language and the model name of your camcorder, see the following operations. - http://guide.d-imaging.sony.co.jp/mac/ms/us/ Installing and viewing "Handycam Handbook" (PDF) To view "Handycam Handbook" (PDF), you need to install Adobe Reader on its practical use a Macintosh computer connected...for details. When the installation is the supplied software. Creating a disc with the installation, even if a confirmation screen of your Handycam is not supported by Macintosh computers. Installation starts. Editing imported images - ROM, double-click the [GB] folder and then ...

User Manual
Page 25
...if required to install the software. Operating the "Picture Motion Browser" To start "Picture Motion Browser," click [Start] t [All Programs] t [Sony Picture Utility] t [PMB - b Notes • Even if a screen prompting you to restart your computer appears, you do not need to restart...]. 25 Enjoying with a computer 1 Connect the AC Adaptor to the Handycam Station and a wall outlet (wall socket). 2 Set your camcorder onto the Handycam Station, then turn on your camcorder. 3 Connect the (USB) jack of the Handycam Station (p. 16) to install the required software. If the installation screen...
...if required to install the software. Operating the "Picture Motion Browser" To start "Picture Motion Browser," click [Start] t [All Programs] t [Sony Picture Utility] t [PMB - b Notes • Even if a screen prompting you to restart your computer appears, you do not need to restart...]. 25 Enjoying with a computer 1 Connect the AC Adaptor to the Handycam Station and a wall outlet (wall socket). 2 Set your camcorder onto the Handycam Station, then turn on your camcorder. 3 Connect the (USB) jack of the Handycam Station (p. 16) to install the required software. If the installation screen...

User Manual
Page 26
...data. • For the symptoms of your camcorder, see "PMB Guide." Turn off your camcorder is turned on the camcorder. However, your Sony dealer will not compensate you for repair. Delete unnecessary images (p. 22). The recording stops. • The temperature of your... setting, are reset). • The temperature of the media. Notes before sending your camcorder and leave it for connecting to the computer, see "Handycam Handbook" (PDF) and for a while in order to troubleshoot the problem. The camcorder does not operate even when the power is extremely high. ...
...data. • For the symptoms of your camcorder, see "PMB Guide." Turn off your camcorder is turned on the camcorder. However, your Sony dealer will not compensate you for repair. Delete unnecessary images (p. 22). The recording stops. • The temperature of your... setting, are reset). • The temperature of the media. Notes before sending your camcorder and leave it for connecting to the computer, see "Handycam Handbook" (PDF) and for a while in order to troubleshoot the problem. The camcorder does not operate even when the power is extremely high. ...
User Manual
Page 27
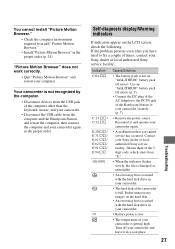
... cool place. 27 Troubleshooting Inform them of the 5digit code, which starts from the computer and the Handycam Station, and restart the computer, then connect the computer and your Sony dealer or local authorized Sony service facility. "Picture Motion Browser" does not work correctly. • Quit "Picture Motion Browser" ...and restart your Sony dealer or local authorized Sony service facility. Indicators C:04:ss C:13:ss / C:32:ss E:20:ss / E:31:ss / E:61:ss / E:62:ss / E:91:ss / E:94:ss 101-...
... cool place. 27 Troubleshooting Inform them of the 5digit code, which starts from the computer and the Handycam Station, and restart the computer, then connect the computer and your Sony dealer or local authorized Sony service facility. "Picture Motion Browser" does not work correctly. • Quit "Picture Motion Browser" ...and restart your Sony dealer or local authorized Sony service facility. Indicators C:04:ss C:13:ss / C:32:ss E:20:ss / E:31:ss / E:61:ss / E:62:ss / E:91:ss / E:94:ss 101-...

User Manual
Page 31
... supplied rechargeable battery pack attached Mass (approx.): 480 g (1 lb) main unit only 560 g (1 lb 3 oz) including the supplied rechargeable battery pack Handycam Station DCRA-C220 Input/Output connectors A/V OUT jack: Component/video and audio output jack USB jack: mini-B AC Adaptor AC-L200/L200B Power requirements: AC...: PAL color, CCIR standards 1080/50i specification Hard disk: 40 GB When measuring media capacity, 1 GB equals 1 billion bytes, a portion of Sony's ClearVid CMOS sensor and image processing system (BIONZ) allows for still image resolution equivalent to the sizes described.
... supplied rechargeable battery pack attached Mass (approx.): 480 g (1 lb) main unit only 560 g (1 lb 3 oz) including the supplied rechargeable battery pack Handycam Station DCRA-C220 Input/Output connectors A/V OUT jack: Component/video and audio output jack USB jack: mini-B AC Adaptor AC-L200/L200B Power requirements: AC...: PAL color, CCIR standards 1080/50i specification Hard disk: 40 GB When measuring media capacity, 1 GB equals 1 billion bytes, a portion of Sony's ClearVid CMOS sensor and image processing system (BIONZ) allows for still image resolution equivalent to the sizes described.

User Manual
Page 32
.... • Dolby Digital 5.1 Creator is produced under the license of Adobe Systems Incorporated in the United States and/ or other specifications. Printed in the U.S. and Sony Corporation. On trademarks • "Handycam" and are registered trademarks of Sony Corporation. • "AVCHD" and "AVCHD" logotype are registered trademarks of their respective companies.
.... • Dolby Digital 5.1 Creator is produced under the license of Adobe Systems Incorporated in the United States and/ or other specifications. Printed in the U.S. and Sony Corporation. On trademarks • "Handycam" and are registered trademarks of Sony Corporation. • "AVCHD" and "AVCHD" logotype are registered trademarks of their respective companies.


