User Manual
Page 1
http://www.sony.net/ Printed on this product and answers to frequently asked questions can be found at our Customer Support Website. Additional information on 70% or more recycled paper using VOC (Volatile Organic Compound) -free vegetable oil based ink. Printed in Japan GB 2-887-515-11(1) Digital HD Video Camera Recorder Operating...
http://www.sony.net/ Printed on this product and answers to frequently asked questions can be found at our Customer Support Website. Additional information on 70% or more recycled paper using VOC (Volatile Organic Compound) -free vegetable oil based ink. Printed in Japan GB 2-887-515-11(1) Digital HD Video Camera Recorder Operating...

User Manual
Page 4
... there may be some tiny black points and/or bright points (white, red, blue, or green in the HDV format on DV format video cameras or on mini DV players. On playing back HDV tapes on other accessories are subject to change without any way. Note on the icons used ... to malfunction. About this manual • The images of the LCD screen and the viewfinder used for illustration purposes are captured using a digital still camera, and therefore may be copyrighted. These points are normal results of the manufacturing process and do not affect the recording in each local language are...
... there may be some tiny black points and/or bright points (white, red, blue, or green in the HDV format on DV format video cameras or on mini DV players. On playing back HDV tapes on other accessories are subject to change without any way. Note on the icons used ... to malfunction. About this manual • The images of the LCD screen and the viewfinder used for illustration purposes are captured using a digital still camera, and therefore may be copyrighted. These points are normal results of the manufacturing process and do not affect the recording in each local language are...

User Manual
Page 5
It adopts the MTF measurement system for your camcorder is equipped with a Carl Zeiss lens, which was developed jointly by Carl Zeiss, in Germany, and Sony Corporation, and produces superior images. Also, the lens for video cameras and offers a quality typical of light from a subject coming into the lens. 5 The number value indicates the amount of a Carl Zeiss lens. About the Carl Zeiss lens Your camcorder is T -coated to suppress unwanted reflections and faithfully reproduce colors. MTF= Modulation Transfer Function.
It adopts the MTF measurement system for your camcorder is equipped with a Carl Zeiss lens, which was developed jointly by Carl Zeiss, in Germany, and Sony Corporation, and produces superior images. Also, the lens for video cameras and offers a quality typical of light from a subject coming into the lens. 5 The number value indicates the amount of a Carl Zeiss lens. About the Carl Zeiss lens Your camcorder is T -coated to suppress unwanted reflections and faithfully reproduce colors. MTF= Modulation Transfer Function.

User Manual
Page 7
... Searching for a recording start point (Index search 47 Playing the picture on a TV 48 Using the Menu Using the menu items 53 Menu items 54 (CAMERA SET) menu 56 Settings to adjust your camcorder to the recording conditions (EXPOSURE/ IRIS/STEADYSHOT/BACK LIGHT, etc.) (AUDIO SET) menu 61 Settings for the...
... Searching for a recording start point (Index search 47 Playing the picture on a TV 48 Using the Menu Using the menu items 53 Menu items 54 (CAMERA SET) menu 56 Settings to adjust your camcorder to the recording conditions (EXPOSURE/ IRIS/STEADYSHOT/BACK LIGHT, etc.) (AUDIO SET) menu 61 Settings for the...
User Manual
Page 10
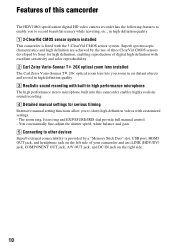
...215; optical zoom lens lets you zoom in high definition quality. 1 3-ClearVid CMOS sensor system installed This camcorder is provided by Sony for high definition, enabling reproduction of this camcorder enables highly realistic sound recording. 4 Detailed manual settings for serious filming Extensive manual ... performance microphone The high performance stereo microphone built into this camcorder The HDV1080i specification digital HD video camera recorder has the following features to enable you to other devices Superb external connectability is fitted with customized settings. -
...215; optical zoom lens lets you zoom in high definition quality. 1 3-ClearVid CMOS sensor system installed This camcorder is provided by Sony for high definition, enabling reproduction of this camcorder enables highly realistic sound recording. 4 Detailed manual settings for serious filming Extensive manual ... performance microphone The high performance stereo microphone built into this camcorder The HDV1080i specification digital HD video camera recorder has the following features to enable you to other devices Superb external connectability is fitted with customized settings. -

User Manual
Page 11
Saving Camera profile (p. 70) Two settings profiles, including brightness, color, etc., can be shot in your camcorder. Smooth slow recording (p. 56) Moving subjects can record 1.2M still ...
Saving Camera profile (p. 70) Two settings profiles, including brightness, color, etc., can be shot in your camcorder. Smooth slow recording (p. 56) Moving subjects can record 1.2M still ...

User Manual
Page 18
... and time ([CLOCK SET], p. 21), the next time you turn off the power Slide the POWER switch to OFF (CHG), slide it for a few seconds. CAMERA: To record pictures. To turn on the power of your camcorder properly To record or play or edit pictures. Step 4: Turning the power on and...
... and time ([CLOCK SET], p. 21), the next time you turn off the power Slide the POWER switch to OFF (CHG), slide it for a few seconds. CAMERA: To record pictures. To turn on the power of your camcorder properly To record or play or edit pictures. Step 4: Turning the power on and...

User Manual
Page 21
... 0 : 00 [ MENU ] : CANCEL 5 Set [M] (month), [D] (day), hour and minute, then press the dial. You can set the date and time again (p. 110). The clock starts. CAMERA SET EXPOSURE/IRIS SMTH SLW REC CNTRST ENHCR STEADYSHOT COLOR BAR AF ASSIST AE SHIFT [ MENU ] : END 2 Select (OTHERS) by turning the SEL/ PUSH EXEC... dial, then press the dial. OTHERS RETURN CAMERA PROF. ASSIGN BTN PHOTO/EXP.FOCUS CLOCK SET WORLD TIME LANGUAGE QUICK REC [ MENU ] : END 3 Select [CLOCK SET] by turning the SEL/PUSH...
... 0 : 00 [ MENU ] : CANCEL 5 Set [M] (month), [D] (day), hour and minute, then press the dial. You can set the date and time again (p. 110). The clock starts. CAMERA SET EXPOSURE/IRIS SMTH SLW REC CNTRST ENHCR STEADYSHOT COLOR BAR AF ASSIST AE SHIFT [ MENU ] : END 2 Select (OTHERS) by turning the SEL/ PUSH EXEC... dial, then press the dial. OTHERS RETURN CAMERA PROF. ASSIGN BTN PHOTO/EXP.FOCUS CLOCK SET WORLD TIME LANGUAGE QUICK REC [ MENU ] : END 3 Select [CLOCK SET] by turning the SEL/PUSH...

User Manual
Page 25
... The procedure for recording movies is HDV format ([REC FORMAT] p. 66). 1 Open the shutter of the lens hood. 2 While pressing the green button, set to CAMERA. If the POWER switch is set the POWER switch to OFF (CHG), slide it while pressing the green button. The factory setting is below. •...
... The procedure for recording movies is HDV format ([REC FORMAT] p. 66). 1 Open the shutter of the lens hood. 2 While pressing the green button, set to CAMERA. If the POWER switch is set the POWER switch to OFF (CHG), slide it while pressing the green button. The factory setting is below. •...
User Manual
Page 28
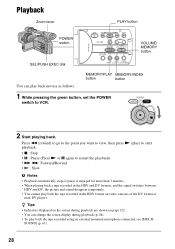
... (p. 44). • To play ) to start playback. • x : Stop • X : Pause (Press N or X again to VCR. 2 Start playing back. z Tips • Indicators displayed on video cameras of the DV format or mini-DV players.
... (p. 44). • To play ) to start playback. • x : Stop • X : Pause (Press N or X again to VCR. 2 Start playing back. z Tips • Indicators displayed on video cameras of the DV format or mini-DV players.

User Manual
Page 32
When the focus mode is magnified by about 3 seconds in the following cases. (It will not be easier to confirm the focus setting during camera EXPOSURE/IRIS setting, changing the zoom from the menu (p. 56). z Tip • You can be set with the EXPOSURE/IRIS dial G. 32 x IRIS You can ...
When the focus mode is magnified by about 3 seconds in the following cases. (It will not be easier to confirm the focus setting during camera EXPOSURE/IRIS setting, changing the zoom from the menu (p. 56). z Tip • You can be set with the EXPOSURE/IRIS dial G. 32 x IRIS You can ...
User Manual
Page 34
... release the auto lock. 2 Press the GAIN button B. To hide the zebra pattern • Set the ZEBRA switch E to display the zebra pattern with video cameras). b Note • The zebra pattern is not recorded on such a part, you can adjust the gain manually when shooting blackish or dark objects if you...
... release the auto lock. 2 Press the GAIN button B. To hide the zebra pattern • Set the ZEBRA switch E to display the zebra pattern with video cameras). b Note • The zebra pattern is not recorded on such a part, you can adjust the gain manually when shooting blackish or dark objects if you...
User Manual
Page 36
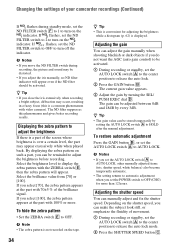
... the SEL/PUSH EXEC dial C. The adjusted value is adjusted, A or B stops blinking and remains on the recording time of day, the weather, or the camera person, and store them in a photography studio • Under sodium lamps or mercury lamps z Tip • The white balance can be stored temporarily by adjusting...
... the SEL/PUSH EXEC dial C. The adjusted value is adjusted, A or B stops blinking and remains on the recording time of day, the weather, or the camera person, and store them in a photography studio • Under sodium lamps or mercury lamps z Tip • The white balance can be stored temporarily by adjusting...

User Manual
Page 37
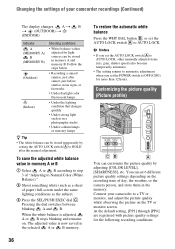
...] [SKINTON E DTL] To make white parts reddish) [CINEMATONE GAMMA] When you set picture NAME] profiles [PP1] through [PP6] are recorded with the settings of film cameras [PROFILE To name the set [ON], pictures are available.
...] [SKINTON E DTL] To make white parts reddish) [CINEMATONE GAMMA] When you set picture NAME] profiles [PP1] through [PP6] are recorded with the settings of film cameras [PROFILE To name the set [ON], pictures are available.
User Manual
Page 42
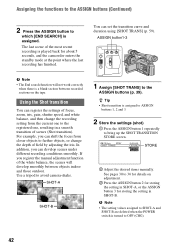
... balance, the scenes will not work correctly when there is played back for details on the tape. z Tip • Shot transition is turned to avoid camera-shake. Use a tripod to OFF (CHG). 42 Using the Shot transition You can set the transition curve and duration using [SHOT TRANS] (p. 59). b Note •...
... balance, the scenes will not work correctly when there is played back for details on the tape. z Tip • Shot transition is turned to avoid camera-shake. Use a tripod to OFF (CHG). 42 Using the Shot transition You can set the transition curve and duration using [SHOT TRANS] (p. 59). b Note •...

User Manual
Page 44
...as [DV AUDIO MIX] (p. 61) • Output signal setup ([VCR HDV/DV], etc.) (p. 66) • Functions assigned to the ASSIGN buttons (p. 39) • Camera setup. (p. 56) • Picture profile (p. 36) 1 Press the STATUS CHECK button B. 2 Turn the SEL/PUSH EXEC dial A to [OFF], the settings of PICTURE ...and off the setup value • Press the STATUS CHECK button B. 44 When the POWER switch is set to CAMERA, the items appear in the following order: AUDIO t OUTPUT t ASSIGN t CAMERA t PICT.PROFILE When the POWER switch is set to VCR, the items appear in the following items. •...
...as [DV AUDIO MIX] (p. 61) • Output signal setup ([VCR HDV/DV], etc.) (p. 66) • Functions assigned to the ASSIGN buttons (p. 39) • Camera setup. (p. 56) • Picture profile (p. 36) 1 Press the STATUS CHECK button B. 2 Turn the SEL/PUSH EXEC dial A to [OFF], the settings of PICTURE ...and off the setup value • Press the STATUS CHECK button B. 44 When the POWER switch is set to CAMERA, the items appear in the following order: AUDIO t OUTPUT t ASSIGN t CAMERA t PICT.PROFILE When the POWER switch is set to VCR, the items appear in the following items. •...

User Manual
Page 53
... ON OFF [ MENU ] : END 6 Press the MENU button to display the menu index screen. CAMERA SET (p. 56) AUDIO SET (p. 61) DISPLAY SET (p. 62) IN/OUT REC (p. 66) MEMORY SET (p. 68) OTHERS (p. ...70) OTHERS RETURN CAMERA PROF. ASSIGN BTN PHOTO/EXP.FOCUS CLOCK SET WORLD TIME LANGUAGE QUICK REC [ MENU ] : END 4 Select ... on the power mode of the desired menu by turning the SEL/PUSH EXEC dial, then press the dial. CAMERA SET EXPOSURE/IRIS SMTH SLW REC CNTRST ENHCR STEADYSHOT COLOR BAR AF ASSIST AE SHIFT [ MENU ] : END ...
... ON OFF [ MENU ] : END 6 Press the MENU button to display the menu index screen. CAMERA SET (p. 56) AUDIO SET (p. 61) DISPLAY SET (p. 62) IN/OUT REC (p. 66) MEMORY SET (p. 68) OTHERS (p. ...70) OTHERS RETURN CAMERA PROF. ASSIGN BTN PHOTO/EXP.FOCUS CLOCK SET WORLD TIME LANGUAGE QUICK REC [ MENU ] : END 4 Select ... on the power mode of the desired menu by turning the SEL/PUSH EXEC dial, then press the dial. CAMERA SET EXPOSURE/IRIS SMTH SLW REC CNTRST ENHCR STEADYSHOT COLOR BAR AF ASSIST AE SHIFT [ MENU ] : END ...

User Manual
Page 54
... on the POWER switch position. z - z - z - z - z - z - z - MODE MULTI-SOUND DV AUDIO MIX (DISPLAY SET) menu (p. 62) z - AUDIO REC LV DV AU. Position of POWER switch: CAMERA VCR (CAMERA SET) menu (p. 56) EXPOSURE/IRIS SMTH SLW REC CNTRST ENHCR STEADYSHOT COLOR BAR AF ASSIST AE SHIFT AE RESPONSE AGC LIMIT AT IRIS LMT AWB...
... on the POWER switch position. z - z - z - z - z - z - z - MODE MULTI-SOUND DV AUDIO MIX (DISPLAY SET) menu (p. 62) z - AUDIO REC LV DV AU. Position of POWER switch: CAMERA VCR (CAMERA SET) menu (p. 56) EXPOSURE/IRIS SMTH SLW REC CNTRST ENHCR STEADYSHOT COLOR BAR AF ASSIST AE SHIFT AE RESPONSE AGC LIMIT AT IRIS LMT AWB...

User Manual
Page 55
z PB ZOOM - BEEP z z REC LAMP z - z FORMAT z z FILE NO. Using the Menu Position of POWER switch: CAMERA VCR (IN/OUT REC) menu (p. 66) REC FORMAT z - z DV REC MODE z z DV WIDE REC z - z QUICK REC z - REMOTE CTRL z z 55 COMPONENT z z i.LINK CONV z z TV TYPE z z (MEMORY SET) menu (p. 68) QUALITY z z ALL ERASE - z (OTHERS) (p. 70) CAMERA PROF. z z ASSIGN BTN z z PHOTO/EXP.FOCUS z z CLOCK SET z z WORLD TIME z z LANGUAGE z z USB SELECT - VCR HDV/DV - z z NEW FOLDER z z REC FOLDER z z PB FOLDER -
z PB ZOOM - BEEP z z REC LAMP z - z FORMAT z z FILE NO. Using the Menu Position of POWER switch: CAMERA VCR (IN/OUT REC) menu (p. 66) REC FORMAT z - z DV REC MODE z z DV WIDE REC z - z QUICK REC z - REMOTE CTRL z z 55 COMPONENT z z i.LINK CONV z z TV TYPE z z (MEMORY SET) menu (p. 68) QUALITY z z ALL ERASE - z (OTHERS) (p. 70) CAMERA PROF. z z ASSIGN BTN z z PHOTO/EXP.FOCUS z z CLOCK SET z z WORLD TIME z z LANGUAGE z z USB SELECT - VCR HDV/DV - z z NEW FOLDER z z REC FOLDER z z PB FOLDER -

User Manual
Page 56
...and [AE SHIFT] (p. 32). Select [EXECUTE], and press the REC START/STOP button on selecting menu items. Press the MENU button t select the (CAMERA SET) by turning the dial down. When [Recording···] disappears, recording is recorded as a golf or tennis swing. Select [TIMING] to ...select one of the EXPOSURE/IRIS dial. b Notes • Sounds cannot be shorter than the set time according to recording condition. 56 (CAMERA SET) menu Settings to adjust your camcorder. • Recording time is estimated time. See page 53 for recording before pressing the REC START/STOP...
...and [AE SHIFT] (p. 32). Select [EXECUTE], and press the REC START/STOP button on selecting menu items. Press the MENU button t select the (CAMERA SET) by turning the dial down. When [Recording···] disappears, recording is recorded as a golf or tennis swing. Select [TIMING] to ...select one of the EXPOSURE/IRIS dial. b Notes • Sounds cannot be shorter than the set time according to recording condition. 56 (CAMERA SET) menu Settings to adjust your camcorder. • Recording time is estimated time. See page 53 for recording before pressing the REC START/STOP...


