Operating Instructions
Page 3
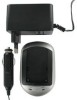
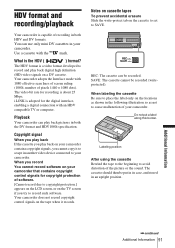
... use Your camcorder is not compatible with the HDV format. Using this manual The images of your recordings on a TV, you see. ,continued 3 You can use only mini DV cassettes in MPEG2 format, which utilizes 1080 effective scanning lines, within the HDV standards, and records pictures at dusk. The HDV standards • Digital high-definition (HD) video signals are recorded and played back on a DV format cassette. • HDV signals are captured using extremely high...
... use Your camcorder is not compatible with the HDV format. Using this manual The images of your recordings on a TV, you see. ,continued 3 You can use only mini DV cassettes in MPEG2 format, which utilizes 1080 effective scanning lines, within the HDV standards, and records pictures at dusk. The HDV standards • Digital high-definition (HD) video signals are recorded and played back on a DV format cassette. • HDV signals are captured using extremely high...
Operating Instructions
Page 7
... Maintenance and precautions 95 Specification 98 Quick Reference Identifying parts and controls ...........100 Index 107 Note on the icons used in this manual : Features available for the HDV format only. : Features available for the DV format only. 7 LCD COLOR, etc 58 Using the (IN/OUT REC) menu - REC FORMAT/TV TYPE, etc. ...59 Using the (OTHERS) menu - Advanced operations Using the Menu Selecting menu items 51 Using the (CAMERA SET) menu - AUDIO MIX, etc 56 Using the (LCD/VF SET) menu -
... Maintenance and precautions 95 Specification 98 Quick Reference Identifying parts and controls ...........100 Index 107 Note on the icons used in this manual : Features available for the HDV format only. : Features available for the DV format only. 7 LCD COLOR, etc 58 Using the (IN/OUT REC) menu - REC FORMAT/TV TYPE, etc. ...59 Using the (OTHERS) menu - Advanced operations Using the Menu Selecting menu items 51 Using the (CAMERA SET) menu - AUDIO MIX, etc 56 Using the (LCD/VF SET) menu -

Operating Instructions
Page 12
... charging or when the power is turned off when the battery is fully charged. The battery information appears for about 7 seconds. To check the remaining battery - B Possible recording time using the viewfinder. 12 Getting started The CHG (charge) lamp lights up . Keep the button pressed to view it for about 20 seconds. 1 Set the POWER switch to OFF (CHG). 2 Open the LCD panel and adjust the angle. 3 Press DISPLAY/BATT INFO. 5 Set the POWER switch...
... charging or when the power is turned off when the battery is fully charged. The battery information appears for about 7 seconds. To check the remaining battery - B Possible recording time using the viewfinder. 12 Getting started The CHG (charge) lamp lights up . Keep the button pressed to view it for about 20 seconds. 1 Set the POWER switch to OFF (CHG). 2 Open the LCD panel and adjust the angle. 3 Press DISPLAY/BATT INFO. 5 Set the POWER switch...

Operating Instructions
Page 21
... tape. B Remaining battery The indicated time may not be displayed during playback by pressing REC START/STOP again. E Recording capacity of the tape (p. 64) F Microphone volume level (p. 36) G Center marker (p. 55) The center marker appears at the center of this information during recording. 6 0min HDV1080i ND 1 REC 0:00:00 6 0min L R A Recording format ( or ) Recording mode (SP or LP) is left in the LP mode. • The recording time, date, and the camera settings data are viewing...
... tape. B Remaining battery The indicated time may not be displayed during playback by pressing REC START/STOP again. E Recording capacity of the tape (p. 64) F Microphone volume level (p. 36) G Center marker (p. 55) The center marker appears at the center of this information during recording. 6 0min HDV1080i ND 1 REC 0:00:00 6 0min L R A Recording format ( or ) Recording mode (SP or LP) is left in the LP mode. • The recording time, date, and the camera settings data are viewing...
Operating Instructions
Page 22
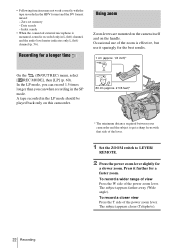
Date search - Press it sparingly for the best results. 1 cm (approx. 1/2 inch)* On the (IN/OUT REC) menu, select [ REC MODE], then [LP] (p. 60). To record a wider range of view Press the W side of the power zoom lever. To record a closer view Press the T side of the power zoom lever. Zero set memory - Recording for a longer time Using zoom Zoom levers are mounted on the camera itself and on this camcorder. 80 cm...
Date search - Press it sparingly for the best results. 1 cm (approx. 1/2 inch)* On the (IN/OUT REC) menu, select [ REC MODE], then [LP] (p. 60). To record a wider range of view Press the W side of the power zoom lever. To record a closer view Press the T side of the power zoom lever. Zero set memory - Recording for a longer time Using zoom Zoom levers are mounted on the camera itself and on this camcorder. 80 cm...

Operating Instructions
Page 37
Recording a picture using [SHOT TRANS] on the (CAMERA SET) menu (p. 53). Step 2: Check the stored settings (Shot) 1 Press STORE/CHECK/EXEC repeatedly to farther objects, or change the depth of field by adjusting the iris. Shot transition REC START/STOP Recording You can register the settings of focus, zoom, iris, gain, shutter speed, and white balance, and then change the recording setting from closer objects to turn on the CHECK lamp. 2 Press the button (A or B) in which the...
Recording a picture using [SHOT TRANS] on the (CAMERA SET) menu (p. 53). Step 2: Check the stored settings (Shot) 1 Press STORE/CHECK/EXEC repeatedly to farther objects, or change the depth of field by adjusting the iris. Shot transition REC START/STOP Recording You can register the settings of focus, zoom, iris, gain, shutter speed, and white balance, and then change the recording setting from closer objects to turn on the CHECK lamp. 2 Press the button (A or B) in which the...
Operating Instructions
Page 44
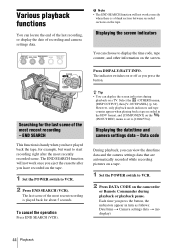
... format, and [COMPONENT] on the (IN/OUT REC) menu is handy when you can view the date/time data and the camera settings data that are automatically recorded while recording pictures on the camcorder or Remote Commander during playback on the tape. Searching for about 5 seconds. END SEARCH This function is set to VCR. 2 Press DATA CODE on a tape. 1 Set the POWER switch to [1080i/576i]. To cancel the operation Press END SEARCH (VCR). The END SEARCH function will not work...
... format, and [COMPONENT] on the (IN/OUT REC) menu is handy when you can view the date/time data and the camera settings data that are automatically recorded while recording pictures on the camcorder or Remote Commander during playback on the tape. Searching for about 5 seconds. END SEARCH This function is set to VCR. 2 Press DATA CODE on a tape. 1 Set the POWER switch to [1080i/576i]. To cancel the operation Press END SEARCH (VCR). The END SEARCH function will not work...

Operating Instructions
Page 46
... compatible with the devices to be set so that it recognizes that the camcorder is connected. Playing the picture on a TV TV connections differ depending on the type of this connection, the TV needs to the wall socket for the details. Viewing the picture on a high definition TV When you have an S video jack TV on your TV or VCR S video cable (optional) Yellow A/V connecting cable (supplied) White Red Component video cable (supplied) Green i.LINK cable...
... compatible with the devices to be set so that it recognizes that the camcorder is connected. Playing the picture on a TV TV connections differ depending on the type of this connection, the TV needs to the wall socket for the details. Viewing the picture on a high definition TV When you have an S video jack TV on your TV or VCR S video cable (optional) Yellow A/V connecting cable (supplied) White Red Component video cable (supplied) Green i.LINK cable...

Operating Instructions
Page 48
... VCR. The audio will not be connected, connect it with your TV (p. 60). Viewing the picture on a 16:9 TV or a 4:3 TV When you connect with the S video cable alone. When a picture recorded in the HDV format, set [COMPONENT] on the (IN/ OUT REC) menu according to the audio input jack of the A/V connecting cable (supplied). To output audio signals, connect the white and red plugs of the A/V connecting cable to your camcorder by the S video jacks using the component video cable This connection...
... VCR. The audio will not be connected, connect it with your TV (p. 60). Viewing the picture on a 16:9 TV or a 4:3 TV When you connect with the S video cable alone. When a picture recorded in the HDV format, set [COMPONENT] on the (IN/ OUT REC) menu according to the audio input jack of the A/V connecting cable (supplied). To output audio signals, connect the white and red plugs of the A/V connecting cable to your camcorder by the S video jacks using the component video cable This connection...

Operating Instructions
Page 49
... set memory display disappears. 4 Press N (play the sound in monaural mode, use only. If the tape counter is connected to a VCR Connect your camcorder to play ). ,continued Playback 49 Set the input selector on a tape for playback Searching quickly for a desired scene - This adaptor is monaural (When your TV has only one audio input jack) Connect the yellow plug of the A/V connecting cable to the video input jack and connect the white or the red plug to the audio input jack of your camcorder...
... set memory display disappears. 4 Press N (play the sound in monaural mode, use only. If the tape counter is connected to a VCR Connect your camcorder to play ). ,continued Playback 49 Set the input selector on a tape for playback Searching quickly for a desired scene - This adaptor is monaural (When your TV has only one audio input jack) Connect the yellow plug of the A/V connecting cable to the video input jack and connect the white or the red plug to the audio input jack of your camcorder...

Operating Instructions
Page 56
... bit audio mode. • Only the originally recorded sound will be output from both main and sub sound. b Note • You can adjust the audio balance between the originally recorded sound (ST1) and sound added afterwards (ST2) on a tape that was recorded in stereo mode using an external monaural microphone to select items, see "Selecting menu items" (p. 51). AUDIO MIX You can play back a dual sound track cassette on the power mode of your camcorder. AUDIO MIX...
... bit audio mode. • Only the originally recorded sound will be output from both main and sub sound. b Note • You can adjust the audio balance between the originally recorded sound (ST1) and sound added afterwards (ST2) on a tape that was recorded in stereo mode using an external monaural microphone to select items, see "Selecting menu items" (p. 51). AUDIO MIX You can play back a dual sound track cassette on the power mode of your camcorder. AUDIO MIX...

Operating Instructions
Page 62
... select or change the language used for the on how to sound a beep instead of your camcorder. CLOCK SET You can adjust vary depending on the power mode of the melody. BEEP GMELODY NORMAL OFF Select to the ASSIGN buttons (p. 68). OTHERS RETURN ASS I GN BTN CLOCK SET WORLD T I ME LANGUAGE BEEP FORMAT LAMP DATA CODE [ MENU ] : END ASSIGN BTN You can select from English, Simplified English, Traditional...
... select or change the language used for the on how to sound a beep instead of your camcorder. CLOCK SET You can adjust vary depending on the power mode of the melody. BEEP GMELODY NORMAL OFF Select to the ASSIGN buttons (p. 68). OTHERS RETURN ASS I GN BTN CLOCK SET WORLD T I ME LANGUAGE BEEP FORMAT LAMP DATA CODE [ MENU ] : END ASSIGN BTN You can select from English, Simplified English, Traditional...

Operating Instructions
Page 70
... video format to be able to an HDV compatible device using an i.LINK cable (optional). To dub to an HDV compatible device Connect your camcorder to other recording devices (such as VCRs). See page 74 about this connection. • If the player and the recorder are not continued smoothly after recording pause or stop. 70 Dubbing/Editing Dubbing/Editing Dubbing to another tape Connecting a VCR You can copy a picture played back on your camcorder to a VCR...
... video format to be able to an HDV compatible device using an i.LINK cable (optional). To dub to an HDV compatible device Connect your camcorder to other recording devices (such as VCRs). See page 74 about this connection. • If the player and the recorder are not continued smoothly after recording pause or stop. 70 Dubbing/Editing Dubbing/Editing Dubbing to another tape Connecting a VCR You can copy a picture played back on your camcorder to a VCR...
Operating Instructions
Page 79
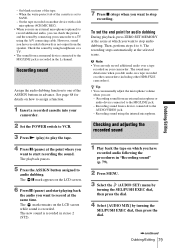
... audio dubbing. Check the sound by connecting your camcorder. 2 Set the POWER switch to VCR. 3 Press N (play) to a TV using the internal microphone. The X mark appears on how to assign a function. 1 Insert a recorded cassette into your camcorder to play the tape. 4 Press X (pause) at the selected scene. On the tape recorded on other camcorders (including other HDR-FX1E camcorders). z Tip • You can manually adjust the microphone volume when you can only record additional audio over a tape recorded on which you have recorded audio following...
... audio dubbing. Check the sound by connecting your camcorder. 2 Set the POWER switch to VCR. 3 Press N (play) to a TV using the internal microphone. The X mark appears on how to assign a function. 1 Insert a recorded cassette into your camcorder to play the tape. 4 Press X (pause) at the selected scene. On the tape recorded on other camcorders (including other HDR-FX1E camcorders). z Tip • You can manually adjust the microphone volume when you can only record additional audio over a tape recorded on which you have recorded audio following...

Operating Instructions
Page 86
... Troubleshooting cIf the tape has reached the end, rewind the tape (p. 42). function (p. 34). cWhen you are playing was recorded without setting the date and time. • A blank section on the tape is a blank section at the beginning or in the HDV format. cReverse playback is displayed on the screen. • The tape you are using an S VIDEO cable or a component video cable, make sure the red and white plugs of the A/V connecting cable are...
... Troubleshooting cIf the tape has reached the end, rewind the tape (p. 42). function (p. 34). cWhen you are playing was recorded without setting the date and time. • A blank section on the tape is a blank section at the beginning or in the HDV format. cReverse playback is displayed on the screen. • The tape you are using an S VIDEO cable or a component video cable, make sure the red and white plugs of the A/V connecting cable are...

Operating Instructions
Page 87
... using a 4-channel microphone. cBefore recording, set [TV TYPE] on the LCD screen or the viewfinder. Dubbing Symptom Cause and/or Corrective Actions Pictures from connected devices are connected (p. 46). • This happens when viewing a picture recorded in a TV color system other recording devices using the component video cable, make sure the red and white plugs of your camcorder. Pictures disappears for a moment when you press EXPANDED FOCUS. • If you press EXPANDED FOCUS during dubbing. cTo play back a tape recorded...
... using a 4-channel microphone. cBefore recording, set [TV TYPE] on the LCD screen or the viewfinder. Dubbing Symptom Cause and/or Corrective Actions Pictures from connected devices are connected (p. 46). • This happens when viewing a picture recorded in a TV color system other recording devices using the component video cable, make sure the red and white plugs of your camcorder. Pictures disappears for a moment when you press EXPANDED FOCUS. • If you press EXPANDED FOCUS during dubbing. cTo play back a tape recorded...
Operating Instructions
Page 91
... SAVE. Playback Your camcorder can be recorded. Labeling position After using the cassette Rewind the tape to the beginning to your camcorder that contains copyright control signals for copyright protection of your camcorder. The cassette should then be recorded (writeprotected). REC: The cassette can play back digital high definition (HD) video signals on your camcorder. When you cannot copy it records. Copyright signal When you play back If the cassette you play back on your camcorder...
... SAVE. Playback Your camcorder can be recorded. Labeling position After using the cassette Rewind the tape to the beginning to your camcorder that contains copyright control signals for copyright protection of your camcorder. The cassette should then be recorded (writeprotected). REC: The cassette can play back digital high definition (HD) video signals on your camcorder. When you cannot copy it records. Copyright signal When you play back If the cassette you play back on your camcorder...

Operating Instructions
Page 96
... image even after about 1 hour). Use cleaning paper moistened with above substances on the playback picture or the screen is exposed to have the video head replaced. Mosaic-pattern noise appears on your Sony dealer or local authorized Sony service facility to salty air such as it tightly. Playback pictures do not move . - LCD screen • Do not add excessive pressure on the screen during recording. • The video head...
... image even after about 1 hour). Use cleaning paper moistened with above substances on the playback picture or the screen is exposed to have the video head replaced. Mosaic-pattern noise appears on your Sony dealer or local authorized Sony service facility to salty air such as it tightly. Playback pictures do not move . - LCD screen • Do not add excessive pressure on the screen during recording. • The video head...
Operating Instructions
Page 107
... 63 L LANC 103 Language (LANGUAGE 18 Large eyecup 16 LCD back light (LCD BL LEVEL 58 LCD brightness (LCD BRIGHT 15 LCD COLOR 58 LCD screen 3 Lens hood 104 Low-angle recording ......... 21 LP (Long Play) See Recording mode (REC MODE) M Main sound See MULTI-SOUND Manual focus 32 Menu AUDIO SET 56 CAMERA SET........... 52 IN/OUT REC 59 LCD/VF SET 58 OTHERS 62 Selecting items 51 Menu letter size (LETTER SIZE 63 MIC/LINE IN 57 Microphone volume level 36 Mirror mode 23 Moisture condensation ...... 95...
... 63 L LANC 103 Language (LANGUAGE 18 Large eyecup 16 LCD back light (LCD BL LEVEL 58 LCD brightness (LCD BRIGHT 15 LCD COLOR 58 LCD screen 3 Lens hood 104 Low-angle recording ......... 21 LP (Long Play) See Recording mode (REC MODE) M Main sound See MULTI-SOUND Manual focus 32 Menu AUDIO SET 56 CAMERA SET........... 52 IN/OUT REC 59 LCD/VF SET 58 OTHERS 62 Selecting items 51 Menu letter size (LETTER SIZE 63 MIC/LINE IN 57 Microphone volume level 36 Mirror mode 23 Moisture condensation ...... 95...

Operating Instructions
Page 108
... Play) See Recording mode (REC MODE) SPOT LIGHT 25 STATUS CHECK........24, 45 SteadyShot (STEADYSHOT) ........ 54 SteadyShot type (STDYSHOT TYP).....54 Stereo 56 Sub sound See MULTI-SOUND T Tape counter 21, 49 Telephoto See Zoom Time code 21 Transition curve (TRANS CURVE 53 Transition time (TRANS TIME 53 TV color systems 90 TV TYPE 61 U Using abroad 90 V VCR HDV/DV 59 Video head 96 Viewfinder Adjusting 15 Brightness (VF B.LIGHT)......58 Maintenance 97 Volume...
... Play) See Recording mode (REC MODE) SPOT LIGHT 25 STATUS CHECK........24, 45 SteadyShot (STEADYSHOT) ........ 54 SteadyShot type (STDYSHOT TYP).....54 Stereo 56 Sub sound See MULTI-SOUND T Tape counter 21, 49 Telephoto See Zoom Time code 21 Transition curve (TRANS CURVE 53 Transition time (TRANS TIME 53 TV color systems 90 TV TYPE 61 U Using abroad 90 V VCR HDV/DV 59 Video head 96 Viewfinder Adjusting 15 Brightness (VF B.LIGHT)......58 Maintenance 97 Volume...


