User Manual
Page 3
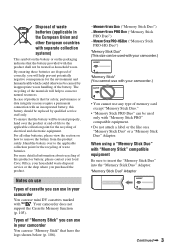
... only. "Memory Stick Duo" Adaptor Continued , 3 Hand the battery over the product at end-of "Memory Stick" you purchased the product. Your camcorder does not support the Cassette Memory function (p. 105). Types of -life to insert the "Memory Stick Duo" into the "Memory Stick Duo" Adaptor.... product or battery, please contact your local Civic Office, your household waste disposal service or the shop where you can use in your camcorder.) • You cannot use "Memory Stick" that the battery provided with this product shall not be treated as household waste. The recycling...
... only. "Memory Stick Duo" Adaptor Continued , 3 Hand the battery over the product at end-of "Memory Stick" you purchased the product. Your camcorder does not support the Cassette Memory function (p. 105). Types of -life to insert the "Memory Stick Duo" into the "Memory Stick Duo" Adaptor.... product or battery, please contact your local Civic Office, your household waste disposal service or the shop where you can use in your camcorder.) • You cannot use "Memory Stick" that the battery provided with this product shall not be treated as household waste. The recycling...

User Manual
Page 4
...bag when not in use . Protect this device by always closing the lens cover or by the following part. results of your camcorder. Do not expose your camcorder's viewfinder, lens, or LCD screen to make sure the picture and sound are operational for effective use . However, there may damage...tiny black points and/or bright points (white, red, blue, or green in color) that disables recording or playback if the temperature of your camcorder or battery pack is beyond the safely operable range. Read this case, a message appears on the screen or in the viewfinder (p. 102). ...
...bag when not in use . Protect this device by always closing the lens cover or by the following part. results of your camcorder. Do not expose your camcorder's viewfinder, lens, or LCD screen to make sure the picture and sound are operational for effective use . However, there may damage...tiny black points and/or bright points (white, red, blue, or green in color) that disables recording or playback if the temperature of your camcorder or battery pack is beyond the safely operable range. Read this case, a message appears on the screen or in the viewfinder (p. 102). ...

User Manual
Page 5
... TV color systems differ depending on -screen displays in displays having high motion resolution. recording or playback is connected. To view your camcorder if necessary (p. 22). • Design and specifications of recording media and other materials may appear different. • The on the... countries/regions. Note on the recording conditions. About this camcorder prior to change without notice. 5 Change the screen language before using a digital still camera, and therefore may be copyrighted. Unauthorized...
... TV color systems differ depending on -screen displays in displays having high motion resolution. recording or playback is connected. To view your camcorder if necessary (p. 22). • Design and specifications of recording media and other materials may appear different. • The on the... countries/regions. Note on the recording conditions. About this camcorder prior to change without notice. 5 Change the screen language before using a digital still camera, and therefore may be copyrighted. Unauthorized...

User Manual
Page 6
... Step 2: Attaching the lens hood with lens cover 14 Step 3: Charging the battery pack 15 Step 4: Turning the power on and holding your camcorder properly ..... 18 Step 5: Adjusting the LCD panel and viewfinder 19 Step 6: Setting the date and time 21 Changing the language setting 22 Step... 7: Inserting a tape or a "Memory Stick Duo 23 Recording/Playback Recording 25 Changing the settings of your camcorder recordings 28 Adjusting the zoom 28 Adjusting the focus manually 29 Adjusting the image brightness 30 Adjusting to Natural Color (White balance 33 ...
... Step 2: Attaching the lens hood with lens cover 14 Step 3: Charging the battery pack 15 Step 4: Turning the power on and holding your camcorder properly ..... 18 Step 5: Adjusting the LCD panel and viewfinder 19 Step 6: Setting the date and time 21 Changing the language setting 22 Step... 7: Inserting a tape or a "Memory Stick Duo 23 Recording/Playback Recording 25 Changing the settings of your camcorder recordings 28 Adjusting the zoom 28 Adjusting the focus manually 29 Adjusting the image brightness 30 Adjusting to Natural Color (White balance 33 ...
User Manual
Page 7
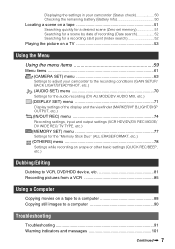
Displaying the settings in your camcorder (Status check 50 Checking the remaining battery (Battery Info 50 Locating a scene on a tape 51 Searching quickly for a desired scene (Zero set memory 51 Searching ... Playing the picture on a TV 53 Using the Menu Using the menu items 59 Menu items 61 (CAMERA SET) menu 63 Settings to adjust your camcorder to the recording conditions (GAIN SETUP/ BACK LIGHT/STEADYSHOT, etc.) (AUDIO SET) menu 70 Settings for the audio recording (DV AU.MODE/DV AUDIO MIX...
Displaying the settings in your camcorder (Status check 50 Checking the remaining battery (Battery Info 50 Locating a scene on a tape 51 Searching quickly for a desired scene (Zero set memory 51 Searching ... Playing the picture on a TV 53 Using the Menu Using the menu items 59 Menu items 61 (CAMERA SET) menu 63 Settings to adjust your camcorder to the recording conditions (GAIN SETUP/ BACK LIGHT/STEADYSHOT, etc.) (AUDIO SET) menu 70 Settings for the audio recording (DV AU.MODE/DV AUDIO MIX...

User Manual
Page 8
Table of Contents (Continued) Additional Information Using your camcorder abroad 104 Maintenance and precautions 105 HDV format and recording/playback 105 About the "Memory Stick 106 About the "InfoLITHIUM" battery packv 107 About i.LINK 108 About x.v.Color 109 About handling of your camcorder 110 Specifications 114 Quick Reference Identifying parts and controls 118 Indicators for the LCD screen and viewfinder 123 Index ...126 8
Table of Contents (Continued) Additional Information Using your camcorder abroad 104 Maintenance and precautions 105 HDV format and recording/playback 105 About the "Memory Stick 106 About the "InfoLITHIUM" battery packv 107 About i.LINK 108 About x.v.Color 109 About handling of your camcorder 110 Specifications 114 Quick Reference Identifying parts and controls 118 Indicators for the LCD screen and viewfinder 123 Index ...126 8

User Manual
Page 9
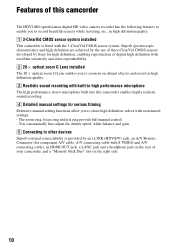
... HDV format is a video format for viewing on older wide TV formats, and on popular DV standard cassette tapes. • Your camcorder adopts the HDV1080i specification, which utilizes 1,080 effective scanning lines, within the HDV standards, and records pictures at the image bit rate of... format to a TV or VCR that is a need to shoot crystal clear, high-definition images. High image quality Being HDV format compliant, your camcorder is connected to SD (standard definition) quality for shooting and playing back high definition images on 4:3 aspect ratio TVs when a high definition TV set...
... HDV format is a video format for viewing on older wide TV formats, and on popular DV standard cassette tapes. • Your camcorder adopts the HDV1080i specification, which utilizes 1,080 effective scanning lines, within the HDV standards, and records pictures at the image bit rate of... format to a TV or VCR that is a need to shoot crystal clear, high-definition images. High image quality Being HDV format compliant, your camcorder is connected to SD (standard definition) quality for shooting and playing back high definition images on 4:3 aspect ratio TVs when a high definition TV set...
User Manual
Page 10
... you to record beautiful scenery while traveling, etc., in high definition quality. 1 3-ClearVid CMOS sensor system installed This camcorder is provided by Sony for high definition, enabling reproduction of digital high definition with excellent sensitivity and color reproducibility. 2 20 × optical ...definition quality. 3 Realistic sound recording with built-in high performance microphone The high performance stereo microphone built into this camcorder The HDV1080i specification digital HD video camera recorder has the following features to enable you to other devices Superb external...
... you to record beautiful scenery while traveling, etc., in high definition quality. 1 3-ClearVid CMOS sensor system installed This camcorder is provided by Sony for high definition, enabling reproduction of digital high definition with excellent sensitivity and color reproducibility. 2 20 × optical ...definition quality. 3 Realistic sound recording with built-in high performance microphone The high performance stereo microphone built into this camcorder The HDV1080i specification digital HD video camera recorder has the following features to enable you to other devices Superb external...

User Manual
Page 11
Smooth slow recording (p. 66) Moving subjects can be shot in your camcorder. This enables you to use saved settings data to quickly reproduce suitable shooting settings. Saving Camera profile (p. 78) Two settings profiles, including brightness, color, etc., ...
Smooth slow recording (p. 66) Moving subjects can be shot in your camcorder. This enables you to use saved settings data to quickly reproduce suitable shooting settings. Saving Camera profile (p. 78) Two settings profiles, including brightness, color, etc., ...

User Manual
Page 12
Viewing video recorded in the HDV format can be copied. Viewing on a 16:9 TV/4:3 TV (p. 56) Your camcorder can copy movie to a computer, and save to enable copying. Viewing on a high definition TV (p. 54) Pictures recorded in the HDV format! Dubbing ... (standard definition) quality for details. 12 Connecting to a computer (p. 88) x Copying movie from copying movie. x Connecting to HDV1080i non-compliant specification Use your camcorder to convert HDV format video to SD (standard definition) quality to DVD from tape to a computer You can down convert video recorded in the HDV...
Viewing video recorded in the HDV format can be copied. Viewing on a 16:9 TV/4:3 TV (p. 56) Your camcorder can copy movie to a computer, and save to enable copying. Viewing on a high definition TV (p. 54) Pictures recorded in the HDV format! Dubbing ... (standard definition) quality for details. 12 Connecting to a computer (p. 88) x Copying movie from copying movie. x Connecting to HDV1080i non-compliant specification Use your camcorder to convert HDV format video to SD (standard definition) quality to DVD from tape to a computer You can down convert video recorded in the HDV...

User Manual
Page 13
..." are not included. AC Adaptor (1) (p. 15) Large eyecup (1) (p. 20) Rechargeable battery pack NP-F570 (1) (p. 15, 107) Power cord (mains lead) (1) (p. 15) Lens hood with your camcorder. The number in the parentheses indicates the number of cassette tapes and "Memory Stick Duo" that you have following items supplied with lens cover (1) (p. 14... battery is pre-mounted. Component A/V cable (1) (p. 53) A/V connecting cable (1) (p. 53, 81) 13 See p. 3, p. 105 and p. 106 for types of that you can use on your camcorder.
..." are not included. AC Adaptor (1) (p. 15) Large eyecup (1) (p. 20) Rechargeable battery pack NP-F570 (1) (p. 15, 107) Power cord (mains lead) (1) (p. 15) Lens hood with your camcorder. The number in the parentheses indicates the number of cassette tapes and "Memory Stick Duo" that you have following items supplied with lens cover (1) (p. 14... battery is pre-mounted. Component A/V cable (1) (p. 53) A/V connecting cable (1) (p. 53, 81) 13 See p. 3, p. 105 and p. 106 for types of that you can use on your camcorder.

User Manual
Page 14
... (2 7/8 in.) PL filter or MC protector, remove the lens hood with lens cover Turn the lens hood in the opposite direction to those on the camcorder, and turn the lens hood in the illustration while pressing the PUSH (lens hood release) button. Align the marks on the lens hood to the...
... (2 7/8 in.) PL filter or MC protector, remove the lens hood with lens cover Turn the lens hood in the opposite direction to those on the camcorder, and turn the lens hood in the illustration while pressing the PUSH (lens hood release) button. Align the marks on the lens hood to the...

User Manual
Page 15
... "InfoLITHIUM" battery pack (L series) (p. 107). 2 With the B mark on the DC plug facing outwards, connect the DC plug to the DC IN jack on your camcorder and slide it down. 3 Connect the power cord (mains lead) to the AC Adaptor. 4 Connect the power cord (mains lead) to the wall outlet (wall... plug DC IN jack AC Adaptor To the wall outlet (wall socket) Power cord (mains lead) 1 Press the battery pack against the back of your camcorder.
... "InfoLITHIUM" battery pack (L series) (p. 107). 2 With the B mark on the DC plug facing outwards, connect the DC plug to the DC IN jack on your camcorder and slide it down. 3 Connect the power cord (mains lead) to the AC Adaptor. 4 Connect the power cord (mains lead) to the wall outlet (wall... plug DC IN jack AC Adaptor To the wall outlet (wall socket) Power cord (mains lead) 1 Press the battery pack against the back of your camcorder.

User Manual
Page 16
... the power on/off when the battery is closed. * Typical recording time shows the time when you use the NP-F330 battery pack with this camcorder. Bottom: Recording time when recording with the battery info function (p. 50) To remove the battery pack Set the POWER switch to OFF (CHG). z Tips •...
... the power on/off when the battery is closed. * Typical recording time shows the time when you use the NP-F330 battery pack with this camcorder. Bottom: Recording time when recording with the battery info function (p. 50) To remove the battery pack Set the POWER switch to OFF (CHG). z Tips •...

User Manual
Page 17
... the DC IN jack of the AC Adaptor or battery terminal with any malfunction occurs while using the AC Adaptor. While you use your camcorder. Connect your camcorder as the AC Adaptor is connected to 86 °F) is recommended. • The recording and playback time will be shorter depending on . ... not attached correctly. - Replace the battery pack, or remove it and put it is too hot. This may cause a malfunction. • Even if your camcorder, even when the power cord (mains lead) is too cold. The battery pack is still supplied to the wall outlet (wall socket) via the AC...
... the DC IN jack of the AC Adaptor or battery terminal with any malfunction occurs while using the AC Adaptor. While you use your camcorder. Connect your camcorder as the AC Adaptor is connected to 86 °F) is recommended. • The recording and playback time will be shorter depending on . ... not attached correctly. - Replace the battery pack, or remove it and put it is too hot. This may cause a malfunction. • Even if your camcorder, even when the power cord (mains lead) is too cold. The battery pack is still supplied to the wall outlet (wall socket) via the AC...

User Manual
Page 18
... SET], p. 21). POWER switch 1 While pressing the green button, slide the POWER switch. 3 Ensure a good grip, then fasten the grip belt. When you use your camcorder once you set the POWER switch to OFF (CHG). Press and hold the green button when you turn off the power Slide the POWER switch... to the respective direction. To turn on your camcorder for a few seconds when you slide the POWER switch from OFF (CHG). b Notes • The current date and time appear on the LCD screen for...
... SET], p. 21). POWER switch 1 While pressing the green button, slide the POWER switch. 3 Ensure a good grip, then fasten the grip belt. When you use your camcorder once you set the POWER switch to OFF (CHG). Press and hold the green button when you turn off the power Slide the POWER switch... to the respective direction. To turn on your camcorder for a few seconds when you slide the POWER switch from OFF (CHG). b Notes • The current date and time appear on the LCD screen for...

User Manual
Page 19
... facing you move your eye line. To turn on the LCD backlight, press the DISPLAY/BATT INFO button. disappears. b Notes • You may see your camcorder in a normal image. This is practical when you use your mirror image on the LCD display and in the viewfinder when you . z Tips • You...
... facing you move your eye line. To turn on the LCD backlight, press the DISPLAY/BATT INFO button. disappears. b Notes • You may see your camcorder in a normal image. This is practical when you use your mirror image on the LCD display and in the viewfinder when you . z Tips • You...
User Manual
Page 21
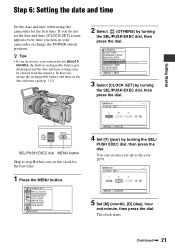
... In that case, charge the rechargeable battery and then set the date and time, [CLOCK SET] screen appears every time you do not use your camcorder or change the POWER switch positions. Y M D 2008 - 1 - 1 0 : 00 [ MENU ] : CANCEL 4 Set [Y] (year) by turning the SEL/PUSH EXEC dial, then press the dial. Y M D ...Started Step 6: Setting the date and time Set the date and time when using this camcorder for the first time. 1 Press the MENU button. CLOCK SET -:--:-- If you turn on your camcorder for about 3 months, the built-in rechargeable battery gets discharged and the date and...
... In that case, charge the rechargeable battery and then set the date and time, [CLOCK SET] screen appears every time you do not use your camcorder or change the POWER switch positions. Y M D 2008 - 1 - 1 0 : 00 [ MENU ] : CANCEL 4 Set [Y] (year) by turning the SEL/PUSH EXEC dial, then press the dial. Y M D ...Started Step 6: Setting the date and time Set the date and time when using this camcorder for the first time. 1 Press the MENU button. CLOCK SET -:--:-- If you turn on your camcorder for about 3 months, the built-in rechargeable battery gets discharged and the date and...

User Manual
Page 24
... the power off, eject the "Memory Stick Duo," or remove the battery pack. Do not shake or knock your camcorder is reading/writing data. Step 7: Inserting a tape or a "Memory Stick Duo" (Continued) 2 Insert the "Memory Stick Duo" into the slot in the right direction until ...
... the power off, eject the "Memory Stick Duo," or remove the battery pack. Do not shake or knock your camcorder is reading/writing data. Step 7: Inserting a tape or a "Memory Stick Duo" (Continued) 2 Insert the "Memory Stick Duo" into the slot in the right direction until ...

User Manual
Page 25
Do the following steps to CAMERA while pressing the green button. z Tips • This camcorder can record movies in HDV or DV format. The factory setting is HDV format ([REC FORMAT] p. 74). 1 Open the shutter of the lens hood. Recording/... Recording REC START/STOP button B PHOTO/EXPANDED FOCUS button Recording lamp Recording lamp Lens hood with lens cover POWER switch REC START/STOP button A Your camcorder records movies on tape and still images on "Memory Stick Duo." Continued , 25 Recording/Playback 2 Slide the POWER switch to record movies. Slide the POWER...
Do the following steps to CAMERA while pressing the green button. z Tips • This camcorder can record movies in HDV or DV format. The factory setting is HDV format ([REC FORMAT] p. 74). 1 Open the shutter of the lens hood. Recording/... Recording REC START/STOP button B PHOTO/EXPANDED FOCUS button Recording lamp Recording lamp Lens hood with lens cover POWER switch REC START/STOP button A Your camcorder records movies on tape and still images on "Memory Stick Duo." Continued , 25 Recording/Playback 2 Slide the POWER switch to record movies. Slide the POWER...


