
User Guide
Page 3
...the OPTION MENU 12 Menu lists 13 List of the HOME MENU 13 List of the OPTION MENU 14 Read this before operating your camcorder 15 Notes on using the Hard Disk Drive Handycam 16 Getting started Step 1: Charging the battery pack 18 Step 2: Turning the power on... date and time 21 Changing the language setting 22 Recording/Playback Five pieces of contents Using the Handycam Handbook 2 Searching for recording movies and photos 34 Zooming 34 Recording sound with more presence (5.1ch surround recording 34 Recording high quality photos during movie recording (Dual Rec 35 Recording in ...
...the OPTION MENU 12 Menu lists 13 List of the HOME MENU 13 List of the OPTION MENU 14 Read this before operating your camcorder 15 Notes on using the Hard Disk Drive Handycam 16 Getting started Step 1: Charging the battery pack 18 Step 2: Turning the power on... date and time 21 Changing the language setting 22 Recording/Playback Five pieces of contents Using the Handycam Handbook 2 Searching for recording movies and photos 34 Zooming 34 Recording sound with more presence (5.1ch surround recording 34 Recording high quality photos during movie recording (Dual Rec 35 Recording in ...

User Guide
Page 5
...camcorder MOVIE SETTINGS (Items for recording movies 74 PHOTO SETTINGS (Items for when connected to a TV 93 CLOCK/ LANG (Items to adjust the sound and the screen 91 OUTPUT SETTINGS (Items for recording photos 81 FACE FUNC. SET (Items to set face function 86 VIEW IMAGES SET (Items to customize the display 88 SOUND/DISP SET (Items to set... recordable photos 121 Using your camcorder abroad 122 File/folder structure on the internal hard disk and "Memory Stick PRO Duo" media ...124 Maintenance and precautions 125 About the AVCHD format 125 About GPS (HDR-XR500V/XR520V 126 About "Memory...
...camcorder MOVIE SETTINGS (Items for recording movies 74 PHOTO SETTINGS (Items for when connected to a TV 93 CLOCK/ LANG (Items to adjust the sound and the screen 91 OUTPUT SETTINGS (Items for recording photos 81 FACE FUNC. SET (Items to set face function 86 VIEW IMAGES SET (Items to customize the display 88 SOUND/DISP SET (Items to set... recordable photos 121 Using your camcorder abroad 122 File/folder structure on the internal hard disk and "Memory Stick PRO Duo" media ...124 Maintenance and precautions 125 About the AVCHD format 125 About GPS (HDR-XR500V/XR520V 126 About "Memory...
User Guide
Page 8
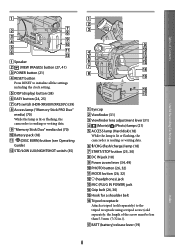
... RESET to initialize all the settings including the clock setting. DISP (display) button (38) EASY button (24, 25) GPS switch (HDR-XR500V/XR520V) (39) Access lamp ("Memory Stick PRO Duo" media) (70) While the lamp is lit or flashing, the camcorder is reading or writing data.... lens adjustment lever (31) (Movie)/ (Photo) lamps (21) ACCESS lamp (Hard disk) (18) While the lamp is lit or flashing, the camcorder is reading or writing data. /CHG (flash/charge) lamp (18) START/STOP button (25, 30) DC IN jack (18) ...
... RESET to initialize all the settings including the clock setting. DISP (display) button (38) EASY button (24, 25) GPS switch (HDR-XR500V/XR520V) (39) Access lamp ("Memory Stick PRO Duo" media) (70) While the lamp is lit or flashing, the camcorder is reading or writing data.... lens adjustment lever (31) (Movie)/ (Photo) lamps (21) ACCESS lamp (Hard disk) (18) While the lamp is lit or flashing, the camcorder is reading or writing data. /CHG (flash/charge) lamp (18) START/STOP button (25, 30) DC IN jack (18) ...

User Guide
Page 9
... When you press any of these buttons, the orange frame appears on the tab, inset your camcorder (p. 9). When no commands have been sent from the Wireless Remote Commander within a ...disappears. Tab WARNING Battery may explode if mistreated. Select a desired button or an item with a Sony CR2025 lithium battery. Wireless Remote Commander Notes Remove the insulation sheet before using...90) Displays the date and time, camera setting data, or coordinates (HDR-XR500V/XR520V) of the Wireless Remote Commander While pressing on the LCD screen...
... When you press any of these buttons, the orange frame appears on the tab, inset your camcorder (p. 9). When no commands have been sent from the Wireless Remote Commander within a ...disappears. Tab WARNING Battery may explode if mistreated. Select a desired button or an item with a Sony CR2025 lithium battery. Wireless Remote Commander Notes Remove the insulation sheet before using...90) Displays the date and time, camera setting data, or coordinates (HDR-XR500V/XR520V) of the Wireless Remote Commander While pressing on the LCD screen...

User Guide
Page 10
...SELECT (76) Remaining battery Return button (12) Center Indicator [STBY]/[REC] Meaning Recording status (25, 30) Photo size (81) Slide show set (50) NightShot (35) Warning (115) Playback mode (28, 41) Upper right Indicator Meaning Recording image quality (HD/SD) and recording mode (FH/HQ/SP...(25, 32) Playback folder (43) Current playing movie or photo/Number of total recorded movies or photos (28, 43) Meaning FACE DETECTION (86) DETECTION SET (87) LOW LUX (35) Manual focus (103) SCENE SELECTION (104) White balance (105) SteadyShot off (77, 83) SPOT MTR/FCS/SPOT METER/...
...SELECT (76) Remaining battery Return button (12) Center Indicator [STBY]/[REC] Meaning Recording status (25, 30) Photo size (81) Slide show set (50) NightShot (35) Warning (115) Playback mode (28, 41) Upper right Indicator Meaning Recording image quality (HD/SD) and recording mode (FH/HQ/SP...(25, 32) Playback folder (43) Current playing movie or photo/Number of total recorded movies or photos (28, 43) Meaning FACE DETECTION (86) DETECTION SET (87) LOW LUX (35) Manual focus (103) SCENE SELECTION (104) White balance (105) SteadyShot off (77, 83) SPOT MTR/FCS/SPOT METER/...

User Guide
Page 12
... OPTION MENU The OPTION MENU appears just like the pop-up window that appear on the screen depend on the recording/playback status of your camcorder, etc. (HOME) (HOME) button Using the HELP function To see the descriptions on the HOME MENU, touch (HELP) on the HOME ...MENU screen. (The bottom of your camcorder at the time. 12 Menu item Useful Recording Techniques Index Category Follow the instructions on the screen. After completing the setting, touch . When the item is not on the screen, touch another ...
... OPTION MENU The OPTION MENU appears just like the pop-up window that appear on the screen depend on the recording/playback status of your camcorder, etc. (HOME) (HOME) button Using the HELP function To see the descriptions on the HOME MENU, touch (HELP) on the HOME ...MENU screen. (The bottom of your camcorder at the time. 12 Menu item Useful Recording Techniques Index Category Follow the instructions on the screen. After completing the setting, touch . When the item is not on the screen, touch another ...

User Guide
Page 13
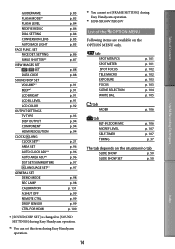
... MODE AUDIO MODE AE SHIFT WB SHIFT NIGHTSHOT LIGHT WIDE SELECT DIGITAL ZOOM STEADYSHOT X.V.COLOR GUIDEFRAME REMAINING SET FLASH MODE*1 FLASH LEVEL REDEYE REDUC DIAL SETTING CONVERSION LENS AUTO BACK LIGHT PHOTO SETTINGS IMAGE SIZE*1 FILE NO. AE SHIFT WB SHIFT NIGHTSHOT LIGHT STEADYSHOT p. 74 p. 74 p. 75 p. 75 p. 75 p. ... Guide*1 p. 51 MUSIC TOOL p. 47 DOWNLOAD MUSIC*1 p. 47 EMPTY MUSIC*1 p. 47 BATTERY INFO p. 69 (MANAGE MEDIA) category MOVIE MEDIA SET*1 p. 70 PHOTO MEDIA SET*1 p. 70 MEDIA INFO p. 72 MEDIA FORMAT*1 p. 72 REPAIR IMG.DB F. Menu lists List of Contents
... MODE AUDIO MODE AE SHIFT WB SHIFT NIGHTSHOT LIGHT WIDE SELECT DIGITAL ZOOM STEADYSHOT X.V.COLOR GUIDEFRAME REMAINING SET FLASH MODE*1 FLASH LEVEL REDEYE REDUC DIAL SETTING CONVERSION LENS AUTO BACK LIGHT PHOTO SETTINGS IMAGE SIZE*1 FILE NO. AE SHIFT WB SHIFT NIGHTSHOT LIGHT STEADYSHOT p. 74 p. 74 p. 75 p. 75 p. 75 p. ... Guide*1 p. 51 MUSIC TOOL p. 47 DOWNLOAD MUSIC*1 p. 47 EMPTY MUSIC*1 p. 47 BATTERY INFO p. 69 (MANAGE MEDIA) category MOVIE MEDIA SET*1 p. 70 PHOTO MEDIA SET*1 p. 70 MEDIA INFO p. 72 MEDIA FORMAT*1 p. 72 REPAIR IMG.DB F. Menu lists List of Contents
User Guide
Page 14
... Following items are available on the situation/no tab SLIDE SHOW p. 50 SLIDE SHOW SET p. 50 Index [SOUND/DISP SET] is changed to [SOUND SETTINGS] during Easy Handycam operation. *1 You can set this item during Easy Handycam operation. *3 HDR-XR500V/XR520V List of Contents Useful Recording Techniques GUIDEFRAME FLASH MODE*1 FLASH LEVEL REDEYE REDUC...
... Following items are available on the situation/no tab SLIDE SHOW p. 50 SLIDE SHOW SET p. 50 Index [SOUND/DISP SET] is changed to [SOUND SETTINGS] during Easy Handycam operation. *1 You can set this item during Easy Handycam operation. *3 HDR-XR500V/XR520V List of Contents Useful Recording Techniques GUIDEFRAME FLASH MODE*1 FLASH LEVEL REDEYE REDUC...
User Guide
Page 15
... turned off and landing of the following parts, and also do any of an airplane (HDR-XR500V/XR520V). Viewfinder LCD screen Shoe cover The camcorder is set to ON. Otherwise, the recording media may be damaged, recorded images may result in the correct way. Make sure that is grayed out is already...
... turned off and landing of the following parts, and also do any of an airplane (HDR-XR500V/XR520V). Viewfinder LCD screen Shoe cover The camcorder is set to ON. Otherwise, the recording media may be damaged, recorded images may result in the correct way. Make sure that is grayed out is already...

User Guide
Page 16
... use . About changing the language setting The on-screen displays in each local language are not compatible with the AVCHD format Discs recorded with high definition image quality (HD) This camcorder captures high definition footage in the AVCHD format....camcorder with the following devices; Other AVCHD format compatible devices which are not compatible with High Profile Devices which are used with DVD based players or recorders, as a DVD-R using your computer (see Operating Guide). Change the screen language before using your image data using a VCR, or a DVD/HDD...
... use . About changing the language setting The on-screen displays in each local language are not compatible with the AVCHD format Discs recorded with high definition image quality (HD) This camcorder captures high definition footage in the AVCHD format....camcorder with the following devices; Other AVCHD format compatible devices which are not compatible with High Profile Devices which are used with DVD based players or recorders, as a DVD-R using your computer (see Operating Guide). Change the screen language before using your image data using a VCR, or a DVD/HDD...

User Guide
Page 19
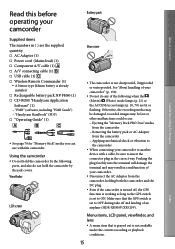
...pack is recommended. Charging time Approximate time (min.) required when you leave your camcorder within the AC 100 V - 240 V, 50 Hz/60 Hz range. ... Charging time 135 135 170 390 Time measured with the camcorder at the upper left on the battery pack When you ...pack. We do not recommend using the AC Adaptor supplied with your camcorder without any operation for about 5 minutes, to 86 F) is not discharged...; See page 119 on recording and playing time. When your camcorder is on, you can charge the battery pack in any countries/regions using...
...pack is recommended. Charging time Approximate time (min.) required when you leave your camcorder within the AC 100 V - 240 V, 50 Hz/60 Hz range. ... Charging time 135 135 170 390 Time measured with the camcorder at the upper left on the battery pack When you ...pack. We do not recommend using the AC Adaptor supplied with your camcorder without any operation for about 5 minutes, to 86 F) is not discharged...; See page 119 on recording and playing time. When your camcorder is on, you can charge the battery pack in any countries/regions using...
User Guide
Page 21
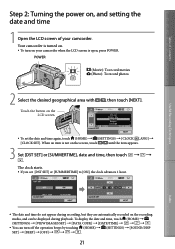
... displayed during recording, but they are automatically recorded on the recording media, and can turn on your camcorder. Table of Contents Step 2: Turning the power on, and setting the date and time 1 Open the LCD screen of your camcorder when the LCD screen is not on the screen, touch / until the item appears...
... displayed during recording, but they are automatically recorded on the recording media, and can turn on your camcorder. Table of Contents Step 2: Turning the power on, and setting the date and time 1 Open the LCD screen of your camcorder when the LCD screen is not on the screen, touch / until the item appears...
User Guide
Page 22
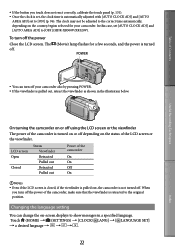
.... The off your camcorder. Changing the language setting You can change the on the country/region selected for a few seconds, and the power is turned POWER You can turn off the power Close the LCD screen. The clock may not be adjusted to [OFF] (HDR-XR500V/XR520V). When... you turn off . (Movie) lamp flashes for your camcorder also by pressing POWER. If the viewfinder is automatically adjusted with [AUTO CLOCK ADJ] and [AUTO AREA ADJ] set , the clock time is pulled out, retract the viewfinder...
.... The off your camcorder. Changing the language setting You can change the on the country/region selected for a few seconds, and the power is turned POWER You can turn off the power Close the LCD screen. The clock may not be adjusted to [OFF] (HDR-XR500V/XR520V). When... you turn off . (Movie) lamp flashes for your camcorder also by pressing POWER. If the viewfinder is automatically adjusted with [AUTO CLOCK ADJ] and [AUTO AREA ADJ] set , the clock time is pulled out, retract the viewfinder...
User Guide
Page 24
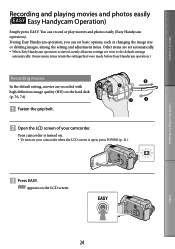
...appears on your camcorder. Table of your camcorder when the LCD screen is started, nearly all menu settings are reset to the default settings automatically. (Some menu items retain the settings that were made before Easy Handycam operation.) Recording movies In the default setting, movies are set automatically. &#... or play movies and photos easily (Easy Handycam operation). You can set basic options, such as changing the image size or deleting images, among the setting and adjustment items. Other items are recorded with high definition image quality (HD) on the hard disk (p. 70, 74...
...appears on your camcorder. Table of your camcorder when the LCD screen is started, nearly all menu settings are reset to the default settings automatically. (Some menu items retain the settings that were made before Easy Handycam operation.) Recording movies In the default setting, movies are set automatically. &#... or play movies and photos easily (Easy Handycam operation). You can set basic options, such as changing the image size or deleting images, among the setting and adjustment items. Other items are recorded with high definition image quality (HD) on the hard disk (p. 70, 74...

User Guide
Page 27
If you touch the movie or photo with , you select standard definition image quality (SD) movies in [ / SET] (p. 88). appears with the movie or photo that was most recently played or recorded. HOME MENU Previous 12 ...48) : Displays the Highlight Playback screen (p. 47). : Displays the screen to select the index type ([ MAP] (HDR-XR500V/XR520V)/ [ FILM ROLL]/[ FACE]) (p. 44, 45, 46). : Displays high definition image quality (HD) movies.* : Displays photos. * appears when you can continue playback from the previous time. (...
If you touch the movie or photo with , you select standard definition image quality (SD) movies in [ / SET] (p. 88). appears with the movie or photo that was most recently played or recorded. HOME MENU Previous 12 ...48) : Displays the Highlight Playback screen (p. 47). : Displays the screen to select the index type ([ MAP] (HDR-XR500V/XR520V)/ [ FILM ROLL]/[ FACE]) (p. 44, 45, 46). : Displays high definition image quality (HD) movies.* : Displays photos. * appears when you can continue playback from the previous time. (...
User Guide
Page 28
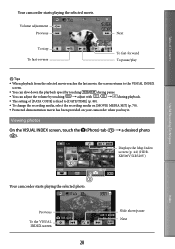
... / during pause. You can adjust the volume by touching adjust with / during playback. The setting of Contents Your camcorder starts playing the selected movie. Displays the Map Index screen (p. 44) (HDRXR500V/XR520V) Useful Recording Techniques Index Your...DATE/TIME] (p. 88). To change the recording media, select the recording media on [MOVIE MEDIA SET] (p. 70). Protected demonstration movie has been provided on your camcorder when you buy it. Previous To the VISUAL INDEX screen 28 Slide show/pause Next Viewing photos On the...
... / during pause. You can adjust the volume by touching adjust with / during playback. The setting of Contents Your camcorder starts playing the selected movie. Displays the Map Index screen (p. 44) (HDRXR500V/XR520V) Useful Recording Techniques Index Your...DATE/TIME] (p. 88). To change the recording media, select the recording media on [MOVIE MEDIA SET] (p. 70). Protected demonstration movie has been provided on your camcorder when you buy it. Previous To the VISUAL INDEX screen 28 Slide show/pause Next Viewing photos On the...
User Guide
Page 29
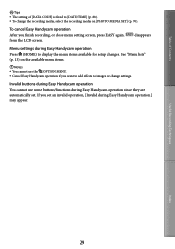
... menu items available for setup changes. Invalid buttons during Easy Handycam operation You cannot use the OPTION MENU. Cancel Easy Handycam operation if you set . from the LCD screen. See "Menu lists" (p. 13) on the available menu items. Notes You cannot use some buttons/functions... during Easy Handycam operation Press (HOME) to images or change the recording media, select the recording media on [PHOTO MEDIA SET] (p. 70). Useful Recording Techniques Index 29 To cancel Easy Handycam operation After you finish recording, or close menu...
... menu items available for setup changes. Invalid buttons during Easy Handycam operation You cannot use the OPTION MENU. Cancel Easy Handycam operation if you set . from the LCD screen. See "Menu lists" (p. 13) on the available menu items. Notes You cannot use some buttons/functions... during Easy Handycam operation Press (HOME) to images or change the recording media, select the recording media on [PHOTO MEDIA SET] (p. 70). Useful Recording Techniques Index 29 To cancel Easy Handycam operation After you finish recording, or close menu...
User Guide
Page 30
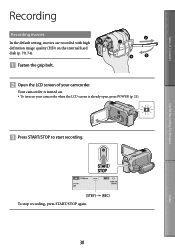
Your camcorder is already open, press POWER (p. 21). Press START/STOP to start recording. STBY] [REC] To stop recording, press START/STOP again. 30 Index Table of your camcorder when the LCD screen is turned on. To turn on the internal hard disk (p. 70, 74). Fasten the grip belt. Open the LCD screen of Contents Useful Recording Techniques Recording Recording movies In the default setting, movies are recorded with high definition image quality (HD) on your camcorder.
Your camcorder is already open, press POWER (p. 21). Press START/STOP to start recording. STBY] [REC] To stop recording, press START/STOP again. 30 Index Table of your camcorder when the LCD screen is turned on. To turn on the internal hard disk (p. 70, 74). Fasten the grip belt. Open the LCD screen of Contents Useful Recording Techniques Recording Recording movies In the default setting, movies are recorded with high definition image quality (HD) on your camcorder.
User Guide
Page 31
... (p. 70, 74). [ STEADYSHOT] is recorded automatically when the camcorder detects the smile of a person during movie recording ([SMILE SHUTTER], p. 87). In this case, set to your camcorder can check the recordable time and the remaining capacity, etc., by pressing PHOTO...and record images using the outer frame displayed on the camcorder. An orange frame appears around the face is optimized automatically ([FACE DET. SETTING], p. 86). In the default setting, a photo is set [GUIDEFRAME] to the camcorder (), and then adjust the angle (). However,...
... (p. 70, 74). [ STEADYSHOT] is recorded automatically when the camcorder detects the smile of a person during movie recording ([SMILE SHUTTER], p. 87). In this case, set to your camcorder can check the recordable time and the remaining capacity, etc., by pressing PHOTO...and record images using the outer frame displayed on the camcorder. An orange frame appears around the face is optimized automatically ([FACE DET. SETTING], p. 86). In the default setting, a photo is set [GUIDEFRAME] to the camcorder (), and then adjust the angle (). However,...
User Guide
Page 32
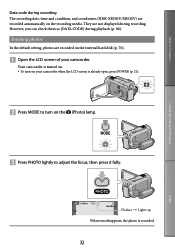
..., and coordinates (HDR-XR500V/XR520V) are recorded automatically on the (Photo) lamp. Press PHOTO lightly to adjust the focus, then press it fully. Flashes Lights up When disappears, the photo is already open, press POWER (p. 21). Press MODE to turn on the recording media. Your camcorder is turned on...
..., and coordinates (HDR-XR500V/XR520V) are recorded automatically on the (Photo) lamp. Press PHOTO lightly to adjust the focus, then press it fully. Flashes Lights up When disappears, the photo is already open, press POWER (p. 21). Press MODE to turn on the recording media. Your camcorder is turned on...


