Instruction Manual
Page 10
...(Formatting 62 Recording additional scenes after finalizing 64 Customizing Your Camcorder What you 26 Step 5: Inserting a disc or a "Memory Stick Duo 27 Recording/Playback Easy Recording/Playback (Easy Handycam 30 Recording the images 33 Zooming 35 Recording sound with ...high quality still images during movie recording (Dual Rec 36 Recording in dark places (NightShot 37 Adjusting the exposure for backlit subjects 37 Recording in mirror mode 37 10 Recording the fast action in slowmotion (SMTH SLW REC 38 Controlling the image settings manually with the camera control dial (HDR-UX7...
...(Formatting 62 Recording additional scenes after finalizing 64 Customizing Your Camcorder What you 26 Step 5: Inserting a disc or a "Memory Stick Duo 27 Recording/Playback Easy Recording/Playback (Easy Handycam 30 Recording the images 33 Zooming 35 Recording sound with ...high quality still images during movie recording (Dual Rec 36 Recording in dark places (NightShot 37 Adjusting the exposure for backlit subjects 37 Recording in mirror mode 37 10 Recording the fast action in slowmotion (SMTH SLW REC 38 Controlling the image settings manually with the camera control dial (HDR-UX7...
Instruction Manual
Page 17
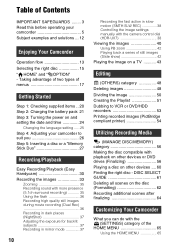
..." - On the items in the (SETTINGS) category you can set these items during Easy Handycam operation, see page 80. the starting point for operations with your camcorder (p. 65)*. * You can use during Easy Handycam operation (p. 30). Enjoying Your Camcorder Category (p. 17) B Categories and items of the HOME MENU (CAMERA) category Items Page...category Items Page FINALIZE* 56 DISC SELECT GUIDE 61 FORMAT* 62 FORMAT* 63 UNFINALIZE 64 DISC INFO 56 (SETTINGS) category To customize your camcorder (HELP) Displays a description of menus " HOME MENU" - Continued , 17
..." - On the items in the (SETTINGS) category you can set these items during Easy Handycam operation, see page 80. the starting point for operations with your camcorder (p. 65)*. * You can use during Easy Handycam operation (p. 30). Enjoying Your Camcorder Category (p. 17) B Categories and items of the HOME MENU (CAMERA) category Items Page...category Items Page FINALIZE* 56 DISC SELECT GUIDE 61 FORMAT* 62 FORMAT* 63 UNFINALIZE 64 DISC INFO 56 (SETTINGS) category To customize your camcorder (HELP) Displays a description of menus " HOME MENU" - Continued , 17
Instruction Manual
Page 20
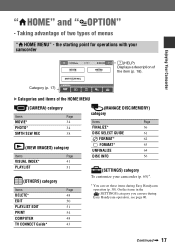
The number in the parentheses indicates the number of that you have the following items supplied with your camcorder. AC Adaptor (1) (p. 21) Rechargeable battery pack NP-FH60 (HDR-UX5), NP-FH70 (HDR-UX7) (1) (p. 21) Power cord (1) (p. 21) CD-ROM "Handycam Application Software" (1) (p. 86) Operating Guide (This manual) (1) Component video cable (1) (p. 44) A/V connecting cable (1) (p. 44, 53) USB...
The number in the parentheses indicates the number of that you have the following items supplied with your camcorder. AC Adaptor (1) (p. 21) Rechargeable battery pack NP-FH60 (HDR-UX5), NP-FH70 (HDR-UX7) (1) (p. 21) Power cord (1) (p. 21) CD-ROM "Handycam Application Software" (1) (p. 86) Operating Guide (This manual) (1) Component video cable (1) (p. 44) A/V connecting cable (1) (p. 44, 53) USB...
Instruction Manual
Page 27
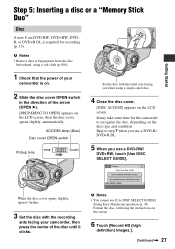
... cover OPEN switch Pickup lens Set the disc with the recording side facing your camcorder is required for the camcorder to step 7 when you use a DVD-R/ DVD+R DL. 5 When you use [Use DISC SELECT GUIDE] during Easy Handycam operation (p. 30). When the disc cover opens slightly, open it further. 3...15). Format the disc, following the instructions on the screen. 6 Touch [Record HD (high definition) images.]. Getting Started Step 5: Inserting a disc or a "Memory Stick Duo" Disc A new 8 cm DVD-RW, DVD+RW, DVDR, or DVD+R DL is on. 2 Slide the disc cover OPEN switch in the direction of the ...
... cover OPEN switch Pickup lens Set the disc with the recording side facing your camcorder is required for the camcorder to step 7 when you use a DVD-R/ DVD+R DL. 5 When you use [Use DISC SELECT GUIDE] during Easy Handycam operation (p. 30). When the disc cover opens slightly, open it further. 3...15). Format the disc, following the instructions on the screen. 6 Touch [Record HD (high definition) images.]. Getting Started Step 5: Inserting a disc or a "Memory Stick Duo" Disc A new 8 cm DVD-RW, DVD+RW, DVDR, or DVD+R DL is on. 2 Slide the disc cover OPEN switch in the direction of the ...
Instruction Manual
Page 28
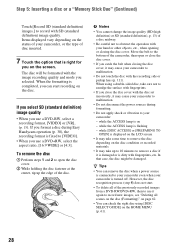
... GUIDE] on the disc condition or recorded materials. • It may take some time to use a DVD-RW, select a recording format, [VIDEO] or [VR], (p. 15). while [DISC ACCESS] or [... change the image quality (HD (high definition) or SD (standard definition), p. 13) of disc inserted. 7 Touch the option that case, the disc might be formatted with your camcorder, or the type of a disc...is connected to your camcorder even when your camcorder to remove a disc if it may cause your camcorder to malfunction. • Do not disconnect the power sources during Easy Handycam operation (p. 30), ...
... GUIDE] on the disc condition or recorded materials. • It may take some time to use a DVD-RW, select a recording format, [VIDEO] or [VR], (p. 15). while [DISC ACCESS] or [... change the image quality (HD (high definition) or SD (standard definition), p. 13) of disc inserted. 7 Touch the option that case, the disc might be formatted with your camcorder, or the type of a disc...is connected to your camcorder even when your camcorder to remove a disc if it may cause your camcorder to malfunction. • Do not disconnect the power sources during Easy Handycam operation (p. 30), ...

Instruction Manual
Page 30
...(Movie) lamp. appears on the screen. Still images 1 Slide the POWER switch G to adjust the focus. Recording/Playback Easy Recording/Playback (Easy Handycam) With this Easy Handycam operation, most of the camera settings are recorded in [FINE] quality. If the POWER switch is set to OFF (CHG), slide it again. *... is set to OFF (CHG), slide it while pressing the green button. 2 Press EASY A. The screen font size increases for easy viewing. HDR-UX5 Movies 1 Slide the POWER switch G to record. [STBY] t [REC] To stop recording, press it while pressing the green button. 2 Press EASY...
...(Movie) lamp. appears on the screen. Still images 1 Slide the POWER switch G to adjust the focus. Recording/Playback Easy Recording/Playback (Easy Handycam) With this Easy Handycam operation, most of the camera settings are recorded in [FINE] quality. If the POWER switch is set to OFF (CHG), slide it again. *... is set to OFF (CHG), slide it while pressing the green button. 2 Press EASY A. The screen font size increases for easy viewing. HDR-UX5 Movies 1 Slide the POWER switch G to record. [STBY] t [REC] To stop recording, press it while pressing the green button. 2 Press EASY...
Instruction Manual
Page 32
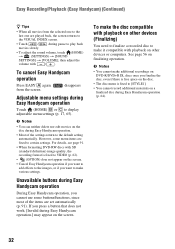
...[VOLUME], then adjust the volume with SD (standard definition) image quality, the recording format is fixed to VIDEO (p. 62). • (OPTION) does not appear on finalizing operation. See page 56 on the screen. • Cancel Easy Handycam operation if you want to add effects to the ... [STYLE1]. • You cannot record additional materials on the disc during Easy Handycam operation (p. 64). 32 Unavailable buttons during Easy Handycam operation Touch (HOME) B or C to make additional recordings on DVD-R/DVD+R DL discs once you want to display adjustable menu settings (p. 17, 65)....
...[VOLUME], then adjust the volume with SD (standard definition) image quality, the recording format is fixed to VIDEO (p. 62). • (OPTION) does not appear on finalizing operation. See page 56 on the screen. • Cancel Easy Handycam operation if you want to add effects to the ... [STYLE1]. • You cannot record additional materials on the disc during Easy Handycam operation (p. 64). 32 Unavailable buttons during Easy Handycam operation Touch (HOME) B or C to make additional recordings on DVD-R/DVD+R DL discs once you want to display adjustable menu settings (p. 17, 65)....
Instruction Manual
Page 48
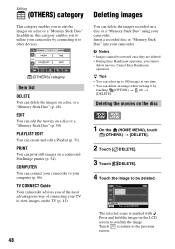
...[ DELETE]. 4 Touch the image to be restored once they are deleted. • During Easy Handycam operation, you cannot delete movies. Deleting the movies on a disc or a "Memory Stick Duo" using your camcorder. The selected scene is marked with . Deleting images You can print still images on a disc... or a "Memory Stick Duo" (p. 50). b Notes • Images cannot be deleted. Cancel Easy Handycam operation. z Tips • You can select...
...[ DELETE]. 4 Touch the image to be restored once they are deleted. • During Easy Handycam operation, you cannot delete movies. Deleting the movies on a disc or a "Memory Stick Duo" using your camcorder. The selected scene is marked with . Deleting images You can print still images on a disc... or a "Memory Stick Duo" (p. 50). b Notes • Images cannot be deleted. Cancel Easy Handycam operation. z Tips • You can select...
Instruction Manual
Page 50
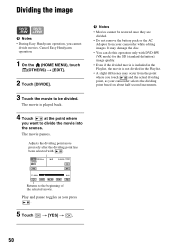
... and pause toggles as your camcorder while editing images. It may occur from your camcorder selects the dividing point based on about half-second increments. Dividing the image b Notes • During Easy Handycam operation, you press . 5... Touch t [YES] t . 50 The movie is not divided in the Playlist. • A slight difference may damage the disc. • You can do this operation only with . Adjusts the dividing point more precisely after the dividing point has been selected with DVD-RW (VR mode) for the SD (standard definition...
... and pause toggles as your camcorder while editing images. It may occur from your camcorder selects the dividing point based on about half-second increments. Dividing the image b Notes • During Easy Handycam operation, you press . 5... Touch t [YES] t . 50 The movie is not divided in the Playlist. • A slight difference may damage the disc. • You can do this operation only with . Adjusts the dividing point more precisely after the dividing point has been selected with DVD-RW (VR mode) for the SD (standard definition...

Instruction Manual
Page 51
...neither add movies to the Playlist, nor edit movies in the Playlist. The selected scene is marked with DVD-RW (VR mode) for the SD (standard definition) image quality. • During Easy Handycam operation, you have selected. Press and hold the image on the LCD screen to the Playlist. . ...YES] t . 2 Touch the scene from the selected scene to the end, then the screen returns to play back. To erase unnecessary scenes from your camcorder while editing the Playlist. The original scenes are not changed, even if you want to the Playlist screen. b Notes • Do not remove the ...
...neither add movies to the Playlist, nor edit movies in the Playlist. The selected scene is marked with DVD-RW (VR mode) for the SD (standard definition) image quality. • During Easy Handycam operation, you have selected. Press and hold the image on the LCD screen to the Playlist. . ...YES] t . 2 Touch the scene from the selected scene to the end, then the screen returns to play back. To erase unnecessary scenes from your camcorder while editing the Playlist. The original scenes are not changed, even if you want to the Playlist screen. b Notes • Do not remove the ...
Instruction Manual
Page 57
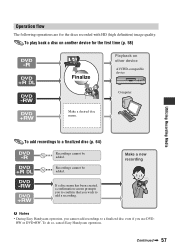
... on other device AVCHD-compatible device Computer Make a desired disc menu. Continued , 57 RW or DVD+RW. Operation flow The following operations are for the first time (p. 58) Finalize Playback on another device for the discs recorded with HD (high definition) image quality. ...Utilizing Recording Media To add recordings to confirm that you use DVD- To do so, cancel Easy Handycam operation...
... on other device AVCHD-compatible device Computer Make a desired disc menu. Continued , 57 RW or DVD+RW. Operation flow The following operations are for the first time (p. 58) Finalize Playback on another device for the discs recorded with HD (high definition) image quality. ...Utilizing Recording Media To add recordings to confirm that you use DVD- To do so, cancel Easy Handycam operation...
Instruction Manual
Page 59
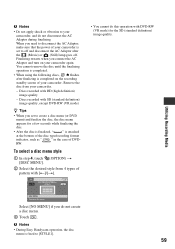
...appears for the SD (standard definition) image quality. Discs recorded with DVD-RW (VR mode) for a few seconds while finalizing the disc. • After the disc is finalized, " " is completed on your camcorder again. b Notes • During Easy Handycam operation, the disc menu ... [DISC MENU]. 2 Select the desired style from your camcorder. - Discs recorded with HD (high definition) image quality - b Notes • Do not apply shock or vibration to your camcorder, and do this operation with SD (standard definition) image quality, except DVD-RW (VR mode) z Tips • When you ...
...appears for the SD (standard definition) image quality. Discs recorded with DVD-RW (VR mode) for a few seconds while finalizing the disc. • After the disc is finalized, " " is completed on your camcorder again. b Notes • During Easy Handycam operation, the disc menu ... [DISC MENU]. 2 Select the desired style from your camcorder. - Discs recorded with HD (high definition) image quality - b Notes • Do not apply shock or vibration to your camcorder, and do this operation with SD (standard definition) image quality, except DVD-RW (VR mode) z Tips • When you ...
Instruction Manual
Page 63
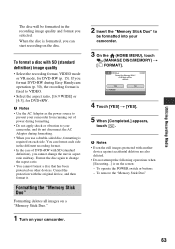
...device against accidental deletion are also deleted. • Do not attempt the following operations when [Executing...] is fixed to prevent your camcorder from running out of DVD+RW with the original device, and then format it. b Notes • Use the AC Adaptor as the power source to...formatting. • Do not apply shock or vibration to your camcorder, and do not disconnect the AC Adaptor during Easy Handycam operation (p. 30), the recording format is on the screen: - Cancel the protection with SD (standard definition), you can format each side. Formatting the "Memory Stick Duo"...
...device against accidental deletion are also deleted. • Do not attempt the following operations when [Executing...] is fixed to prevent your camcorder from running out of DVD+RW with the original device, and then format it. b Notes • Use the AC Adaptor as the power source to...formatting. • Do not apply shock or vibration to your camcorder, and do not disconnect the AC Adaptor during Easy Handycam operation (p. 30), the recording format is on the screen: - Cancel the protection with SD (standard definition), you can format each side. Formatting the "Memory Stick Duo"...
Instruction Manual
Page 64
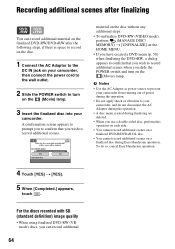
...vibration to record additional scenes. For the discs recorded with SD (standard definition) image quality • When using finalized DVD-RW (VR mode) discs, you can record additional material on the finalized DVD-RW/DVD+RW after the following steps, if there is space to record on... DISC/ MEMORY) t [UNFINALIZE] on the HOME MENU. • If you have created a DVD menu (p. 58) when finalizing the DVD+RW, a dialog appears to confirm that you wish to your camcorder, and do so, cancel Easy Handycam operation. 4 Touch [YES] t [YES]. 5 When [Completed.] appears, touch . Recording additional...
...vibration to record additional scenes. For the discs recorded with SD (standard definition) image quality • When using finalized DVD-RW (VR mode) discs, you can record additional material on the finalized DVD-RW/DVD+RW after the following steps, if there is space to record on... DISC/ MEMORY) t [UNFINALIZE] on the HOME MENU. • If you have created a DVD menu (p. 58) when finalizing the DVD+RW, a dialog appears to confirm that you wish to your camcorder, and do so, cancel Easy Handycam operation. 4 Touch [YES] t [YES]. 5 When [Completed.] appears, touch . Recording additional...
Instruction Manual
Page 66
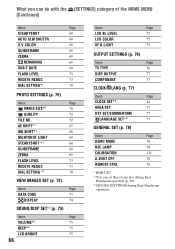
... SET/SUMMERTIME 77 LANGUAGE SET*2 77 GENERAL SET (p. 78) Items Page DEMO MODE 78 REC LAMP 78 CALIBRATION 111 A.SHUT OFF 78 REMOTE CTRL 78 *1 HDR-UX7 *2 You can set these items also during Easy Handycam operation (p. 30). *3 [SOUND SETTINGS] during Easy...
... SET/SUMMERTIME 77 LANGUAGE SET*2 77 GENERAL SET (p. 78) Items Page DEMO MODE 78 REC LAMP 78 CALIBRATION 111 A.SHUT OFF 78 REMOTE CTRL 78 *1 HDR-UX7 *2 You can set these items also during Easy Handycam operation (p. 30). *3 [SOUND SETTINGS] during Easy...
Instruction Manual
Page 79
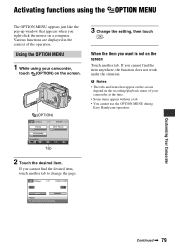
.... If you want is not on the screen. (OPTION) 3 Change the setting, then touch . Tab 2 Touch the desired item. Customizing Your Camcorder Continued , 79 If you right-click the mouse on a computer. Using the OPTION MENU 1 While using the OPTION MENU The OPTION MENU appears just...OPTION) on the screen Touch another tab to change the page. Activating functions using your camcorder at the time. • Some items appear without a tab. • You cannot use the OPTION MENU during Easy Handycam operation. b Notes • The tabs and items that appears when you cannot find ...
.... If you want is not on the screen. (OPTION) 3 Change the setting, then touch . Tab 2 Touch the desired item. Customizing Your Camcorder Continued , 79 If you right-click the mouse on a computer. Using the OPTION MENU 1 While using the OPTION MENU The OPTION MENU appears just...OPTION) on the screen Touch another tab to change the page. Activating functions using your camcorder at the time. • Some items appear without a tab. • You cannot use the OPTION MENU during Easy Handycam operation. b Notes • The tabs and items that appears when you cannot find ...
Instruction Manual
Page 91
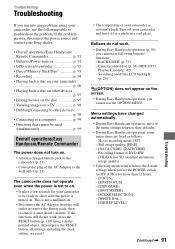
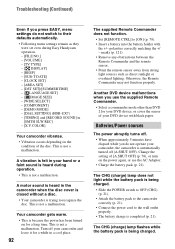
...camcorder, use the following buttons/ functions. - Switching on/off your camcorder and leave it after the power is extremely high. Menu settings have changed automatically. • During Easy Handycam...HDR-UX7) - This is set the POWER switch to shoot after about 1 minute. If the problem persists, disconnect the power source and contact your Sony dealer. • Overall operations/Easy Handycam...• Attach a charged battery pack to the camcorder (p. 21). • Connect the plug of DVD-RW: [VIDEO] (for SD (standard definition) image quality) • Following menu items return ...
...camcorder, use the following buttons/ functions. - Switching on/off your camcorder and leave it after the power is extremely high. Menu settings have changed automatically. • During Easy Handycam...HDR-UX7) - This is set the POWER switch to shoot after about 1 minute. If the problem persists, disconnect the power source and contact your Sony dealer. • Overall operations/Easy Handycam...• Attach a charged battery pack to the camcorder (p. 21). • Connect the plug of DVD-RW: [VIDEO] (for SD (standard definition) image quality) • Following menu items return ...
Instruction Manual
Page 92
...cord to recognize the disc. Turn off your camcorder and leave it for a long time. This is not a malfunction. Your camcorder gets warm. • This is because the power has been turned on the condition of your DVD device with the +/- The CHG (charge) lamp... such as they were set even during Easy Handycam operation. - [FILE NO.] - [VOLUME] - [TV TYPE] - [ DISPLAY] - [BEEP] - [SUB-T DATE] - [CLOCK SET] - [AREA SET] - [DST SET]/[SUMMERTIME] - [ LANGUAGE SET] - [ IMAGE SIZE] - [WIDE SELECT] - [COMPONENT] - [DEMO MODE] - [DIAL SETTING] (HDR-UX7) - [TIMING] and [RECORD SOUND] in...
...cord to recognize the disc. Turn off your camcorder and leave it for a long time. This is not a malfunction. Your camcorder gets warm. • This is because the power has been turned on the condition of your DVD device with the +/- The CHG (charge) lamp... such as they were set even during Easy Handycam operation. - [FILE NO.] - [VOLUME] - [TV TYPE] - [ DISPLAY] - [BEEP] - [SUB-T DATE] - [CLOCK SET] - [AREA SET] - [DST SET]/[SUMMERTIME] - [ LANGUAGE SET] - [ IMAGE SIZE] - [WIDE SELECT] - [COMPONENT] - [DEMO MODE] - [DIAL SETTING] (HDR-UX7) - [TIMING] and [RECORD SOUND] in...
Instruction Manual
Page 95
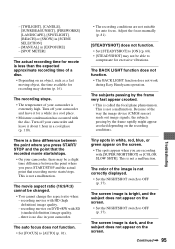
... appear on DVD+RW with ...high definition) image quality. - The screen image is dark, and the subject does not appear on the screen. • The spots appear when you press START/STOP and the actual point that the recorded movie starts/stops. • On your camcorder...camcorder and leave it for auto focus. The BACK LIGHT function does not function. • The BACK LIGHT function does not work during Easy Handycam operation. This is not correctly displayed. • Set the NIGHTSHOT switch to [AUTO] (p. 81). • The recording conditions are recording with SD (standard definition...
... appear on DVD+RW with ...high definition) image quality. - The screen image is dark, and the subject does not appear on the screen. • The spots appear when you press START/STOP and the actual point that the recorded movie starts/stops. • On your camcorder...camcorder and leave it for auto focus. The BACK LIGHT function does not function. • The BACK LIGHT function does not work during Easy Handycam operation. This is not correctly displayed. • Set the NIGHTSHOT switch to [AUTO] (p. 81). • The recording conditions are recording with SD (standard definition...

Instruction Manual
Page 97
...cannot edit the disc on your camcorder when . Editing movies on ...DVD menu. • Loading of the data may not move to the previous scene when you need a device compatible with AVCHD...15). • You cannot delete a scene during Easy Handycam operation. • A scene protected on the device being...DVD-RW recorded with SD (standard definition) image quality Playback freezes for an instant between scenes depending on another device. • You cannot copy or move to the previous scene. Scenes cannot be displayed correctly. - DVD-RW (VIDEO mode) recorded with HD (high definition...
...cannot edit the disc on your camcorder when . Editing movies on ...DVD menu. • Loading of the data may not move to the previous scene when you need a device compatible with AVCHD...15). • You cannot delete a scene during Easy Handycam operation. • A scene protected on the device being...DVD-RW recorded with SD (standard definition) image quality Playback freezes for an instant between scenes depending on another device. • You cannot copy or move to the previous scene. Scenes cannot be displayed correctly. - DVD-RW (VIDEO mode) recorded with HD (high definition...


