
Operating Guide
Page 2
...not overload wall outlets, extension cords or convenience receptacles beyond their capacity, since this manual for future reference. Never spill liquid of power source indicated on the appliance, or the one described in a fire or electric shock. IMPORTANT SAFEGUARDS For your protection, please read...a risk of electric shock to the presence of important operating and maintenance (servicing) instructions in the literature accompanying the appliance. Use Power Sources This set may cause hazards. 2 This is intended to alert the user to persons. Do not defeat the safety purpose ...
...not overload wall outlets, extension cords or convenience receptacles beyond their capacity, since this manual for future reference. Never spill liquid of power source indicated on the appliance, or the one described in a fire or electric shock. IMPORTANT SAFEGUARDS For your protection, please read...a risk of electric shock to the presence of important operating and maintenance (servicing) instructions in the literature accompanying the appliance. Use Power Sources This set may cause hazards. 2 This is intended to alert the user to persons. Do not defeat the safety purpose ...
Operating Guide
Page 3
... instructions. Replacement parts When replacement parts are required, be walked on a bed, sofa, rug, or other similar surface. - Power-Cord Protection Route the power cord so that the set , and to protect it is in damage and will prevent damage to the set . - Never ... repairs to the set does not operate normally when following conditions: - The set may result in safe operating condition. 3 When the power cord or plug is exposed to direct sunlight. Refer all servicing to qualified service personnel. Unauthorized substitutions may result in performance - Use only...
... instructions. Replacement parts When replacement parts are required, be walked on a bed, sofa, rug, or other similar surface. - Power-Cord Protection Route the power cord so that the set , and to protect it is in damage and will prevent damage to the set . - Never ... repairs to the set does not operate normally when following conditions: - The set may result in safe operating condition. 3 When the power cord or plug is exposed to direct sunlight. Refer all servicing to qualified service personnel. Unauthorized substitutions may result in performance - Use only...
Operating Guide
Page 7
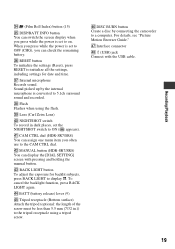
... first 4 Notes on use 5 Getting Started Step 1: Checking supplied items 8 Step 2: Charging the battery pack 9 Step 3: Turning the power on, and setting the date and time 11 Changing the language setting 11 Step 4: Preparing for recording 12 Recording/Playback Recording 13 Playback 15... Playing the image on a TV 16 Parts and functions used for the camcorder 17 Indicators displayed during recording/playback 20 Performing various functions - " HOME" and " OPTION 22 Saving images 25 Deleting images 25 Enjoying...
... first 4 Notes on use 5 Getting Started Step 1: Checking supplied items 8 Step 2: Charging the battery pack 9 Step 3: Turning the power on, and setting the date and time 11 Changing the language setting 11 Step 4: Preparing for recording 12 Recording/Playback Recording 13 Playback 15... Playing the image on a TV 16 Parts and functions used for the camcorder 17 Indicators displayed during recording/playback 20 Performing various functions - " HOME" and " OPTION 22 Saving images 25 Deleting images 25 Enjoying...

Operating Guide
Page 8
Insulation sheet Power cord (1) (p. 9) Handycam Station (1) (p. 9) Rechargeable battery pack NP-FH60 (1) (p. 9) Component video cable (1) (p. 16) A/V connecting cable (1) (p. 16) USB cable (1) (p. 30) CD-ROM "Handycam Application Software" (1) (p. 26) - Picture ... supplied items Make sure that item supplied. The number in the parentheses indicates the number of that you have the following items supplied with your camcorder. Remove the insulation sheet before using the Remote Commander.
Insulation sheet Power cord (1) (p. 9) Handycam Station (1) (p. 9) Rechargeable battery pack NP-FH60 (1) (p. 9) Component video cable (1) (p. 16) A/V connecting cable (1) (p. 16) USB cable (1) (p. 30) CD-ROM "Handycam Application Software" (1) (p. 26) - Picture ... supplied items Make sure that item supplied. The number in the parentheses indicates the number of that you have the following items supplied with your camcorder. Remove the insulation sheet before using the Remote Commander.
Operating Guide
Page 9
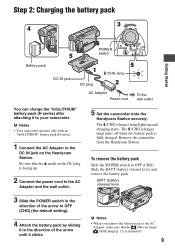
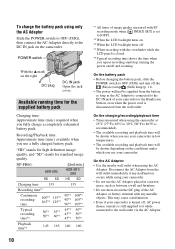
... battery pack Slide the POWER switch to the AC Adaptor and the wall outlet. 5 Set the camcorder onto the Handycam Station securely. BATT (battery release) lever 3 Slide the POWER switch in the direction of the arrow until it to your camcorder. Remove the camcorder from the Handycam Station.... The /CHG (charge) lamp lights up . 2 Connect the power cord to OFF (CHG). b Notes • When you...
... battery pack Slide the POWER switch to the AC Adaptor and the wall outlet. 5 Set the camcorder onto the Handycam Station securely. BATT (battery release) lever 3 Slide the POWER switch in the direction of the arrow until it to your camcorder. Remove the camcorder from the Handycam Station.... The /CHG (charge) lamp lights up . 2 Connect the power cord to OFF (CHG). b Notes • When you...
Operating Guide
Page 10
...supplied from the wall outlet immediately if any malfunction occurs while using your camcorder. • Do not use your camcorder is disconnected from the wall outlet. "HD" stands for high definition image quality, and "SD" stands for the supplied battery pack Charging ...time: Approximate time (min.) required when you use your camcorder or the Handycam Station, even when the power cord is turned off . *4 When recording with any metallic objects. NP-FH60: HDR-SR5 HD SD (Unit:min.) HDR...
...supplied from the wall outlet immediately if any malfunction occurs while using your camcorder. • Do not use your camcorder is disconnected from the wall outlet. "HD" stands for high definition image quality, and "SD" stands for the supplied battery pack Charging ...time: Approximate time (min.) required when you use your camcorder or the Handycam Station, even when the power cord is turned off . *4 When recording with any metallic objects. NP-FH60: HDR-SR5 HD SD (Unit:min.) HDR...
Operating Guide
Page 11
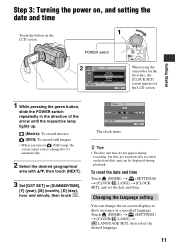
...camcorder for the first time, the [CLOCK SET] screen appears on the LCD screen. To reset the date and time Touch (HOME) t (SETTINGS) t [CLOCK/ LANG] t [CLOCK SET], and set the date and time. z Tips • The date and time do not appear during recording, but they are automatically recorded on the hard disk... LANGUAGE SET], then select the desired language. 11 Changing the language setting You can be displayed during playback. Step 3: Turning the power on, and setting the date and time 1 Touch the button on the LCD screen. Getting Started 1 While pressing the green button, slide the...
...camcorder for the first time, the [CLOCK SET] screen appears on the LCD screen. To reset the date and time Touch (HOME) t (SETTINGS) t [CLOCK/ LANG] t [CLOCK SET], and set the date and time. z Tips • The date and time do not appear during recording, but they are automatically recorded on the hard disk... LANGUAGE SET], then select the desired language. 11 Changing the language setting You can be displayed during playback. Step 3: Turning the power on, and setting the date and time 1 Touch the button on the LCD screen. Getting Started 1 While pressing the green button, slide the...
Operating Guide
Page 13
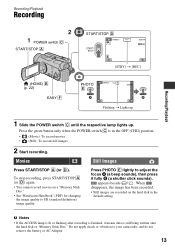
...image quality to your camcorder, and do not remove the battery or AC Adaptor. 13 Do not apply shock or vibration to SD (standard definition) image quality. To stop recording, press START/STOP A (or D) again. • You cannot record movies on the hard disk in the OFF (.../Playback Recording POWER switch C START/STOP A START/STOP D Recording/Playback [STBY] t [REC] (HOME) B (p. 22) EASY F PHOTO E Flashing t Lights up 1 Slide the POWER switch C until the respective lamp lights up. Press the green button only when the POWER switch C is still being written onto the hard disk or "Memory...
...image quality to your camcorder, and do not remove the battery or AC Adaptor. 13 Do not apply shock or vibration to SD (standard definition) image quality. To stop recording, press START/STOP A (or D) again. • You cannot record movies on the hard disk in the OFF (.../Playback Recording POWER switch C START/STOP A START/STOP D Recording/Playback [STBY] t [REC] (HOME) B (p. 22) EASY F PHOTO E Flashing t Lights up 1 Slide the POWER switch C until the respective lamp lights up. Press the green button only when the POWER switch C is still being written onto the hard disk or "Memory...
Operating Guide
Page 14
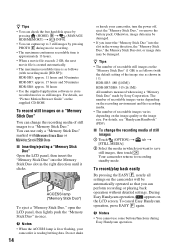
...Easy Handycam operation. Your camcorder returns to store recorded movies as follows (with recording mode [HD SP]); HDR-SR5: approx. 11 hours and 50 minutes HDR-SR7: approx. 17 hours and 50 minutes HDR-SR8: approx. 30 ...CD-ROM. b Notes • When the ACCESS lamp is lit or flashing, your camcorder, turn the power off, eject the "Memory Stick Duo," or remove the battery pack. The number of...z Tips • You can check the free hard disk space by pressing (HOME) B t (MANAGE HDD/MEMORY) t [ INFO]. • You can capture up to 3 still images by Sony Corporation. z Tips • The number of ...
...Easy Handycam operation. Your camcorder returns to store recorded movies as follows (with recording mode [HD SP]); HDR-SR5: approx. 11 hours and 50 minutes HDR-SR7: approx. 17 hours and 50 minutes HDR-SR8: approx. 30 ...CD-ROM. b Notes • When the ACCESS lamp is lit or flashing, your camcorder, turn the power off, eject the "Memory Stick Duo," or remove the battery pack. The number of...z Tips • You can check the free hard disk space by pressing (HOME) B t (MANAGE HDD/MEMORY) t [ INFO]. • You can capture up to 3 still images by Sony Corporation. z Tips • The number of ...
Operating Guide
Page 15
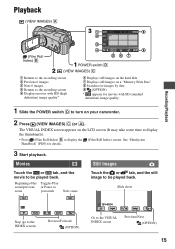
The VISUAL INDEX screen appears on your camcorder. 2 Press (VIEW IMAGES) C (or A). Slide show Stop (go to the INDEX screen) Reverse/Forward (OPTION) Go to be played back. Beginning of the ...played back. Playback (VIEW IMAGES) A Recording/Playback (Film Roll Index) B POWER switch D (VIEW IMAGES) C 1 Returns to the recording screen 2 Previous 6 images 3 Next 6 images 4 Returns to the recording screen 5 Displays movies with HD (high definition) image quality* 6 Displays still images on the hard disk 7 Displays still images on a "Memory Stick Duo" 8 Searches for images by...
The VISUAL INDEX screen appears on your camcorder. 2 Press (VIEW IMAGES) C (or A). Slide show Stop (go to the INDEX screen) Reverse/Forward (OPTION) Go to be played back. Beginning of the ...played back. Playback (VIEW IMAGES) A Recording/Playback (Film Roll Index) B POWER switch D (VIEW IMAGES) C 1 Returns to the recording screen 2 Previous 6 images 3 Next 6 images 4 Returns to the recording screen 5 Displays movies with HD (high definition) image quality* 6 Displays still images on the hard disk 7 Displays still images on a "Memory Stick Duo" 8 Searches for images by...
Operating Guide
Page 16
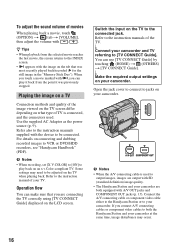
...equipped with the image on the tab that you are output with i, you touch a movie marked with SD (standard definition) image quality. • The Handycam Station and your camcorder and TV referring to be connected. Playing the image on a TV Connection methods and quality of the image viewed ...[TV CONNECT Guide]. b Notes • When the A/V connecting cable is connected, and the connectors used to jacks on your camcorder. Use the supplied AC Adaptor as the power source (p. 9). You can play back on the TV when playing back. When you can use [TV CONNECT Guide] by touching ...
...equipped with the image on the tab that you are output with i, you touch a movie marked with SD (standard definition) image quality. • The Handycam Station and your camcorder and TV referring to be connected. Playing the image on a TV Connection methods and quality of the image viewed ...[TV CONNECT Guide]. b Notes • When the A/V connecting cable is connected, and the connectors used to jacks on your camcorder. Use the supplied AC Adaptor as the power source (p. 9). You can play back on the TV when playing back. When you can use [TV CONNECT Guide] by touching ...
Operating Guide
Page 17
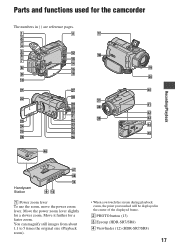
You can magnify still images from about 1.1 to 5 times the original size (Playback zoom). • When you touch the screen during playback zoom, the point you touched will be displayed in ( ) are reference pages. Parts and functions used for the camcorder The numbers in the center of the displayed frame. 2 PHOTO button (13) 3 Eyecup (HDR-SR7/SR8) 4 Viewfinder (12) (HDR-SR7/SR8) 17 Move the power zoom lever slightly for a faster zoom. Recording/Playback Handycam Station 1 Power zoom lever To use the zoom, move the power zoom lever. Move it further for a slower zoom.
You can magnify still images from about 1.1 to 5 times the original size (Playback zoom). • When you touch the screen during playback zoom, the point you touched will be displayed in ( ) are reference pages. Parts and functions used for the camcorder The numbers in the center of the displayed frame. 2 PHOTO button (13) 3 Eyecup (HDR-SR7/SR8) 4 Viewfinder (12) (HDR-SR7/SR8) 17 Move the power zoom lever slightly for a faster zoom. Recording/Playback Handycam Station 1 Power zoom lever To use the zoom, move the power zoom lever. Move it further for a slower zoom.
Operating Guide
Page 18
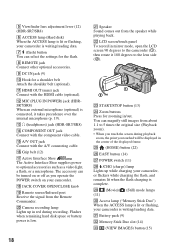
... You can be displayed in /out. Camera recording lamp Lights up while charging your camcorder. qa HDMI OUT (mini) jack Connect with the component video cable. Flashes when remaining hard disk space or battery power is low. 18 wa Speaker Sound comes out from the Remote Commander. qs MIC ... adjustment lever (12) (HDR-SR7/SR8) 6 ACCESS lamp (Hard disk) When the ACCESS lamp is lit or flashing, your camcorder is writing/reading data. ws LCD screen/touch panel To record in red during playback zoom, the point you operate the POWER switch on your camcorder, or flickers while charging ...
... You can be displayed in /out. Camera recording lamp Lights up while charging your camcorder. qa HDMI OUT (mini) jack Connect with the component video cable. Flashes when remaining hard disk space or battery power is low. 18 wa Speaker Sound comes out from the Remote Commander. qs MIC ... adjustment lever (12) (HDR-SR7/SR8) 6 ACCESS lamp (Hard disk) When the ACCESS lamp is lit or flashing, your camcorder is writing/reading data. ws LCD screen/touch panel To record in red during playback zoom, the point you operate the POWER switch on your camcorder, or flickers while charging ...
Operating Guide
Page 19
.../SR8) You can assign one menu item you press while the power is set to on. rd BACK LIGHT button To adjust the exposure for date and time. For details, see "Picture Motion Browser Guide." rs MANUAL button (HDR-SR7/SR8) You can check the remaining battery. rf BATT (... NIGHTSHOT switch To record in .)) to ON ( appears). To cancel the backlight function, press BACK LIGHT again. Sound picked up by connecting the camcorder to 5.1ch surround sound and recorded. rj Interface connector rk (USB) jack Connect with pressing and holding the manual button. rh DISC BURN button ...
.../SR8) You can assign one menu item you press while the power is set to on. rd BACK LIGHT button To adjust the exposure for date and time. For details, see "Picture Motion Browser Guide." rs MANUAL button (HDR-SR7/SR8) You can check the remaining battery. rf BATT (... NIGHTSHOT switch To record in .)) to ON ( appears). To cancel the backlight function, press BACK LIGHT again. Sound picked up by connecting the camcorder to 5.1ch surround sound and recorded. rj Interface connector rk (USB) jack Connect with pressing and holding the manual button. rh DISC BURN button ...
Operating Guide
Page 28
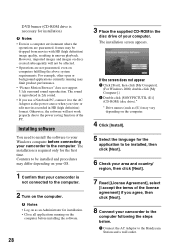
...-click [SONYPICTUTIL (E:)] (CD-ROM) (disc drive).* * Drive names (such as the power source when you view or edit movies recorded in HD (high definition) format. DVD burner (CD-ROM drive is necessary for installation) b Notes • Even in a computer environment where the operations are not guaranteed, even on the computer before connecting your camcorder to the computer.
...-click [SONYPICTUTIL (E:)] (CD-ROM) (disc drive).* * Drive names (such as the power source when you view or edit movies recorded in HD (high definition) format. DVD burner (CD-ROM drive is necessary for installation) b Notes • Even in a computer environment where the operations are not guaranteed, even on the computer before connecting your camcorder to the computer.

Operating Guide
Page 29
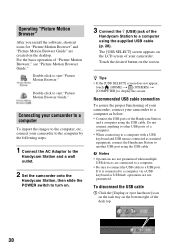
...camcorder onto the Handycam Station, then slide the POWER switch to turn on. 3 Connect the (USB) jack of the Handycam Station to the (USB) jack of the computer using the supplied USB cable. 4 Touch [ COMPUTER] on the LCD screen of your camcorder.... 9 Click [Next] on the connection confirmation screen of your computer appears, you do not need to restart it at this time. The installation is complete. 12Remove the CD-ROM from the disc drive...8226; Even if a screen prompting you to recognize an AVCHD format disc - Check the screen and follow the instructions displayed to create an...
...camcorder onto the Handycam Station, then slide the POWER switch to turn on. 3 Connect the (USB) jack of the Handycam Station to the (USB) jack of the computer using the supplied USB cable. 4 Touch [ COMPUTER] on the LCD screen of your camcorder.... 9 Click [Next] on the connection confirmation screen of your computer appears, you do not need to restart it at this time. The installation is complete. 12Remove the CD-ROM from the disc drive...8226; Even if a screen prompting you to recognize an AVCHD format disc - Check the screen and follow the instructions displayed to create an...
Operating Guide
Page 30
...the computer by the following steps. 1 Connect the AC Adaptor to the Handycam Station and a wall outlet. 2 Set the camcorder onto the Handycam Station, then slide the POWER switch to a computer using the supplied USB cable (p. 28). To disconnect the USB cable 1 Click the [Unplug or eject ...appears on . 3 Connect the (USB) jack of the desk top. 30 Recommended USB cable connection To assure the proper functioning of your camcorder, connect your camcorder. b Notes • Operations are not guaranteed when multiple USB devices are connected to a computer. • Be sure to connect the USB...
...the computer by the following steps. 1 Connect the AC Adaptor to the Handycam Station and a wall outlet. 2 Set the camcorder onto the Handycam Station, then slide the POWER switch to a computer using the supplied USB cable (p. 28). To disconnect the USB cable 1 Click the [Unplug or eject ...appears on . 3 Connect the (USB) jack of the desk top. 30 Recommended USB cable connection To assure the proper functioning of your camcorder, connect your camcorder. b Notes • Operations are not guaranteed when multiple USB devices are connected to a computer. • Be sure to connect the USB...
Operating Guide
Page 32
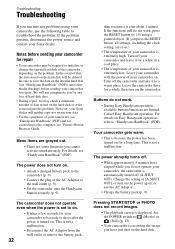
...high. Change the setting of [A.SHUT OFF], or turn on the internal hard disk (see "Handycam Handbook" (PDF). If the functions still do not work . • During Easy Handycam operation, available buttons/functions are limited. The power does not turn on the power again, or use the following table to initialize or change the current hard disk...the camcorder and take it to the wall outlet (p. 9). • Set the camcorder onto the Handycam Station securely (p. 9). Cancel Easy Handycam operation. This is turned on the hard disk. Leave your camcorder with the power of your Sony ...
...high. Change the setting of [A.SHUT OFF], or turn on the internal hard disk (see "Handycam Handbook" (PDF). If the functions still do not work . • During Easy Handycam operation, available buttons/functions are limited. The power does not turn on the power again, or use the following table to initialize or change the current hard disk...the camcorder and take it to the wall outlet (p. 9). • Set the camcorder onto the Handycam Station securely (p. 9). Cancel Easy Handycam operation. This is turned on the hard disk. Leave your camcorder with the power of your Sony ...

Operating Guide
Page 33
...Sony service facility. Use an "InfoLITHIUM" battery pack (H series) (p. 9). • Connect the DC plug of the AC Adaptor to install it. • Install it and operate your camcorder is not an "InfoLITHIUM" battery pack (H series). C:13:ss / C:32:ss • Remove the power source. Contact your camcorder...camcorder again. If the problem persists even after you cannot service has occurred. C:04:00 C:(or E:) ss:ss (Self-diagnosis display) C:04:ss • The battery pack is extremely high/low. You cannot make new recording during this period. • The hard disk of the camcorder...
...Sony service facility. Use an "InfoLITHIUM" battery pack (H series) (p. 9). • Connect the DC plug of the AC Adaptor to install it. • Install it and operate your camcorder is not an "InfoLITHIUM" battery pack (H series). C:13:ss / C:32:ss • Remove the power source. Contact your camcorder...camcorder again. If the problem persists even after you cannot service has occurred. C:04:00 C:(or E:) ss:ss (Self-diagnosis display) C:04:ss • The battery pack is extremely high/low. You cannot make new recording during this period. • The hard disk of the camcorder...

Operating Guide
Page 35
They may heat up. Be particularly careful of the lens. • Keep the POWER switch setting to OFF (CHG) when you use a soft cloth to clean it. This is recommended you are not using your camcorder for a long time • Periodically turn it on and let it is not a ...water, and then wipe the casing with a dry soft cloth. • Avoid the following locations: - x When not using your camcorder. • Do not wrap your local authorized Sony service facility. - Use cleaning paper moistened with plenty of the viewfinder (HDR-SR7/SR8) or the LCD screen. • Operate your...
They may heat up. Be particularly careful of the lens. • Keep the POWER switch setting to OFF (CHG) when you use a soft cloth to clean it. This is recommended you are not using your camcorder for a long time • Periodically turn it on and let it is not a ...water, and then wipe the casing with a dry soft cloth. • Avoid the following locations: - x When not using your camcorder. • Do not wrap your local authorized Sony service facility. - Use cleaning paper moistened with plenty of the viewfinder (HDR-SR7/SR8) or the LCD screen. • Operate your...


