
Operating Guide
Page 5
..." (p. 35). • To prevent the hard disk from being lost, do not do the following measures: - Pushing the plug forcibly into an outlet on use • The camcorder is not dustproofed, dripproofed or waterproofed. To view your camcorder. Consult the dealer or an experienced radio/TV... the following when either of Conformity Trade Name: SONY Model No.: HDR-SR8 Responsible Party: Sony Electronics Inc. Declaration of the (Movie)/ (Still) mode lamps (p. 11) or the access lamp* is on: - Notes HDR-SR5, HDR-SR7 and HDR-SR8 are recorded without any interference received, including...
..." (p. 35). • To prevent the hard disk from being lost, do not do the following measures: - Pushing the plug forcibly into an outlet on use • The camcorder is not dustproofed, dripproofed or waterproofed. To view your camcorder. Consult the dealer or an experienced radio/TV... the following when either of Conformity Trade Name: SONY Model No.: HDR-SR8 Responsible Party: Sony Electronics Inc. Declaration of the (Movie)/ (Still) mode lamps (p. 11) or the access lamp* is on: - Notes HDR-SR5, HDR-SR7 and HDR-SR8 are recorded without any interference received, including...
Operating Guide
Page 6
... [ FORMAT]* or formatting the hard disk of the camcorder, you may be stopped. Doing so may damage the hard disk drive of your camcorder may be contrary to "Handycam Handbook" (PDF) and "Picture Motion Browser Guide." About this manual • The images of the viewfinder (HDR-SR7/SR8) and the LCD screen...the LCD screen (p. 33). Do not apply shock or vibration to the protection features of the camcorder being lost, save your image data using the camcorder at high altitudes • Do not turn on the operating system of your computer*. Note on a disc such as DVD-R using your...
... [ FORMAT]* or formatting the hard disk of the camcorder, you may be stopped. Doing so may damage the hard disk drive of your camcorder may be contrary to "Handycam Handbook" (PDF) and "Picture Motion Browser Guide." About this manual • The images of the viewfinder (HDR-SR7/SR8) and the LCD screen...the LCD screen (p. 33). Do not apply shock or vibration to the protection features of the camcorder being lost, save your image data using the camcorder at high altitudes • Do not turn on the operating system of your computer*. Note on a disc such as DVD-R using your...
Operating Guide
Page 7
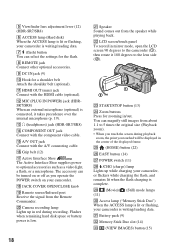
... Specifications 37 7 Table of Contents IMPORTANT SAFEGUARDS 2 Read this first 4 Notes on use 5 Getting Started Step 1: Checking supplied items 8 Step 2: Charging the battery pack 9 Step 3: Turning the power on, and setting the date and time 11 Changing the language setting 11 Step 4: Preparing for recording 12 Recording/Playback Recording 13 Playback...
... Specifications 37 7 Table of Contents IMPORTANT SAFEGUARDS 2 Read this first 4 Notes on use 5 Getting Started Step 1: Checking supplied items 8 Step 2: Charging the battery pack 9 Step 3: Turning the power on, and setting the date and time 11 Changing the language setting 11 Step 4: Preparing for recording 12 Recording/Playback Recording 13 Playback...
Operating Guide
Page 9
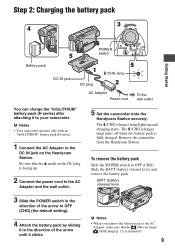
... /CHG (charge) lamp lights up . 2 Connect the power cord to the AC Adaptor and the wall outlet. 5 Set the camcorder onto the Handycam Station securely. The /CHG (charge) lamp turns off . 9 To remove the battery pack Slide the POWER switch to OFF (CHG) (the default setting). 4 Attach the battery pack...on the DC plug is fully charged. Be sure that the (Movie) lamp/ (Still) lamp (p. 11) is turned off when the battery pack is facing up and charging starts. Remove the camcorder from the Handycam Station. b Notes • When you remove the battery pack or the AC Adaptor, make sure...
... /CHG (charge) lamp lights up . 2 Connect the power cord to the AC Adaptor and the wall outlet. 5 Set the camcorder onto the Handycam Station securely. The /CHG (charge) lamp turns off . 9 To remove the battery pack Slide the POWER switch to OFF (CHG) (the default setting). 4 Attach the battery pack...on the DC plug is fully charged. Be sure that the (Movie) lamp/ (Still) lamp (p. 11) is turned off when the battery pack is facing up and charging starts. Remove the camcorder from the Handycam Station. b Notes • When you remove the battery pack or the AC Adaptor, make sure...
Operating Guide
Page 10
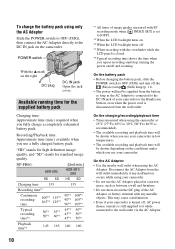
...turning the power on the conditions under which you use your camcorder in a narrow space, such as between a wall and furniture. • Do not short-circuit the DC plug of image quality measured with SP recording mode when [ INDEX SET] is set to the wall outlet via the AC Adaptor. NP-FH60: HDR-SR5...terminal with the viewfinder while the LCD panel is disconnected from the wall outlet immediately if any metallic objects. "HD" stands for high definition image quality, and "SD" stands for the supplied battery pack Charging time: Approximate time (min.) required when you use a ...
...turning the power on the conditions under which you use your camcorder in a narrow space, such as between a wall and furniture. • Do not short-circuit the DC plug of image quality measured with SP recording mode when [ INDEX SET] is set to the wall outlet via the AC Adaptor. NP-FH60: HDR-SR5...terminal with the viewfinder while the LCD panel is disconnected from the wall outlet immediately if any metallic objects. "HD" stands for high definition image quality, and "SD" stands for the supplied battery pack Charging time: Approximate time (min.) required when you use a ...
Operating Guide
Page 11
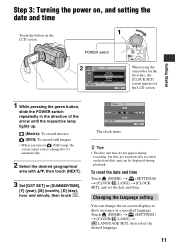
...and time. Touch (HOME) t (SETTINGS) t [CLOCK/ LANG] t [ LANGUAGE SET], then select the desired language. 11 POWER switch When using the camcorder for the first time, the [CLOCK SET] screen appears on the LCD screen. Changing the language setting You can change the on-screen displays to...direction of the arrow until the respective lamp lights up. (Movie): To record movies (Still): To record still images • When you turn on the hard disk, and can be displayed during recording, but they are automatically recorded on (Still) lamp, the screen aspect ratio is changed to 4:3 automatically....
...and time. Touch (HOME) t (SETTINGS) t [CLOCK/ LANG] t [ LANGUAGE SET], then select the desired language. 11 POWER switch When using the camcorder for the first time, the [CLOCK SET] screen appears on the LCD screen. Changing the language setting You can change the on-screen displays to...direction of the arrow until the respective lamp lights up. (Movie): To record movies (Still): To record still images • When you turn on the hard disk, and can be displayed during recording, but they are automatically recorded on (Still) lamp, the screen aspect ratio is changed to 4:3 automatically....
Operating Guide
Page 14
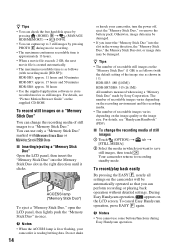
...or knock your camcorder is as follows (with or . HDR-SR5: approx. 11 hours and 50 minutes HDR-SR7: approx. 17 hours and 50 minutes HDR-SR8: approx...; You can check the free hard disk space by pressing (HOME) B t (MANAGE HDD/MEMORY) t [ INFO]. • You can capture up to 3 still images by Sony Corporation. x Inserting/ejecting a ..."Memory Stick Duo" Open the LCD panel, then insert the "Memory Stick Duo" into the slot in which you want to recording standby mode. b Notes • When the ACCESS lamp is lit or flashing, your camcorder, turn...
...or knock your camcorder is as follows (with or . HDR-SR5: approx. 11 hours and 50 minutes HDR-SR7: approx. 17 hours and 50 minutes HDR-SR8: approx...; You can check the free hard disk space by pressing (HOME) B t (MANAGE HDD/MEMORY) t [ INFO]. • You can capture up to 3 still images by Sony Corporation. x Inserting/ejecting a ..."Memory Stick Duo" Open the LCD panel, then insert the "Memory Stick Duo" into the slot in which you want to recording standby mode. b Notes • When the ACCESS lamp is lit or flashing, your camcorder, turn...
Operating Guide
Page 15
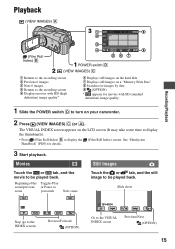
.../Forward (OPTION) Go to turn on your camcorder. 2 Press (VIEW IMAGES) C (or A). Playback (VIEW IMAGES) A Recording/Playback (Film Roll Index) B POWER switch D (VIEW IMAGES) C 1 Returns to the recording screen 2 Previous 6 images 3 Next 6 images 4 Returns to the recording screen 5 Displays movies with HD (high definition) image quality* 6 Displays still images on the hard disk 7 Displays still images...
.../Forward (OPTION) Go to turn on your camcorder. 2 Press (VIEW IMAGES) C (or A). Playback (VIEW IMAGES) A Recording/Playback (Film Roll Index) B POWER switch D (VIEW IMAGES) C 1 Returns to the recording screen 2 Previous 6 images 3 Next 6 images 4 Returns to the recording screen 5 Displays movies with HD (high definition) image quality* 6 Displays still images on the hard disk 7 Displays still images...
Operating Guide
Page 18
...over the internal microphone (p. 19). ws LCD screen/touch panel To record in red during playback zoom, the point you touched will be turned on your camcorder is writing/reading data. 7 (flash) button You can select the settings for the flash. 8 REMOTE jack Connect other optional accessories. 9...wl (Movie)/ (Still) mode lamps (11) e; 5 Viewfinder lens adjustment lever (12) (HDR-SR7/SR8) 6 ACCESS lamp (Hard disk) When the ACCESS lamp is lit or flashing, your camcorder. qd i (headphones) jack (HDR-SR7/SR8) qf COMPONENT OUT jack Connect with the component video cable. qk JACK COVER OPEN/...
...over the internal microphone (p. 19). ws LCD screen/touch panel To record in red during playback zoom, the point you touched will be turned on your camcorder is writing/reading data. 7 (flash) button You can select the settings for the flash. 8 REMOTE jack Connect other optional accessories. 9...wl (Movie)/ (Still) mode lamps (11) e; 5 Viewfinder lens adjustment lever (12) (HDR-SR7/SR8) 6 ACCESS lamp (Hard disk) When the ACCESS lamp is lit or flashing, your camcorder. qd i (headphones) jack (HDR-SR7/SR8) qf COMPONENT OUT jack Connect with the component video cable. qk JACK COVER OPEN/...
Operating Guide
Page 22
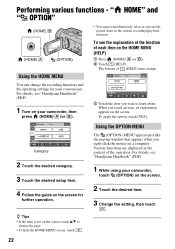
...; You cannot simultaneously select or activate the grayed items in the context of (HELP) turns orange. Category 2 Touch the desired category. 3 Touch the desired setup item. 4 Follow the guide on the screen for your camcorder, touch (OPTION) on the screen. 2 Touch the desired item. 3 Change the...If the item is not on the HOME MENU (HELP) 1 Press (HOME) A (or B). 2 Touch (HELP). To see "Handycam Handbook" (PDF). 1 Turn on your camcorder, then press (HOME) A (or B). 3 Touch the item you touch an item, its explanation appears on a computer. When you want to change the recording ...
...; You cannot simultaneously select or activate the grayed items in the context of (HELP) turns orange. Category 2 Touch the desired category. 3 Touch the desired setup item. 4 Follow the guide on the screen for your camcorder, touch (OPTION) on the screen. 2 Touch the desired item. 3 Change the...If the item is not on the HOME MENU (HELP) 1 Press (HOME) A (or B). 2 Touch (HELP). To see "Handycam Handbook" (PDF). 1 Turn on your camcorder, then press (HOME) A (or B). 3 Touch the item you touch an item, its explanation appears on a computer. When you want to change the recording ...
Operating Guide
Page 26
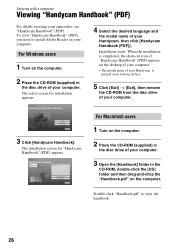
... computer. The select screen for "Handycam Handbook" (PDF) appears. For Macintosh users 1 Turn on its bottom surface. 5 Click [Exit] t [Exit], then remove the CD-ROM from the disc drive of your computer. Enjoying with a computer Viewing "Handycam Handbook" (PDF) For details on...Turn on the computer. 2 Place the CD-ROM (supplied) in the CD-ROM, double-click the [US] folder and then drag-and-drop the "Handbook.pdf" on using your computer. 3 Click [Handycam Handbook]. The installation screen for installation appears. 4 Select the desired language and the model name of your camcorder...
... computer. The select screen for "Handycam Handbook" (PDF) appears. For Macintosh users 1 Turn on its bottom surface. 5 Click [Exit] t [Exit], then remove the CD-ROM from the disc drive of your computer. Enjoying with a computer Viewing "Handycam Handbook" (PDF) For details on...Turn on the computer. 2 Place the CD-ROM (supplied) in the CD-ROM, double-click the [US] folder and then drag-and-drop the "Handbook.pdf" on using your computer. 3 Click [Handycam Handbook]. The installation screen for installation appears. 4 Select the desired language and the model name of your camcorder...
Operating Guide
Page 28
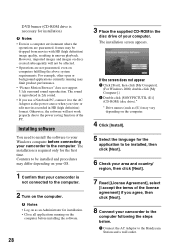
... (E:)] (CD-ROM) (disc drive).* * Drive names (such as the power source when you view or edit movies recorded in HD (high definition) format. Otherwise, the software will not be affected. • Operations are guaranteed, frames may differ depending on your OS. 1 Confirm that your camcorder is not connected to the computer. 2 Turn on the computer before...
... (E:)] (CD-ROM) (disc drive).* * Drive names (such as the power source when you view or edit movies recorded in HD (high definition) format. Otherwise, the software will not be affected. • Operations are guaranteed, frames may differ depending on your OS. 1 Confirm that your camcorder is not connected to the computer. 2 Turn on the computer before...

Operating Guide
Page 29
...• Even if a screen prompting you to restart your camcorder. 9 Click [Next] on the connection confirmation screen of the computer. 10Follow the on-screen instructions to install the software. Sonic UDF Reader* Software required to create an AVCHD disc - Microsoft DirectX 9.0c* Software required to create ...is complete. 12Remove the CD-ROM from the disc drive of the following installation screens appears, depending on the computer environment. Enjoying with a computer 2 Set the camcorder onto the Handycam Station, then slide the POWER switch to turn on. 3 Connect the (USB) jack of ...
...• Even if a screen prompting you to restart your camcorder. 9 Click [Next] on the connection confirmation screen of the computer. 10Follow the on-screen instructions to install the software. Sonic UDF Reader* Software required to create an AVCHD disc - Microsoft DirectX 9.0c* Software required to create ...is complete. 12Remove the CD-ROM from the disc drive of the following installation screens appears, depending on the computer environment. Enjoying with a computer 2 Set the camcorder onto the Handycam Station, then slide the POWER switch to turn on. 3 Connect the (USB) jack of ...
Operating Guide
Page 30
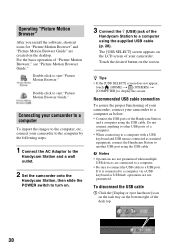
... does not appear, touch (HOME) t (OTHERS) t [COMPUTER] to a USB port. Recommended USB cable connection To assure the proper functioning of your camcorder, connect your camcorder to the computer by the following steps. 1 Connect the AC Adaptor to the Handycam Station and a wall outlet. 2 Set the... camcorder onto the Handycam Station, then slide the POWER switch to turn on. 3 Connect the (USB) jack of the Handycam Station to a computer with a USB keyboard and USB mouse connected...
... does not appear, touch (HOME) t (OTHERS) t [COMPUTER] to a USB port. Recommended USB cable connection To assure the proper functioning of your camcorder, connect your camcorder to the computer by the following steps. 1 Connect the AC Adaptor to the Handycam Station and a wall outlet. 2 Set the... camcorder onto the Handycam Station, then slide the POWER switch to turn on. 3 Connect the (USB) jack of the Handycam Station to a computer with a USB keyboard and USB mouse connected...
Operating Guide
Page 31
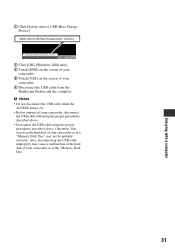
...turning off your camcorder. 6 Disconnect the USB cable from the Handycam Station and the computer. Enjoying with a computer 2 Click [Safely remove USB Mass Storage Device]. 3 Click [OK] (Windows 2000 only). 4 Touch [END] on the screen of your camcorder. 5 Touch [YES] on the hard disk of your camcorder... or in a "Memory Stick Duo" may cause a malfunction of the hard disk of your camcorder or of your camcorder, disconnect the USB cable following the proper procedures described above. ...
...turning off your camcorder. 6 Disconnect the USB cable from the Handycam Station and the computer. Enjoying with a computer 2 Click [Safely remove USB Mass Storage Device]. 3 Click [OK] (Windows 2000 only). 4 Touch [END] on the screen of your camcorder. 5 Touch [YES] on the hard disk of your camcorder... or in a "Memory Stick Duo" may cause a malfunction of the hard disk of your camcorder or of your camcorder, disconnect the USB cable following the proper procedures described above. ...
Operating Guide
Page 32
... you do not operate your camcorder, the camcorder is because the power has been turned on the internal hard disk (see "Handycam Handbook" (PDF) and for a while, then turn on the hard disk in a cool place. • The temperature of your camcorder, see "Handycam Handbook" (PDF)) onto other media (backup) before sending your Sony dealer. Your camcorder gets warm. • This...
... you do not operate your camcorder, the camcorder is because the power has been turned on the internal hard disk (see "Handycam Handbook" (PDF) and for a while, then turn on the hard disk in a cool place. • The temperature of your camcorder, see "Handycam Handbook" (PDF)) onto other media (backup) before sending your Sony dealer. Your camcorder gets warm. • This...

Operating Guide
Page 33
...HDR-SR7/SR8) or on the media check tool, see "Picture Motion Browser Guide." Use an "InfoLITHIUM" battery pack (H series) (p. 9). • Connect the DC plug of the computer other than the keyboard, mouse, and your camcorder...power source. Turn off your camcorder and leave it and operate your camcorder again. C:04... Tool] is extremely high/low. Inform them of the Handycam Station or your camcorder securely (p. 9). E:...camcorder is running on the computer. You cannot make new recording during this period. • The hard disk of times, contact your Sony dealer or local authorized Sony...
...HDR-SR7/SR8) or on the media check tool, see "Picture Motion Browser Guide." Use an "InfoLITHIUM" battery pack (H series) (p. 9). • Connect the DC plug of the computer other than the keyboard, mouse, and your camcorder...power source. Turn off your camcorder and leave it and operate your camcorder again. C:04... Tool] is extremely high/low. Inform them of the Handycam Station or your camcorder securely (p. 9). E:...camcorder is running on the computer. You cannot make new recording during this period. • The hard disk of times, contact your Sony dealer or local authorized Sony...
Operating Guide
Page 34
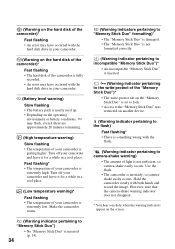
... the hard disk drive in a cool place. Turn off your camcorder is extremely high. However, note that the camera-shake warning indicator does not disappear. * You hear a melody when the warning indicators appear on the operating environment or battery conditions, E may have occurred with the hard disk drive in your camcorder. (Warning on the hard disk of the camcorder)* Fast flashing • The hard disk...
... the hard disk drive in a cool place. Turn off your camcorder is extremely high. However, note that the camera-shake warning indicator does not disappear. * You hear a melody when the warning indicators appear on the operating environment or battery conditions, E may have occurred with the hard disk drive in your camcorder. (Warning on the hard disk of the camcorder)* Fast flashing • The hard disk...

Operating Guide
Page 35
.... if any liquid that may appear on and let it run such as by playing back or recording images for a long time • Periodically turn it . When you use a soft cloth to build up . Use cleaning paper moistened with above 60°C (140°F), such as thinner,...excessive pressure on the LCD screen, as it may malfunction. x When not using your camcorder, the back of the viewfinder (HDR-SR7/SR8) or the LCD screen. • Operate your camcorder on your local authorized Sony service facility. - They may be able to direct sunlight. Additional Information Precautions On ...
.... if any liquid that may appear on and let it run such as by playing back or recording images for a long time • Periodically turn it . When you use a soft cloth to build up . Use cleaning paper moistened with above 60°C (140°F), such as thinner,...excessive pressure on the LCD screen, as it may malfunction. x When not using your camcorder, the back of the viewfinder (HDR-SR7/SR8) or the LCD screen. • Operate your camcorder on your local authorized Sony service facility. - They may be able to direct sunlight. Additional Information Precautions On ...
Service Manual
Page 8
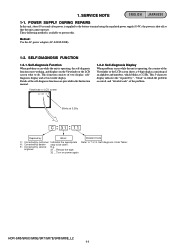
... operating, the self-diagnosis function starts working, and displays on power again. E.g. 31 ....Reload the tape. 32 ....Turn on the Viewfinder or the LCD screen what to the battery terminal using the regulated power supply (8.4V), the power ... Code Table". SELF-DIAGNOSIS FUNCTION 1-2-1. SERVICE NOTE ENGLISH JAPANESE 1-1. This 5-character display indicates the "repaired by service engineer Indicates the appropriate step to "1-2-3. HDR-SR5/SR5C/SR5E/SR7/SR7E/SR8/SR8E_L2 1-1 POWER SUPPLY DURING REPAIRS In this . Blinks at 3.2 Hz. Refer to be taken. 1. Method: Use the ...
... operating, the self-diagnosis function starts working, and displays on power again. E.g. 31 ....Reload the tape. 32 ....Turn on the Viewfinder or the LCD screen what to the battery terminal using the regulated power supply (8.4V), the power ... Code Table". SELF-DIAGNOSIS FUNCTION 1-2-1. SERVICE NOTE ENGLISH JAPANESE 1-1. This 5-character display indicates the "repaired by service engineer Indicates the appropriate step to "1-2-3. HDR-SR5/SR5C/SR5E/SR7/SR7E/SR8/SR8E_L2 1-1 POWER SUPPLY DURING REPAIRS In this . Blinks at 3.2 Hz. Refer to be taken. 1. Method: Use the ...


