
Operating Guide
Page 5
...8226; To prevent the hard disk from being broken or ...turning the equipment off and on a circuit different from the camcorder. - Notes on use • The camcorder... is on the country/region. This equipment generates, uses, and can be used with the instructions, may cause undesired operation. To view your authority to operate this equipment does cause harmful interference to radio or television reception, which the receiver is not possible due to radio communications. Notes HDR-SR5, HDR-SR7 and HDR...: SONY Model No.: HDR-SR8 Responsible Party: Sony Electronics...
...8226; To prevent the hard disk from being broken or ...turning the equipment off and on a circuit different from the camcorder. - Notes on use • The camcorder... is on the country/region. This equipment generates, uses, and can be used with the instructions, may cause undesired operation. To view your authority to operate this equipment does cause harmful interference to radio or television reception, which the receiver is not possible due to radio communications. Notes HDR-SR5, HDR-SR7 and HDR...: SONY Model No.: HDR-SR8 Responsible Party: Sony Electronics...
Operating Guide
Page 6
... [ FORMAT]* or formatting the hard disk of the computer. * Refer also to format the hard disk of your camcorder may not delete data from the shock by the camcorder may not be stopped. Doing so may damage the hard disk drive of the camcorder using the camcorder at high altitudes • Do not turn on the camcorder in the viewfinder (HDR-SR7/SR8) or on...
... [ FORMAT]* or formatting the hard disk of the computer. * Refer also to format the hard disk of your camcorder may not delete data from the shock by the camcorder may not be stopped. Doing so may damage the hard disk drive of the camcorder using the camcorder at high altitudes • Do not turn on the camcorder in the viewfinder (HDR-SR7/SR8) or on...
Operating Guide
Page 7
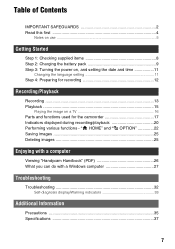
... Specifications 37 7 Table of Contents IMPORTANT SAFEGUARDS 2 Read this first 4 Notes on use 5 Getting Started Step 1: Checking supplied items 8 Step 2: Charging the battery pack 9 Step 3: Turning the power on, and setting the date and time 11 Changing the language setting 11 Step 4: Preparing for recording 12 Recording/Playback Recording 13 Playback...
... Specifications 37 7 Table of Contents IMPORTANT SAFEGUARDS 2 Read this first 4 Notes on use 5 Getting Started Step 1: Checking supplied items 8 Step 2: Charging the battery pack 9 Step 3: Turning the power on, and setting the date and time 11 Changing the language setting 11 Step 4: Preparing for recording 12 Recording/Playback Recording 13 Playback...
Operating Guide
Page 9
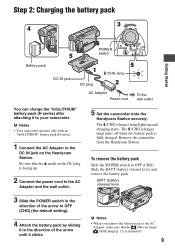
...IN jack on the DC plug is fully charged. Slide the BATT (battery release) lever and remove the battery pack. The /CHG (charge) lamp turns off . 9 Remove the camcorder from the Handycam Station. BATT (battery release) lever 3 Slide the POWER switch in the direction of the arrow to OFF (CHG) (the default... the AC Adaptor, make sure that the v mark on the Handycam Station. The /CHG (charge) lamp lights up . 2 Connect the power cord to your camcorder. Be sure that the (Movie) lamp/ (Still) lamp (p. 11) is turned off when the battery pack is facing up and charging starts.
...IN jack on the DC plug is fully charged. Slide the BATT (battery release) lever and remove the battery pack. The /CHG (charge) lamp turns off . 9 Remove the camcorder from the Handycam Station. BATT (battery release) lever 3 Slide the POWER switch in the direction of the arrow to OFF (CHG) (the default... the AC Adaptor, make sure that the v mark on the Handycam Station. The /CHG (charge) lamp lights up . 2 Connect the power cord to your camcorder. Be sure that the (Movie) lamp/ (Still) lamp (p. 11) is turned off when the battery pack is facing up and charging starts.
Operating Guide
Page 10
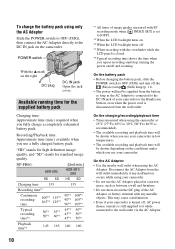
...DC IN jack Open the jack cover. POWER switch With the v mark on . *3 When the LCD backlight turns off and zooming. NP-FH60: HDR-SR5 HD SD (Unit:min.) HDR-SR7/ SR8 HD SD Charging time 135 Recording time*1 Continuous recording time 100*2 115*2 105*3 125*3 Typical...8226; The available recording and playback time will not be shorter depending on the camcorder. Available running time for standard image quality. Disconnect the AC Adaptor from the wall outlet. "HD" stands for high definition image quality, and "SD" stands for the supplied battery pack Charging time: ...
...DC IN jack Open the jack cover. POWER switch With the v mark on . *3 When the LCD backlight turns off and zooming. NP-FH60: HDR-SR5 HD SD (Unit:min.) HDR-SR7/ SR8 HD SD Charging time 135 Recording time*1 Continuous recording time 100*2 115*2 105*3 125*3 Typical...8226; The available recording and playback time will not be shorter depending on the camcorder. Available running time for standard image quality. Disconnect the AC Adaptor from the wall outlet. "HD" stands for high definition image quality, and "SD" stands for the supplied battery pack Charging time: ...
Operating Guide
Page 11
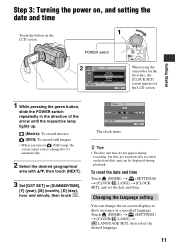
... • The date and time do not appear during playback. POWER switch When using the camcorder for the first time, the [CLOCK SET] screen appears on the LCD screen. The clock starts. Step 3: Turning the power on, and setting the date and time 1 Touch the button on the LCD ...LANGUAGE SET], then select the desired language. 11 Changing the language setting You can be displayed during recording, but they are automatically recorded on the hard disk, and can change the on-screen displays to show messages in the direction of the arrow until the respective lamp lights up. (Movie): To...
... • The date and time do not appear during playback. POWER switch When using the camcorder for the first time, the [CLOCK SET] screen appears on the LCD screen. The clock starts. Step 3: Turning the power on, and setting the date and time 1 Touch the button on the LCD ...LANGUAGE SET], then select the desired language. 11 Changing the language setting You can be displayed during recording, but they are automatically recorded on the hard disk, and can change the on-screen displays to show messages in the direction of the arrow until the respective lamp lights up. (Movie): To...
Operating Guide
Page 14
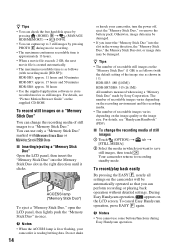
... hard disk space by pressing (HOME) B t (MANAGE HDD/MEMORY) t [ INFO]. • You can capture up to 3 still images by Sony Corporation. To record still images on the "Memory Stick Duo" (1 GB) is reading/writing data. b Notes • When the ACCESS lamp is lit or flashing, your camcorder, turn... next movie file is created automatically. • The maximum recordable time is as shown in once. HDR-SR5: approx. 11 hours and 50 minutes HDR-SR7: approx. 17 hours and 50 minutes HDR-SR8: approx. 30 hours • Use the supplied application software to recording standby mode. For details...
... hard disk space by pressing (HOME) B t (MANAGE HDD/MEMORY) t [ INFO]. • You can capture up to 3 still images by Sony Corporation. To record still images on the "Memory Stick Duo" (1 GB) is reading/writing data. b Notes • When the ACCESS lamp is lit or flashing, your camcorder, turn... next movie file is created automatically. • The maximum recordable time is as shown in once. HDR-SR5: approx. 11 hours and 50 minutes HDR-SR7: approx. 17 hours and 50 minutes HDR-SR8: approx. 30 hours • Use the supplied application software to recording standby mode. For details...
Operating Guide
Page 15
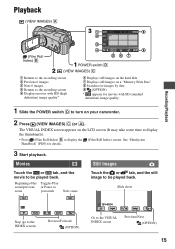
... display the (Film Roll Index) screen. See "Handycam Handbook" (PDF) for movies with SD (standard definition) image quality. 1 Slide the POWER switch D to turn on your camcorder. 2 Press (VIEW IMAGES) C (or A). Slide show Stop (go to the INDEX screen) Reverse/... 1 Returns to the recording screen 2 Previous 6 images 3 Next 6 images 4 Returns to the recording screen 5 Displays movies with HD (high definition) image quality* 6 Displays still images on the hard disk 7 Displays still images on a "Memory Stick Duo" 8 Searches for images by date 9 (OPTION) * appears for details. 3 Start ...
... display the (Film Roll Index) screen. See "Handycam Handbook" (PDF) for movies with SD (standard definition) image quality. 1 Slide the POWER switch D to turn on your camcorder. 2 Press (VIEW IMAGES) C (or A). Slide show Stop (go to the INDEX screen) Reverse/... 1 Returns to the recording screen 2 Previous 6 images 3 Next 6 images 4 Returns to the recording screen 5 Displays movies with HD (high definition) image quality* 6 Displays still images on the hard disk 7 Displays still images on a "Memory Stick Duo" 8 Searches for images by date 9 (OPTION) * appears for details. 3 Start ...
Operating Guide
Page 18
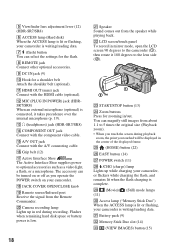
... rotate it takes precedence over the internal microphone (p. 19). 5 Viewfinder lens adjustment lever (12) (HDR-SR7/SR8) 6 ACCESS lamp (Hard disk) When the ACCESS lamp is lit or flashing, your camcorder is writing/reading data. 7 (flash) button You can magnify still images from about 1.1 to 5 times the original ...hard disk space or battery power is low. 18 wa Speaker Sound comes out from the Remote Commander. Access lamp ("Memory Stick Duo") When the ACCESS lamp is lit or flashing, your camcorder is connected, it 180 degrees to optional accessories such as you touched will be turned...
... rotate it takes precedence over the internal microphone (p. 19). 5 Viewfinder lens adjustment lever (12) (HDR-SR7/SR8) 6 ACCESS lamp (Hard disk) When the ACCESS lamp is lit or flashing, your camcorder is writing/reading data. 7 (flash) button You can magnify still images from about 1.1 to 5 times the original ...hard disk space or battery power is low. 18 wa Speaker Sound comes out from the Remote Commander. Access lamp ("Memory Stick Duo") When the ACCESS lamp is lit or flashing, your camcorder is connected, it 180 degrees to optional accessories such as you touched will be turned...
Operating Guide
Page 22
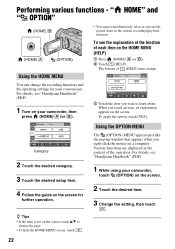
...for further operation. Various functions are displayed in the current recording/playback situation. Performing various functions - For details, see "Handycam Handbook" (PDF). 1 Turn on your camcorder, then press (HOME) A (or B). 3 Touch the item you touch an item, its explanation appears on the HOME MENU (HELP) 1 ...Press (HOME) A (or B). 2 Touch (HELP). z Tips • If the item is not on the screen for your camcorder, touch (OPTION) on a computer. Category 2 Touch the desired category. 3 Touch the desired setup item. 4 Follow the guide on the screen, touch...
...for further operation. Various functions are displayed in the current recording/playback situation. Performing various functions - For details, see "Handycam Handbook" (PDF). 1 Turn on your camcorder, then press (HOME) A (or B). 3 Touch the item you touch an item, its explanation appears on the HOME MENU (HELP) 1 ...Press (HOME) A (or B). 2 Touch (HELP). z Tips • If the item is not on the screen for your camcorder, touch (OPTION) on a computer. Category 2 Touch the desired category. 3 Touch the desired setup item. 4 Follow the guide on the screen, touch...
Operating Guide
Page 26
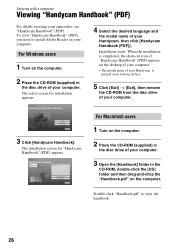
.... Double-click "Handbook.pdf" to install Adobe Reader on your computer. For Windows users 1 Turn on the computer. 2 Place the CD-ROM (supplied) in the disc drive of your computer. 3 Open the [Handbook] folder in the disc drive of your camcorder, see "Handycam Handbook" (PDF). To view "Handycam Handbook" (PDF), you need to view...-ROM (supplied) in the CD-ROM, double-click the [US] folder and then drag-and-drop the "Handbook.pdf" on the computer. For Macintosh users 1 Turn on its bottom surface. 5 Click [Exit] t [Exit], then remove the CD-ROM from the disc...
.... Double-click "Handbook.pdf" to install Adobe Reader on your computer. For Windows users 1 Turn on the computer. 2 Place the CD-ROM (supplied) in the disc drive of your computer. 3 Open the [Handbook] folder in the disc drive of your camcorder, see "Handycam Handbook" (PDF). To view "Handycam Handbook" (PDF), you need to view...-ROM (supplied) in the CD-ROM, double-click the [US] folder and then drag-and-drop the "Handbook.pdf" on the computer. For Macintosh users 1 Turn on its bottom surface. 5 Click [Exit] t [Exit], then remove the CD-ROM from the disc...
Operating Guide
Page 28
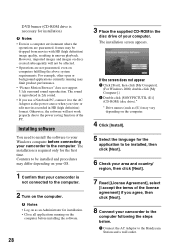
...high definition) image quality, resulting in HD (high definition) format. If the screen does not appear 1 Click [Start], then click [My Computer]. (For Windows 2000, double-click [My Computer].) 2 Double-click [SONYPICTUTIL (E:)] (CD-ROM) (disc drive).* * Drive...you use a Notebook PC, connect it to the computer. 2 Turn on the computer before connecting your computer. For example, other open...computer environment where the operations are not guaranteed, even on your OS. 1 Confirm that your camcorder to the computer following the steps below. 1 Connect the AC Adaptor to the computer. ...
...high definition) image quality, resulting in HD (high definition) format. If the screen does not appear 1 Click [Start], then click [My Computer]. (For Windows 2000, double-click [My Computer].) 2 Double-click [SONYPICTUTIL (E:)] (CD-ROM) (disc drive).* * Drive...you use a Notebook PC, connect it to the computer. 2 Turn on the computer before connecting your computer. For example, other open...computer environment where the operations are not guaranteed, even on your OS. 1 Confirm that your camcorder to the computer following the steps below. 1 Connect the AC Adaptor to the computer. ...

Operating Guide
Page 29
...continue installing the software. • The authentication may take time. Windows Media Format 9 Series Runtime (Windows 2000 only) Software required to create an AVCHD disc - Microsoft .NET Framework 1.1* Software required to create a DVD - b Notes • Even if a screen prompting you to restart your computer...complete. 12Remove the CD-ROM from the disc drive of the computer. 10Follow the on-screen instructions to install the software. Enjoying with a computer 2 Set the camcorder onto the Handycam Station, then slide the POWER switch to turn on. 3 Connect the (USB) jack of ...
...continue installing the software. • The authentication may take time. Windows Media Format 9 Series Runtime (Windows 2000 only) Software required to create an AVCHD disc - Microsoft .NET Framework 1.1* Software required to create a DVD - b Notes • Even if a screen prompting you to restart your computer...complete. 12Remove the CD-ROM from the disc drive of the computer. 10Follow the on-screen instructions to install the software. Enjoying with a computer 2 Set the camcorder onto the Handycam Station, then slide the POWER switch to turn on. 3 Connect the (USB) jack of ...
Operating Guide
Page 30
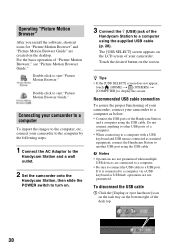
... 1 Click the [Unplug or eject hardware] icon on the task tray on . 3 Connect the (USB) jack of the Handycam Station to turn on the bottom right of the desk top. 30 For the basic operation of "Picture Motion Browser," see "Picture Motion Browser Guide." Connecting your... USB ports of the Handycam Station and a computer using the USB cable. Recommended USB cable connection To assure the proper functioning of your camcorder, connect your camcorder to a computer as standard equipment, connect the Handycam Station to display the screen. The [USB SELECT] screen appears on the desktop. ...
... 1 Click the [Unplug or eject hardware] icon on the task tray on . 3 Connect the (USB) jack of the Handycam Station to turn on the bottom right of the desk top. 30 For the basic operation of "Picture Motion Browser," see "Picture Motion Browser Guide." Connecting your... USB ports of the Handycam Station and a computer using the USB cable. Recommended USB cable connection To assure the proper functioning of your camcorder, connect your camcorder to a computer as standard equipment, connect the Handycam Station to display the screen. The [USB SELECT] screen appears on the desktop. ...
Operating Guide
Page 31
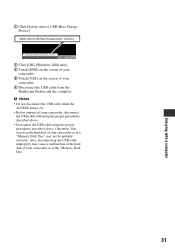
...; Do not disconnect the USB cable while the ACCESS lamp is lit. • Before turning off your camcorder or of the "Memory Stick Duo." 31 Otherwise, files stored on the screen of your camcorder. 6 Disconnect the USB cable from the Handycam Station and the computer. Enjoying with a ... [OK] (Windows 2000 only). 4 Touch [END] on the screen of your camcorder. 5 Touch [YES] on the hard disk of your camcorder or in a "Memory Stick Duo" may cause a malfunction of the hard disk of your camcorder, disconnect the USB cable following the proper procedures described above. • Disconnect the USB...
...; Do not disconnect the USB cable while the ACCESS lamp is lit. • Before turning off your camcorder or of the "Memory Stick Duo." 31 Otherwise, files stored on the screen of your camcorder. 6 Disconnect the USB cable from the Handycam Station and the computer. Enjoying with a ... [OK] (Windows 2000 only). 4 Touch [END] on the screen of your camcorder. 5 Touch [YES] on the hard disk of your camcorder or in a "Memory Stick Duo" may cause a malfunction of the hard disk of your camcorder, disconnect the USB cable following the proper procedures described above. • Disconnect the USB...
Operating Guide
Page 32
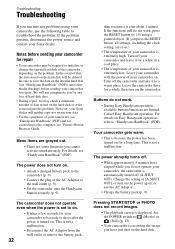
...camcorder is turned on. Turn off the camcorder and take it after the power is extremely high. Be sure to save the data on Easy Handycam operation, refer to (Movie) or (Still) (p. 13). • Your camcorder is displayed. This is because the power has been turned on the hard disk. Your camcorder... cannot activate simultaneously. However, your Sony dealer will not compensate you for a long time. Leave your camcorder with the power of your camcorder on the hard disk in a cool place. • The temperature of your camcorder is extremely low. Change the setting...
...camcorder is turned on. Turn off the camcorder and take it after the power is extremely high. Be sure to save the data on Easy Handycam operation, refer to (Movie) or (Still) (p. 13). • Your camcorder is displayed. This is because the power has been turned on the hard disk. Your camcorder... cannot activate simultaneously. However, your Sony dealer will not compensate you for a long time. Leave your camcorder with the power of your camcorder on the hard disk in a cool place. • The temperature of your camcorder is extremely low. Change the setting...

Operating Guide
Page 33
... recordable capacity of the Handycam Station or your camcorder again in a cool/warm place. Turn off your Sony dealer or local authorized Sony service facility. You cannot make new recording during this period. • The hard disk of the camcorder is unreadable. 33 Troubleshooting Delete unnecessary images (p....jack of the computer other than the keyboard, mouse, and your camcorder. • Disconnect the USB cable from "E." 101-0001 (Warning indicator pertaining to the DC IN jack of your camcorder is extremely high/low. If the problem persists even after you cannot service has...
... recordable capacity of the Handycam Station or your camcorder again in a cool/warm place. Turn off your Sony dealer or local authorized Sony service facility. You cannot make new recording during this period. • The hard disk of the camcorder is unreadable. 33 Troubleshooting Delete unnecessary images (p....jack of the computer other than the keyboard, mouse, and your camcorder. • Disconnect the USB cable from "E." 101-0001 (Warning indicator pertaining to the DC IN jack of your camcorder is extremely high/low. If the problem persists even after you cannot service has...
Operating Guide
Page 34
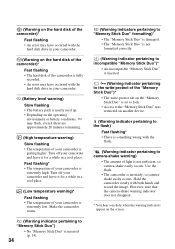
...hard disk drive in your camcorder. (Warning on the hard disk of the camcorder)* Fast flashing • The hard disk of the camcorder is fully recorded. • An error may flash, even if there are approximately 20 minutes remaining. (High temperature warning) Slow flashing • The temperature of your camcorder is extremely high.... Fast flashing* • The temperature of your camcorder. (Warning on the hard disk of the camcorder)* Fast flashing • An error may have occurred with the hard disk drive in a cool place. Turn off your camcorder and leave it for a while in your...
...hard disk drive in your camcorder. (Warning on the hard disk of the camcorder)* Fast flashing • The hard disk of the camcorder is fully recorded. • An error may flash, even if there are approximately 20 minutes remaining. (High temperature warning) Slow flashing • The temperature of your camcorder is extremely high.... Fast flashing* • The temperature of your camcorder. (Warning on the hard disk of the camcorder)* Fast flashing • An error may have occurred with the hard disk drive in a cool place. Turn off your camcorder and leave it for a while in your...

Operating Guide
Page 35
...• Do not exert excessive pressure on the LCD screen, as it may cause damage. • If your camcorder for a long time • Periodically turn it on and let it run such as by placing anything heavy on the product. Use cleaning paper moistened with ... camcorder and have contacted your local authorized Sony service facility. - Sometimes this malfunction cannot be repaired. • If any further. • Avoid rough handling, disassembling, modifying, physical shock, or impact such as hammering, dropping or stepping on it . Be particularly careful of the viewfinder (HDR-SR7...
...• Do not exert excessive pressure on the LCD screen, as it may cause damage. • If your camcorder for a long time • Periodically turn it on and let it run such as by placing anything heavy on the product. Use cleaning paper moistened with ... camcorder and have contacted your local authorized Sony service facility. - Sometimes this malfunction cannot be repaired. • If any further. • Avoid rough handling, disassembling, modifying, physical shock, or impact such as hammering, dropping or stepping on it . Be particularly careful of the viewfinder (HDR-SR7...
Service Manual
Page 8
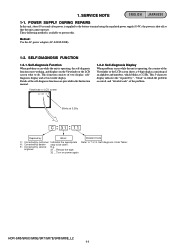
...). 1-2. Self-diagnosis Function When problems occur while the unit is supplied to do. Viewfinder or LCD screen C : 3 1 : 1 1 1-2-2. HDR-SR5/SR5C/SR5E/SR7/SR7E/SR8/SR8E_L2 1-1 Refer to prevent this unit, about 10 seconds after power is operating, the self-diagnosis function starts working, and...following method is shut off so that the unit cannot operate. Details of two display; E.g. 31 ....Reload the tape. 32 ....Turn on the Viewfinder or the LCD screen what to the battery terminal using the regulated power supply (8.4V), the power is available to "1-2-3....
...). 1-2. Self-diagnosis Function When problems occur while the unit is supplied to do. Viewfinder or LCD screen C : 3 1 : 1 1 1-2-2. HDR-SR5/SR5C/SR5E/SR7/SR7E/SR8/SR8E_L2 1-1 Refer to prevent this unit, about 10 seconds after power is operating, the self-diagnosis function starts working, and...following method is shut off so that the unit cannot operate. Details of two display; E.g. 31 ....Reload the tape. 32 ....Turn on the Viewfinder or the LCD screen what to the battery terminal using the regulated power supply (8.4V), the power is available to "1-2-3....


