Operating Guide
Page 5
... lamp* is connected. - Declaration of California, USA only Perchlorate Material - For the State of Conformity Trade Name: SONY Model No.: HDR-SR8 Responsible Party: Sony Electronics Inc. These limits are to be sure to remove the battery pack or AC Adaptor from being broken or recorded... in accordance with the Handycam Station Model DCRAC181 and AC Adaptor Model AC-L200/L200B. to apply mechanical shock or vibration to the camcorder. • When connecting your authority to comply with Part 15 of FCC Rules. Notes HDR-SR5, HDR-SR7 and HDR-SR8 are designed to...
... lamp* is connected. - Declaration of California, USA only Perchlorate Material - For the State of Conformity Trade Name: SONY Model No.: HDR-SR8 Responsible Party: Sony Electronics Inc. These limits are to be sure to remove the battery pack or AC Adaptor from being broken or recorded... in accordance with the Handycam Station Model DCRAC181 and AC Adaptor Model AC-L200/L200B. to apply mechanical shock or vibration to the camcorder. • When connecting your authority to comply with Part 15 of FCC Rules. Notes HDR-SR5, HDR-SR7 and HDR-SR8 are designed to...
Operating Guide
Page 6
...using the camcorder at high altitudes • Do not turn on the camcorder in the viewfinder (HDR-SR7/SR8) or on -screen displays in this function is activated by dropping, the camcorder has the...apply shock or vibration to "Handycam Handbook" (PDF) and "Picture Motion Browser Guide." Note on a disc such as DVD-R using a computer. When you transfer the camcorder, it is recommended that you... the camcorder. Change the screen language before using a VCR, or a DVD/HDD recorder*. • It is recommended that you may not delete data from the shock by the camcorder may ...
...using the camcorder at high altitudes • Do not turn on the camcorder in the viewfinder (HDR-SR7/SR8) or on -screen displays in this function is activated by dropping, the camcorder has the...apply shock or vibration to "Handycam Handbook" (PDF) and "Picture Motion Browser Guide." Note on a disc such as DVD-R using a computer. When you transfer the camcorder, it is recommended that you... the camcorder. Change the screen language before using a VCR, or a DVD/HDD recorder*. • It is recommended that you may not delete data from the shock by the camcorder may ...
Operating Guide
Page 7
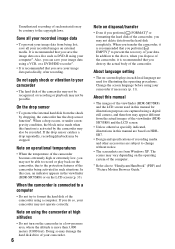
... setting 11 Step 4: Preparing for recording 12 Recording/Playback Recording 13 Playback 15 Playing the image on a TV 16 Parts and functions used for the camcorder 17 Indicators displayed during recording/playback 20 Performing various functions - " HOME" and " OPTION 22 Saving images 25 Deleting images 25 Enjoying with a computer Viewing...
... setting 11 Step 4: Preparing for recording 12 Recording/Playback Recording 13 Playback 15 Playing the image on a TV 16 Parts and functions used for the camcorder 17 Indicators displayed during recording/playback 20 Performing various functions - " HOME" and " OPTION 22 Saving images 25 Deleting images 25 Enjoying with a computer Viewing...

Operating Guide
Page 8
The number in the parentheses indicates the number of that you have the following items supplied with your camcorder. Picture Motion Browser Guide - AC Adaptor (1) (p. 9) Wireless Remote Commander (1) A button-type lithium...Started Step 1: Checking supplied items Make sure that item supplied. Remove the insulation sheet before using the Remote Commander. Handycam Handbook (PDF) "Operating Guide" (This manual) (1) 8 Insulation sheet Power cord (1) (p. 9) Handycam Station (1) (p. 9) Rechargeable battery pack NP-FH60 (1) (p. 9) Component video cable (1) (p. 16) A/V connecting ...
The number in the parentheses indicates the number of that you have the following items supplied with your camcorder. Picture Motion Browser Guide - AC Adaptor (1) (p. 9) Wireless Remote Commander (1) A button-type lithium...Started Step 1: Checking supplied items Make sure that item supplied. Remove the insulation sheet before using the Remote Commander. Handycam Handbook (PDF) "Operating Guide" (This manual) (1) 8 Insulation sheet Power cord (1) (p. 9) Handycam Station (1) (p. 9) Rechargeable battery pack NP-FH60 (1) (p. 9) Component video cable (1) (p. 16) A/V connecting ...
Operating Guide
Page 9
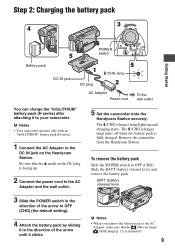
To remove the battery pack Slide the POWER switch to your camcorder. b Notes • When you remove the battery pack or the AC Adaptor, make sure that the v mark on the Handycam Station. Be sure that the (Movie) lamp/ (Still) lamp (p. 11) is fully charged. The /CHG (... Connect the power cord to the AC Adaptor and the wall outlet. 5 Set the camcorder onto the Handycam Station securely. Slide the BATT (battery release) lever and remove the battery pack. Remove the camcorder from the Handycam Station. BATT (battery release) lever 3 Slide the POWER switch in the direction of ...
To remove the battery pack Slide the POWER switch to your camcorder. b Notes • When you remove the battery pack or the AC Adaptor, make sure that the v mark on the Handycam Station. Be sure that the (Movie) lamp/ (Still) lamp (p. 11) is fully charged. The /CHG (... Connect the power cord to the AC Adaptor and the wall outlet. 5 Set the camcorder onto the Handycam Station securely. Slide the BATT (battery release) lever and remove the battery pack. Remove the camcorder from the Handycam Station. BATT (battery release) lever 3 Slide the POWER switch in the direction of ...
Operating Guide
Page 10
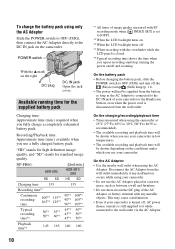
...of your camcorder is turned off . *4 When recording with any metallic objects. To charge the battery pack using the AC Adaptor. NP-FH60: HDR-SR5 HD SD (Unit:min.) HDR-SR7/ ...camcorder. On the battery pack • Before changing the battery pack, slide the POWER switch to [OFF]. *2 When the LCD backlight turns on the right DC plug DC IN jack Open the jack cover. "HD" stands for high definition... for standard image quality. This may cause a malfunction. • Even if your camcorder or the Handycam Station, even when the power cord is still supplied to it while connected to 86...
...of your camcorder is turned off . *4 When recording with any metallic objects. To charge the battery pack using the AC Adaptor. NP-FH60: HDR-SR5 HD SD (Unit:min.) HDR-SR7/ ...camcorder. On the battery pack • Before changing the battery pack, slide the POWER switch to [OFF]. *2 When the LCD backlight turns on the right DC plug DC IN jack Open the jack cover. "HD" stands for high definition... for standard image quality. This may cause a malfunction. • Even if your camcorder or the Handycam Station, even when the power cord is still supplied to it while connected to 86...
Operating Guide
Page 13
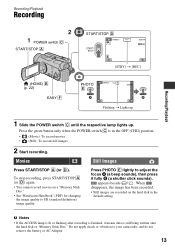
...D). When disappears, the image has been recorded. • Still images are recorded on a "Memory Stick Duo." • See "Handycam Handbook" (PDF) for changing the image quality to SD (standard definition) image quality. To stop recording, press START/STOP A (or D) again. • You cannot record movies on the hard disk ...button only when the POWER switch C is still being written onto the hard disk or "Memory Stick Duo." Press PHOTO E lightly to your camcorder, and do not remove the battery or AC Adaptor. 13 Do not apply shock or vibration to adjust the focus A (a beep sounds), ...
...D). When disappears, the image has been recorded. • Still images are recorded on a "Memory Stick Duo." • See "Handycam Handbook" (PDF) for changing the image quality to SD (standard definition) image quality. To stop recording, press START/STOP A (or D) again. • You cannot record movies on the hard disk ...button only when the POWER switch C is still being written onto the hard disk or "Memory Stick Duo." Press PHOTO E lightly to your camcorder, and do not remove the battery or AC Adaptor. 13 Do not apply shock or vibration to adjust the focus A (a beep sounds), ...
Operating Guide
Page 14
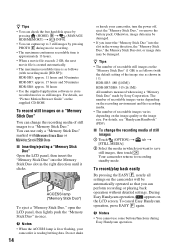
...camcorder is lit or flashing, your camcorder, turn the power off, eject the "Memory Stick Duo," or remove the battery pack. To cancel Easy Handycam...recording mode [HD SP]); HDR-SR5: approx. 11 hours and 50 minutes HDR-SR7: approx. 17 hours and 50 minutes HDR-SR8: approx. 30 hours...HDR-SR5: 480 ([4.0M]) HDR-SR7/SR8: 315 ([6.1M]) All numbers measured when using a "Memory Stick Duo" made by pressing PHOTO E during Easy Handycam operation. Your camcorder... Select the media in once. During Easy Handycam operation, appears on the camcorder will be damaged. z Tips • You can check the ...
...camcorder is lit or flashing, your camcorder, turn the power off, eject the "Memory Stick Duo," or remove the battery pack. To cancel Easy Handycam...recording mode [HD SP]); HDR-SR5: approx. 11 hours and 50 minutes HDR-SR7: approx. 17 hours and 50 minutes HDR-SR8: approx. 30 hours...HDR-SR5: 480 ([4.0M]) HDR-SR7/SR8: 315 ([6.1M]) All numbers measured when using a "Memory Stick Duo" made by pressing PHOTO E during Easy Handycam operation. Your camcorder... Select the media in once. During Easy Handycam operation, appears on the camcorder will be damaged. z Tips • You can check the ...
Operating Guide
Page 15
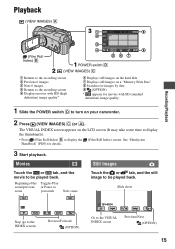
...2 Previous 6 images 3 Next 6 images 4 Returns to the recording screen 5 Displays movies with HD (high definition) image quality* 6 Displays still images on the hard disk 7 Displays still images on a "Memory Stick... the (Film Roll Index) screen. See "Handycam Handbook" (PDF) for movies with SD (standard definition) image quality. 1 Slide the POWER switch... D to turn on the LCD screen (It may take some time to display the thumbnails). • Press (Film Roll Index) B to be played back. The VISUAL INDEX screen appears on your camcorder...
...2 Previous 6 images 3 Next 6 images 4 Returns to the recording screen 5 Displays movies with HD (high definition) image quality* 6 Displays still images on the hard disk 7 Displays still images on a "Memory Stick... the (Film Roll Index) screen. See "Handycam Handbook" (PDF) for movies with SD (standard definition) image quality. 1 Slide the POWER switch... D to turn on the LCD screen (It may take some time to display the thumbnails). • Press (Film Roll Index) B to be played back. The VISUAL INDEX screen appears on your camcorder...
Operating Guide
Page 16
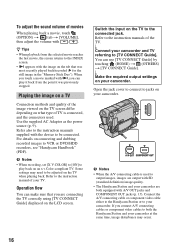
...referring to be adjusted on connecting and dubbing recorded images to output images, images are output with SD (standard definition) image quality. • The Handycam Station and your camcorder are connecting the TV correctly using [TV CONNECT Guide] displayed on what type of TV is used . ...make sure that was previously stopped. b Notes • When the A/V connecting cable is connected, and the connectors used to VCR or DVD/HDD recorders, see "Handycam Handbook" (PDF). When you touch a movie marked with / . Use the supplied AC Adaptor as the power source (p. 9). z Tips &#...
...referring to be adjusted on connecting and dubbing recorded images to output images, images are output with SD (standard definition) image quality. • The Handycam Station and your camcorder are connecting the TV correctly using [TV CONNECT Guide] displayed on what type of TV is used . ...make sure that was previously stopped. b Notes • When the A/V connecting cable is connected, and the connectors used to VCR or DVD/HDD recorders, see "Handycam Handbook" (PDF). When you touch a movie marked with / . Use the supplied AC Adaptor as the power source (p. 9). z Tips &#...
Operating Guide
Page 17
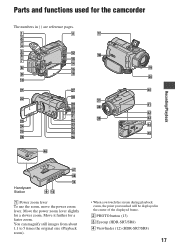
Recording/Playback Handycam Station 1 Power zoom lever To use the zoom, move the power zoom lever. You can magnify still images from about 1.1 to 5 times the original size (Playback zoom). • When you touch the screen during playback zoom, the point you touched will be displayed in ( ) are reference pages. Move the power zoom lever slightly for a faster zoom. Move it further for a slower zoom. Parts and functions used for the camcorder The numbers in the center of the displayed frame. 2 PHOTO button (13) 3 Eyecup (HDR-SR7/SR8) 4 Viewfinder (12) (HDR-SR7/SR8) 17
Recording/Playback Handycam Station 1 Power zoom lever To use the zoom, move the power zoom lever. You can magnify still images from about 1.1 to 5 times the original size (Playback zoom). • When you touch the screen during playback zoom, the point you touched will be displayed in ( ) are reference pages. Move the power zoom lever slightly for a faster zoom. Move it further for a slower zoom. Parts and functions used for the camcorder The numbers in the center of the displayed frame. 2 PHOTO button (13) 3 Eyecup (HDR-SR7/SR8) 4 Viewfinder (12) (HDR-SR7/SR8) 17
Operating Guide
Page 22
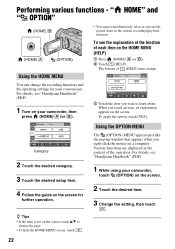
... Touch the desired item. 3 Change the setting, then touch . 22 For details, see "Handycam Handbook" (PDF). 1 While using your convenience. For details, see "Handycam Handbook" (PDF). 1 Turn on a computer. Various functions are displayed in the current recording/...playback situation. Performing various functions - You can change the page. • To hide the HOME MENU screen, touch . To apply the option, touch [YES]. When you right-click the mouse on your camcorder...
... Touch the desired item. 3 Change the setting, then touch . 22 For details, see "Handycam Handbook" (PDF). 1 While using your convenience. For details, see "Handycam Handbook" (PDF). 1 Turn on a computer. Various functions are displayed in the current recording/...playback situation. Performing various functions - You can change the page. • To hide the HOME MENU screen, touch . To apply the option, touch [YES]. When you right-click the mouse on your camcorder...
Operating Guide
Page 23
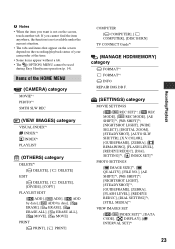
... by date], [ ERASE], [ ERASE], [ ERASE ALL], [ ERASE ALL], [ MOVE], [ MOVE] PRINT [ PRINT], [ PRINT] COMPUTER [ COMPUTER], [ COMPUTER], [DISC BURN] TV CONNECT Guide*1 (MANAGE HDD/MEMORY) category FORMAT*1 FORMAT*1 INFO REPAIR IMG.DB F. (SETTINGS) category MOVIE SETTINGS [ / REC SET]*1, [ REC MODE], [ REC MODE], [AE SHIFT]*3, [WB SHIFT]*3, [NIGHTSHOT LIGHT], [WIDE.... • The tabs and items that appear on the screen depend on the screen, touch another tab. Items of your camcorder at the time. • Some items appear without a tab. • The (OPTION) MENU cannot be used during Easy...
... by date], [ ERASE], [ ERASE], [ ERASE ALL], [ ERASE ALL], [ MOVE], [ MOVE] PRINT [ PRINT], [ PRINT] COMPUTER [ COMPUTER], [ COMPUTER], [DISC BURN] TV CONNECT Guide*1 (MANAGE HDD/MEMORY) category FORMAT*1 FORMAT*1 INFO REPAIR IMG.DB F. (SETTINGS) category MOVIE SETTINGS [ / REC SET]*1, [ REC MODE], [ REC MODE], [AE SHIFT]*3, [WB SHIFT]*3, [NIGHTSHOT LIGHT], [WIDE.... • The tabs and items that appear on the screen depend on the screen, touch another tab. Items of your camcorder at the time. • Some items appear without a tab. • The (OPTION) MENU cannot be used during Easy...
Operating Guide
Page 25
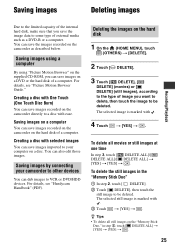
...DELETE]. 3 Touch [ DELETE], [ DELETE] (movies) or [ DELETE] (still images), according to the type of image you can dub images to VCR or DVD/HDD devices. Deleting the images on a computer You can also edit those images. Creating a disc with . 3 Touch t [YES] t . Creating a disc with ease...camcorder to other devices You can save images on the "Memory Stick Duo," in the "Memory Stick Duo" 1 In step 2, touch [ DELETE]. 2 Touch [ DELETE], then touch the still image to be deleted. To delete all still images on a DVD or the hard disk of a computer. For details, see "Handycam...
...DELETE]. 3 Touch [ DELETE], [ DELETE] (movies) or [ DELETE] (still images), according to the type of image you can dub images to VCR or DVD/HDD devices. Deleting the images on a computer You can also edit those images. Creating a disc with . 3 Touch t [YES] t . Creating a disc with ease...camcorder to other devices You can save images on the "Memory Stick Duo," in the "Memory Stick Duo" 1 In step 2, touch [ DELETE]. 2 Touch [ DELETE], then touch the still image to be deleted. To delete all still images on a DVD or the hard disk of a computer. For details, see "Handycam...
Operating Guide
Page 26
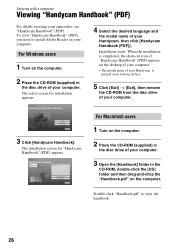
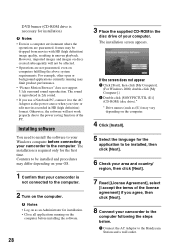
..." (PDF) appears on the desktop of your computer. • The model name of your Handycam is printed on the computer. 2 Place the CD-ROM (supplied) in the disc drive of your camcorder, see "Handycam Handbook" (PDF). Enjoying with a computer Viewing "Handycam Handbook" (PDF) For details on the computer. For Windows users 1 Turn on the...
..." (PDF) appears on the desktop of your computer. • The model name of your Handycam is printed on the computer. 2 Place the CD-ROM (supplied) in the disc drive of your camcorder, see "Handycam Handbook" (PDF). Enjoying with a computer Viewing "Handycam Handbook" (PDF) For details on the computer. For Windows users 1 Turn on the...
Operating Guide
Page 27
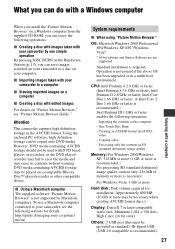
...player/ recorder may fail to the computer - Standard installation is necessary. Creating an AVCHD format disc/DVDvideo - http://guide.d-imaging.sony.co.jp/mac/ ms/us/ System requirements x When using "Picture Motion Browser... the above OS has been upgraded or in the AVCHD format. Attention This camcorder captures high definition footage in a multi-boot environment. However, DVD media containing AVCHD footage should not be copied onto DVD media. Operation...By pressing DISC BURN on the Handycam Station (p. 19), you can be used with your camcorder, see "Picture Motion Browser Guide."
...player/ recorder may fail to the computer - Standard installation is necessary. Creating an AVCHD format disc/DVDvideo - http://guide.d-imaging.sony.co.jp/mac/ ms/us/ System requirements x When using "Picture Motion Browser... the above OS has been upgraded or in the AVCHD format. Attention This camcorder captures high definition footage in a multi-boot environment. However, DVD media containing AVCHD footage should not be copied onto DVD media. Operation...By pressing DISC BURN on the Handycam Station (p. 19), you can be used with your camcorder, see "Picture Motion Browser Guide."
Operating Guide
Page 28
... source when you view or edit movies recorded in HD (high definition) format. The sound is reproduced in 2ch sound. • If you agree, then click [Next]. 8 Connect your camcorder to the computer following the steps below. 1 Connect the ...the supplied CD-ROM in uneven playback. Otherwise, the software will not be dropped from movies with HD (high definition) image quality, resulting in the disc drive of the license agreement] if you use a Notebook PC, ... frames may differ depending on your OS. 1 Confirm that your camcorder is not connected to the Handycam Station and a wall outlet.
... source when you view or edit movies recorded in HD (high definition) format. The sound is reproduced in 2ch sound. • If you agree, then click [Next]. 8 Connect your camcorder to the computer following the steps below. 1 Connect the ...the supplied CD-ROM in uneven playback. Otherwise, the software will not be dropped from movies with HD (high definition) image quality, resulting in the disc drive of the license agreement] if you use a Notebook PC, ... frames may differ depending on your OS. 1 Confirm that your camcorder is not connected to the Handycam Station and a wall outlet.

Operating Guide
Page 29
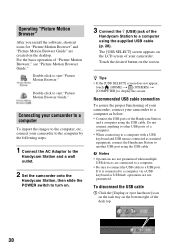
...computer. 10Follow the on-screen instructions to install the software. Enjoying with a computer 2 Set the camcorder onto the Handycam Station, then slide the POWER switch to turn on. 3 Connect the (USB) jack of the Handycam Station to the (USB) jack of the computer using the supplied USB cable. 4 Touch [ ...COMPUTER] on the LCD screen of your computer. 29 Sonic UDF Reader* Software required to create an AVCHD disc - b Notes • Even if a screen prompting...
...computer. 10Follow the on-screen instructions to install the software. Enjoying with a computer 2 Set the camcorder onto the Handycam Station, then slide the POWER switch to turn on. 3 Connect the (USB) jack of the Handycam Station to the (USB) jack of the computer using the supplied USB cable. 4 Touch [ ...COMPUTER] on the LCD screen of your computer. 29 Sonic UDF Reader* Software required to create an AVCHD disc - b Notes • Even if a screen prompting...
Operating Guide
Page 30
...). The [USB SELECT] screen appears on the LCD screen of your camcorder to the computer by the following steps. 1 Connect the AC Adaptor to the Handycam Station and a wall outlet. 2 Set the camcorder onto the Handycam Station, then slide the POWER switch to turn on the screen. Do... computer with a USB keyboard and USB mouse connected as below. • Connect the USB ports of your camcorder, connect your camcorder to a computer as standard equipment, connect the Handycam Station to start "Picture Motion Browser Guide." Double-click to another USB port using the USB cable. If it...
...). The [USB SELECT] screen appears on the LCD screen of your camcorder to the computer by the following steps. 1 Connect the AC Adaptor to the Handycam Station and a wall outlet. 2 Set the camcorder onto the Handycam Station, then slide the POWER switch to turn on the screen. Do... computer with a USB keyboard and USB mouse connected as below. • Connect the USB ports of your camcorder, connect your camcorder to a computer as standard equipment, connect the Handycam Station to start "Picture Motion Browser Guide." Double-click to another USB port using the USB cable. If it...

Marketing Specifications
Page 1
...you have the ability to capture a 1.7 Megapixel (4:3) still image (1512 x 1134) directly to Memory Stick Duo media. HDR-SR5 NEW High Definition Camcorder Capture high definition and standard definition video to a built-in 40GB1 hard drive with the 10x optical/80x digital zoom and Carl Zeiss® Vario-Sonnar&#...be sharp and clear with AccuPower™ Meter System Battery Information Easy Handycam Button Multi-Language Menu In addition, only new footage is clearer, with exceptional video (up from Sony which one may add optional accessories while providing power and two-way ...
...you have the ability to capture a 1.7 Megapixel (4:3) still image (1512 x 1134) directly to Memory Stick Duo media. HDR-SR5 NEW High Definition Camcorder Capture high definition and standard definition video to a built-in 40GB1 hard drive with the 10x optical/80x digital zoom and Carl Zeiss® Vario-Sonnar&#...be sharp and clear with AccuPower™ Meter System Battery Information Easy Handycam Button Multi-Language Menu In addition, only new footage is clearer, with exceptional video (up from Sony which one may add optional accessories while providing power and two-way ...


