Operating Instructions
Page 29
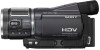
...lights up in red during recording (p. 60). Remote sensor Point the Remote Commander (p. 34) towards the remote sensor to operate your camcorder. Speaker Sounds come out from the speaker. • For how to display in the selected format and battery information appear for up...in the center of the displayed frame. Adjust the magnification with W (Wide angle)/T (Telephoto). To initialize the settings Press RESET to initialize all the settings, including the setting of the date and time. (Menu items customized on the LCD frame. Recording/Playback ...
...lights up in red during recording (p. 60). Remote sensor Point the Remote Commander (p. 34) towards the remote sensor to operate your camcorder. Speaker Sounds come out from the speaker. • For how to display in the selected format and battery information appear for up...in the center of the displayed frame. Adjust the magnification with W (Wide angle)/T (Telephoto). To initialize the settings Press RESET to initialize all the settings, including the setting of the date and time. (Menu items customized on the LCD frame. Recording/Playback ...

Operating Instructions
Page 34
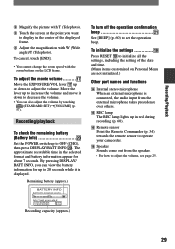
...want to stop playback. 3 Press REW . Playback starts from the point designated "0:00:00" on the tape. The tape counter is reset to "0:00:00" and appears on the screen. 6 0 min 0:00:00 P-MENU If the tape counter is a blank section between recorded ...DISPLAY (p. 19) Memory control buttons (Index, -/+, Memory playback) (p. 25) • Aim the Remote Commander towards the remote sensor to operate your camcorder (p. 34 29). • To change the battery, see page 110. Searching quickly for a desired scene (Zero set memory will not function correctly if there ...
...want to stop playback. 3 Press REW . Playback starts from the point designated "0:00:00" on the tape. The tape counter is reset to "0:00:00" and appears on the screen. 6 0 min 0:00:00 P-MENU If the tape counter is a blank section between recorded ...DISPLAY (p. 19) Memory control buttons (Index, -/+, Memory playback) (p. 25) • Aim the Remote Commander towards the remote sensor to operate your camcorder (p. 34 29). • To change the battery, see page 110. Searching quickly for a desired scene (Zero set memory will not function correctly if there ...

Operating Instructions
Page 48
... default setting is not used. The right side of the picture while the right area shows the brighter areas. To cancel the count down, touch [RESET]. CAMERA SET menu (Continued) 80 Pixels Darker Brighter Brightness • The left area on a tape. The zooming zone appears when you select the zooming level...
... default setting is not used. The right side of the picture while the right area shows the brighter areas. To cancel the count down, touch [RESET]. CAMERA SET menu (Continued) 80 Pixels Darker Brighter Brightness • The left area on a tape. The zooming zone appears when you select the zooming level...

Operating Instructions
Page 51
... same folder will be set as the number of recordable pictures on a "Memory Stick Duo." The file number is reset when a new folder is created or the recording folder is completed, and all the images will have to 999MSDCF) on ...to format the "Memory Stick Duo" (p. 51), or delete them using your computer. • The number of folders increases. RESET Resets the file number to be deleted. • Do not do any of 9999 images are saved in the 101MSDCF folder.... created. Touch [YES] . • You cannot delete the created folders using your camcorder.
... same folder will be set as the number of recordable pictures on a "Memory Stick Duo." The file number is reset when a new folder is created or the recording folder is completed, and all the images will have to 999MSDCF) on ...to format the "Memory Stick Duo" (p. 51), or delete them using your computer. • The number of folders increases. RESET Resets the file number to be deleted. • Do not do any of 9999 images are saved in the 101MSDCF folder.... created. Touch [YES] . • You cannot delete the created folders using your camcorder.

Operating Instructions
Page 63
If the desired menu item is not displayed, touch / . 63 Initializing the Personal Menu settings (Reset) Touch [P-MENU SET UP] [RESET][YES][YES] . If the desired menu item is not displayed, touch / . 2 Touch the menu item you want to move. 3 Touch / to the desired place. 4 Touch . Using the Menu Arranging the order of menu items displayed on Personal Menu 1 Touch [P-MENU SET UP] [SORT]. To sort more items, repeat steps 2 to 4. 5 Touch [END] . • You cannot move the menu item to move [P-MENU SET UP].
If the desired menu item is not displayed, touch / . 63 Initializing the Personal Menu settings (Reset) Touch [P-MENU SET UP] [RESET][YES][YES] . If the desired menu item is not displayed, touch / . 2 Touch the menu item you want to move. 3 Touch / to the desired place. 4 Touch . Using the Menu Arranging the order of menu items displayed on Personal Menu 1 Touch [P-MENU SET UP] [SORT]. To sort more items, repeat steps 2 to 4. 5 Touch [END] . • You cannot move the menu item to move [P-MENU SET UP].

Operating Instructions
Page 81
...). • Use the AC Adaptor to connect to a wall outlet (p. 13). Troubleshooting If you do not work, press the RESET button (p. 29) using your camcorder (p. 21, 22). Batteries/Power sources The power abruptly turns off (A.SHUT OFF). The CHG (charge) lamp flashes while the ...POWER switch up to OFF (CHG) (p. 13). • Attach the battery pack to the camcorder correctly (p. 13). • No power is supplied from the wall outlet and contact your Sony dealer. The camcorder does not operate even when the power is completed (p. 13). If the problem persists, disconnect the...
...). • Use the AC Adaptor to connect to a wall outlet (p. 13). Troubleshooting If you do not work, press the RESET button (p. 29) using your camcorder (p. 21, 22). Batteries/Power sources The power abruptly turns off (A.SHUT OFF). The CHG (charge) lamp flashes while the ...POWER switch up to OFF (CHG) (p. 13). • Attach the battery pack to the camcorder correctly (p. 13). • No power is supplied from the wall outlet and contact your Sony dealer. The camcorder does not operate even when the power is completed (p. 13). If the problem persists, disconnect the...

Operating Instructions
Page 96
... remaining. (Moisture condensation warning)* • Eject the cassette, remove the power source, and then leave it again and operate your camcorder again. Reconnect it for at least 1 hour, then reinsert the cassette (p. 108). Use an "InfoLITHIUM" battery pack (p. 105). •... flash, even if there are not described above have tried a couple of times, contact your Sony dealer or local authorized Sony service facility. Press RESET (p. 29), and operate your camcorder for about 1 hour with the cassette lid open (p. 108). (Warning indicator pertaining to "Memory Stick ...
... remaining. (Moisture condensation warning)* • Eject the cassette, remove the power source, and then leave it again and operate your camcorder again. Reconnect it for at least 1 hour, then reinsert the cassette (p. 108). Use an "InfoLITHIUM" battery pack (p. 105). •... flash, even if there are not described above have tried a couple of times, contact your Sony dealer or local authorized Sony service facility. Press RESET (p. 29), and operate your camcorder for about 1 hour with the cassette lid open (p. 108). (Warning indicator pertaining to "Memory Stick ...

Operating Instructions
Page 114
.../DV Interface (i.LINK) jack (72) (USB) jack (72) DISPLAY/BATT INFO button (29) COMPONENT OUT jack (72) A/V OUT jack (72) RESET button (29) Eyecup Viewfinder (18) Viewfinder lens adjustment lever (18) LANC jack (72) CHG (charge) lamp...) AUTO LOCK switch (27) Battery pack (13) DC IN jack (72) Attaching the shoulder strap Attach the shoulder strap supplied with your camcorder to the hooks for the shoulder strap. 114
.../DV Interface (i.LINK) jack (72) (USB) jack (72) DISPLAY/BATT INFO button (29) COMPONENT OUT jack (72) A/V OUT jack (72) RESET button (29) Eyecup Viewfinder (18) Viewfinder lens adjustment lever (18) LANC jack (72) CHG (charge) lamp...) AUTO LOCK switch (27) Battery pack (13) DC IN jack (72) Attaching the shoulder strap Attach the shoulder strap supplied with your camcorder to the hooks for the shoulder strap. 114
Operating Instructions
Page 117
... Image size (IMAGE SIZE 49 Still image 49 Index screen 25 Index screen display button 31 Indicators 32 INDOOR 45 "InfoLITHIUM" battery pack 105 Initialize (Reset 29 Insulation sheet 34 Internal microphone 29 INT.REC-STL (Interval photo recording 54 i.LINK 106 i.LINK cable 64, 78 i.LINK CONV 36, 59 J Jack... folder) ........ 51 FORMAT 51, 103 Frame-by-frame playback.... 55 Full charge 14 G Grip belt 16 GUIDEFRAME 60 H HDV1080i 10, 56 HDV format 56 HD (high definition) image quality 36 Headphones jack 72 HISTOGRAM 47, 92 Holding the...
... Image size (IMAGE SIZE 49 Still image 49 Index screen 25 Index screen display button 31 Indicators 32 INDOOR 45 "InfoLITHIUM" battery pack 105 Initialize (Reset 29 Insulation sheet 34 Internal microphone 29 INT.REC-STL (Interval photo recording 54 i.LINK 106 i.LINK cable 64, 78 i.LINK CONV 36, 59 J Jack... folder) ........ 51 FORMAT 51, 103 Frame-by-frame playback.... 55 Full charge 14 G Grip belt 16 GUIDEFRAME 60 H HDV1080i 10, 56 HDV format 56 HD (high definition) image quality 36 Headphones jack 72 HISTOGRAM 47, 92 Holding the...

Operating Instructions
Page 118
... 33 REC START/STOP 24 REDEYE REDUC 46 REMAINING 60 Remaining battery 30 Remote Commander 34 REMOTE CTRL (Remote control 60 Remote sensor 29 RESET button 29 Reversal Playback 55 Review button 30 S SD (standard definition) image quality 36 Searching for the starting point 33 Self... PASTEL 53 PB FOLDER (Playback folder 51 PB zoom 28 Personal Menu 40, 62 Add 62 Arrange the order.......... 63 Customize 62 Delete 62 Reset 63 Use 40 Personal Menu button .......... 30 PHOTO button 24, 34 PictBridge 70 PictBridge PRINT 70 Picture Search 25 PICT.APPLI. EFFECT (Picture...
... 33 REC START/STOP 24 REDEYE REDUC 46 REMAINING 60 Remaining battery 30 Remote Commander 34 REMOTE CTRL (Remote control 60 Remote sensor 29 RESET button 29 Reversal Playback 55 Review button 30 S SD (standard definition) image quality 36 Searching for the starting point 33 Self... PASTEL 53 PB FOLDER (Playback folder 51 PB zoom 28 Personal Menu 40, 62 Add 62 Arrange the order.......... 63 Customize 62 Delete 62 Reset 63 Use 40 Personal Menu button .......... 30 PHOTO button 24, 34 PictBridge 70 PictBridge PRINT 70 Picture Search 25 PICT.APPLI. EFFECT (Picture...


