
Operating Guide
Page 8
... on other devices You cannot play back a tape recorded in this manual Features available for the HDV format only Features available for illustrating the operating procedures. About this manual • The images of recording media and other devices. Change the screen language... other accessories are used for the DV format only This function that can be used in the HDV format on DV format video cameras or on this manual for illustration purposes are captured using your camcorder if necessary (p. 25). • Design and specifications of the LCD screen and the viewfinder used ...
... on other devices You cannot play back a tape recorded in this manual Features available for the HDV format only Features available for illustrating the operating procedures. About this manual • The images of recording media and other devices. Change the screen language... other accessories are used for the DV format only This function that can be used in the HDV format on DV format video cameras or on this manual for illustration purposes are captured using your camcorder if necessary (p. 25). • Design and specifications of the LCD screen and the viewfinder used ...
Operating Guide
Page 9
...INSTRUCTIONS 3 Read this first 5 Enjoying pictures with high definition quality Trying out the new HDV format 12 Features of this camcorder 13 Handy Functions for Recording 14 Viewing video recorded in the HDV format 15 Getting Started Step 1: Checking supplied items 16 Step 2: Attaching the lens hood... with lens cover 17 Step 3: Charging the battery pack 18 Step 4: Turning the power on and holding your camcorder properly .....21 Step 5: Adjusting the...
...INSTRUCTIONS 3 Read this first 5 Enjoying pictures with high definition quality Trying out the new HDV format 12 Features of this camcorder 13 Handy Functions for Recording 14 Viewing video recorded in the HDV format 15 Getting Started Step 1: Checking supplied items 16 Step 2: Attaching the lens hood... with lens cover 17 Step 3: Charging the battery pack 18 Step 4: Turning the power on and holding your camcorder properly .....21 Step 5: Adjusting the...

Operating Guide
Page 10
...the screen 52 Displaying recording data (Data code 52 Displaying the settings in your camcorder (Status check 53 Checking the remaining battery (Battery Info 53 Locating a scene ... the Menu Using the menu items 62 Menu items 64 (CAMERA SET) menu 66 Settings to adjust your camcorder to the recording conditions (GAIN SETUP/ BACK LIGHT/STEADYSHOT, etc.) (AUDIO SET) menu 73 Settings for the...(MARKER/VF B.LIGHT/DISP OUTPUT, etc.) (IN/OUT REC) menu 77 Recording settings, input and output settings (VCR HDV/DV/DV REC MODE/ DV WIDE REC/ TV TYPE, etc.) (MEMORY SET) menu 80 Settings for the "Memory...
...the screen 52 Displaying recording data (Data code 52 Displaying the settings in your camcorder (Status check 53 Checking the remaining battery (Battery Info 53 Locating a scene ... the Menu Using the menu items 62 Menu items 64 (CAMERA SET) menu 66 Settings to adjust your camcorder to the recording conditions (GAIN SETUP/ BACK LIGHT/STEADYSHOT, etc.) (AUDIO SET) menu 73 Settings for the...(MARKER/VF B.LIGHT/DISP OUTPUT, etc.) (IN/OUT REC) menu 77 Recording settings, input and output settings (VCR HDV/DV/DV REC MODE/ DV WIDE REC/ TV TYPE, etc.) (MEMORY SET) menu 80 Settings for the "Memory...

Operating Guide
Page 11
Troubleshooting Troubleshooting 94 Warning indicators and messages 104 Additional Information Using your camcorder abroad 107 Maintenance and precautions 110 HDV format and recording/playback 110 About the "Memory Stick 111 About the "InfoLITHIUM" battery pack 112 About i.LINK 113 About x.v.Color 114 About handling of your camcorder 115 Specifications 119 Quick Reference Identifying parts and controls 123 Indicators for the LCD screen and viewfinder 128 Index ...131 Spanish Quick Guide/Guía rápida en español 135 11
Troubleshooting Troubleshooting 94 Warning indicators and messages 104 Additional Information Using your camcorder abroad 107 Maintenance and precautions 110 HDV format and recording/playback 110 About the "Memory Stick 111 About the "InfoLITHIUM" battery pack 112 About i.LINK 113 About x.v.Color 114 About handling of your camcorder 115 Specifications 119 Quick Reference Identifying parts and controls 123 Indicators for the LCD screen and viewfinder 128 Index ...131 Spanish Quick Guide/Guía rápida en español 135 11

Operating Guide
Page 12
...lines • These operating instructions refer to specify. High image quality Being HDV format compliant, your camcorder is connected to a TV or VCR that is a need to the HDV1080i specification as HDV format unless there is not HDV1080i compliant. Enjoying pictures with high definition quality...shooting and playing back high definition images on popular DV standard cassette tapes. • Your camcorder adopts the HDV1080i specification, which utilizes 1,080 effective scanning lines, within the HDV standards, and records pictures at the image bit rate of the world, you to shoot ...
...lines • These operating instructions refer to specify. High image quality Being HDV format compliant, your camcorder is connected to a TV or VCR that is a need to the HDV1080i specification as HDV format unless there is not HDV1080i compliant. Enjoying pictures with high definition quality...shooting and playing back high definition images on popular DV standard cassette tapes. • Your camcorder adopts the HDV1080i specification, which utilizes 1,080 effective scanning lines, within the HDV standards, and records pictures at the image bit rate of the world, you to shoot ...

Operating Guide
Page 13
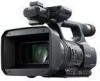
... manual control. - Superb spectroscopic characteristics and high definition are achieved by the use of three ClearVid CMOS sensors developed by Sony for high definition, enabling reproduction of digital high definition with excellent sensitivity and color reproducibility. 2 20 × optical zoom...definition quality. 3 Realistic sound recording with built-in high definition quality. 1 3-ClearVid CMOS sensor system installed This camcorder is provided by an i.LINK (HDV/DV) jack, an A/V Remote Connector (for serious filming Extensive manual setting functions allow you to shoot high ...
... manual control. - Superb spectroscopic characteristics and high definition are achieved by the use of three ClearVid CMOS sensors developed by Sony for high definition, enabling reproduction of digital high definition with excellent sensitivity and color reproducibility. 2 20 × optical zoom...definition quality. 3 Realistic sound recording with built-in high definition quality. 1 3-ClearVid CMOS sensor system installed This camcorder is provided by an i.LINK (HDV/DV) jack, an A/V Remote Connector (for serious filming Extensive manual setting functions allow you to shoot high ...

Operating Guide
Page 15
...page 58. Connecting to a computer (p. 91) x Copying movie from copying movie. x Connecting to HDV1080i non-compliant specification Use your camcorder to convert HDV format video to SD (standard definition) quality to DVD from tape to SD (standard definition) quality for details. 15 Viewing on a ...16:9 TV/4:3 TV (p. 59) Your camcorder can down convert video recorded in HD (high definition) quality. See page 91 for playback on a high definition TV (p. 57) Pictures recorded in the HDV format! Enjoying pictures with high definition quality Viewing video recorded ...
...page 58. Connecting to a computer (p. 91) x Copying movie from copying movie. x Connecting to HDV1080i non-compliant specification Use your camcorder to convert HDV format video to SD (standard definition) quality to DVD from tape to SD (standard definition) quality for details. 15 Viewing on a ...16:9 TV/4:3 TV (p. 59) Your camcorder can down convert video recorded in HD (high definition) quality. See page 91 for playback on a high definition TV (p. 57) Pictures recorded in the HDV format! Enjoying pictures with high definition quality Viewing video recorded ...

Operating Guide
Page 19
... battery The CHG lamp turns off and zooming. Charging time Approximate time (min.) required when you use the NP-F330 battery pack with this camcorder. Recording in the HDV format Battery pack NP-F570 (supplied) NP-F770 NP-F970 Continuous recording time 135 140 290 295 430 445 Typical recording time* 65...
... battery The CHG lamp turns off and zooming. Charging time Approximate time (min.) required when you use the NP-F330 battery pack with this camcorder. Recording in the HDV format Battery pack NP-F570 (supplied) NP-F770 NP-F970 Continuous recording time 135 140 290 295 430 445 Typical recording time* 65...

Operating Guide
Page 20
...to OFF (CHG). • The CHG lamp flashes during charging, or Battery Info (p. 53) will be correctly displayed under which you use your camcorder in a narrow space, such as shown in a warm place. - Replace the battery pack, or remove it and put it is disconnected from ... pack. This may cause a malfunction. • Even if your camcorder as between a wall and furniture. • Do not short-circuit the DC plug of your camcorder, even when the power cord (mains lead) is attached to your camcorder. HDV format pictures Battery pack NP-F570 (supplied) NP-F770 NP-F970 ...
...to OFF (CHG). • The CHG lamp flashes during charging, or Battery Info (p. 53) will be correctly displayed under which you use your camcorder in a narrow space, such as shown in a warm place. - Replace the battery pack, or remove it and put it is disconnected from ... pack. This may cause a malfunction. • Even if your camcorder as between a wall and furniture. • Do not short-circuit the DC plug of your camcorder, even when the power cord (mains lead) is attached to your camcorder. HDV format pictures Battery pack NP-F570 (supplied) NP-F770 NP-F970 ...

Operating Guide
Page 28
Do the following steps to CAMERA while pressing the green button. Slide the POWER switch while pressing the green button. 28 The factory setting is HDV format ([REC FORMAT] p. 77). 1 Open the shutter of the lens hood. 2 Slide the POWER switch to record movies. Recording/Playback Recording REC START/STOP button B PHOTO/EXPANDED FOCUS button Recording lamp Recording lamp Lens hood with lens cover POWER switch REC START/STOP button A Your camcorder records movies on tape and still images on "Memory Stick Duo." z Tips • This camcorder can record movies in HDV or DV format.
Do the following steps to CAMERA while pressing the green button. Slide the POWER switch while pressing the green button. 28 The factory setting is HDV format ([REC FORMAT] p. 77). 1 Open the shutter of the lens hood. 2 Slide the POWER switch to record movies. Recording/Playback Recording REC START/STOP button B PHOTO/EXPANDED FOCUS button Recording lamp Recording lamp Lens hood with lens cover POWER switch REC START/STOP button A Your camcorder records movies on tape and still images on "Memory Stick Duo." z Tips • This camcorder can record movies in HDV or DV format.

Operating Guide
Page 30
... your Remote Commander at the scene. When [PROG.SCAN] is slower than 1/48 - While using smooth slow rec - Playing back in HDV format: 1.2 M - Playing back in your camcorder with [PB ZOOM] set to [OFF] or [30] and the shutter speed is set to [ON] (p. 82). 30 Be sure... using the fader - A still image will hear the shutter click. • Image sizes of Sony's ClearVid CMOS sensor and image processing system (Enhanced Imaging Processor) allows for Sony "Memory Stick Duo." While using your camcorder. 1 Set the POWER switch to VCR. 2 Press the N(play) button to search for the...
... your Remote Commander at the scene. When [PROG.SCAN] is slower than 1/48 - While using smooth slow rec - Playing back in HDV format: 1.2 M - Playing back in your camcorder with [PB ZOOM] set to [OFF] or [30] and the shutter speed is set to [ON] (p. 82). 30 Be sure... using the fader - A still image will hear the shutter click. • Image sizes of Sony's ClearVid CMOS sensor and image processing system (Enhanced Imaging Processor) allows for Sony "Memory Stick Duo." While using your camcorder. 1 Set the POWER switch to VCR. 2 Press the N(play) button to search for the...

Operating Guide
Page 49
... Recording/Playback SEL/PUSH EXEC dial MEMORY/PLAY button MEMORY/INDEX button MEMORY/DELETE button You can play back movies recorded in which HDV format and DV format are mixed. • You cannot play back movies as follows. 1 Slide the POWER switch to VCR ...• X : PAUSE (Press N or X again to restart the playback) • m : REW (Rewind, review) • M : FF (Cue, fast forward) • y : SLOW b Notes • Your camcorder automatically goes into a stopped state when it is in pause for more than 3 minutes. • The screen may temporarily go blank losing images and sound...
... Recording/Playback SEL/PUSH EXEC dial MEMORY/PLAY button MEMORY/INDEX button MEMORY/DELETE button You can play back movies recorded in which HDV format and DV format are mixed. • You cannot play back movies as follows. 1 Slide the POWER switch to VCR ...• X : PAUSE (Press N or X again to restart the playback) • m : REW (Rewind, review) • M : FF (Cue, fast forward) • y : SLOW b Notes • Your camcorder automatically goes into a stopped state when it is in pause for more than 3 minutes. • The screen may temporarily go blank losing images and sound...
Operating Guide
Page 53
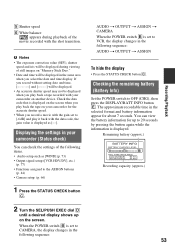
... a desired display shows up on another device. Check the data code that is displayed on the screen when you play back the tape on your camcorder (Status check) You can view the battery information for the accurate shutter speed. • When you play it back with your... t CAMERA When the POWER switch B is set to VCR, the display changes in your camcorder for up to 20 seconds by pressing the button again while the information is displayed as [WIND] (p. 73) • Output signal setup ([VCR HDV/DV], etc.) (p. 77) • Functions assigned to [-6dB] and play back a tape recorded...
... a desired display shows up on another device. Check the data code that is displayed on the screen when you play back the tape on your camcorder (Status check) You can view the battery information for the accurate shutter speed. • When you play it back with your... t CAMERA When the POWER switch B is set to VCR, the display changes in your camcorder for up to 20 seconds by pressing the button again while the information is displayed as [WIND] (p. 73) • Output signal setup ([VCR HDV/DV], etc.) (p. 77) • Functions assigned to [-6dB] and play back a tape recorded...

Operating Guide
Page 56
The TV may not recognize the video signal properly when changing [VCR HDV/DV] and [i.LINK CONV] settings after connecting with the device to be connected. Use the supplied AC Adaptor to the instruction manuals supplied with an i.LINK cable. 56 Jacks on your camcorder Open the jack cover and connect the cable. 1 2 3 b Notes • Make all menu settings on what type of TV is connected and connectors used. Refer also to obtain AC power (p. 18). A/V R HDMI OUT Playing the picture on a TV Connection methods and image quality differ depending on your camcorder before connecting.
The TV may not recognize the video signal properly when changing [VCR HDV/DV] and [i.LINK CONV] settings after connecting with the device to be connected. Use the supplied AC Adaptor to the instruction manuals supplied with an i.LINK cable. 56 Jacks on your camcorder Open the jack cover and connect the cable. 1 2 3 b Notes • Make all menu settings on what type of TV is connected and connectors used. Refer also to obtain AC power (p. 18). A/V R HDMI OUT Playing the picture on a TV Connection methods and image quality differ depending on your camcorder before connecting.

Operating Guide
Page 57
COMPONENT IN AUDIO A HHDDMMII i.LINK (for HDV1080i) B C Type Camcorder Cable TV A 2 Component A/V cable (supplied) (Green) Y (Blue) PB/CB (Red) PR/CR (White) (Red) : Signal flow Menu Setting (IN/OUT REC) menu t [VCR HDV/DV] t [AUTO] (p. 77) [COMPONENT] t [1080i/480i] (p. 79) b Notes • If you connect only component video plugs, audio signals are not...
COMPONENT IN AUDIO A HHDDMMII i.LINK (for HDV1080i) B C Type Camcorder Cable TV A 2 Component A/V cable (supplied) (Green) Y (Blue) PB/CB (Red) PR/CR (White) (Red) : Signal flow Menu Setting (IN/OUT REC) menu t [VCR HDV/DV] t [AUTO] (p. 77) [COMPONENT] t [1080i/480i] (p. 79) b Notes • If you connect only component video plugs, audio signals are not...

Operating Guide
Page 58
... i.LINK cable (p. 84) cannot be attached. 58 For details, confirm the specifications of your TV. • This camcorder has a 4-pin i.LINK terminal. C 1 i.LINK cable (optional) (IN/OUT REC) menu t [VCR HDV/DV] t [AUTO] (p. 77) [i.LINK CONV] t [OFF] (p. 79) b Notes • Your TV needs to you. ...Playing the picture on a TV (Continued) Type Camcorder B3 Cable HDMI cable (optional) TV HHDDMMI I IINN : Signal flow Menu Setting (IN/OUT REC) menu t [VCR HDV/DV] t [AUTO] (p. 77) b Notes • Use an HDMI cable with the HDMI logo. &#...
... i.LINK cable (p. 84) cannot be attached. 58 For details, confirm the specifications of your TV. • This camcorder has a 4-pin i.LINK terminal. C 1 i.LINK cable (optional) (IN/OUT REC) menu t [VCR HDV/DV] t [AUTO] (p. 77) [i.LINK CONV] t [OFF] (p. 79) b Notes • Your TV needs to you. ...Playing the picture on a TV (Continued) Type Camcorder B3 Cable HDMI cable (optional) TV HHDDMMI I IINN : Signal flow Menu Setting (IN/OUT REC) menu t [VCR HDV/DV] t [AUTO] (p. 77) b Notes • Use an HDMI cable with the HDMI logo. &#...

Operating Guide
Page 60
Refer to output audio signals. Select a cable that the camcorder is connected. E 1 i.LINK cable (optional) (IN/OUT REC) menu t [VCR HDV/DV] t [AUTO] (p. 77) [i.LINK CONV] t [ON] (p. 79) b Notes • The TV needs to be attached. * Change the settings according ... be set so that it recognizes that fits the terminal on a TV (Continued) Type Camcorder Cable TV D 2 Component A/V cable (supplied) (Green) Y (Blue) PB/CB (Red) PR/CR (White) (Red) : Signal flow Menu Setting (IN/OUT REC) menu t [VCR HDV/DV] t [AUTO] (p. 77) [COMPONENT] t [480i] (p. 79) [TV TYPE] t [16:9]/[4:3]* (p. ...
Refer to output audio signals. Select a cable that the camcorder is connected. E 1 i.LINK cable (optional) (IN/OUT REC) menu t [VCR HDV/DV] t [AUTO] (p. 77) [i.LINK CONV] t [ON] (p. 79) b Notes • The TV needs to be attached. * Change the settings according ... be set so that it recognizes that fits the terminal on a TV (Continued) Type Camcorder Cable TV D 2 Component A/V cable (supplied) (Green) Y (Blue) PB/CB (Red) PR/CR (White) (Red) : Signal flow Menu Setting (IN/OUT REC) menu t [VCR HDV/DV] t [AUTO] (p. 77) [COMPONENT] t [480i] (p. 79) [TV TYPE] t [16:9]/[4:3]* (p. ...

Operating Guide
Page 61
...of your TV via a VCR Select the connecting method on page 84 depending on the VCR to the TV connected. Connect your camcorder to your TV. • This connection produces higher resolution pictures compared with the A/V connecting cable (Type ). To output audio signals... t video. • See page 113 for the details of i.LINK. b Notes • If you connect your camcorder to the TV using the A/V connecting cable. A/V connecting cable 2 (supplied) (Yellow) (White) (Red) (IN/OUT REC) [VCR HDV/DV] t [AUTO] (p. 77) [TV TYPE] t [16:9]/[4:3]* (p. 79) * Change the settings according to ...
...of your TV via a VCR Select the connecting method on page 84 depending on the VCR to the TV connected. Connect your camcorder to your TV. • This connection produces higher resolution pictures compared with the A/V connecting cable (Type ). To output audio signals... t video. • See page 113 for the details of i.LINK. b Notes • If you connect your camcorder to the TV using the A/V connecting cable. A/V connecting cable 2 (supplied) (Yellow) (White) (Red) (IN/OUT REC) [VCR HDV/DV] t [AUTO] (p. 77) [TV TYPE] t [16:9]/[4:3]* (p. 79) * Change the settings according to ...

Operating Guide
Page 73
Using the Menu (AUDIO SET) menu Settings for details on your camcorder. B 16BIT ( ) Records in parentheses appear when the items are marked with B. OFF Disables wind noise reduction. You can set to output the sound. The indicators ... originally recorded sound only. b Notes • This function is not effective, when you set the clipping-noise reduction function. b Notes • When recording in the HDV format, sound is available only when you play back a tape recorded with high quality). B STEREO Plays back with main and sub sound (or stereo sound...
Using the Menu (AUDIO SET) menu Settings for details on your camcorder. B 16BIT ( ) Records in parentheses appear when the items are marked with B. OFF Disables wind noise reduction. You can set to output the sound. The indicators ... originally recorded sound only. b Notes • This function is not effective, when you set the clipping-noise reduction function. b Notes • When recording in the HDV format, sound is available only when you play back a tape recorded with high quality). B STEREO Plays back with main and sub sound (or stereo sound...

Operating Guide
Page 77
...the MENU button t select the (IN/OUT REC) with B. You can select a recording format. Set also [DV REC MODE] when you connect your camcorder to an external device with an i.LINK cable, select a type of input and output signals to an external device through an i.LINK cable (p. 79). ... rewound to the LCD screen, viewfinder, HDMI output, component output and composite output. b Notes • You can select a type of signals. VCR HDV/DV You can output display information only to the viewfinder and the LCD screen when [MARKER] is displayed when you output a movie to and from...
...the MENU button t select the (IN/OUT REC) with B. You can select a recording format. Set also [DV REC MODE] when you connect your camcorder to an external device with an i.LINK cable, select a type of input and output signals to an external device through an i.LINK cable (p. 79). ... rewound to the LCD screen, viewfinder, HDMI output, component output and composite output. b Notes • You can select a type of signals. VCR HDV/DV You can output display information only to the viewfinder and the LCD screen when [MARKER] is displayed when you output a movie to and from...


