Operating Guide (Large File - 11.29 MB)
Page 5
...outlet when using a genuine Sony battery charger or a device that can charge the battery pack. • Keep the battery pack out of the reach of used rechargeable batteries to excessive heat such as between a wall and furniture. • Even if your camcorder is turned off, AC power... (house current) is mishandled, the battery pack can burst, cause a fire or even chemical burns. Disconnect the AC Adaptor from earphones and headphones can help preserve our environment by Sony. • Dispose of small children. •...
...outlet when using a genuine Sony battery charger or a device that can charge the battery pack. • Keep the battery pack out of the reach of used rechargeable batteries to excessive heat such as between a wall and furniture. • Even if your camcorder is turned off, AC power... (house current) is mishandled, the battery pack can burst, cause a fire or even chemical burns. Disconnect the AC Adaptor from earphones and headphones can help preserve our environment by Sony. • Dispose of small children. •...
Operating Guide (Large File - 11.29 MB)
Page 9
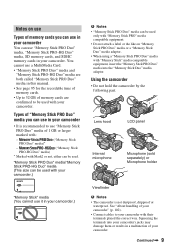
... into the "Memory Stick Duo" media adaptor. "Memory Stick PRO Duo" media/"Memory Stick PRO-HG Duo" media (This size can be used with your camcorder.) b Notes • "Memory Stick PRO Duo" media can be used only with "Memory Stick PRO" media compatible equipment. • Do not...camcorder • Do not hold the camcorder by the following part. Notes on "Memory Stick PRO Duo" media or a "Memory Stick Duo" media adaptor. • When using a "Memory Stick PRO Duo" media with "Memory Stick" media compatible equipment, insert the "Memory Stick PRO Duo" media into your camcorder...
... into the "Memory Stick Duo" media adaptor. "Memory Stick PRO Duo" media/"Memory Stick PRO-HG Duo" media (This size can be used with your camcorder.) b Notes • "Memory Stick PRO Duo" media can be used only with "Memory Stick PRO" media compatible equipment. • Do not...camcorder • Do not hold the camcorder by the following part. Notes on "Memory Stick PRO Duo" media or a "Memory Stick Duo" media adaptor. • When using a "Memory Stick PRO Duo" media with "Memory Stick" media compatible equipment, insert the "Memory Stick PRO Duo" media into your camcorder...
Operating Guide (Large File - 11.29 MB)
Page 10
...be notable in any problems. • Compensation for effective use it is recommended that disables recording or playback if the temperature of your camcorder. In this case, a message appears on the memory card will converge on the recording conditions. (This phenomenon may be recovered. All.... Unauthorized recording of such materials may be provided, even if recording or playback is not possible due to a malfunction of the camcorder, storage media, etc., or even if images or sounds are recorded without any way. Save important data on the memory card on other strong...
...be notable in any problems. • Compensation for effective use it is recommended that disables recording or playback if the temperature of your camcorder. In this case, a message appears on the memory card will converge on the recording conditions. (This phenomenon may be recovered. All.... Unauthorized recording of such materials may be provided, even if recording or playback is not possible due to a malfunction of the camcorder, storage media, etc., or even if images or sounds are recorded without any way. Save important data on the memory card on other strong...
Operating Guide (Large File - 11.29 MB)
Page 11
... the DVD player/recorder may fail to eject the media and may be reduced by using your camcorder, it is lighted with the AVCHD format • Movies made using [MEDIA FORMAT] if images are not compatible with a flash. When you transfer the memory card or your camcorder if necessary (p. 23). • Design and specifications of the...
... the DVD player/recorder may fail to eject the media and may be reduced by using your camcorder, it is lighted with the AVCHD format • Movies made using [MEDIA FORMAT] if images are not compatible with a flash. When you transfer the memory card or your camcorder if necessary (p. 23). • Design and specifications of the...
Operating Guide (Large File - 11.29 MB)
Page 12
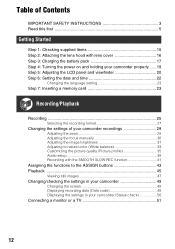
... Step 2: Attaching the lens hood with lens cover 16 Step 3: Charging the battery pack 17 Step 4: Turning the power on and holding your camcorder properly ..... 19 Step 5: Adjusting the LCD panel and viewfinder 20 Step 6: Setting the date and time 22 Changing the language setting 23 Step... 7: Inserting a memory card 23 Recording/Playback Recording 25 Selecting the recording format 27 Changing the settings of your camcorder recordings 29 Adjusting the zoom 29 Adjusting the focus manually 30 Adjusting the image brightness 31 Adjusting to natural color (White balance 33...
... Step 2: Attaching the lens hood with lens cover 16 Step 3: Charging the battery pack 17 Step 4: Turning the power on and holding your camcorder properly ..... 19 Step 5: Adjusting the LCD panel and viewfinder 20 Step 6: Setting the date and time 22 Changing the language setting 23 Step... 7: Inserting a memory card 23 Recording/Playback Recording 25 Selecting the recording format 27 Changing the settings of your camcorder recordings 29 Adjusting the zoom 29 Adjusting the focus manually 30 Adjusting the image brightness 31 Adjusting to natural color (White balance 33...

Operating Guide (Large File - 11.29 MB)
Page 13
... 63 Repairing the image database file 64 Using the Menu Operating the menu 65 Menu items 67 (CAMERA SET) menu 69 Settings to adjust your camcorder to the recording conditions (GAIN SET/ BACK LIGHT/STEADYSHOT, etc.) (REC/OUT SET) menu 73 Recording settings, input and output settings (REC FORMAT/VIDEO OUT...
... 63 Repairing the image database file 64 Using the Menu Operating the menu 65 Menu items 67 (CAMERA SET) menu 69 Settings to adjust your camcorder to the recording conditions (GAIN SET/ BACK LIGHT/STEADYSHOT, etc.) (REC/OUT SET) menu 73 Recording settings, input and output settings (REC FORMAT/VIDEO OUT...
Operating Guide (Large File - 11.29 MB)
Page 14
...messages 92 Additional Information Recording time of movies 95 Using your camcorder abroad 97 File/folder structure on the memory card 98 Maintenance and precautions 99 About the AVCHD format 99 About the "Memory Stick" media 99 About the "InfoLITHIUM" battery pack 100 About x.v.Color 101... About handling of your camcorder 102 Specifications 105 Quick Reference Identifying parts and controls 109 Wireless ...
...messages 92 Additional Information Recording time of movies 95 Using your camcorder abroad 97 File/folder structure on the memory card 98 Maintenance and precautions 99 About the AVCHD format 99 About the "Memory Stick" media 99 About the "InfoLITHIUM" battery pack 100 About x.v.Color 101... About handling of your camcorder 102 Specifications 105 Quick Reference Identifying parts and controls 109 Wireless ...
Operating Guide (Large File - 11.29 MB)
Page 15
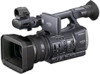
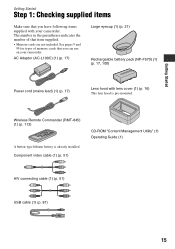
...A/V connecting cable (1) (p. 51) USB cable (1) (p. 81) 15 Getting Started Getting Started Step 1: Checking supplied items Make sure that you can use on your camcorder. The number in the parentheses indicates the number of memory cards that item supplied. • Memory cards are not included. AC Adaptor (AC-L100C) (1) (p. ...17) Large eyecup (1) (p. 21) Rechargeable battery pack (NP-F570) (1) (p. 17, 100) Power cord (mains lead) (1) (p. 17) Lens hood with your camcorder. Wireless Remote Commander (RMT-845) (1) (p. 113) A button-type lithium battery is pre-mounted.
...A/V connecting cable (1) (p. 51) USB cable (1) (p. 81) 15 Getting Started Getting Started Step 1: Checking supplied items Make sure that you can use on your camcorder. The number in the parentheses indicates the number of memory cards that item supplied. • Memory cards are not included. AC Adaptor (AC-L100C) (1) (p. ...17) Large eyecup (1) (p. 21) Rechargeable battery pack (NP-F570) (1) (p. 17, 100) Power cord (mains lead) (1) (p. 17) Lens hood with your camcorder. Wireless Remote Commander (RMT-845) (1) (p. 113) A button-type lithium battery is pre-mounted.
Operating Guide (Large File - 11.29 MB)
Page 16
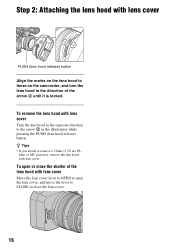
... to OPEN to open or close the lens cover. 16 To open the lens cover, and move the lever to CLOSE to those on the camcorder, and turn the lens hood in the direction of the lens hood with lens cover. Step 2: Attaching the lens hood with lens cover PUSH (lens...
... to OPEN to open or close the lens cover. 16 To open the lens cover, and move the lever to CLOSE to those on the camcorder, and turn the lens hood in the direction of the lens hood with lens cover. Step 2: Attaching the lens hood with lens cover PUSH (lens...
Operating Guide (Large File - 11.29 MB)
Page 17
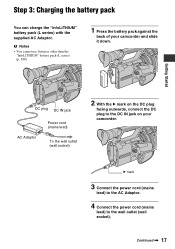
... AC Adaptor. b Notes • You cannot use batteries other than the "InfoLITHIUM" battery pack (L series) (p. 100). 1 Press the battery pack against the back of your camcorder. Getting Started DC plug DC IN jack AC Adaptor Power cord (mains lead) To the wall outlet (wall socket) 2 With the B mark on the DC... , 17 B mark 3 Connect the power cord (mains lead) to the AC Adaptor. 4 Connect the power cord (mains lead) to the DC IN jack on your camcorder and slide it down.
... AC Adaptor. b Notes • You cannot use batteries other than the "InfoLITHIUM" battery pack (L series) (p. 100). 1 Press the battery pack against the back of your camcorder. Getting Started DC plug DC IN jack AC Adaptor Power cord (mains lead) To the wall outlet (wall socket) 2 With the B mark on the DC... , 17 B mark 3 Connect the power cord (mains lead) to the AC Adaptor. 4 Connect the power cord (mains lead) to the DC IN jack on your camcorder and slide it down.
Operating Guide (Large File - 11.29 MB)
Page 18
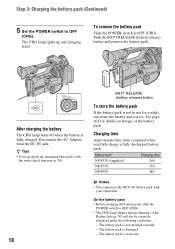
...the POWER switch to OFF (CHG). The battery pack is worn-out. z Tips • You can check the remaining battery life with your camcorder. The CHG lamp lights up and charging starts. See page 101 for a while, run down the battery and store it. Charging time Approximate time... is not attached correctly. - Step 3: Charging the battery pack (Continued) 5 Set the POWER switch to OFF (CHG). • The CHG lamp flashes during charging, or the Battery Info (p. 50) will not be correctly displayed under the following conditions. - To remove the battery pack Slide the POWER ...
...the POWER switch to OFF (CHG). The battery pack is worn-out. z Tips • You can check the remaining battery life with your camcorder. The CHG lamp lights up and charging starts. See page 101 for a while, run down the battery and store it. Charging time Approximate time... is not attached correctly. - Step 3: Charging the battery pack (Continued) 5 Set the POWER switch to OFF (CHG). • The CHG lamp flashes during charging, or the Battery Info (p. 50) will not be correctly displayed under the following conditions. - To remove the battery pack Slide the POWER ...
Operating Guide (Large File - 11.29 MB)
Page 19
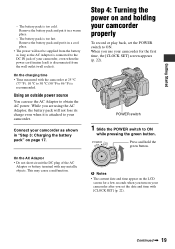
...on the LCD screen for the first time, the [CLOCK SET] screen appears (p. 22). Continued , 19 The battery pack is attached to your camcorder. While you are using the AC Adaptor, the battery pack will not be supplied from the wall outlet (wall socket). This may cause a malfunction.... Connect your camcorder, even when the power cord (mains lead) is recommended. POWER switch 1 Slide the POWER switch to obtain the AC power. Press and hold...
...on the LCD screen for the first time, the [CLOCK SET] screen appears (p. 22). Continued , 19 The battery pack is attached to your camcorder. While you are using the AC Adaptor, the battery pack will not be supplied from the wall outlet (wall socket). This may cause a malfunction.... Connect your camcorder, even when the power cord (mains lead) is recommended. POWER switch 1 Slide the POWER switch to obtain the AC power. Press and hold...
Operating Guide (Large File - 11.29 MB)
Page 20
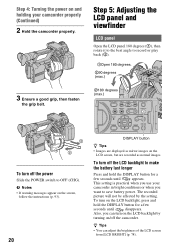
.... Also, you can adjust the brightness of the LCD screen from [LCD BRIGHT] (p. 78). This setting is practical when you use your camcorder properly (Continued) 2 Hold the camcorder properly. 3 Ensure a good grip, then fasten the grip belt. z Tips • You can turn off the power Slide the POWER ...switch to save battery power. To turn off the camcorder. Step 4: Turning the power on the LCD screen, but are displayed as mirror images on and holding your camcorder in bright conditions or when you want to OFF (CHG). The recorded picture will...
.... Also, you can adjust the brightness of the LCD screen from [LCD BRIGHT] (p. 78). This setting is practical when you use your camcorder properly (Continued) 2 Hold the camcorder properly. 3 Ensure a good grip, then fasten the grip belt. z Tips • You can turn off the power Slide the POWER ...switch to save battery power. To turn off the camcorder. Step 4: Turning the power on the LCD screen, but are displayed as mirror images on and holding your camcorder in bright conditions or when you want to OFF (CHG). The recorded picture will...
Operating Guide (Large File - 11.29 MB)
Page 22
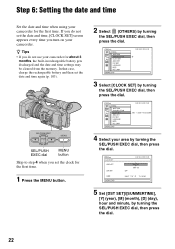
... press the dial. 3 Select [CLOCK SET] by turning the SEL/PUSH EXEC dial, then press the dial. 22 z Tips • If you turn on your camcorder for the first time. Step 6: Setting the date and time Set the date and time when using your area by turning the SEL/PUSH EXEC... date and time, [CLOCK SET] screen appears every time you do not set the clock for the first time. 1 Press the MENU button. 4 Select your camcorder for about 3 months, the built-in rechargeable battery gets discharged and the date and time settings may be cleared from the memory. If you do...
... press the dial. 3 Select [CLOCK SET] by turning the SEL/PUSH EXEC dial, then press the dial. 22 z Tips • If you turn on your camcorder for the first time. Step 6: Setting the date and time Set the date and time when using your area by turning the SEL/PUSH EXEC... date and time, [CLOCK SET] screen appears every time you do not set the clock for the first time. 1 Press the MENU button. 4 Select your camcorder for about 3 months, the built-in rechargeable battery gets discharged and the date and time settings may be cleared from the memory. If you do...
Operating Guide (Large File - 11.29 MB)
Page 24
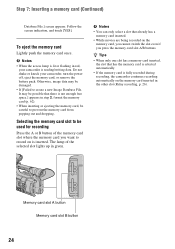
... • If [Failed to prevent the memory card from popping out and dropping. Do not shake or knock your camcorder is fully recorded during recording, the camcorder continues recording automatically on is not enough free space.] appears in the other slot (Relay recording, p. 26). Memory card... slot A button Memory card slot B button 24 b Notes • When the access lamp is lit or flashing in red, your camcorder, turn the power off, eject the memory card, or remove the battery pack. Step 7: Inserting a memory card (Continued) Database File.] ...
... • If [Failed to prevent the memory card from popping out and dropping. Do not shake or knock your camcorder is fully recorded during recording, the camcorder continues recording automatically on is not enough free space.] appears in the other slot (Relay recording, p. 26). Memory card... slot A button Memory card slot B button 24 b Notes • When the access lamp is lit or flashing in red, your camcorder, turn the power off, eject the memory card, or remove the battery pack. Step 7: Inserting a memory card (Continued) Database File.] ...
Operating Guide (Large File - 11.29 MB)
Page 25
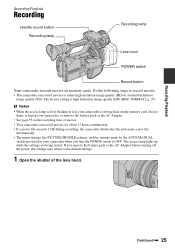
... being stored. If you turn the POWER switch to the default settings. 1 Open the shutter of movies. • Your camcorder can record movies in your camcorder, or remove the battery pack or the AC Adaptor. • See page 95 on the memory card. Recording/Playback Continued ... high definition image quality (HD) or standard definition image quality (SD). b Notes • When the access lamp is lit or flashing in red, your camcorder is high definition image quality (HD) ([REC FORMAT], p. 27). Recording/Playback Recording Handle record button Recording lamp Recording lamp Lens hood...
... being stored. If you turn the POWER switch to the default settings. 1 Open the shutter of movies. • Your camcorder can record movies in your camcorder, or remove the battery pack or the AC Adaptor. • See page 95 on the memory card. Recording/Playback Continued ... high definition image quality (HD) or standard definition image quality (SD). b Notes • When the access lamp is lit or flashing in red, your camcorder is high definition image quality (HD) ([REC FORMAT], p. 27). Recording/Playback Recording Handle record button Recording lamp Recording lamp Lens hood...

Operating Guide (Large File - 11.29 MB)
Page 26
...) Insert memory cards each in high definition image quality (HD), the aspect ratio is convenient. z Tips • When recording in both slots A and B, so the camcorder switches memory card A (or B) just before space on the other one after turning it face down, or lift the viewfinder up during the low angle...
...) Insert memory cards each in high definition image quality (HD), the aspect ratio is convenient. z Tips • When recording in both slots A and B, so the camcorder switches memory card A (or B) just before space on the other one after turning it face down, or lift the viewfinder up during the low angle...
Operating Guide (Large File - 11.29 MB)
Page 27
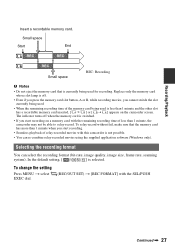
... card slot button, A or B, while recording movies, you start recording. • Seamless playback of less than 1 minute when you start recording on the camcorder screen. To relay-record without fail, make sure that is less than 1 minute and the other slot has a recordable memory card inserted, [ ] or ...size, frame rate, scanning system). To change the setting Press MENU t select EXEC dial. (REC/OUT SET) t [REC FORMAT] with this camcorder is selected. Replace only the memory card whose slot lamp is off when the memory card is switched. • If you cannot switch the slot...
... card slot button, A or B, while recording movies, you start recording. • Seamless playback of less than 1 minute when you start recording on the camcorder screen. To relay-record without fail, make sure that is less than 1 minute and the other slot has a recordable memory card inserted, [ ] or ...size, frame rate, scanning system). To change the setting Press MENU t select EXEC dial. (REC/OUT SET) t [REC FORMAT] with this camcorder is selected. Replace only the memory card whose slot lamp is off when the memory card is switched. • If you cannot switch the slot...
Operating Guide (Large File - 11.29 MB)
Page 29
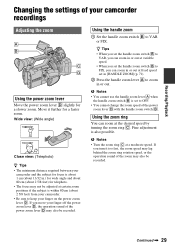
...speed of your finger on the power zoom lever D. If you can zoom in .) for wide angle and about 80 cm (about 2 5/8 feet) from your camcorder. • Be sure to VAR or FIX. Using the power zoom lever Move the power zoom lever D slightly for a faster zoom. Continued , 29 Using ...the handle zoom 1 Set the handle zoom switch B to keep your camcorder recordings Adjusting the zoom . Fine adjustment is about 1 cm (about 13/32 in or out at variable speed. • When you set the handle zoom...
...speed of your finger on the power zoom lever D. If you can zoom in .) for wide angle and about 80 cm (about 2 5/8 feet) from your camcorder. • Be sure to VAR or FIX. Using the power zoom lever Move the power zoom lever D slightly for a faster zoom. Continued , 29 Using ...the handle zoom 1 Set the handle zoom switch B to keep your camcorder recordings Adjusting the zoom . Fine adjustment is about 1 cm (about 13/32 in or out at variable speed. • When you set the handle zoom...
Operating Guide (Large File - 11.29 MB)
Page 30
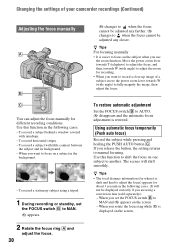
... to adjust the focus) appears for when it is easier to focus on the subject when you want to record a close-up image of your camcorder recordings (Continued) Adjusting the focus manually 9 changes to when the focus cannot be adjusted any farther. 9 changes to when the focus cannot be displayed correctly...
... to adjust the focus) appears for when it is easier to focus on the subject when you want to record a close-up image of your camcorder recordings (Continued) Adjusting the focus manually 9 changes to when the focus cannot be adjusted any farther. 9 changes to when the focus cannot be displayed correctly...


