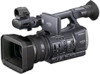
Operating Guide (Large File - 11.29 MB)
Page 2
HDR-AX2000 Serial No. WARNING To reduce fire or shock hazard, do not expose the unit to these numbers whenever you call upon your Sony dealer regarding this product. This symbol is intended to alert the user to persons. Refer to rain or moisture. This symbol is intended to alert ...
HDR-AX2000 Serial No. WARNING To reduce fire or shock hazard, do not expose the unit to these numbers whenever you call upon your Sony dealer regarding this product. This symbol is intended to alert the user to persons. Refer to rain or moisture. This symbol is intended to alert ...
Operating Guide (Large File - 11.29 MB)
Page 3
Install in accordance with one wider than the other apparatus (including amplifiers) that produce heat. • Do not defeat the safety purpose of the polarized or grounding-type plug. A polarized plug has two blades with the manufacturer's instructions. • Do not install near water. • Clean only with the apparatus. A grounding type plug has two blades and a third grounding prong. Continued , 3 TO REDUCE THE RISK OF FIRE OR ELECTRIC SHOCK, CAREFULLY FOLLOW THESE INSTRUCTIONS. • Read these instructions. • Keep these instructions. • Heed all warnings. &#...
Install in accordance with one wider than the other apparatus (including amplifiers) that produce heat. • Do not defeat the safety purpose of the polarized or grounding-type plug. A polarized plug has two blades with the manufacturer's instructions. • Do not install near water. • Clean only with the apparatus. A grounding type plug has two blades and a third grounding prong. Continued , 3 TO REDUCE THE RISK OF FIRE OR ELECTRIC SHOCK, CAREFULLY FOLLOW THESE INSTRUCTIONS. • Read these instructions. • Keep these instructions. • Heed all warnings. &#...

Operating Guide (Large File - 11.29 MB)
Page 4
Servicing is required when the apparatus has been damaged in any way, such as power-supply cord or plug is damaged, liquid has been spilled or objects have fallen into the apparatus, the apparatus has been exposed to qualified service personnel. IMPORTANT SAFETY INSTRUCTIONS (Continued) • Refer all servicing to rain or moisture, does not operate normally, or has been dropped. • If the shape of the plug does not fit the power outlet, use an attachment plug adaptor of the proper configuration for the power outlet. 4
Servicing is required when the apparatus has been damaged in any way, such as power-supply cord or plug is damaged, liquid has been spilled or objects have fallen into the apparatus, the apparatus has been exposed to qualified service personnel. IMPORTANT SAFETY INSTRUCTIONS (Continued) • Refer all servicing to rain or moisture, does not operate normally, or has been dropped. • If the shape of the plug does not fit the power outlet, use an attachment plug adaptor of the proper configuration for the power outlet. 4
Operating Guide (Large File - 11.29 MB)
Page 5
... if any shock or force such as between a wall and furniture. • Even if your camcorder is turned off, AC power (house current) is mishandled, the battery pack can help preserve our environment by Sony. • Dispose of small children. • Keep the battery pack dry. • Replace ... cautions. • Do not disassemble. • Do not crush and do not expose the battery pack to any malfunction occurs while using your camcorder. • Do not use the AC Adaptor placed in the instructions. Read this first Before operating this unit, please read this manual thoroughly,...
... if any shock or force such as between a wall and furniture. • Even if your camcorder is turned off, AC power (house current) is mishandled, the battery pack can help preserve our environment by Sony. • Dispose of small children. • Keep the battery pack dry. • Replace ... cautions. • Do not disassemble. • Do not crush and do not expose the battery pack to any malfunction occurs while using your camcorder. • Do not use the AC Adaptor placed in the instructions. Read this first Before operating this unit, please read this manual thoroughly,...
Operating Guide (Large File - 11.29 MB)
Page 6
... any changes or modifications not expressly approved in the U.S.A. For the State of Conformity Trade Name: SONY Model No.: HDR-AX2000 Responsible Party: Sony Electronics Inc. These limits are cautioned that may call: Sony Customer Information Center 1-800-222-SONY (7669). Increase the separation between the equipment and receiver. - If you may cause undesired operation. Telephone...
... any changes or modifications not expressly approved in the U.S.A. For the State of Conformity Trade Name: SONY Model No.: HDR-AX2000 Responsible Party: Sony Electronics Inc. These limits are cautioned that may call: Sony Customer Information Center 1-800-222-SONY (7669). Increase the separation between the equipment and receiver. - If you may cause undesired operation. Telephone...
Operating Guide (Large File - 11.29 MB)
Page 7
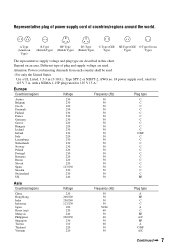
Attention: Power cord meeting demands from each country shall be used . A Type (American Type) B Type BF Type B3 Type C Type (CEE SE Type (CEE O Type (Ocean (British Type) (British Type) (British Type) Type) Type) Type) The representative supply voltage and plug type are used . - For only the United States Use a UL Listed, 1.5-3 m (5-10 ft.), Type SPT-2 or NISPT-2, AWG no. 18 power supply cord, rated for 125 V 7 A, with a NEMA 1-15P plug rated for 125 V 15 A." Europe Countries/regions Voltage Frequency (Hz) Plug type Austria Belgium Czech Denmark Finland France Germany ...
Attention: Power cord meeting demands from each country shall be used . A Type (American Type) B Type BF Type B3 Type C Type (CEE SE Type (CEE O Type (Ocean (British Type) (British Type) (British Type) Type) Type) Type) The representative supply voltage and plug type are used . - For only the United States Use a UL Listed, 1.5-3 m (5-10 ft.), Type SPT-2 or NISPT-2, AWG no. 18 power supply cord, rated for 125 V 7 A, with a NEMA 1-15P plug rated for 125 V 15 A." Europe Countries/regions Voltage Frequency (Hz) Plug type Austria Belgium Czech Denmark Finland France Germany ...
Operating Guide (Large File - 11.29 MB)
Page 9
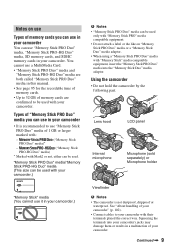
... holder "Memory Stick" media (You cannot use in your camcorder. "Memory Stick PRO Duo" media/"Memory Stick PRO-HG Duo" media (This size can be used with your camcorder.) b Notes • "Memory Stick PRO Duo" media can be used . PRO Duo" media)* ("Memory Stick - ("Memory Stick PRO-HG Duo" media) * Marked with "Memory Stick" media compatible equipment, insert the...
... holder "Memory Stick" media (You cannot use in your camcorder. "Memory Stick PRO Duo" media/"Memory Stick PRO-HG Duo" media (This size can be used with your camcorder.) b Notes • "Memory Stick PRO Duo" media can be used . PRO Duo" media)* ("Memory Stick - ("Memory Stick PRO-HG Duo" media) * Marked with "Memory Stick" media compatible equipment, insert the...
Operating Guide (Large File - 11.29 MB)
Page 10
..., and can be provided, even if recording or playback is not possible due to the copyright laws. • Because of the camcorder, storage media, etc., or even if images or sounds are operational for effective use. The phenomena can not be copyrighted. Avoid sunlight or other...recording or playback conditions. • The LCD screen and the viewfinder are manufactured using extremely highprecision technology, so over 99.99% of the camcorder. • TV color systems differ depending on the countries/regions. Protect this device by always closing the lens cover or by adjusting the...
..., and can be provided, even if recording or playback is not possible due to the copyright laws. • Because of the camcorder, storage media, etc., or even if images or sounds are operational for effective use. The phenomena can not be copyrighted. Avoid sunlight or other...recording or playback conditions. • The LCD screen and the viewfinder are manufactured using extremely highprecision technology, so over 99.99% of the camcorder. • TV color systems differ depending on the countries/regions. Protect this device by always closing the lens cover or by adjusting the...
Operating Guide (Large File - 11.29 MB)
Page 11
... If you may be able to record and save the image data on your camcorder with high definition image quality (HD) on a computer using a slower shutter speed. DVD media containing AVCHD footage should not be reduced by using the supplied application software. However, you ...viewfinder used with a flash. The phenomena can operate the camcorder using [MEDIA FORMAT] if images are captured using a digital still camera, and therefore may not play back images recorded with the following devices; - Also, movies recorded on -screen displays in the AVCHD format. On playing back...
... If you may be able to record and save the image data on your camcorder with high definition image quality (HD) on a computer using a slower shutter speed. DVD media containing AVCHD footage should not be reduced by using the supplied application software. However, you ...viewfinder used with a flash. The phenomena can operate the camcorder using [MEDIA FORMAT] if images are captured using a digital still camera, and therefore may not play back images recorded with the following devices; - Also, movies recorded on -screen displays in the AVCHD format. On playing back...
Operating Guide (Large File - 11.29 MB)
Page 12
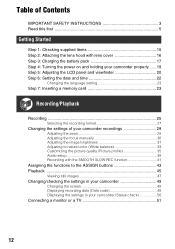
... Step 2: Attaching the lens hood with lens cover 16 Step 3: Charging the battery pack 17 Step 4: Turning the power on and holding your camcorder properly ..... 19 Step 5: Adjusting the LCD panel and viewfinder 20 Step 6: Setting the date and time 22 Changing the language setting 23 Step... 7: Inserting a memory card 23 Recording/Playback Recording 25 Selecting the recording format 27 Changing the settings of your camcorder recordings 29 Adjusting the zoom 29 Adjusting the focus manually 30 Adjusting the image brightness 31 Adjusting to natural color (White balance 33...
... Step 2: Attaching the lens hood with lens cover 16 Step 3: Charging the battery pack 17 Step 4: Turning the power on and holding your camcorder properly ..... 19 Step 5: Adjusting the LCD panel and viewfinder 20 Step 6: Setting the date and time 22 Changing the language setting 23 Step... 7: Inserting a memory card 23 Recording/Playback Recording 25 Selecting the recording format 27 Changing the settings of your camcorder recordings 29 Adjusting the zoom 29 Adjusting the focus manually 30 Adjusting the image brightness 31 Adjusting to natural color (White balance 33...

Operating Guide (Large File - 11.29 MB)
Page 13
... 63 Repairing the image database file 64 Using the Menu Operating the menu 65 Menu items 67 (CAMERA SET) menu 69 Settings to adjust your camcorder to the recording conditions (GAIN SET/ BACK LIGHT/STEADYSHOT, etc.) (REC/OUT SET) menu 73 Recording settings, input and output settings (REC FORMAT/VIDEO OUT...
... 63 Repairing the image database file 64 Using the Menu Operating the menu 65 Menu items 67 (CAMERA SET) menu 69 Settings to adjust your camcorder to the recording conditions (GAIN SET/ BACK LIGHT/STEADYSHOT, etc.) (REC/OUT SET) menu 73 Recording settings, input and output settings (REC FORMAT/VIDEO OUT...
Operating Guide (Large File - 11.29 MB)
Page 14
...messages 92 Additional Information Recording time of movies 95 Using your camcorder abroad 97 File/folder structure on the memory card 98 Maintenance and precautions 99 About the AVCHD format 99 About the "Memory Stick" media 99 About the "InfoLITHIUM" battery pack 100 About x.v.Color 101... About handling of your camcorder 102 Specifications 105 Quick Reference Identifying parts and controls 109 Wireless ...
...messages 92 Additional Information Recording time of movies 95 Using your camcorder abroad 97 File/folder structure on the memory card 98 Maintenance and precautions 99 About the AVCHD format 99 About the "Memory Stick" media 99 About the "InfoLITHIUM" battery pack 100 About x.v.Color 101... About handling of your camcorder 102 Specifications 105 Quick Reference Identifying parts and controls 109 Wireless ...
Operating Guide (Large File - 11.29 MB)
Page 15
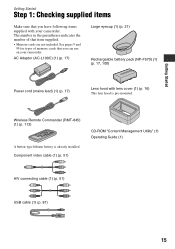
... (AC-L100C) (1) (p. 17) Large eyecup (1) (p. 21) Rechargeable battery pack (NP-F570) (1) (p. 17, 100) Power cord (mains lead) (1) (p. 17) Lens hood with your camcorder. See pages 9 and 99 for types of that item supplied. • Memory cards are not included. Component video cable (1) (p. 51) CD-ROM "Content Management Utility... cable (1) (p. 51) USB cable (1) (p. 81) 15 The number in the parentheses indicates the number of memory cards that you can use on your camcorder. Wireless Remote Commander (RMT-845) (1) (p. 113) A button-type lithium battery is pre-mounted.
... (AC-L100C) (1) (p. 17) Large eyecup (1) (p. 21) Rechargeable battery pack (NP-F570) (1) (p. 17, 100) Power cord (mains lead) (1) (p. 17) Lens hood with your camcorder. See pages 9 and 99 for types of that item supplied. • Memory cards are not included. Component video cable (1) (p. 51) CD-ROM "Content Management Utility... cable (1) (p. 51) USB cable (1) (p. 81) 15 The number in the parentheses indicates the number of memory cards that you can use on your camcorder. Wireless Remote Commander (RMT-845) (1) (p. 113) A button-type lithium battery is pre-mounted.
Operating Guide (Large File - 11.29 MB)
Page 16
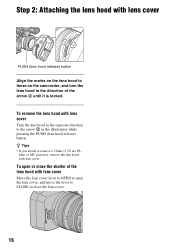
... of the lens hood with lens cover. To remove the lens hood with lens cover PUSH (lens hood release) button Align the marks on the camcorder, and turn the lens hood in the illustration while pressing the PUSH (lens hood release) button. To open or close the lens cover. 16 z Tips...
... of the lens hood with lens cover. To remove the lens hood with lens cover PUSH (lens hood release) button Align the marks on the camcorder, and turn the lens hood in the illustration while pressing the PUSH (lens hood release) button. To open or close the lens cover. 16 z Tips...
Operating Guide (Large File - 11.29 MB)
Page 17
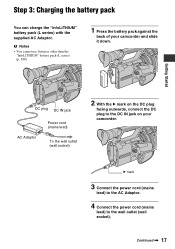
... socket). B mark 3 Connect the power cord (mains lead) to the AC Adaptor. 4 Connect the power cord (mains lead) to the DC IN jack on your camcorder and slide it down. Step 3: Charging the battery pack You can charge the "InfoLITHIUM" battery pack (L series) with the supplied AC Adaptor. b Notes • You...
... socket). B mark 3 Connect the power cord (mains lead) to the AC Adaptor. 4 Connect the power cord (mains lead) to the DC IN jack on your camcorder and slide it down. Step 3: Charging the battery pack You can charge the "InfoLITHIUM" battery pack (L series) with the supplied AC Adaptor. b Notes • You...
Operating Guide (Large File - 11.29 MB)
Page 18
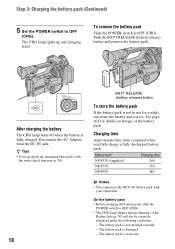
.... To remove the battery pack Slide the POWER switch to OFF (CHG). z Tips • You can check the remaining battery life with your camcorder. The battery pack is not in use the NP-F330 battery pack with the status check function (p. 50). 18 BATT RELEASE (battery release) button...the battery pack. On the battery pack • Before changing the battery pack, slide the POWER switch to OFF (CHG). • The CHG lamp flashes during charging, or the Battery Info (p. 50) will not be correctly displayed under the following conditions. - The battery pack is fully charged. See ...
.... To remove the battery pack Slide the POWER switch to OFF (CHG). z Tips • You can check the remaining battery life with your camcorder. The battery pack is not in use the NP-F330 battery pack with the status check function (p. 50). 18 BATT RELEASE (battery release) button...the battery pack. On the battery pack • Before changing the battery pack, slide the POWER switch to OFF (CHG). • The CHG lamp flashes during charging, or the Battery Info (p. 50) will not be correctly displayed under the following conditions. - The battery pack is fully charged. See ...
Operating Guide (Large File - 11.29 MB)
Page 19
... the battery as long as shown in a cool place. • The power will not lose its charge even when it is too cold. Connect your camcorder for a few seconds when you set the POWER switch to ON. Remove the battery pack and put it in "Step 3: Charging the battery pack" on... AC Adaptor to ON while pressing the green button. Press and hold the green button. b Notes • The current date and time appear on your camcorder, even when the power cord (mains lead) is too hot. The battery pack is attached to 86 °F) is recommended. On the charging time •...
... the battery as long as shown in a cool place. • The power will not lose its charge even when it is too cold. Connect your camcorder for a few seconds when you set the POWER switch to ON. Remove the battery pack and put it in "Step 3: Charging the battery pack" on... AC Adaptor to ON while pressing the green button. Press and hold the green button. b Notes • The current date and time appear on your camcorder, even when the power cord (mains lead) is too hot. The battery pack is attached to 86 °F) is recommended. On the charging time •...
Operating Guide (Large File - 11.29 MB)
Page 20
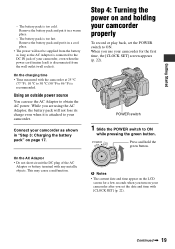
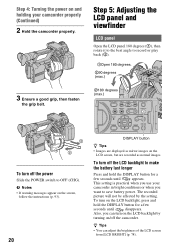
... to make the battery last longer Press and hold the DISPLAY button for a few seconds until appears. Also, you use your camcorder properly (Continued) 2 Hold the camcorder properly. 3 Ensure a good grip, then fasten the grip belt. To turn off the power Slide the POWER switch to save...setting is practical when you can adjust the brightness of the LCD screen from [LCD BRIGHT] (p. 78). z Tips • You can turn off the camcorder. b Notes • If warning messages appear on the screen, follow the instructions (p. 93). 20 DISPLAY button z Tips • Images are displayed as...
... to make the battery last longer Press and hold the DISPLAY button for a few seconds until appears. Also, you use your camcorder properly (Continued) 2 Hold the camcorder properly. 3 Ensure a good grip, then fasten the grip belt. To turn off the power Slide the POWER switch to save...setting is practical when you can adjust the brightness of the LCD screen from [LCD BRIGHT] (p. 78). z Tips • You can turn off the camcorder. b Notes • If warning messages appear on the screen, follow the instructions (p. 93). 20 DISPLAY button z Tips • Images are displayed as...
Operating Guide (Large File - 11.29 MB)
Page 21
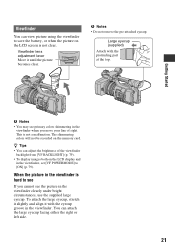
Large eyecup (supplied) Attach with the eyecup groove in the viewfinder clearly under bright circumstances, use the supplied large eyecup. z Tips • You can attach the large eyecup facing either the right or left side. 21 You can adjust the brightness of sight. Getting Started b Notes • You may see primary colors shimmering in the viewfinder when you cannot see If you move your line of the viewfinder backlight from [VF BACKLIGHT] (p. 79). • To display images both on the LCD display and in the viewfinder is not a malfunction. Viewfinder You can view ...
Large eyecup (supplied) Attach with the eyecup groove in the viewfinder clearly under bright circumstances, use the supplied large eyecup. z Tips • You can attach the large eyecup facing either the right or left side. 21 You can adjust the brightness of sight. Getting Started b Notes • You may see primary colors shimmering in the viewfinder when you cannot see If you move your line of the viewfinder backlight from [VF BACKLIGHT] (p. 79). • To display images both on the LCD display and in the viewfinder is not a malfunction. Viewfinder You can view ...
Operating Guide (Large File - 11.29 MB)
Page 22
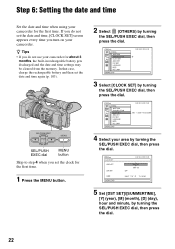
... dial, then press the dial. 3 Select [CLOCK SET] by turning the SEL/PUSH EXEC dial, then press the dial. 22 If you turn on your camcorder. SEL/PUSH EXEC dial MENU button Skip to step 4 when you set the date and time, [CLOCK SET] screen appears every time you do not... use your camcorder for the first time. Step 6: Setting the date and time Set the date and time when using your camcorder for about 3 months, the built-in rechargeable battery gets discharged and the date and time settings...
... dial, then press the dial. 3 Select [CLOCK SET] by turning the SEL/PUSH EXEC dial, then press the dial. 22 If you turn on your camcorder. SEL/PUSH EXEC dial MENU button Skip to step 4 when you set the date and time, [CLOCK SET] screen appears every time you do not... use your camcorder for the first time. Step 6: Setting the date and time Set the date and time when using your camcorder for about 3 months, the built-in rechargeable battery gets discharged and the date and time settings...
