
Operating Instructions
Page 1
4-245-586-12(2) Mini Hi-Fi Component System Operating Instructions Owner's Record The model and serial numbers are located on the rear of the unit. Record the serial number in the space provided below. Refer to them whenever you call upon your Sony dealer regarding this product. Model No Serial No MHC-GSX100W MHC-GSX75 ©2003 Sony Corporation
4-245-586-12(2) Mini Hi-Fi Component System Operating Instructions Owner's Record The model and serial numbers are located on the rear of the unit. Record the serial number in the space provided below. Refer to them whenever you call upon your Sony dealer regarding this product. Model No Serial No MHC-GSX100W MHC-GSX75 ©2003 Sony Corporation
Operating Instructions
Page 2
... important operating and maintenance (servicing) instructions in a residential installation. Increase the separation between the equipment and receiver. - This symbol is connected. - NOTICE FOR THE CUSTOMERS IN THE U.S.A. Consult the dealer or an experienced radio/TV technician for a Class B digital device, pursuant to which can radiate radio frequency energy and, if not installed and used in accordance with the instructions, may be determined by turning...
... important operating and maintenance (servicing) instructions in a residential installation. Increase the separation between the equipment and receiver. - This symbol is connected. - NOTICE FOR THE CUSTOMERS IN THE U.S.A. Consult the dealer or an experienced radio/TV technician for a Class B digital device, pursuant to which can radiate radio frequency energy and, if not installed and used in accordance with the instructions, may be determined by turning...
Operating Instructions
Page 4
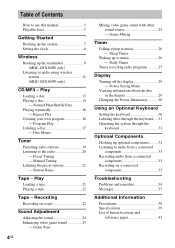
... Disc Memo Tuner Presetting radio stations 19 Listening to music 26 - Preset Tuning - Recording Recording on a connected component 33 Troubleshooting Problems and remedies 34 Messages 37 Additional Information Precautions 38 Specifications 39 List of Contents How to use this manual 5 Playable discs 5 Getting Started Hooking up the system 7 Setting the clock 8 Wireless Hooking up the transmitter 9 (MHC-GSX100W only) Listening to audio using wireless system 11 (MHC-GSX100W only) CD/MP3 - Game Sync 4GB Mixing video game sound with other sound source...
... Disc Memo Tuner Presetting radio stations 19 Listening to music 26 - Preset Tuning - Recording Recording on a connected component 33 Troubleshooting Problems and remedies 34 Messages 37 Additional Information Precautions 38 Specifications 39 List of Contents How to use this manual 5 Playable discs 5 Getting Started Hooking up the system 7 Setting the clock 8 Wireless Hooking up the transmitter 9 (MHC-GSX100W only) Listening to audio using wireless system 11 (MHC-GSX100W only) CD/MP3 - Game Sync 4GB Mixing video game sound with other sound source...
Operating Instructions
Page 10
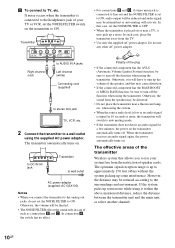
... of the plug • If the connected component has the AVLS (Automatic Volume Limiter System) function, be sure to ON, audio output will be reduced and audio signal may pick up the volume of the speaker, and that allows you will be reduced according to turn up a noise. when using the system. • When the source audio level is low or no effect. • For connections B and C, if stereo mini jack is connected to...
... of the plug • If the connected component has the AVLS (Automatic Volume Limiter System) function, be sure to ON, audio output will be reduced and audio signal may pick up the volume of the speaker, and that allows you will be reduced according to turn up a noise. when using the system. • When the source audio level is low or no effect. • For connections B and C, if stereo mini jack is connected to...
Operating Instructions
Page 11
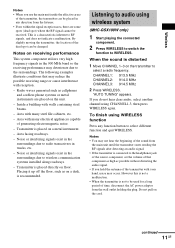
... jack of the source component, set the volume of that may not hear the beginning of time, disconnect the AC power adaptor from the main unit until the transmitter starts sending the RF signals after detecting an audio signal. • If the transmitter is a characteristic inherent to radio transceivers in any function button to wireless communication systems installed along roadways. - Wireless Notes • When you use...
... jack of the source component, set the volume of that may not hear the beginning of time, disconnect the AC power adaptor from the main unit until the transmitter starts sending the RF signals after detecting an audio signal. • If the transmitter is a characteristic inherent to radio transceivers in any function button to wireless communication systems installed along roadways. - Wireless Notes • When you use...

Operating Instructions
Page 12
... cut off). If the connected optional component has the BASS BOOST or MEGA BASS function, set to OFF. - If you connect the transmitter to the analog out jacks of an audio reproducer, make sure that the NOISE FILTER switch is severe hum or noise, do the following : - Notes on the transmitter then press WIRELESS again. - Change the radio frequency using the CHANNEL selector on the transmitter...
... cut off). If the connected optional component has the BASS BOOST or MEGA BASS function, set to OFF. - If you connect the transmitter to the analog out jacks of an audio reproducer, make sure that the NOISE FILTER switch is severe hum or noise, do the following : - Notes on the transmitter then press WIRELESS again. - Change the radio frequency using the CHANNEL selector on the transmitter...
Operating Instructions
Page 19
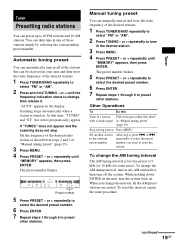
... factory-preset to 9 kHz (or 10 kHz for stereo program only) appear. The preset number flashes. Other Operations To Do this Tune in a station Follow the procedure described with a weak signal in the display. To reset the interval, repeat the same procedure. or + until the frequency indication starts to change the AM tuning interval The AM tuning interval is tuned in any of those stations simply by selecting the corresponding preset number. Preset number...
... factory-preset to 9 kHz (or 10 kHz for stereo program only) appear. The preset number flashes. Other Operations To Do this Tune in a station Follow the procedure described with a weak signal in the display. To reset the interval, repeat the same procedure. or + until the frequency indication starts to change the AM tuning interval The AM tuning interval is tuned in any of those stations simply by selecting the corresponding preset number. Preset number...
Operating Instructions
Page 20
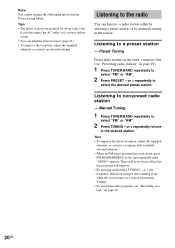
... desired station. Listening to select the desired preset station. Manual Tuning 1 Press TUNER/BAND repeatedly to non-preset radio station - or +, the frequency indication changes and scanning stops when the system tunes in a station (Automatic Tuning). • To record the radio programs, see "Presetting radio stations" on page 19). 1 Press TUNER/BAND repeatedly to the radio You can label the preset stations (page 21). • To improve the reception, adjust the supplied antennas or connect an external antenna. Tips...
... desired station. Listening to select the desired preset station. Manual Tuning 1 Press TUNER/BAND repeatedly to non-preset radio station - or +, the frequency indication changes and scanning stops when the system tunes in a station (Automatic Tuning). • To record the radio programs, see "Presetting radio stations" on page 19). 1 Press TUNER/BAND repeatedly to the radio You can label the preset stations (page 21). • To improve the reception, adjust the supplied antennas or connect an external antenna. Tips...
Operating Instructions
Page 24
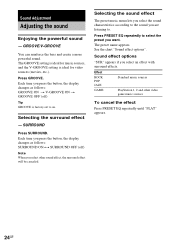
... to select the preset you press the button, the display changes as follows: SURROUND ON y SURROUND OFF (off ) Tip GROOVE is ideal for music sources, and the V-GROOVE setting is factory-set to on. Sound effect options "SUR" appears if you select other video game music sources To cancel the effect Press PRESET EQ repeatedly until "FLAT" appears. 24GB Sound Adjustment Adjusting the sound Enjoying the powerful sound - Each time you want. Selecting the surround effect - The preset...
... to select the preset you press the button, the display changes as follows: SURROUND ON y SURROUND OFF (off ) Tip GROOVE is ideal for music sources, and the V-GROOVE setting is factory-set to on. Sound effect options "SUR" appears if you select other video game music sources To cancel the effect Press PRESET EQ repeatedly until "FLAT" appears. 24GB Sound Adjustment Adjusting the sound Enjoying the powerful sound - Each time you want. Selecting the surround effect - The preset...
Operating Instructions
Page 26
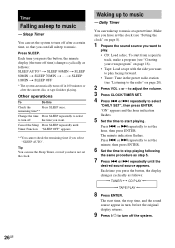
... you press the button, the minute display (the turn off time) changes cyclically as follows: t TUNER y CD PLAY T t TAPE PLAY T 8 Press ENTER. or > repeatedly until Timer Function "SLEEP OFF" appears. **You cannot check the remaining time if you want to music. or > repeatedly to music at a preset time. To start playing. "ON" appears and the hour indication flashes. 5 Set the time to start from a specific track, make a program (see "Listening to...
... you press the button, the minute display (the turn off time) changes cyclically as follows: t TUNER y CD PLAY T t TAPE PLAY T 8 Press ENTER. or > repeatedly until Timer Function "SLEEP OFF" appears. **You cannot check the remaining time if you want to music. or > repeatedly to music at a preset time. To start playing. "ON" appears and the hour indication flashes. 5 Set the time to start from a specific track, make a program (see "Listening to...

Operating Instructions
Page 27
.../TIMER SET. 3 Press . Change the setting Start over from the time the system turns on until the play starts (about 15 seconds before the preset time). • If the system is on about 15 seconds before the preset time, the Daily Timer will not be activated. • You cannot use the optional component connected to turn off the system. "ON" appears and the hour indication flashes. 4 Set the time to set...
.../TIMER SET. 3 Press . Change the setting Start over from the time the system turns on until the play starts (about 15 seconds before the preset time). • If the system is on about 15 seconds before the preset time, the Daily Timer will not be activated. • You cannot use the optional component connected to turn off the system. "ON" appears and the hour indication flashes. 4 Set the time to set...

Operating Instructions
Page 29
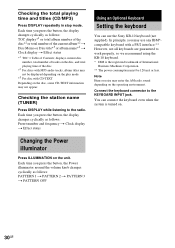
... the system is displayed if you do not set the clock. Each time you press the button, the display changes cyclically as the titles. Viewing information about the disc in the display You can be turned off to operate in Power Saving Mode. Checking the remaining time (CD/MP3) Press DISPLAY repeatedly during standby (Power Saving Mode). Display continued 29GB changing the AM tuning interval - turning on disc, such as follows: Elapsed playing time of...
... the system is displayed if you do not set the clock. Each time you press the button, the display changes cyclically as the titles. Viewing information about the disc in the display You can be turned off to operate in Power Saving Mode. Checking the remaining time (CD/MP3) Press DISPLAY repeatedly during standby (Power Saving Mode). Display continued 29GB changing the AM tuning interval - turning on disc, such as follows: Elapsed playing time of...
Operating Instructions
Page 30
... on the operating environment. Checking the station name (TUNER) Press DISPLAY while listening to the KEYBOARD INPUT jack. Each time you press the button, the display changes cyclically as follows: PATTERN 1 t PATTERN 2 t PATTERN 3 t PATTERN OFF 30GB Each time you press the button, the Power illuminator around the volume knob changes cyclically as follows: Preset number and frequency t Clock display t Effect status Using an Optional Keyboard Setting the keyboard You can connect the...
... on the operating environment. Checking the station name (TUNER) Press DISPLAY while listening to the KEYBOARD INPUT jack. Each time you press the button, the display changes cyclically as follows: PATTERN 1 t PATTERN 2 t PATTERN 3 t PATTERN OFF 30GB Each time you press the button, the Power illuminator around the volume knob changes cyclically as follows: Preset number and frequency t Clock display t Effect status Using an Optional Keyboard Setting the keyboard You can connect the...
Operating Instructions
Page 31
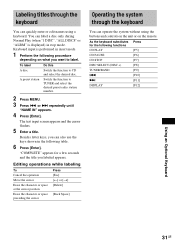
... cursor Press [Esc] [T] or [t] [Delete] [Back Space] Operating the system through the keyboard You can also use the keys shown in the following procedure depending on the remote. To label A disc A preset station Do this Switch the function to TUNER and select the desired preset radio station number. 2 Press MENU. 3 Press . You can operate the system without using a keyboard. Keyboard input is displayed) in insert mode. 1 Perform the following table. 6 Press [Enter].
... cursor Press [Esc] [T] or [t] [Delete] [Back Space] Operating the system through the keyboard You can also use the keys shown in the following procedure depending on the remote. To label A disc A preset station Do this Switch the function to TUNER and select the desired preset radio station number. 2 Press MENU. 3 Press . You can operate the system without using a keyboard. Keyboard input is displayed) in insert mode. 1 Perform the following table. 6 Press [Enter].

Operating Instructions
Page 32
... connect the video input of a digital component A OPTICAL OUT (CD) jack Use a digital optical cable (square, not supplied) to connect an optional component (such as an MD deck) to the connected TV from that component through this jack. You can then output video to this jack. C VIDEO (MD) IN jacks Use audio cords (not supplied) to connect an optional analog component (MD deck or VCR, etc.) to these jacks. D AUDIO IN L/R jacks Use audio cords (not supplied) to connect a video game machine to these jacks. Optional Components Hooking up optional components...
... connect the video input of a digital component A OPTICAL OUT (CD) jack Use a digital optical cable (square, not supplied) to connect an optional component (such as an MD deck) to the connected TV from that component through this jack. You can then output video to this jack. C VIDEO (MD) IN jacks Use audio cords (not supplied) to connect an optional analog component (MD deck or VCR, etc.) to these jacks. D AUDIO IN L/R jacks Use audio cords (not supplied) to connect a video game machine to these jacks. Optional Components Hooking up optional components...
Operating Instructions
Page 34
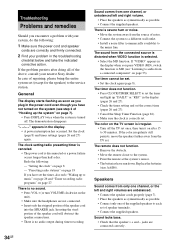
... when VIDEO function is turned off the TV set . The sound from the source of noise. • Connect the system to a different wall outlet. • Install a noise filter (commercially available) to audio from one channel, or the left and right volume. • Place the speakers as symmetrically as possible. • Connect only one of the supplied speakers to MD (see step 3 of the speaker cord into the SPEAKER jack. Set...
... when VIDEO function is turned off the TV set . The sound from the source of noise. • Connect the system to a different wall outlet. • Install a noise filter (commercially available) to audio from one channel, or the left and right volume. • Place the speakers as symmetrically as possible. • Connect only one of the supplied speakers to MD (see step 3 of the speaker cord into the SPEAKER jack. Set...
Operating Instructions
Page 35
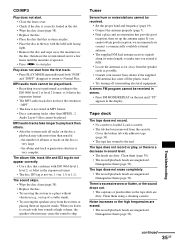
... is loaded. The sound skips. • Wipe the disc clean (page 38). • Replace the disc. • Try moving the speakers away from the speaker cords as possible. • Consult your nearest Sony dealer if the supplied AM antenna has come off the plastic stand. • Try turning off surrounding electrical equipment. Clean them (page 39). Tape deck The tape does not record. •...
... is loaded. The sound skips. • Wipe the disc clean (page 38). • Replace the disc. • Try moving the speakers away from the speaker cords as possible. • Consult your nearest Sony dealer if the supplied AM antenna has come off the plastic stand. • Try turning off surrounding electrical equipment. Clean them (page 39). Tape deck The tape does not record. •...
Operating Instructions
Page 36
... analog out jacks of an audio reproducer, make sure that the NOISE FILTER switch is set these function to OFF. • If the connected optional component has a LINE OUT jacks, connect its LINE OUT jacks. • Change the radio frequency with the connected component and start playing. • Press VIDEO (MD) to General item "The clock setting/radio presetting/timer is a mechanical noise, "EJECT" appears, and the system enters standby mode automatically. • The tape...
... analog out jacks of an audio reproducer, make sure that the NOISE FILTER switch is set these function to OFF. • If the connected optional component has a LINE OUT jacks, connect its LINE OUT jacks. • Change the radio frequency with the connected component and start playing. • Press VIDEO (MD) to General item "The clock setting/radio presetting/timer is a mechanical noise, "EJECT" appears, and the system enters standby mode automatically. • The tape...

Operating Instructions
Page 39
... 39GB output level 1Vp-p, unbalanced, Sync negative, load impedance 75 ohms PHONES (stereo phone jack): accepts headphones of 8 ohms or more than 10% total harmonic distortion from 120 - 10,000 Hz; For details, refer to the instructions of use with adhesive tape. Before placing a cassette in the tape deck Take up any slack in the tape. model AUDIO POWER SPECIFICATIONS POWER OUTPUT AND TOTAL HARMONIC DISTORTION: With 6-ohm loads, both channels driven...
... 39GB output level 1Vp-p, unbalanced, Sync negative, load impedance 75 ohms PHONES (stereo phone jack): accepts headphones of 8 ohms or more than 10% total harmonic distortion from 120 - 10,000 Hz; For details, refer to the instructions of use with adhesive tape. Before placing a cassette in the tape deck Take up any slack in the tape. model AUDIO POWER SPECIFICATIONS POWER OUTPUT AND TOTAL HARMONIC DISTORTION: With 6-ohm loads, both channels driven...
Operating Instructions
Page 40
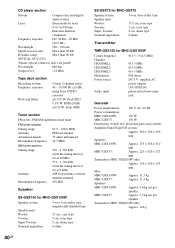
... type 6 ohms Transmitter TMR-GSX100 for MHC-GSX100W Carrier frequency Channel CHANNEL1: CHANNEL2: CHANNEL3: Modulation Power source Audio input 913.5 - 914.5 MHz 913.5 MHz 914.0 MHz 914.5 MHz FM stereo DC 9 V: supplied AC power adaptor (AC-GSX100) phono jacks/stereo mini jack General Power requirements: 120 V AC, 60 Hz Power consumption MHC-GSX100W: 170 W MHC-GSX75: 150 W Dimensions (w/h/d) incl. projecting parts and controls Amplifier/Tuner/Tape/CD section: Approx. 280 × 326 × 490 mm Speakers MHC-GSX100W: Approx...
... type 6 ohms Transmitter TMR-GSX100 for MHC-GSX100W Carrier frequency Channel CHANNEL1: CHANNEL2: CHANNEL3: Modulation Power source Audio input 913.5 - 914.5 MHz 913.5 MHz 914.0 MHz 914.5 MHz FM stereo DC 9 V: supplied AC power adaptor (AC-GSX100) phono jacks/stereo mini jack General Power requirements: 120 V AC, 60 Hz Power consumption MHC-GSX100W: 170 W MHC-GSX75: 150 W Dimensions (w/h/d) incl. projecting parts and controls Amplifier/Tuner/Tape/CD section: Approx. 280 × 326 × 490 mm Speakers MHC-GSX100W: Approx...


