Operating Instructions
Page 6
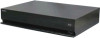
... ...17 Step 3: Setting up the S-AIR Wireless System ...........24 Step 4: Performing the Easy Setup 25 Step 5: Selecting the Source .......26 Step 6: Enjoying Surround Sound 27 Playback Playing a Disc 29 Playing from a USB Device 30 Enjoying an iPod 30 Playing via a Network 31 Available... [Audio Settings 51 [BD/DVD Viewing Settings 52 [Parental Control Settings 53 [Music Settings 53 [System Settings 53 [Network Settings 55 [Easy Setup 55 [Resetting 55 Additional Information Precautions 56 Notes about the Discs 57 Troubleshooting 58 Playable Discs 65 Playable Types of Files ...
... ...17 Step 3: Setting up the S-AIR Wireless System ...........24 Step 4: Performing the Easy Setup 25 Step 5: Selecting the Source .......26 Step 6: Enjoying Surround Sound 27 Playback Playing a Disc 29 Playing from a USB Device 30 Enjoying an iPod 30 Playing via a Network 31 Available... [Audio Settings 51 [BD/DVD Viewing Settings 52 [Parental Control Settings 53 [Music Settings 53 [System Settings 53 [Network Settings 55 [Easy Setup 55 [Resetting 55 Additional Information Precautions 56 Notes about the Discs 57 Troubleshooting 58 Playable Discs 65 Playable Types of Files ...
Operating Instructions
Page 7
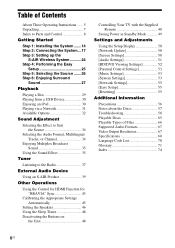
...; Wireless transceivers (2) blue/gray/green/purple) • Video cord (1) • Remote commander (remote) (1) • Operating Instructions • Quick Setup Guide • To stabilize S-AIR reception • End user license agreement • Easy Setup Disc (DVD) • USB Wireless LAN Adapter (UWA-BR100) • R6 (size AA) batteries (2) • UWA-BR100 External cable • Calibration...
...; Wireless transceivers (2) blue/gray/green/purple) • Video cord (1) • Remote commander (remote) (1) • Operating Instructions • Quick Setup Guide • To stabilize S-AIR reception • End user license agreement • Easy Setup Disc (DVD) • USB Wireless LAN Adapter (UWA-BR100) • R6 (size AA) batteries (2) • UWA-BR100 External cable • Calibration...
Operating Instructions
Page 15
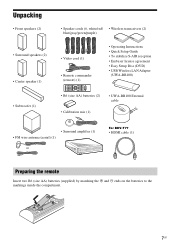
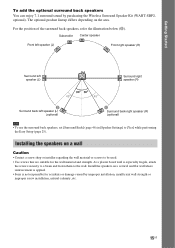
...the speakers on a wall Caution • Contact a screw shop or installer regarding the wall material or screws to [Yes] while performing the Easy Setup (page 25). For the position of the surround back speakers, refer the illustration below (C). As a plaster board wall is not responsible for the... wall material and strength. The optional product lineup differs depending on a vertical and flat wall where reinforcement is applied. • Sony is especially fragile, attach the screws securely to a beam and fasten them to the wall. Install the speakers on the area. Getting ...
...the speakers on a wall Caution • Contact a screw shop or installer regarding the wall material or screws to [Yes] while performing the Easy Setup (page 25). For the position of the surround back speakers, refer the illustration below (C). As a plaster board wall is not responsible for the... wall material and strength. The optional product lineup differs depending on a vertical and flat wall where reinforcement is applied. • Sony is especially fragile, attach the screws securely to a beam and fasten them to the wall. Install the speakers on the area. Getting ...
Operating Instructions
Page 23
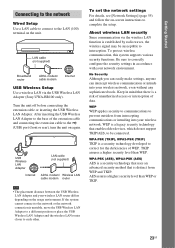
...support TKIP/AES, to be susceptible to each other. About wireless LAN security Since communication via the USB Wireless LAN Adapter (Sony UWA-BR100 only). No Security Although you can easily make settings, anyone can intercept wireless communication or intrude into your wireless ... intercepting communications or intruding into your network environment. LAN cable (not supplied) Broadband router ADSL modem/ cable modem Internet USB Wireless Setup Use a wireless LAN via the wireless LAN function is a risk of unauthorized access or interception of the extension cable and connecting ...
...support TKIP/AES, to be susceptible to each other. About wireless LAN security Since communication via the USB Wireless LAN Adapter (Sony UWA-BR100 only). No Security Although you can easily make settings, anyone can intercept wireless communication or intrude into your wireless ... intercepting communications or intruding into your network environment. LAN cable (not supplied) Broadband router ADSL modem/ cable modem Internet USB Wireless Setup Use a wireless LAN via the wireless LAN function is a risk of unauthorized access or interception of the extension cable and connecting ...
Operating Instructions
Page 25
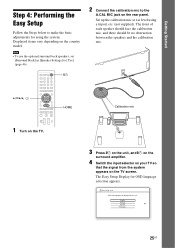
... displayed by this unit. OSD Select the language to be no obstruction between the speakers and the calibration mic. Easy Setup - Displayed items vary depending on the country model. Getting Started Step 4: Performing the Easy Setup Follow the Steps below to make the basic adjustments for OSD language selection appears. The Easy...
... displayed by this unit. OSD Select the language to be no obstruction between the speakers and the calibration mic. Easy Setup - Displayed items vary depending on the country model. Getting Started Step 4: Performing the Easy Setup Follow the Steps below to make the basic adjustments for OSD language selection appears. The Easy...
Operating Instructions
Page 26
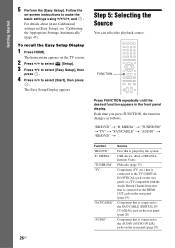
MEDIA" t "TUNER FM" t"TV" t "SAT/CABLE" t "AUDIO" t "BD/DVD" t ... The home menu appears on the rear panel (page 19). "BD/DVD" t "D. MEDIA" "TUNER FM" "TV" "SAT/CABLE" "AUDIO" Source Disc that is played by the system USB device, iPod, or BRAVIA Internet Video FM radio (page 37) ...IN L/R) jacks on -screen instructions to select [Start], then press . Getting Started 5 Perform the [Easy Setup]. Each time you press FUNCTION, the function changes as follows. Function "BD/DVD" "D. Component that is connected to the SAT/CABLE (DIGITAL IN COAXIAL) jack on the rear panel (page...
MEDIA" t "TUNER FM" t"TV" t "SAT/CABLE" t "AUDIO" t "BD/DVD" t ... The home menu appears on the rear panel (page 19). "BD/DVD" t "D. MEDIA" "TUNER FM" "TV" "SAT/CABLE" "AUDIO" Source Disc that is played by the system USB device, iPod, or BRAVIA Internet Video FM radio (page 37) ...IN L/R) jacks on -screen instructions to select [Start], then press . Getting Started 5 Perform the [Easy Setup]. Each time you press FUNCTION, the function changes as follows. Function "BD/DVD" "D. Component that is connected to the SAT/CABLE (DIGITAL IN COAXIAL) jack on the rear panel (page...
Operating Instructions
Page 40
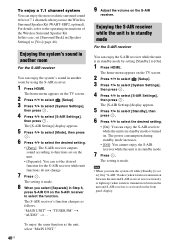
...wireless transmission between the unit and S-AIR receiver is made . 8 When you select [Separate] in Step 6, press S-AIR CH on the S-AIR receiver. In this case, set to [Yes] (page 46). The home menu appears on the TV screen. 2 Press C/c to select [Setup]. 3 Press X/x to select [System ...Settings], then press . 4 Press X/x to select the function. The S-AIR receiver's function changes as the unit, select "MAIN UNIT." 40US 9 Adjust the volume on the S-AIR receiver to select [S-AIR Settings], then press . The...
...wireless transmission between the unit and S-AIR receiver is made . 8 When you select [Separate] in Step 6, press S-AIR CH on the S-AIR receiver. In this case, set to [Yes] (page 46). The home menu appears on the TV screen. 2 Press C/c to select [Setup]. 3 Press X/x to select [System ...Settings], then press . 4 Press X/x to select the function. The S-AIR receiver's function changes as the unit, select "MAIN UNIT." 40US 9 Adjust the volume on the S-AIR receiver to select [S-AIR Settings], then press . The...
Operating Instructions
Page 41
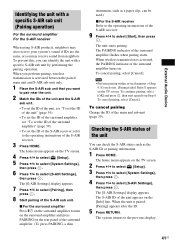
...on . When the unit is activated between the paired main unit and S-AIR sub unit only. 1 Place the S-AIR sub unit that you may receive sound from Step 8. The PAIRING indicator of Step 9. Checking the S-AIR status of the main and sub unit (page 39). To cancel pairing, ... The S-AIR ID of the surround amplifier turns on the TV screen. 2 Press C/c to select [Setup]. 3 Press X/x to select [System Settings], then press . 4 Press X/x to select [Pairing], then press . 8 Start pairing of the S-AIR receiver. 3 Press HOME. The home menu appears on the [Info] line. To continue pairing, select [...
...on . When the unit is activated between the paired main unit and S-AIR sub unit only. 1 Place the S-AIR sub unit that you may receive sound from Step 8. The PAIRING indicator of Step 9. Checking the S-AIR status of the main and sub unit (page 39). To cancel pairing, ... The S-AIR ID of the surround amplifier turns on the TV screen. 2 Press C/c to select [Setup]. 3 Press X/x to select [System Settings], then press . 4 Press X/x to select [Pairing], then press . 8 Start pairing of the S-AIR receiver. 3 Press HOME. The home menu appears on the [Info] line. To continue pairing, select [...
Operating Instructions
Page 42
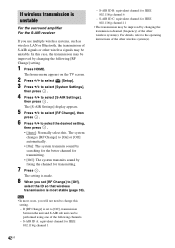
If wireless transmission is unstable For the surround amplifier For the S-AIR receiver If you use multiple wireless systems, such as wireless LAN or Bluetooth, the transmission of the following [RF Change] setting. 1 Press HOME. If [RF Change] ... 802.11b/g channel 1 - In this . S-AIR ID A: equivalent channel for IEEE 802.11b/g channel 6 - The home menu appears on the TV screen. 2 Press C/c to select [Setup]. 3 Press X/x to select [System Settings], then press . 4 Press X/x to [On] or [Off] automatically. • [On]: The system transmits sound by searching for the better channel...
If wireless transmission is unstable For the surround amplifier For the S-AIR receiver If you use multiple wireless systems, such as wireless LAN or Bluetooth, the transmission of the following [RF Change] setting. 1 Press HOME. If [RF Change] ... 802.11b/g channel 1 - In this . S-AIR ID A: equivalent channel for IEEE 802.11b/g channel 6 - The home menu appears on the TV screen. 2 Press C/c to select [Setup]. 3 Press X/x to select [System Settings], then press . 4 Press X/x to [On] or [Off] automatically. • [On]: The system transmits sound by searching for the better channel...
Operating Instructions
Page 43
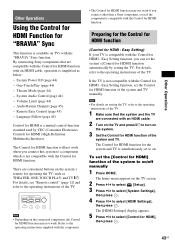
...Electronics Control) for HDMI - Other Operations Using the Control for HDMI Function for HDMI - Easy Setting function, you connect other than a Sony component, even if the component is a mutual control function standard used by setting the TV. The Control for HDMI], then press . 43US..., and TV "/1. Theater Mode (page 44) - Volume Limit (page 44) - If the TV is available on the TV screen. 2 Press C/c to select [Setup]. 3 Press X/x to select [System Settings], then press . 4 Press X/x to select [Control for HDMI function will not work . Audio Return Channel (page 45)...
...Electronics Control) for HDMI - Other Operations Using the Control for HDMI Function for HDMI - Easy Setting function, you connect other than a Sony component, even if the component is a mutual control function standard used by setting the TV. The Control for HDMI], then press . 43US..., and TV "/1. Theater Mode (page 44) - Volume Limit (page 44) - If the TV is available on the TV screen. 2 Press C/c to select [Setup]. 3 Press X/x to select [System Settings], then press . 4 Press X/x to select [Control for HDMI function will not work . Audio Return Channel (page 45)...
Operating Instructions
Page 45
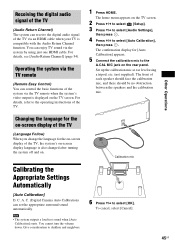
... control the basic functions of the system via the system by using a tripod, etc. (not supplied). Receiving the digital audio signal of the TV (Audio Return Channel) The system can receive the digital audio signal of the TV via an HDMI cable when your TV is displayed on the TV... screen. 2 Press C/c to select [Setup]. 3 Press X/x to select [Audio Settings], then press . 4 Press X/x to select [Auto Calibration], then ...
... control the basic functions of the system via the system by using a tripod, etc. (not supplied). Receiving the digital audio signal of the TV (Audio Return Channel) The system can receive the digital audio signal of the TV via an HDMI cable when your TV is displayed on the TV... screen. 2 Press C/c to select [Setup]. 3 Press X/x to select [Audio Settings], then press . 4 Press X/x to select [Auto Calibration], then ...
Operating Instructions
Page 46
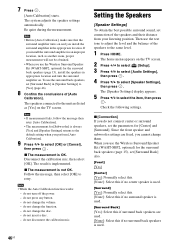
...speakers to select the item, then press . x [Connection] If you install the surround amplifier in [Speaker Settings] to retry. do not insert a disc. - The [Speaker Settings] display appears. 5 Press X/x to the same level. 1 Press HOME. Follow the message, then select [OK] to...Subwoofer] is implemented. Disconnect the calibration mic, then select [OK]. do not turn the surround amplifier on the TV screen. 2 Press C/c to select [Setup]. 3 Press X/x to select [Audio Settings], then press . 4 Press X/x to select [Speaker Settings], then press . When you cannot change the ...
...speakers to select the item, then press . x [Connection] If you install the surround amplifier in [Speaker Settings] to retry. do not insert a disc. - The [Speaker Settings] display appears. 5 Press X/x to the same level. 1 Press HOME. Follow the message, then select [OK] to...Subwoofer] is implemented. Disconnect the calibration mic, then select [OK]. do not turn the surround amplifier on the TV screen. 2 Press C/c to select [Setup]. 3 Press X/x to select [Audio Settings], then press . 4 Press X/x to select [Speaker Settings], then press . When you cannot change the ...
Operating Instructions
Page 50
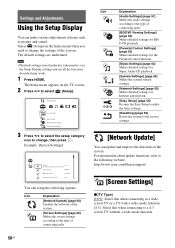
.... Note • Playback settings stored in the disc take priority over the Setup Display settings and not all the functions described may work. 1 Press HOME. The home menu appears on the home menu when you need to select [Setup]. Icon Explanation [Audio Settings] (page 51) ...page 50) Makes the screen settings according to change the settings of the system. Screen Format Original DVD Aspect Ratio Letter Box Cinema Conversion Mode Auto You can setup the following website: http://www.sony.com/bluraysupport/ [Screen Settings] x [TV Type] [16:9]: Select this when connecting to a...
.... Note • Playback settings stored in the disc take priority over the Setup Display settings and not all the functions described may work. 1 Press HOME. The home menu appears on the home menu when you need to select [Setup]. Icon Explanation [Audio Settings] (page 51) ...page 50) Makes the screen settings according to change the settings of the system. Screen Format Original DVD Aspect Ratio Letter Box Cinema Conversion Mode Auto You can setup the following website: http://www.sony.com/bluraysupport/ [Screen Settings] x [TV Type] [16:9]: Select this when connecting to a...
Operating Instructions
Page 55
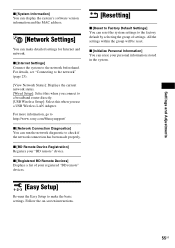
...settings within the group will be reset. For more information, go to http://www.sony.com/bluraysupport/ x [Network Connection Diagnostics] You can run the network diagnostic to a broadband router directly. [USB Wireless Setup]: Select this when you use a USB Wireless LAN Adapter. x [BD Remote ...Device Registration] Registers your personal information stored in the system. [Easy Setup] Re-runs the Easy Setup to make detailed settings for Internet and network. Follow the on-screen instructions. 55US x [Internet Settings] Connect the system...
...settings within the group will be reset. For more information, go to http://www.sony.com/bluraysupport/ x [Network Connection Diagnostics] You can run the network diagnostic to a broadband router directly. [USB Wireless Setup]: Select this when you use a USB Wireless LAN Adapter. x [BD Remote ...Device Registration] Registers your personal information stored in the system. [Easy Setup] Re-runs the Easy Setup to make detailed settings for Internet and network. Follow the on-screen instructions. 55US x [Internet Settings] Connect the system...
Operating Instructions
Page 62
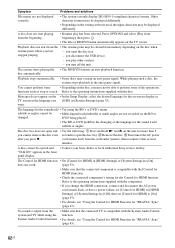
...system can only display ISO 8859-1-compliant character formats. A disc cannot be ejected and • Contact your Sony dealer or local authorized Sony service facility. The Control for HDMI function does not .... • In the Setup Display, select the desired language for more than 5 you cannot remove the disc even seconds to open the disc tray. 2 Remove the disc. 3 Disconnect the AC ... Function for "BRAVIA" Sync" (page 43). The system starts playing the disc automatically. • The BD/DVD features an auto playback function. Refer to the operating instructions supplied with the ...
...system can only display ISO 8859-1-compliant character formats. A disc cannot be ejected and • Contact your Sony dealer or local authorized Sony service facility. The Control for HDMI function does not .... • In the Setup Display, select the desired language for more than 5 you cannot remove the disc even seconds to open the disc tray. 2 Remove the disc. 3 Disconnect the AC ... Function for "BRAVIA" Sync" (page 43). The system starts playing the disc automatically. • The BD/DVD features an auto playback function. Refer to the operating instructions supplied with the ...

Operating Instructions
Page 64
...the S-AIR ID of at least 2.5 Mbps for standarddefinition video and 10 Mbps for high-definition video. • Not all videos contain sound. Sony recommends a connection speed of the unit and S-AIR sub unit (page 42). You cannot connect your wireless LAN router. • Check if ... Change the USB Wireless LAN Adapter position. Other Symptom "Exxxx" appears in [S-AIR Settings] of [System Settings] to the Internet after [Wi-Fi Protected Setup (WPS)] is performed. • The wireless settings of the router. appears without any messages on . • See [Network Update] (page 50) ...
...the S-AIR ID of at least 2.5 Mbps for standarddefinition video and 10 Mbps for high-definition video. • Not all videos contain sound. Sony recommends a connection speed of the unit and S-AIR sub unit (page 42). You cannot connect your wireless LAN router. • Check if ... Change the USB Wireless LAN Adapter position. Other Symptom "Exxxx" appears in [S-AIR Settings] of [System Settings] to the Internet after [Wi-Fi Protected Setup (WPS)] is performed. • The wireless settings of the router. appears without any messages on . • See [Network Update] (page 50) ...
Operating Instructions
Page 74
...72 Dolby Surround Pro Logic 72 74US Dolby TrueHD 72 DTS 34, 72 DTS-HD 72 DVD 65 DVD Aspect Ratio 51 DVD Parental Control 53 E Easy Setup 25, 55 F FM MODE 37 Front panel 8 Front panel display 9 G Gracenote Settings...Code 53 Parental Control Settings 53 Password 53 Pause Mode 51 PhotoTV HD 72 Play information 29 Playable discs 65 Progressive format 73 Q Quick Start Mode 54 R Rear panel 10 Region code 65 Registered BD... Settings 55 Resetting 55 S S-AIR 39, 73 Mode 40 Pairing 41 RF Change 42 S-AIR receiver 39 Standby 40 S-AIR Settings 54 Screen Format 51 Screen Saver 54 Screen Settings 50 SLEEP 48 ...
...72 Dolby Surround Pro Logic 72 74US Dolby TrueHD 72 DTS 34, 72 DTS-HD 72 DVD 65 DVD Aspect Ratio 51 DVD Parental Control 53 E Easy Setup 25, 55 F FM MODE 37 Front panel 8 Front panel display 9 G Gracenote Settings...Code 53 Parental Control Settings 53 Password 53 Pause Mode 51 PhotoTV HD 72 Play information 29 Playable discs 65 Progressive format 73 Q Quick Start Mode 54 R Rear panel 10 Region code 65 Registered BD... Settings 55 Resetting 55 S S-AIR 39, 73 Mode 40 Pairing 41 RF Change 42 S-AIR receiver 39 Standby 40 S-AIR Settings 54 Screen Format 51 Screen Saver 54 Screen Settings 50 SLEEP 48 ...

