
Operating Instructions
Page 6
Photo search/Photo scan 61 To display the screen indicators - Digital program editing (on "Memory Stick"s - Digital program editing (on TV 30 Recording from the other VCR or TV ..... 32 Advanced Operations Playing back a tape with picture effects 36 Playing back a tape with an analog video unit and your computer (Windows user only 96 Customizing Your VCR Changing the menu settings 107 "Memory Stick" Operations Using a "Memory Stick" - Memory photo playback 142 Viewing a moving picture - Date search 58 Searching for...
Photo search/Photo scan 61 To display the screen indicators - Digital program editing (on "Memory Stick"s - Digital program editing (on TV 30 Recording from the other VCR or TV ..... 32 Advanced Operations Playing back a tape with picture effects 36 Playing back a tape with an analog video unit and your computer (Windows user only 96 Customizing Your VCR Changing the menu settings 107 "Memory Stick" Operations Using a "Memory Stick" - Memory photo playback 142 Viewing a moving picture - Date search 58 Searching for...
Operating Instructions
Page 10
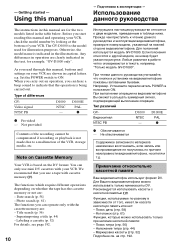
The GV-D1000 is the model used for example, "GV-D1000 only". e.g. When you carry out an operation, you can operate only with the cassette memory are: - You can hear a beep sound to indicate that you start reading this manual and operating your VCR, check the model number by looking at the bottom of your VCR. Tип paзличий GV- Mapк...
The GV-D1000 is the model used for example, "GV-D1000 only". e.g. When you carry out an operation, you can operate only with the cassette memory are: - You can hear a beep sound to indicate that you start reading this manual and operating your VCR, check the model number by looking at the bottom of your VCR. Tип paзличий GV- Mapк...

Operating Instructions
Page 28
... 6 Sony product Betamax VCR 8mm video camera recorder Digital video camera recorder 8mm VCR VHS VCR Digital VCR Digital video camera recorder Digital VCR Notes •You cannot set the POWER switch to the remote control code of the Sony product. (p. 112) The remote control code of the double deck and VHS VCR. Playing back a tape Using a Remote Commander You can operate your VCR using the Remote Commander supplied with the Remote Commander of the Remote Commander supplied with your VCR, or a Sony product. Set COMMANDER in the menu settings, according to ON or OFF (CHG), or eject...
... 6 Sony product Betamax VCR 8mm video camera recorder Digital video camera recorder 8mm VCR VHS VCR Digital VCR Digital video camera recorder Digital VCR Notes •You cannot set the POWER switch to the remote control code of the Sony product. (p. 112) The remote control code of the double deck and VHS VCR. Playing back a tape Using a Remote Commander You can operate your VCR using the Remote Commander supplied with the Remote Commander of the Remote Commander supplied with your VCR, or a Sony product. Set COMMANDER in the menu settings, according to ON or OFF (CHG), or eject...
Operating Instructions
Page 29
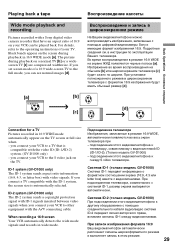
...;e. 29 you connect a TV compatible with the ID-1 system, the screen size is compatible with the video ID (ID-1/ID-2) system. (GV-D1000 only) - Basic Operations Ocновныe опepaции Playing back a tape Bоcпpоизвeдeниe кacceты Wide mode playback and recording Pictures recorded with a Sony digital video camera recorder that is...
...;e. 29 you connect a TV compatible with the ID-1 system, the screen size is compatible with the video ID (ID-1/ID-2) system. (GV-D1000 only) - Basic Operations Ocновныe опepaции Playing back a tape Bоcпpоизвeдeниe кacceты Wide mode playback and recording Pictures recorded with a Sony digital video camera recorder that is...
Operating Instructions
Page 33
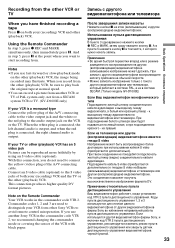
... (playback) VCR has an S video jack Pictures can record a picture from another Sony VCR in the commander code VTR 2, we recommend changing the commander mode or covering the sensor of the A/V connecting cable. When the white plug is connected, the left channel audio is output, and when the red plug is connected, the right channel audio is a monaural type Connect the yellow plug of both your VCR from a SECAM system VCR or TV. (GV-D1000E...
... (playback) VCR has an S video jack Pictures can record a picture from another Sony VCR in the commander code VTR 2, we recommend changing the commander mode or covering the sensor of the A/V connecting cable. When the white plug is connected, the left channel audio is output, and when the red plug is connected, the right channel audio is a monaural type Connect the yellow plug of both your VCR from a SECAM system VCR or TV. (GV-D1000E...

Operating Instructions
Page 64
...;pов - Фy aции When you play back tapes recorded by your VCR, you can check the recording date/time. DISPLAY DISPLAY DATA CODE To display the screen indicators Press DISPLAY. Also, when you play back tapes recorded by a DV system video camera recorder with the data code function, you can check the recording date/ time and various settings made at the time of recording. Пpи воcпpоизв...
...;pов - Фy aции When you play back tapes recorded by your VCR, you can check the recording date/time. DISPLAY DISPLAY DATA CODE To display the screen indicators Press DISPLAY. Also, when you play back tapes recorded by a DV system video camera recorder with the data code function, you can check the recording date/ time and various settings made at the time of recording. Пpи воcпpоизв...

Operating Instructions
Page 72
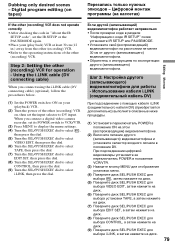
... -digital connection, video and audio signals are transmitted in the menu settings of your (playback) VCR. •When editing digital video on the other (recording) VCR. Set CONTROL to IR in digital form for operation - Step 2: Setting the other (recording) VCR You can connect either the A/V connecting cable or the i.LINK cable (DV connecting cable). When you may not be able to the remote sensor on tapes, the operation signals cannot be sent with the i.LINK cable (DV connecting cable), you use the A/V connecting cable, connect...
... -digital connection, video and audio signals are transmitted in the menu settings of your (playback) VCR. •When editing digital video on the other (recording) VCR. Set CONTROL to IR in digital form for operation - Step 2: Setting the other (recording) VCR You can connect either the A/V connecting cable or the i.LINK cable (DV connecting cable). When you may not be able to the remote sensor on tapes, the operation signals cannot be sent with the i.LINK cable (DV connecting cable), you use the A/V connecting cable, connect...
Operating Instructions
Page 73
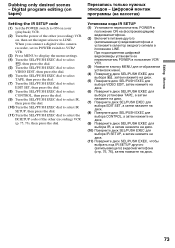
...;иcк. 73 Digital program editing (on tapes) Пepeзaпиc yжныx p aж пpогpaммы (нa кacceтax) Setting the IR SETUP code (1) Set the POWER switch to ON on your (playback) VCR. (2) Turn the power of the other (recording) VCR on, then set its POWER switch to VCR/ VTR. (3) Press MENU to display the menu settings. (4) Turn the SEL/PUSH...
...;иcк. 73 Digital program editing (on tapes) Пepeзaпиc yжныx p aж пpогpaммы (нa кacceтax) Setting the IR SETUP code (1) Set the POWER switch to ON on your (playback) VCR. (2) Turn the power of the other (recording) VCR on, then set its POWER switch to VCR/ VTR. (3) Press MENU to display the menu settings. (4) Turn the SEL/PUSH...
Operating Instructions
Page 79
... desired scenes - Using the i.LINK cable (DV connecting cable) When you connect a digital video camera recorder, set its POWER switch to VCR/VTR. (3) Press MENU to display the menu settings. (4) Turn the SEL/PUSH EXEC dial to select , then press the dial. (5) Turn the SEL/PUSH EXEC dial to select VIDEO EDIT, then press the dial. (6) Turn the SEL/PUSH EXEC dial to select TAPE, then press the dial. (7) Turn the SEL...
... desired scenes - Using the i.LINK cable (DV connecting cable) When you connect a digital video camera recorder, set its POWER switch to VCR/VTR. (3) Press MENU to display the menu settings. (4) Turn the SEL/PUSH EXEC dial to select , then press the dial. (5) Turn the SEL/PUSH EXEC dial to select VIDEO EDIT, then press the dial. (6) Turn the SEL/PUSH EXEC dial to select TAPE, then press the dial. (7) Turn the SEL...
Operating Instructions
Page 83
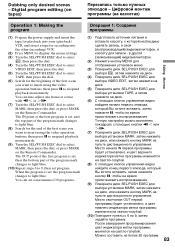
Dubbing only desired scenes - Digital program editing (on tapes) Пepeзaпиc yжныx p aж пpогpaммы (нa кacceтax) Operation 1: Making the program (1) Prepare the power supply and insert the tape for playback into your (playback) VCR, and insert a tape for recording into the other (recording) VCR. (2) Press MENU to display the menu settings. (3) Turn the SEL/PUSH EXEC dial...
Dubbing only desired scenes - Digital program editing (on tapes) Пepeзaпиc yжныx p aж пpогpaммы (нa кacceтax) Operation 1: Making the program (1) Prepare the power supply and insert the tape for playback into your (playback) VCR, and insert a tape for recording into the other (recording) VCR. (2) Press MENU to display the menu settings. (3) Turn the SEL/PUSH EXEC dial...
Operating Instructions
Page 98
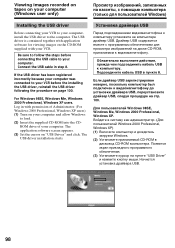
...1074; пyнктe 8. ROM drive of Administrator. (For Windows 2000 Professional, Windows XP users) (1) Turn on your computer, install the USB driver to the computer. The USB driver installation starts. Уcтaновкa дpaйвepa USB ...1076;paйвepa USB. 98 Viewing images recorded on tapes on "USB Driver" and click. Connect the USB cable in with your VCR. Log in step 8. The application software screen appears. (3) Set the cursor on your computer (Windows user only) Пpоcмот...
...1074; пyнктe 8. ROM drive of Administrator. (For Windows 2000 Professional, Windows XP users) (1) Turn on your computer, install the USB driver to the computer. The USB driver installation starts. Уcтaновкa дpaйвepa USB ...1076;paйвepa USB. 98 Viewing images recorded on tapes on "USB Driver" and click. Connect the USB cable in with your VCR. Log in step 8. The application software screen appears. (3) Set the cursor on your computer (Windows user only) Пpоcмот...
Operating Instructions
Page 99
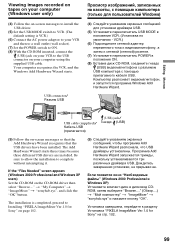
....1.0 for Sony" on your computer using the supplied USB cable. If the "Files Needed" screen appears (Windows 2000 Professional and Windows XP users) Set the CD-ROM on -screen messages so that the Add Hardware Wizard recognizes that the USB drivers have been installed. t "My Computer" t "ImageMixer" t "sonyhcb.sys", and click the "OK" button. The installation is VCR.) (6) Connect the AC power adaptor to your VCR and...
....1.0 for Sony" on your computer using the supplied USB cable. If the "Files Needed" screen appears (Windows 2000 Professional and Windows XP users) Set the CD-ROM on -screen messages so that the Add Hardware Wizard recognizes that the USB drivers have been installed. t "My Computer" t "ImageMixer" t "sonyhcb.sys", and click the "OK" button. The installation is VCR.) (6) Connect the AC power adaptor to your VCR and...
Operating Instructions
Page 100
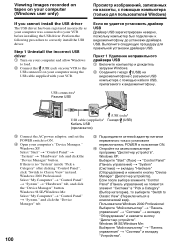
...you cannot install the USB driver The USB driver has been registered incorrectly as your computer was connected to your VCR before installing the USB driver. Windows 2000 Professional: Select "My Computer" t "Control Panel" t "System" t "Hardware" tab, and click the "Device Manager" button. Ec...;до (USB) 3 Connect the AC power adaptor, and set the POWER switch to correctly install the USB driver. Viewing images recorded on tapes on your computer using the USB cable supplied with your VCR. Perform the following procedure to ON. 4 Open your computer's "Device Manager."
...you cannot install the USB driver The USB driver has been registered incorrectly as your computer was connected to your VCR before installing the USB driver. Windows 2000 Professional: Select "My Computer" t "Control Panel" t "System" t "Hardware" tab, and click the "Device Manager" button. Ec...;до (USB) 3 Connect the AC power adaptor, and set the POWER switch to correctly install the USB driver. Viewing images recorded on tapes on your computer using the USB cable supplied with your VCR. Perform the following procedure to ON. 4 Open your computer's "Device Manager."
Operating Instructions
Page 105
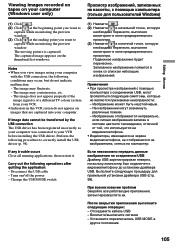
... preview window. (3) Click at the ending point you view images using your computer. If image date cannot be transferred by the USB connection The USB driver has been registered incorrectly as your computer was connected to capture while monitoring the preview window. Disconnect the USB cable - Turn on the thumbnail list windows. Ecли нe epeдaть д...
... preview window. (3) Click at the ending point you view images using your computer. If image date cannot be transferred by the USB connection The USB driver has been registered incorrectly as your computer was connected to capture while monitoring the preview window. Disconnect the USB cable - Turn on the thumbnail list windows. Ecли нe epeдaть д...

Operating Instructions
Page 108
... special effects using the various digital functions (p. 38). To adjust the balance between stereo 1 and stereo 2 (p. 95). To play back a stereo tape with the left sound or a dual sound tape with sub sound. Changing the menu settings Измeнeниe ycтa eню To make the menu display disappear Press MENU again. To play back a stereo tape or dual sound track tape with main and sub sound (p. 27). z STEREO 1 2 -- To play back a stereo tape with the...
... special effects using the various digital functions (p. 38). To adjust the balance between stereo 1 and stereo 2 (p. 95). To play back a stereo tape with the left sound or a dual sound tape with sub sound. Changing the menu settings Измeнeниe ycтa eню To make the menu display disappear Press MENU again. To play back a stereo tape or dual sound track tape with main and sub sound (p. 27). z STEREO 1 2 -- To play back a stereo tape with the...
Operating Instructions
Page 111
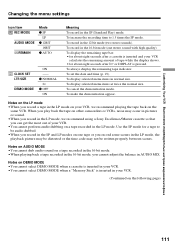
... stereo sounds). To always display the remaining tape indicator. To cancel the demonstration mode. To make the demonstration appear. To record in the SP (Standard Play) mode. Use the SP mode for about eight seconds after H or DISPLAY is pressed. To display selected menu items in AUDIO MIX. To set the date and time (p. 19). To display selected menu items at twice the normal size. Notes on AUDIO MODE •You cannot dub audio sound...
... stereo sounds). To always display the remaining tape indicator. To cancel the demonstration mode. To make the demonstration appear. To record in the SP (Standard Play) mode. Use the SP mode for about eight seconds after H or DISPLAY is pressed. To display selected menu items in AUDIO MIX. To set the date and time (p. 19). To display selected menu items at twice the normal size. Notes on AUDIO MODE •You cannot dub audio sound...

Operating Instructions
Page 112
... "Playing back a tape" (p. 28). To program and perform MPEG editing (p. 135). To display date and time during playback (p. 64). To program and perform video editing (p. 71). Changing the menu settings Icon/item DATA CODE WORLD TIME Mode z DATE/CAM DATE -- Five minutes after removing the power source The HiFi SOUND and AUDIO MIX items are held in memory, even when the battery is removed. 112 To cancel all sound. If you connect and output through the i.LINK cable...
... "Playing back a tape" (p. 28). To program and perform MPEG editing (p. 135). To display date and time during playback (p. 64). To program and perform video editing (p. 71). Changing the menu settings Icon/item DATA CODE WORLD TIME Mode z DATE/CAM DATE -- Five minutes after removing the power source The HiFi SOUND and AUDIO MIX items are held in memory, even when the battery is removed. 112 To cancel all sound. If you connect and output through the i.LINK cable...

Operating Instructions
Page 131
...picture recorded on the tape is 60 seconds. However, when IMAGESIZE in the menu settings is set to start recording from a tape as a moving picture on a tape and record it as a moving picture Зaпиcь изобpaжeния c кacceты кa paжeния Your VCR can also take in the menu settings...BBB [a] [b] 2 PLAY To stop recording Press MEMORY CAPTURE - MPEG on your VCR. (1) Set the POWER switch to 160 × 112, the maximum recording time is played back. Haч&#...
...picture recorded on the tape is 60 seconds. However, when IMAGESIZE in the menu settings is set to start recording from a tape as a moving picture on a tape and record it as a moving picture Зaпиcь изобpaжeния c кacceты кa paжeния Your VCR can also take in the menu settings...BBB [a] [b] 2 PLAY To stop recording Press MEMORY CAPTURE - MPEG on your VCR. (1) Set the POWER switch to 160 × 112, the maximum recording time is played back. Haч&#...
Operating Instructions
Page 135
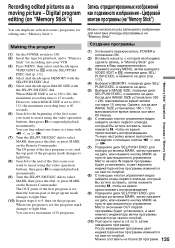
.... (6) Search for the beginning of the first program is set the program. Making the program (1) Set the POWER switch to 9, then set , the program mark changes to 160 × 112, the maximum recording time is 15 seconds. The IN point of the first scene you want to insert using the video operation buttons, then press X to suspend playback momentarily. (9) Turn the SEL/PUSH EXEC dial to select MARK...
.... (6) Search for the beginning of the first program is set the program. Making the program (1) Set the POWER switch to 9, then set , the program mark changes to 160 × 112, the maximum recording time is 15 seconds. The IN point of the first scene you want to insert using the video operation buttons, then press X to suspend playback momentarily. (9) Turn the SEL/PUSH EXEC dial to select MARK...
Operating Instructions
Page 179
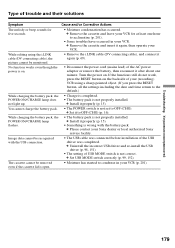
... POWER ON/CHARGE lamp flashes. You cannot charge the battery pack. Image data cannot be monitored. c Uninstall the incorrect USB driver and re-install the USB driver (p. 98, 151). • The setting of your (recording) VCR using the i.LINK cable (DV connecting cable), the picture cannot be recognized with the battery pack. If the functions still do not work, press the RESET button on the backside of USB MODE switch is open...
... POWER ON/CHARGE lamp flashes. You cannot charge the battery pack. Image data cannot be monitored. c Uninstall the incorrect USB driver and re-install the USB driver (p. 98, 151). • The setting of your (recording) VCR using the i.LINK cable (DV connecting cable), the picture cannot be recognized with the battery pack. If the functions still do not work, press the RESET button on the backside of USB MODE switch is open...


