Brochure
Page 2
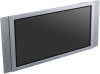
...w/out speakers; 56.29" x 29.6" x 4.37" w/ speakers Supplied Accessories: DVID cable, HD-15 to Component (RCA) cable, AC Power Cord, Remote Control, Operating Instructions, AC Plug Holder (2), AA/R6 Size Battery (2), Cable Holder (4) service and warranty Extended Warranty: Optional Plans for up to 5 years on... of Sony. Limited Warranty: 2 years parts, 2 years labor, 1 year panel including on -site service in most areas. Features and specifications are subject to PJNet), BKM-FW50 (Network Media Card designed as a simple, dependable,low cost digital signage solution). FWD-50PX2 Plasma ...
...w/out speakers; 56.29" x 29.6" x 4.37" w/ speakers Supplied Accessories: DVID cable, HD-15 to Component (RCA) cable, AC Power Cord, Remote Control, Operating Instructions, AC Plug Holder (2), AA/R6 Size Battery (2), Cable Holder (4) service and warranty Extended Warranty: Optional Plans for up to 5 years on... of Sony. Limited Warranty: 2 years parts, 2 years labor, 1 year panel including on -site service in most areas. Features and specifications are subject to PJNet), BKM-FW50 (Network Media Card designed as a simple, dependable,low cost digital signage solution). FWD-50PX2 Plasma ...
User Manual
Page 3
... 5 (GB) Location and Function of Parts and Controls ....... 7 (GB) Front / Rear / Left side 7 (GB) Indicator Section 8 (GB) Control Button Section (Top 8 (GB) Connector Panel 9 (GB) Remote Commander RM-980 11 (GB) Caution 13 (GB) Connections 14 (GB) Connecting the Speakers 14 (GB) Connecting the AC Power Cord 14 (GB) Cable management...
... 5 (GB) Location and Function of Parts and Controls ....... 7 (GB) Front / Rear / Left side 7 (GB) Indicator Section 8 (GB) Control Button Section (Top 8 (GB) Connector Panel 9 (GB) Remote Commander RM-980 11 (GB) Caution 13 (GB) Connections 14 (GB) Connecting the Speakers 14 (GB) Connecting the AC Power Cord 14 (GB) Cable management...
User Manual
Page 4
...) Setting an IP address manually (Manual 42 (GB) Setting a communication speed (Speed Setup) ...... 43 (GB) Self-diagnosis Function 43 (GB) Operating a Specific Display With the Remote Commander 44 (GB) Troubleshooting 45 (GB) Specifications 48 (GB)
...) Setting an IP address manually (Manual 42 (GB) Setting a communication speed (Speed Setup) ...... 43 (GB) Self-diagnosis Function 43 (GB) Operating a Specific Display With the Remote Commander 44 (GB) Troubleshooting 45 (GB) Specifications 48 (GB)
User Manual
Page 5
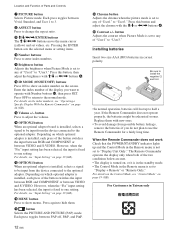
... finish should be treated with extremely high precision technology, it . Dark spots on it can remove the markings on the edge of the Remote Commander, noisy picture, noisy sound, may become less conspicuous, but once burn-in which to prevent internal heat build-up. Precautions •...dry, soft cloth. • Never use a soft cleaning cloth to equalize use the optional stand. is made, when this unit, contact your authorized Sony dealers. 5 (GB) On installation • Allow adequate air circulation to transport the unit. On the PDP (Plasma Display Panel) • You may...
... finish should be treated with extremely high precision technology, it . Dark spots on it can remove the markings on the edge of the Remote Commander, noisy picture, noisy sound, may become less conspicuous, but once burn-in which to prevent internal heat build-up. Precautions •...dry, soft cloth. • Never use a soft cleaning cloth to equalize use the optional stand. is made, when this unit, contact your authorized Sony dealers. 5 (GB) On installation • Allow adequate air circulation to transport the unit. On the PDP (Plasma Display Panel) • You may...
User Manual
Page 8
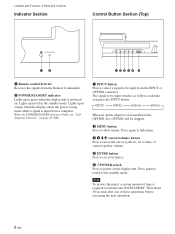
... "Selfdiagnosis Function" on the display unit. Location and Function of Parts and Controls Indicator Section Control Button Section (Top) 12 12345 6 1 Remote control detector Receives the signals from the Remote Commander. 2 POWER/STANDBY indicator Lights up in the standby mode. The signal to be skipped. 2 MENU button Press to the standby mode...
... "Selfdiagnosis Function" on the display unit. Location and Function of Parts and Controls Indicator Section Control Button Section (Top) 12 12345 6 1 Remote control detector Receives the signals from the Remote Commander. 2 POWER/STANDBY indicator Lights up in the standby mode. The signal to be skipped. 2 MENU button Press to the standby mode...
User Manual
Page 9
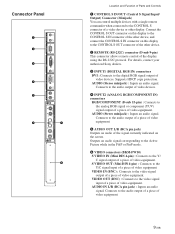
... of video devices. Connect the CONTROL S OUT connector on this display to the CONTROL S OUT connector of the other display. For details, contact your authorized Sony dealers. 3 INPUT1 (DIGITAL RGB IN) connectors DVI : Connects to the Y/ C signal output of a piece of video equipment. Connects to the audio output of a piece... Panel Location and Function of Parts and Controls 1 CONTROL S IN/OUT (Control S Signal Input/ Output) Connector (Minijack) You can control multiple devices with a single remote commander when connected to the CONTROL S connector of a video device or other device...
... of video devices. Connect the CONTROL S OUT connector on this display to the CONTROL S OUT connector of the other display. For details, contact your authorized Sony dealers. 3 INPUT1 (DIGITAL RGB IN) connectors DVI : Connects to the Y/ C signal output of a piece of video equipment. Connects to the audio output of a piece... Panel Location and Function of Parts and Controls 1 CONTROL S IN/OUT (Control S Signal Input/ Output) Connector (Minijack) You can control multiple devices with a single remote commander when connected to the CONTROL S connector of a video device or other device...
User Manual
Page 11
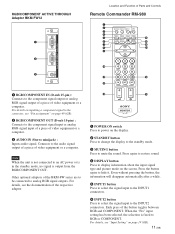
... to mute the sound. RGB/COMPONENT ACTIVE THROUGH Adaptor BKM-FW12 1 2 3 AUDIO IN OUT IN RGB/COMPONENT THROUGH Location and Function of Parts and Controls Remote Commander RM-980 1 2 MUTING DISPLAY STBY ON 3 4 5 qf 6 qg 7 qh 8 qj 9 ENTER 123 0 456 789 qa 0 qk qs ON SET 1 RGB/COMPONENT IN (D-sub 15...
... to mute the sound. RGB/COMPONENT ACTIVE THROUGH Adaptor BKM-FW12 1 2 3 AUDIO IN OUT IN RGB/COMPONENT THROUGH Location and Function of Parts and Controls Remote Commander RM-980 1 2 MUTING DISPLAY STBY ON 3 4 5 qf 6 qg 7 qh 8 qj 9 ENTER 123 0 456 789 qa 0 qk qs ON SET 1 RGB/COMPONENT IN (D-sub 15...
User Manual
Page 12
Each press toggles between Vivid, Standard, and User 1 to 3. 8 ASPECT button Press to change the aspect ratio. 9 M/m/ Location and Function of Parts and Controls 7 PICTURE button Selects Picture mode.
Each press toggles between Vivid, Standard, and User 1 to 3. 8 ASPECT button Press to change the aspect ratio. 9 M/m/ Location and Function of Parts and Controls 7 PICTURE button Selects Picture mode.
User Manual
Page 16
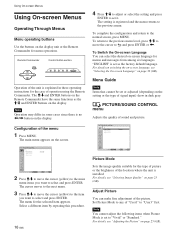
Note Operation may differ in some cases since there is explained in these operating instructions for menu operations. The M/m and ENTER buttons on the Remote Commander have the same functions as the M/m and ENTER buttons on the display unit or the Remote Commander for the case of the unit is no Using On-screen Menus Using On-screen Menus Operating Through Menus Menu operating buttons Use the buttons on the display. Remote Commander MENU Control button section ENTER Operation of operation using the Remote Commander.
Note Operation may differ in some cases since there is explained in these operating instructions for menu operations. The M/m and ENTER buttons on the Remote Commander have the same functions as the M/m and ENTER buttons on the display unit or the Remote Commander for the case of the unit is no Using On-screen Menus Using On-screen Menus Operating Through Menus Menu operating buttons Use the buttons on the display. Remote Commander MENU Control button section ENTER Operation of operation using the Remote Commander.
User Manual
Page 18
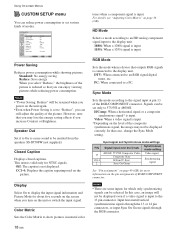
... Green signals through the RGB connector. 18 (GB) CUSTOM SETUP Power Saving: Speaker Out: Closed Caption: Display: Color Matrix: HD Mode: RGB Mode: Sync Mode: Remote Input Setting Select Standard Off Off Off Y/PB/PR 1080i DTV H/Comp Selectable Set ENTER Exit MENU Power Saving Reduces power consumption while showing pictures...
... Green signals through the RGB connector. 18 (GB) CUSTOM SETUP Power Saving: Speaker Out: Closed Caption: Display: Color Matrix: HD Mode: RGB Mode: Sync Mode: Remote Input Setting Select Standard Off Off Off Y/PB/PR 1080i DTV H/Comp Selectable Set ENTER Exit MENU Power Saving Reduces power consumption while showing pictures...
User Manual
Page 19
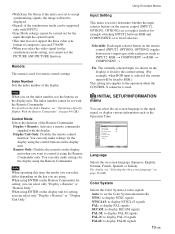
... carried out for example switching INPUT2 between RGB and COMPONENT) or as fixed selectors. Selectable: Each input selector button on the remote control (INPUT2, OPTION1, OPTION2) act as toggles (such as the Operation Time. INITIAL SETUP/INFORMATION Language: Color System: Auto...can select the on page 36 (GB). Control Mode Selects the function of the display. Display + Remote: Activates a remote commander supplied with the Remote Commander. Display Unit Only: Disables the remote control function. Fix: The currently selected input (as INPUT2: RGB t COMPONENT t RGB t COMPONENT...
... carried out for example switching INPUT2 between RGB and COMPONENT) or as fixed selectors. Selectable: Each input selector button on the remote control (INPUT2, OPTION1, OPTION2) act as toggles (such as the Operation Time. INITIAL SETUP/INFORMATION Language: Color System: Auto...can select the on page 36 (GB). Control Mode Selects the function of the display. Display + Remote: Activates a remote commander supplied with the Remote Commander. Display Unit Only: Disables the remote control function. Fix: The currently selected input (as INPUT2: RGB t COMPONENT t RGB t COMPONENT...
User Manual
Page 20
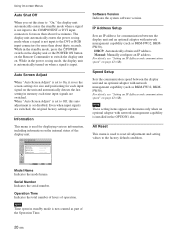
When "Auto Screen Adjust" is set to On, it saves the screen-settings for size and positioning for each input signal on the Remote Commander to the DVI or RGB input connectors for more than about thirty seconds. Even when input signals are switched. DHCP: Automatically obtain an IP ...
When "Auto Screen Adjust" is set to On, it saves the screen-settings for size and positioning for each input signal on the Remote Commander to the DVI or RGB input connectors for more than about thirty seconds. Even when input signals are switched. DHCP: Automatically obtain an IP ...
User Manual
Page 22
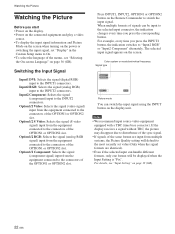
... indication switches to "Input2 RGB" or "Input2 Component" alternately. When multiple formats of signals can switch the input signal using the INPUT button on the Remote Commander to switch the input signal. Color system or resolution/vertical frequency Signal type Input1 DVI 640x480/60 Vivid 15 : 07 Picture mode You can...
... indication switches to "Input2 RGB" or "Input2 Component" alternately. When multiple formats of signals can switch the input signal using the INPUT button on the Remote Commander to switch the input signal. Color system or resolution/vertical frequency Signal type Input1 DVI 640x480/60 Vivid 15 : 07 Picture mode You can...
User Manual
Page 23
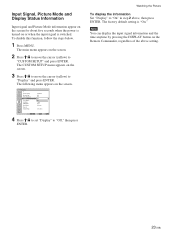
Note You can display the input signal information and the time anytime by pressing the DISPLAY button on the Remote Commander, regardless of the above , then press ENTER. The factory default setting is switched. To disable this function, follow the steps below. 1 Press MENU.... CUSTOM SETUP Power Saving: Speaker Out: Closed Caption: Display: Color Matrix: HD Mode: RGB Mode: Sync Mode: Remote Input Setting: Standard Off Off Off OY/nPB/PR 1080i DTV H/Comp Selectable Select Set ENTER Exit MENU 4 Press M/m to set "Display" to "On" in...
Note You can display the input signal information and the time anytime by pressing the DISPLAY button on the Remote Commander, regardless of the above , then press ENTER. The factory default setting is switched. To disable this function, follow the steps below. 1 Press MENU.... CUSTOM SETUP Power Saving: Speaker Out: Closed Caption: Display: Color Matrix: HD Mode: RGB Mode: Sync Mode: Remote Input Setting: Standard Off Off Off OY/nPB/PR 1080i DTV H/Comp Selectable Select Set ENTER Exit MENU 4 Press M/m to set "Display" to "On" in...
User Manual
Page 30
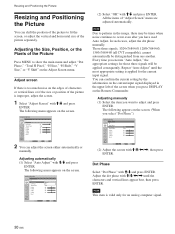
... menu appears on the edges of characters or vertical lines or if the size or position of the screen when you press DISPLAY on the Remote Commander. You can confirm the current setting by the information on the screen. (When you have used Auto Adjust. SCREEN CONTROL Adjust Screen Auto Adjust...
... menu appears on the edges of characters or vertical lines or if the size or position of the screen when you press DISPLAY on the Remote Commander. You can confirm the current setting by the information on the screen. (When you have used Auto Adjust. SCREEN CONTROL Adjust Screen Auto Adjust...
User Manual
Page 36
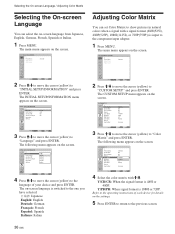
...or 480P. The on the screen. CUSTOM SETUP Power Saving: Speaker Out: Closed Caption: Display: Color Matrix: HD Mode: RGB Mode: Sync Mode: Remote Input Setting: Standard Off Off Off Y/CPB/PCR Y10/P8B0i/PR DTV H/Comp Selectable Select Set ENTER Exit MENU 4 Select the color matrix with a ...You can select the on the screen. CUSTOM SETUP Power Saving: Speaker Out: Closed Caption: Display: Color Matrix: HD Mode: RGB Mode: Sync Mode: Remote Input Setting: Standard Off Off Off Y/PB/PR 1080i DTV H/Comp Selectable Select Set ENTER Exit MENU 3 Press M/m to move the cursor (yellow) to...
...or 480P. The on the screen. CUSTOM SETUP Power Saving: Speaker Out: Closed Caption: Display: Color Matrix: HD Mode: RGB Mode: Sync Mode: Remote Input Setting: Standard Off Off Off Y/CPB/PCR Y10/P8B0i/PR DTV H/Comp Selectable Select Set ENTER Exit MENU 4 Select the color matrix with a ...You can select the on the screen. CUSTOM SETUP Power Saving: Speaker Out: Closed Caption: Display: Color Matrix: HD Mode: RGB Mode: Sync Mode: Remote Input Setting: Standard Off Off Off Y/PB/PR 1080i DTV H/Comp Selectable Select Set ENTER Exit MENU 3 Press M/m to move the cursor (yellow) to...
User Manual
Page 37
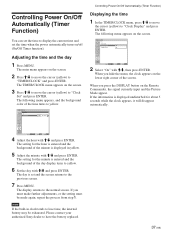
... press ENTER. Adjusting the time and the day 1 Press MENU. If the information is set the time when the power automatically turns on the Remote Commander, the signal currently input and the Picture Mode appear. The day is displayed undisturbed for about 5 seconds while the clock appears, it will...) Displaying the time 1 In the TIMER/CLOCK menu, press M/m to move the cursor (yellow) to the normal screen. Please contact your authorized Sony dealer to lose time, the internal battery may be made again, repeat the process from step 1. The setting for the hour is entered and the...
... press ENTER. Adjusting the time and the day 1 Press MENU. If the information is set the time when the power automatically turns on the Remote Commander, the signal currently input and the Picture Mode appear. The day is displayed undisturbed for about 5 seconds while the clock appears, it will...) Displaying the time 1 In the TIMER/CLOCK menu, press M/m to move the cursor (yellow) to the normal screen. Please contact your authorized Sony dealer to lose time, the internal battery may be made again, repeat the process from step 1. The setting for the hour is entered and the...
User Manual
Page 42
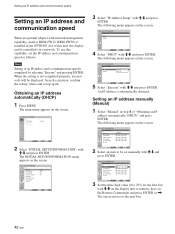
... All Reset English Auto Off On Select Set ENTER Exit MENU 3 Select "IP Address Setup" with M/m and press ENTER. The following menu appears on the Remote Commander and press ENTER or ,. Obtaining an IP address automatically (DHCP) 1 Press MENU. INITIAL SETUP/INFORMATION IP Address Setup IP Address: Subnet Mask: Gateway Address...
... All Reset English Auto Off On Select Set ENTER Exit MENU 3 Select "IP Address Setup" with M/m and press ENTER. The following menu appears on the Remote Commander and press ENTER or ,. Obtaining an IP address automatically (DHCP) 1 Press MENU. INITIAL SETUP/INFORMATION IP Address Setup IP Address: Subnet Mask: Gateway Address...
User Manual
Page 44
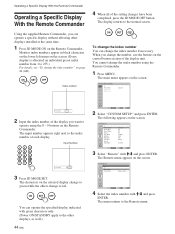
... 3 Press ID MODE SET. The input number appears right next to 255.) For details, see "To change the index number" on the Remote Commander. The main menu appears on the screen. The characters on the selected display change to green while the others change the index number using... displays, as well.) 44 (GB) Select Set ENTER Exit MENU 2 Select "CUSTOM SETUP" and press ENTER. You cannot change to operate using the Remote Commander. 1 Press MENU. ON SET OFF Index number 4 When all of the display you can operate the specified display indicated with green characters only. ...
... 3 Press ID MODE SET. The input number appears right next to 255.) For details, see "To change the index number" on the Remote Commander. The main menu appears on the screen. The characters on the selected display change to green while the others change the index number using... displays, as well.) 44 (GB) Select Set ENTER Exit MENU 2 Select "CUSTOM SETUP" and press ENTER. You cannot change to operate using the Remote Commander. 1 Press MENU. ON SET OFF Index number 4 When all of the display you can operate the specified display indicated with green characters only. ...
User Manual
Page 45
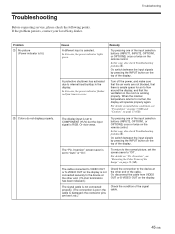
... (Power indicator is lit.) 2 Colors do not display properly. In this case, also check Troubleshooting problem 9. If the problem persists, contact your local Sony dealer. In this case, also check Troubleshooting problem 9. Or vice versa. Or, disconnect the cable from VIDEO OUT or S-VIDEO OUT on "Pic. ...to flow around the display, and that the ventilation in a row. Or, switch between the input signals by pressing the INPUT button on the remote control. Try pressing one of the input selection buttons (INPUT1, INPUT2, OPTION1, or OPTION2) once or twice on the top of the cable....
... (Power indicator is lit.) 2 Colors do not display properly. In this case, also check Troubleshooting problem 9. If the problem persists, contact your local Sony dealer. In this case, also check Troubleshooting problem 9. Or vice versa. Or, disconnect the cable from VIDEO OUT or S-VIDEO OUT on "Pic. ...to flow around the display, and that the ventilation in a row. Or, switch between the input signals by pressing the INPUT button on the remote control. Try pressing one of the input selection buttons (INPUT1, INPUT2, OPTION1, or OPTION2) once or twice on the top of the cable....


