Operating Instructions
Page 12
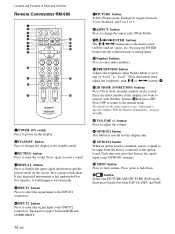
... 6 qg 7 qh 8 qj 9 ENTER 123 0 456 789 qa 0 qk qs ON SET qd ql MONITOR RM-980 1POWER ON switch Press to power on the screen. Each press toggles between Vivid, Standard, and User 1 to 3. 8ASPECT button Press to mute the sound. Each press toggles between RGB and COMPONENT. 7PICTURE button...
... 6 qg 7 qh 8 qj 9 ENTER 123 0 456 789 qa 0 qk qs ON SET qd ql MONITOR RM-980 1POWER ON switch Press to power on the screen. Each press toggles between Vivid, Standard, and User 1 to 3. 8ASPECT button Press to mute the sound. Each press toggles between RGB and COMPONENT. 7PICTURE button...
Operating Instructions
Page 17
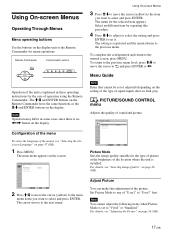
Using On-screen Menus Operating Through Menus Menu operating buttons Use the buttons on the display. Remote Commander MENU Control button section ENTER Operation of the unit is explained in some cases since there is no Note Operation may differ in these operating instructions for menu operations. The M/m and ENTER buttons on the Remote Commander have the same functions as the M/m and ENTER buttons on the display unit or the Remote Commander for the case of operation using the Remote Commander.
Using On-screen Menus Operating Through Menus Menu operating buttons Use the buttons on the display. Remote Commander MENU Control button section ENTER Operation of the unit is explained in some cases since there is no Note Operation may differ in these operating instructions for menu operations. The M/m and ENTER buttons on the Remote Commander have the same functions as the M/m and ENTER buttons on the display unit or the Remote Commander for the case of operation using the Remote Commander.
Operating Instructions
Page 24
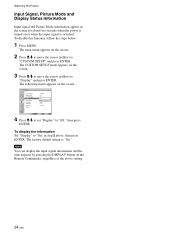
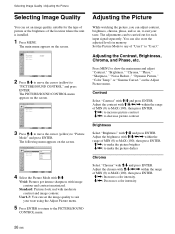
...menu appears on the screen. 3 Press M/m to move the cursor (yellow) to "Display" and press ENTER. The factory default setting is switched. Watching the Picture Input Signal, Picture Mode and Display Status Information Input signal and Picture Mode information appear on the screen for about five seconds ... Note You can display the input signal information and the time anytime by pressing the DISPLAY button on the screen. The main menu appears on the screen. 2 Press M/m to move the cursor (yellow) to "CUSTOM SETUP" and press ENTER. The following menu appears on the Remote Commander,...
...menu appears on the screen. 3 Press M/m to move the cursor (yellow) to "Display" and press ENTER. The factory default setting is switched. Watching the Picture Input Signal, Picture Mode and Display Status Information Input signal and Picture Mode information appear on the screen for about five seconds ... Note You can display the input signal information and the time anytime by pressing the DISPLAY button on the screen. The main menu appears on the screen. 2 Press M/m to move the cursor (yellow) to "CUSTOM SETUP" and press ENTER. The following menu appears on the Remote Commander,...
Operating Instructions
Page 26
... image quality to "User3." PICTURE/SOUND CONTROL Picture Mode: Adjust Picture Adjust Sound Standard Select Set ENTER Exit MENU 2 Press M/m to move the cursor (yellow) to show the main menu and adjust "Contrast," "Brightness," "Chroma," "Phase," "Sharpness," "Noise Reduct.," "Dynamic... Picture," "Color Temp." The PICTURE/SOUND CONTROL menu appears on the screen. PICTURE/SOUND CONTROL Picture Mode: Adjust Picture Adjust Sound Vivid Standard User1 User2 User3 Select Set ENTER Exit MENU 4 Select the Picture Mode...
... image quality to "User3." PICTURE/SOUND CONTROL Picture Mode: Adjust Picture Adjust Sound Standard Select Set ENTER Exit MENU 2 Press M/m to move the cursor (yellow) to show the main menu and adjust "Contrast," "Brightness," "Chroma," "Phase," "Sharpness," "Noise Reduct.," "Dynamic... Picture," "Color Temp." The PICTURE/SOUND CONTROL menu appears on the screen. PICTURE/SOUND CONTROL Picture Mode: Adjust Picture Adjust Sound Vivid Standard User1 User2 User3 Select Set ENTER Exit MENU 4 Select the Picture Mode...
Operating Instructions
Page 27
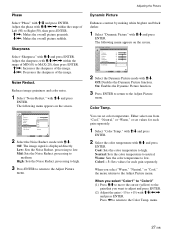
Phase Select "Phase" with M/m/ Adjust the phase with M/m and press ENTER.
Phase Select "Phase" with M/m/ Adjust the phase with M/m and press ENTER.

Operating Instructions
Page 28
.... The Adjust Picture menu items are restored to the Adjust Picture menu. Adjusting the Picture Gamma Correct. The following menu appears on the screen. Notes • You cannot adjust Chroma and Phase when an RGB signal is input. • You cannot adjust Phase when a component... signal is input. PICTURE/SOUND CONTROL Adjust Picture Gamma Correct.: Reset Mid Cancel OK Select Set ENTER Exit MENU 2 Press M/m to move the cursor (yellow) to high. Low: Sets the Gamma Correct. to "OK" and press ENTER. Alternatively, select "Cancel" with a PAL, PAL...
.... The Adjust Picture menu items are restored to the Adjust Picture menu. Adjusting the Picture Gamma Correct. The following menu appears on the screen. Notes • You cannot adjust Chroma and Phase when an RGB signal is input. • You cannot adjust Phase when a component... signal is input. PICTURE/SOUND CONTROL Adjust Picture Gamma Correct.: Reset Mid Cancel OK Select Set ENTER Exit MENU 2 Press M/m to move the cursor (yellow) to high. Low: Sets the Gamma Correct. to "OK" and press ENTER. Alternatively, select "Cancel" with a PAL, PAL...
Operating Instructions
Page 29
.../SOUND CONTROL Picture Mode: Adjust Picture Adjust Sound Standard Select Set ENTER Exit MENU 2 Press M/m to move the cursor (yellow) to "SCREEN CONTROL" and press ENTER. SCREEN CONTROL Multi Display Setup Wide Setup Aspect: Adjust Screen Wide Zoom Select Set ENTER Exit MENU 3 Press M/m to move the cursor (yellow) to "Wide Setup" and press ENTER.
.../SOUND CONTROL Picture Mode: Adjust Picture Adjust Sound Standard Select Set ENTER Exit MENU 2 Press M/m to move the cursor (yellow) to "SCREEN CONTROL" and press ENTER. SCREEN CONTROL Multi Display Setup Wide Setup Aspect: Adjust Screen Wide Zoom Select Set ENTER Exit MENU 3 Press M/m to move the cursor (yellow) to "Wide Setup" and press ENTER.
Operating Instructions
Page 30
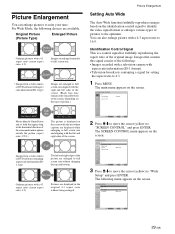
... or bottom of the picture may be cut off or the captions may remain on the top and bottom of picture. 1 In the SCREEN CONTROL menu, press M/m to move the cursor (yellow) to "Auto Wide" and press ENTER. The following menu appears on the type and size of picture. •...in step 3. 7 Select "4:3 Mode" with M/m. The menu returns to the left and right edges of the screen and compresses only the area where captions are reproduced as -is . Picture Enlargement 4 Press M/m to move the cursor (yellow) to "Aspect" and press ENTER. The following menu appears on the type of picture.) ...
... or bottom of the picture may be cut off or the captions may remain on the top and bottom of picture. 1 In the SCREEN CONTROL menu, press M/m to move the cursor (yellow) to "Auto Wide" and press ENTER. The following menu appears on the type and size of picture. •...in step 3. 7 Select "4:3 Mode" with M/m. The menu returns to the left and right edges of the screen and compresses only the area where captions are reproduced as -is . Picture Enlargement 4 Press M/m to move the cursor (yellow) to "Aspect" and press ENTER. The following menu appears on the type of picture.) ...

Operating Instructions
Page 32
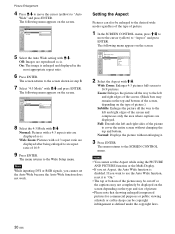
Adjust the horizontal size of the picture with M/m and press ENTER. Resizing and Positioning the Picture H Size Select "H Size" with M/m/
Adjust the horizontal size of the picture with M/m and press ENTER. Resizing and Positioning the Picture H Size Select "H Size" with M/m/
Operating Instructions
Page 33
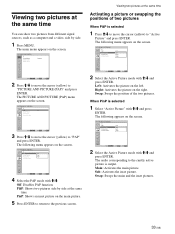
... computer and a video, side by side. 1 Press MENU. Right: Activates the picture on the screen. When PinP is selected 1 Press M/m to move the cursor (yellow) to the previous screen. PICTURE AND PICTURE(PAP) PAP: Off Active Picture P&P Picture Size PinP Picture Position Select Set ENTER... with M/m. The main menu appears on the screen. The PICTURE AND PICTURE (PAP) menu appears on the screen. PICTURE AND PICTURE(PAP) PAP: Off Active Picture Picture Size Picture Position Select Set ENTER Exit MENU 3 Press M/m to move the cursor (yellow) to "Active Picture" and...
... computer and a video, side by side. 1 Press MENU. Right: Activates the picture on the screen. When PinP is selected 1 Press M/m to move the cursor (yellow) to the previous screen. PICTURE AND PICTURE(PAP) PAP: Off Active Picture P&P Picture Size PinP Picture Position Select Set ENTER... with M/m. The main menu appears on the screen. The PICTURE AND PICTURE (PAP) menu appears on the screen. PICTURE AND PICTURE(PAP) PAP: Off Active Picture Picture Size Picture Position Select Set ENTER Exit MENU 3 Press M/m to move the cursor (yellow) to "Active Picture" and...
Operating Instructions
Page 36
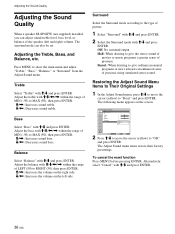
Press MENU to show the main menu and adjust "Treble," "Bass," "Balance," or "Surround" from the Adjust Sound menu. The surround mode can adjust sound treble level, bass level, or balance of the speaker (left and right) volume. Adjusting the Treble, Bass, and Balance, etc. Treble Select "Treble" with M/m/ Adjusting the Sound Quality Adjusting the Sound Quality When a speaker SS-SP42FW (not supplied) installed, you can also be set. Adjust the treble with M/m and press ENTER.
Press MENU to show the main menu and adjust "Treble," "Bass," "Balance," or "Surround" from the Adjust Sound menu. The surround mode can adjust sound treble level, bass level, or balance of the speaker (left and right) volume. Adjusting the Treble, Bass, and Balance, etc. Treble Select "Treble" with M/m/ Adjusting the Sound Quality Adjusting the Sound Quality When a speaker SS-SP42FW (not supplied) installed, you can also be set. Adjust the treble with M/m and press ENTER.
Operating Instructions
Page 37
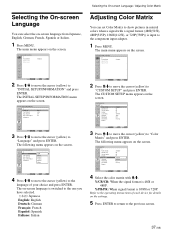
...pictures in natural colors when a signal with M/m. The main menu appears on the screen. PICTURE/SOUND CONTROL Picture Mode: Adjust Picture Adjust Sound Standard Select Set ENTER Exit MENU 2 Press M/m to move the cursor (yellow) to "CUSTOM SETUP" and press ENTER. The INITIAL SETUP/INFORMATION... menu appears on the screen. The on-screen language is switched to the one you have selected. : Japanese English: English ...
...pictures in natural colors when a signal with M/m. The main menu appears on the screen. PICTURE/SOUND CONTROL Picture Mode: Adjust Picture Adjust Sound Standard Select Set ENTER Exit MENU 2 Press M/m to move the cursor (yellow) to "CUSTOM SETUP" and press ENTER. The INITIAL SETUP/INFORMATION... menu appears on the screen. The on-screen language is switched to the one you have selected. : Japanese English: English ...
Operating Instructions
Page 38
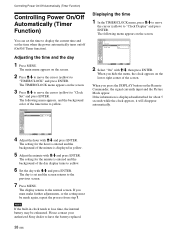
... M/m to move the cursor (yellow) to "Clock Display" and press ENTER. If the information is entered and the background of the screen. The display returns to have the battery replaced. 38 (GB) Please contact your authorized Sony dealer to the normal screen. TIMER/CLOCK Clock Set Clock Set: 00 : 00... Mon Displaying the time 1 In the TIMER/CLOCK menu, press M/m to move the cursor (yellow) to "TIMER/CLOCK" and press ENTER. When you...
... M/m to move the cursor (yellow) to "Clock Display" and press ENTER. If the information is entered and the background of the screen. The display returns to have the battery replaced. 38 (GB) Please contact your authorized Sony dealer to the normal screen. TIMER/CLOCK Clock Set Clock Set: 00 : 00... Mon Displaying the time 1 In the TIMER/CLOCK menu, press M/m to move the cursor (yellow) to "TIMER/CLOCK" and press ENTER. When you...

Operating Instructions
Page 39
... Time] 0 : 00 0 : 00 Controlling Power On/Off Automatically (Timer Function) 5 To set a specific time for the clock. The following menu appears on the screen. TIMER/CLOCK On/Off Timer Repeat Every Day [On Time] [Off Time] 000 :: 0000 000 :: 0000 Select Set ENTER Exit MENU 4 When you press ENTER... press ENTER. Press < to return to set the On Time. 9 Press ENTER. On/Off Timer Function 1 In the TIMER/CLOCK menu, press M/m to move the cursor (yellow) to with M/m and press ENTER. When "Day of week, change to "On/Off Timer" and press ENTER. Select Set ENTER Exit...
... Time] 0 : 00 0 : 00 Controlling Power On/Off Automatically (Timer Function) 5 To set a specific time for the clock. The following menu appears on the screen. TIMER/CLOCK On/Off Timer Repeat Every Day [On Time] [Off Time] 000 :: 0000 000 :: 0000 Select Set ENTER Exit MENU 4 When you press ENTER... press ENTER. Press < to return to set the On Time. 9 Press ENTER. On/Off Timer Function 1 In the TIMER/CLOCK menu, press M/m to move the cursor (yellow) to with M/m and press ENTER. When "Day of week, change to "On/Off Timer" and press ENTER. Select Set ENTER Exit...
Operating Instructions
Page 40
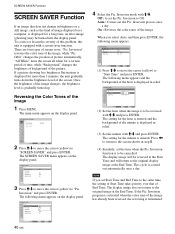
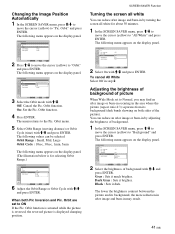
...00 00 : 00 Select Set ENTER Exit MENU (2) Set the hour when the image is to the screen shown in step 5. (4) Similarly, set the Pic. The main menu appears on the display panel. SCREEN SAVER Pic. Press < to return to be reversed at the Start Time and will return to "Start... changes the brightness of background of the picture. Orbit All White: Off Background: Gray Auto Dimmer: On Select Set ENTER Exit MENU 3 Press M/m to move the cursor (yellow) to Off Auto : Carries out the Pic. Orbit Auto All White: Onff Background: Gray Auto Dimmer: On Select 40 (GB)...
...00 00 : 00 Select Set ENTER Exit MENU (2) Set the hour when the image is to the screen shown in step 5. (4) Similarly, set the Pic. The main menu appears on the display panel. SCREEN SAVER Pic. Press < to return to be reversed at the Start Time and will return to "Start... changes the brightness of background of the picture. Orbit All White: Off Background: Gray Auto Dimmer: On Select Set ENTER Exit MENU 3 Press M/m to move the cursor (yellow) to Off Auto : Carries out the Pic. Orbit Auto All White: Onff Background: Gray Auto Dimmer: On Select 40 (GB)...
Operating Instructions
Page 41
... cursor (yellow) to "All White" and press ENTER. Black : Sets it much brighter. SCREEN SAVER Pic. Orbit menu. 5 Select Orbit Range (moving distance) or Orbit Cycle (time) with M/m. SCREEN SAVER Pic. The following menu appears on the display panel. SCREEN SAVER Pic. The following values can reduce an after image and burn-in may find...
... cursor (yellow) to "All White" and press ENTER. Black : Sets it much brighter. SCREEN SAVER Pic. Orbit menu. 5 Select Orbit Range (moving distance) or Orbit Cycle (time) with M/m. SCREEN SAVER Pic. The following menu appears on the display panel. SCREEN SAVER Pic. The following values can reduce an after image and burn-in may find...
Operating Instructions
Page 42
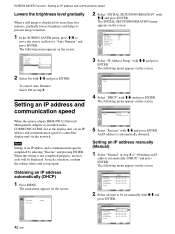
...a still image is displayed for more than five minutes, gradually lowers brightness and helps to prevent image retention. 1 In the SCREEN SAVER menu, press M/m to move the cursor (yellow) to control the display unit via the network. The following menu appears on the... INITIAL SETUP/INFORMATION menu appears on the screen. INITIAL SETUP/INFORMATION IP Address Setup DHCP Manual Select Set ENTER Exit MENU 4 Select "DHCP" with M/m and press ENTER. PICTURE/SOUND CONTROL Picture Mode: Adjust Picture Adjust Sound Standard Select 42 (GB) Set ENTER Exit MENU Select Set ENTER Exit...
...a still image is displayed for more than five minutes, gradually lowers brightness and helps to prevent image retention. 1 In the SCREEN SAVER menu, press M/m to move the cursor (yellow) to control the display unit via the network. The following menu appears on the... INITIAL SETUP/INFORMATION menu appears on the screen. INITIAL SETUP/INFORMATION IP Address Setup DHCP Manual Select Set ENTER Exit MENU 4 Select "DHCP" with M/m and press ENTER. PICTURE/SOUND CONTROL Picture Mode: Adjust Picture Adjust Sound Standard Select 42 (GB) Set ENTER Exit MENU Select Set ENTER Exit...

Operating Instructions
Page 43
...the INITIAL SETUP/INFORMATION menu, select "Speed Setup" with M/m and press ENTER. Inform your authorized Sony dealer. 1 Check the flashing pattern of the display's current condition. Select "Auto Detect" when... flashes twice, followed by the flashing of the four boxes and press ENTER. The cursor moves to be displayed in accordance with no image showing on the remote commander and press ENTER... or ,. This function shows the display's condition based on the screen. 2 Press ENTER and select a communication speed with M/m, then press ENTER. In this ...
...the INITIAL SETUP/INFORMATION menu, select "Speed Setup" with M/m and press ENTER. Inform your authorized Sony dealer. 1 Check the flashing pattern of the display's current condition. Select "Auto Detect" when... flashes twice, followed by the flashing of the four boxes and press ENTER. The cursor moves to be displayed in accordance with no image showing on the remote commander and press ENTER... or ,. This function shows the display's condition based on the screen. 2 Press ENTER and select a communication speed with M/m, then press ENTER. In this ...


