

Mounting Bracket Instruction Manual
Page 2
Installation Manual SFM2 Table of Contents WARNING STATEMENTS...- 3 PARTS LIST ...- 4 INSTALLATION TOOLS ...- 4 INSTALLATION PROCEDURES ...- 5 SINGLE STUD INSTALLATION ...- 5 SOLID STRUCTURE INSTALLATION ...- 6 ATTACHING THE ADAPTER PLATE AND THE BACKPLATE COVER 7 ATTACHING THE ADAPTER PLATE /BACKPLATE COVER TO THE DISPLAY 9 ATTACHING THE DISPLAY TO THE BACKPLATE 10 TECHNICAL SPECIFICATIONS ...- 11 WARRANTY ...- 12 CUSTOMER SUPPORT ...- 12 NOTES ...- 12 - Page - 2 -
Installation Manual SFM2 Table of Contents WARNING STATEMENTS...- 3 PARTS LIST ...- 4 INSTALLATION TOOLS ...- 4 INSTALLATION PROCEDURES ...- 5 SINGLE STUD INSTALLATION ...- 5 SOLID STRUCTURE INSTALLATION ...- 6 ATTACHING THE ADAPTER PLATE AND THE BACKPLATE COVER 7 ATTACHING THE ADAPTER PLATE /BACKPLATE COVER TO THE DISPLAY 9 ATTACHING THE DISPLAY TO THE BACKPLATE 10 TECHNICAL SPECIFICATIONS ...- 11 WARRANTY ...- 12 CUSTOMER SUPPORT ...- 12 NOTES ...- 12 - Page - 2 -
Mounting Bracket Instruction Manual
Page 4
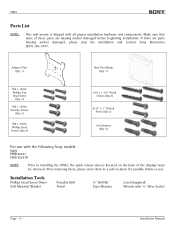
... display) must be removed. Installation Tools Phillips Head Screw Driver Soft Material/ Blanket Portable Drill Pencil ¼" Drill Bit Tape Measure Level (Supplied) Wrench with the following Sony models: SONY FWD-32LX1 FWD-32LX1R NOTE: Prior to installing the SFM2, the quick release sleeves (located on the back of these parts are parts missing and/or damaged, please stop the installation and contact Sony Electronics (877) 350-3477. Adapter...
... display) must be removed. Installation Tools Phillips Head Screw Driver Soft Material/ Blanket Portable Drill Pencil ¼" Drill Bit Tape Measure Level (Supplied) Wrench with the following Sony models: SONY FWD-32LX1 FWD-32LX1R NOTE: Prior to installing the SFM2, the quick release sleeves (located on the back of these parts are parts missing and/or damaged, please stop the installation and contact Sony Electronics (877) 350-3477. Adapter...

Mounting Bracket Instruction Manual
Page 10
.... 2. Slide the monitor down and push in (Figure 8). 4. To secure the two plates, tighten the two (2) M6 x 12 (mm) security screws using a long Phillip head screwdriver (Figure 9). Raise the flat panel with the front plate attached and slide the top flange opening must be shown without the adapter plate and display attached. The flange opening to each other (connection-wise...
.... 2. Slide the monitor down and push in (Figure 8). 4. To secure the two plates, tighten the two (2) M6 x 12 (mm) security screws using a long Phillip head screwdriver (Figure 9). Raise the flat panel with the front plate attached and slide the top flange opening must be shown without the adapter plate and display attached. The flange opening to each other (connection-wise...
Operating Instructions (Flat Panel Display)
Page 3
...) Connections 14 (GB) Connecting the Speakers 14 (GB) Connecting the AC Power Cord 14 (GB) Attaching the ferrite cores 14 (GB) Cable management 15 (GB) Using On-screen Menus 16 (GB) Operating Through Menus 16 (GB) GB Menu Guide 16 (GB) Watching the Picture 21 (GB) Switching the Input Signal 21 (GB) Input Signal, Picture Mode and Display Status Information 22 (GB) Selecting Image Quality 24 (GB) Adjusting the Picture 24 (GB) Adjusting the Contrast, Brightness...
...) Connections 14 (GB) Connecting the Speakers 14 (GB) Connecting the AC Power Cord 14 (GB) Attaching the ferrite cores 14 (GB) Cable management 15 (GB) Using On-screen Menus 16 (GB) Operating Through Menus 16 (GB) GB Menu Guide 16 (GB) Watching the Picture 21 (GB) Switching the Input Signal 21 (GB) Input Signal, Picture Mode and Display Status Information 22 (GB) Selecting Image Quality 24 (GB) Adjusting the Picture 24 (GB) Adjusting the Contrast, Brightness...
Operating Instructions (Flat Panel Display)
Page 5
.... Take this unit, contact your authorized Sony dealers. 5 (GB) On cleaning the display The panel surface • Be sure to unplug the power cord before operating it any further. • Unplug the unit from the wall outlet if it can generate a few dark or bright pixels. • Keeping the LCD panel facing toward the sun for cleaning, follow the directions. • Spraying the...
.... Take this unit, contact your authorized Sony dealers. 5 (GB) On cleaning the display The panel surface • Be sure to unplug the power cord before operating it any further. • Unplug the unit from the wall outlet if it can generate a few dark or bright pixels. • Keeping the LCD panel facing toward the sun for cleaning, follow the directions. • Spraying the...
Operating Instructions (Flat Panel Display)
Page 11
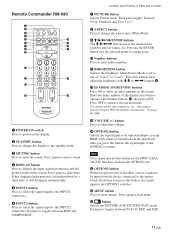
... User 1 to 3. 8 ASPECT button Press to mute the sound. Remote Commander RM-980 1 2 MUTING DISPLAY STBY ON 3 4 5 qf 6 qg 7 qh 8 qj 9 ENTER 123 0 456 789 qa 0 qk qs ON SET qd ql MONITOR RM-980 1 POWER ON switch Press to power on the screen. Location and Function of Parts and Controls 7 PICTURE button Selects Picture mode. Each press toggles between RGB and COMPONENT. Press again to display the input signal information...
... User 1 to 3. 8 ASPECT button Press to mute the sound. Remote Commander RM-980 1 2 MUTING DISPLAY STBY ON 3 4 5 qf 6 qg 7 qh 8 qj 9 ENTER 123 0 456 789 qa 0 qk qs ON SET qd ql MONITOR RM-980 1 POWER ON switch Press to power on the screen. Location and Function of Parts and Controls 7 PICTURE button Selects Picture mode. Each press toggles between RGB and COMPONENT. Press again to display the input signal information...

Operating Instructions (Flat Panel Display)
Page 12
Location and Function of Parts and Controls qk CHROMA button Adjusts the chroma when the picture mode is set to any of "User1" to "User3." Press this button and adjust the chroma with the M/m or
Location and Function of Parts and Controls qk CHROMA button Adjusts the chroma when the picture mode is set to any of "User1" to "User3." Press this button and adjust the chroma with the M/m or

Operating Instructions (Flat Panel Display)
Page 16
Note Operation may differ in these operating instructions for menu operations. Remote Commander MENU Control button section ENTER Operation of operation using the Remote Commander. Using On-screen Menus Using On-screen Menus Operating Through Menus Menu operating buttons Use the buttons on the display. The M/m and ENTER buttons on the Remote Commander have the same functions as the M/m and ENTER buttons on the display unit or the Remote Commander for the case of the unit is explained in some cases since there is no
Note Operation may differ in these operating instructions for menu operations. Remote Commander MENU Control button section ENTER Operation of operation using the Remote Commander. Using On-screen Menus Using On-screen Menus Operating Through Menus Menu operating buttons Use the buttons on the display. The M/m and ENTER buttons on the Remote Commander have the same functions as the M/m and ENTER buttons on the display unit or the Remote Commander for the case of the unit is explained in some cases since there is no

Operating Instructions (Flat Panel Display)
Page 17
.... Wide Setup Sets the Auto Wide function. Note You cannot adjust the following items when Picture Mode is set to match the size and type of images. You can also adjust the number of a picture. The Auto Wide function is used for resizing or repositioning the picture. Adjust Screen This menu is a function which chooses from different signal sources, such as a computer and a video, side by side. Adjust Sound You can make settings for connecting multiple display units and forming a video wall...
.... Wide Setup Sets the Auto Wide function. Note You cannot adjust the following items when Picture Mode is set to match the size and type of images. You can also adjust the number of a picture. The Auto Wide function is used for resizing or repositioning the picture. Adjust Screen This menu is a function which chooses from different signal sources, such as a computer and a video, side by side. Adjust Sound You can make settings for connecting multiple display units and forming a video wall...
Operating Instructions (Flat Panel Display)
Page 18
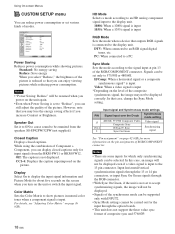
... input. DTV: When connected to a PC. Input horizontal/vertical synchronization signals through the 13 or 14 pin connectors, or input Sync On Green signals through the option boards. • This unit does not support the three value sync format of modes. Using On-screen Menus CUSTOM SETUP menu You can be set only to 575/50I or 480/60I. Signals can reduce power consumption or set to show pictures in natural color tones when a component signal...
... input. DTV: When connected to a PC. Input horizontal/vertical synchronization signals through the 13 or 14 pin connectors, or input Sync On Green signals through the option boards. • This unit does not support the three value sync format of modes. Using On-screen Menus CUSTOM SETUP menu You can be set only to 575/50I or 480/60I. Signals can reduce power consumption or set to show pictures in natural color tones when a component signal...
Operating Instructions (Flat Panel Display)
Page 21
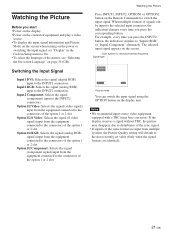
... corresponding button. Watching the Picture Before you start • Power on the display. • Power on the connected equipment and play a video source. • To display the input signal information and Picture Mode on the screen when turning on the power or switching the input signal, set value (Only when the signal formats are identical). 21 (GB) Color system or resolution/vertical frequency Signal type Input1 DVI 640x480/60 Vivid 15 : 07 Picture mode You can be input to the selected input connector...
... corresponding button. Watching the Picture Before you start • Power on the display. • Power on the connected equipment and play a video source. • To display the input signal information and Picture Mode on the screen when turning on the power or switching the input signal, set value (Only when the signal formats are identical). 21 (GB) Color system or resolution/vertical frequency Signal type Input1 DVI 640x480/60 Vivid 15 : 07 Picture mode You can be input to the selected input connector...

Operating Instructions (Flat Panel Display)
Page 22
... "Off," then press ENTER. CUSTOM SETUP Power Saving: Speaker Out: Closed Caption: Display: Color Matrix: HD Mode: RGB Mode: Sync Mode: Illumination: Remote Standard Off Off Off YO/nPB/PR 1080i DTV H/Comp High Select Set ENTER Exit MENU 2 Press M/m to set "Display" to "Display" and press ENTER. Note You can display the input signal information and the time anytime by pressing the DISPLAY button on the Remote Commander, regardless of the above...
... "Off," then press ENTER. CUSTOM SETUP Power Saving: Speaker Out: Closed Caption: Display: Color Matrix: HD Mode: RGB Mode: Sync Mode: Illumination: Remote Standard Off Off Off YO/nPB/PR 1080i DTV H/Comp High Select Set ENTER Exit MENU 2 Press M/m to set "Display" to "Display" and press ENTER. Note You can display the input signal information and the time anytime by pressing the DISPLAY button on the Remote Commander, regardless of the above...

Operating Instructions (Flat Panel Display)
Page 23
... Video Electronics Standards Association. b) VESA is no input signal. Actual on the INPUT2 connector or the BKM-FW12. • If colors appear too light after inputting a DVD signal to S VIDEO. There is a registered trademark of INPUT2 is set to digital RGB. The signal mode of Apple Computer, Inc. The selected input signal is a registered trademark of Option 1 or 2 slot is set to the display unit, adjust the "Chroma" setting in the Adjust Picture menu...
... Video Electronics Standards Association. b) VESA is no input signal. Actual on the INPUT2 connector or the BKM-FW12. • If colors appear too light after inputting a DVD signal to S VIDEO. There is a registered trademark of INPUT2 is set to digital RGB. The signal mode of Apple Computer, Inc. The selected input signal is a registered trademark of Option 1 or 2 slot is set to the display unit, adjust the "Chroma" setting in the Adjust Picture menu...

Operating Instructions (Flat Panel Display)
Page 34
The Multi Display Setup menu appears on the screen. SCREEN CONTROL Multi Display Setup Multi Display: Off Position 2x2 3x3 4x4 Select Set ENTER Exit MENU 5 Select the mode corresponding to the arrangement of the video wall with M/m. SCREEN CONTROL Multi Display Setup Wide Setup Wide Mode: Full Adjust Screen Select Set ENTER Exit MENU Note You can make settings for connecting multiple display units to the Multi Display Setup menu and select "Position" with M/m/ PICTURE/SOUND CONTROL Picture Mode: Adjust Picture Adjust Sound Standard Select Set ENTER Exit ...
The Multi Display Setup menu appears on the screen. SCREEN CONTROL Multi Display Setup Multi Display: Off Position 2x2 3x3 4x4 Select Set ENTER Exit MENU 5 Select the mode corresponding to the arrangement of the video wall with M/m. SCREEN CONTROL Multi Display Setup Wide Setup Wide Mode: Full Adjust Screen Select Set ENTER Exit MENU Note You can make settings for connecting multiple display units to the Multi Display Setup menu and select "Position" with M/m/ PICTURE/SOUND CONTROL Picture Mode: Adjust Picture Adjust Sound Standard Select Set ENTER Exit ...

Operating Instructions (Flat Panel Display)
Page 40
... Remote menu appears on page 40 (GB). Monitor index numbers appear in black characters on the lower left menu on the screen. (Every display is allocated an individual preset index number from 1 to red. The display returns to the Remote menu. When you change the index number" on the screen. PICTURE/SOUND CONTROL Picture Mode: Adjust Picture Adjust Sound Standard Index Number 117 . . . 2 Input the index number of the display unit. The characters on the screen. CUSTOM SETUP Remote Index Number: Control Mode: 1 Display + Remote Select Set ENTER...
... Remote menu appears on page 40 (GB). Monitor index numbers appear in black characters on the lower left menu on the screen. (Every display is allocated an individual preset index number from 1 to red. The display returns to the Remote menu. When you change the index number" on the screen. PICTURE/SOUND CONTROL Picture Mode: Adjust Picture Adjust Sound Standard Index Number 117 . . . 2 Input the index number of the display unit. The characters on the screen. CUSTOM SETUP Remote Index Number: Control Mode: 1 Display + Remote Select Set ENTER...

Operating Instructions (Flat Panel Display)
Page 41
... MHz Panel system a-Si TFT Active Matrix LCD Panel Display resolution 1366 dots (horizontal) × 768 lines (vertical) FWD-42LX1/42LX1E: Pixel pitch 0.681 (horizontal) × 0.681 (vertical) mm (1⁄32 × 1⁄32 inches) Picture size 930 (horizontal) × 523 (vertical) mm (36 5⁄8 × 20 5⁄8 inches) Panel size 42-inch (diagonal 1068 mm) FWD-32LX1/32LX1E: Pixel pitch 0.510 (horizontal) × 0.510 (vertical) mm (1⁄32 × 1⁄32 inches) Picture size 698 (horizontal) × 392 (vertical) mm...
... MHz Panel system a-Si TFT Active Matrix LCD Panel Display resolution 1366 dots (horizontal) × 768 lines (vertical) FWD-42LX1/42LX1E: Pixel pitch 0.681 (horizontal) × 0.681 (vertical) mm (1⁄32 × 1⁄32 inches) Picture size 930 (horizontal) × 523 (vertical) mm (36 5⁄8 × 20 5⁄8 inches) Panel size 42-inch (diagonal 1068 mm) FWD-32LX1/32LX1E: Pixel pitch 0.510 (horizontal) × 0.510 (vertical) mm (1⁄32 × 1⁄32 inches) Picture size 698 (horizontal) × 392 (vertical) mm...

Pro Displays Brochure
Page 6
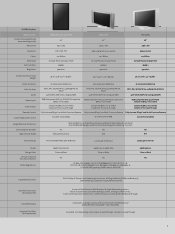
Specifications LCD Displays Model Number Screen Size (viewable area measured diagonally) Resolution Pixel Pitch Colors Panel Type Contrast Ratio Brightness FWD-32LX2F/B & /S FWD-40LX2F/B & /S 32" / 40" 1366 x 768 WXGA 0.51 x 0.51 mm/ 0.648 x 0.648 mm 16.7 Million a-Si-TFT active matrix LCD panel 1300:1 500 cd/m2 Dimensions (W x H x D)/ Weight Screen Protector Anaglog Video Color Systems Audio Video Inputs Video Output Remote Control Color Temperature Control Viewing Angle Closed Caption Decoder High Altitude Capable Mount Design Power Design Color Picture and Picture 32LX2F = 31...
Specifications LCD Displays Model Number Screen Size (viewable area measured diagonally) Resolution Pixel Pitch Colors Panel Type Contrast Ratio Brightness FWD-32LX2F/B & /S FWD-40LX2F/B & /S 32" / 40" 1366 x 768 WXGA 0.51 x 0.51 mm/ 0.648 x 0.648 mm 16.7 Million a-Si-TFT active matrix LCD panel 1300:1 500 cd/m2 Dimensions (W x H x D)/ Weight Screen Protector Anaglog Video Color Systems Audio Video Inputs Video Output Remote Control Color Temperature Control Viewing Angle Closed Caption Decoder High Altitude Capable Mount Design Power Design Color Picture and Picture 32LX2F = 31...
Pro Displays Brochure
Page 7
... or Black Yes Supplied Accessories Optional Accessories (Sold separately) Limited Warranty Optional Card Slots (Sold separately) DVI-D Cable, AC Power Cord, Operating Instructions, AC Plug Holder (2), AA/R6 size Battery (2), Cable Holder (4), Component Cable, Remote Control Universal Table Stands & Wall Brackets, Multiple Networking options which include Status Control/Streaming Content, Storing Content Tuners, Tuners with Hospitality Connections, Alternate Inputs, and Component/RGB Loop Through 2-year parts and labor, 1-year panel onsite service Limited...
... or Black Yes Supplied Accessories Optional Accessories (Sold separately) Limited Warranty Optional Card Slots (Sold separately) DVI-D Cable, AC Power Cord, Operating Instructions, AC Plug Holder (2), AA/R6 size Battery (2), Cable Holder (4), Component Cable, Remote Control Universal Table Stands & Wall Brackets, Multiple Networking options which include Status Control/Streaming Content, Storing Content Tuners, Tuners with Hospitality Connections, Alternate Inputs, and Component/RGB Loop Through 2-year parts and labor, 1-year panel onsite service Limited...

Pro Displays Brochure
Page 9
... Streaming Cards • High definition digital signage • Internal design for clean installation • Flash 6 support • Support for up to 255 Sony displays or projectors • Remote PC Desktop View - stream live or store • Macromedia® Flash® and Microsoft® PowerPoint® viewer included • No special software needed, use PJNet!™ Software to manage and control your company's network • Integrated Software Support - Use Display...
... Streaming Cards • High definition digital signage • Internal design for clean installation • Flash 6 support • Support for up to 255 Sony displays or projectors • Remote PC Desktop View - stream live or store • Macromedia® Flash® and Microsoft® PowerPoint® viewer included • No special software needed, use PJNet!™ Software to manage and control your company's network • Integrated Software Support - Use Display...
Marketing Specifications
Page 2
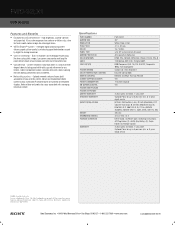
... - s Networking options - Burn-in a choice of networked displays. Specifications PART NUMBER SCREEN SIZE RESOLUTION PIXEL PITCH COLOR PANEL TYPE SCREEN PROTECTOR COLOR SYSTEMS AUDIO VIDEO INPUTS PICTURE MODES COLOR TEMPERATURE CONTROL REMOTE CONTROL CLOSED CAPTION DECODER POWER CONSUMPTION ON-SCREEN CONTROL PICTURE AND PICTURE PICTURE IN PICTURE LIMITED WARRANTY EXTENDED WARRANTY SAFETY REGULATIONS WEIGHT DIMENSIONS (WXHXD) PACKAGE CONTENTS WARRANTY FWD-32LX1 32" WXGA 1366 x 768 .51 x .51 mm 16.7 million a-Si-TFT active matrix LCD panel Anti-Glare/Anti-Reflective NTSC, PAL, SECAM...
... - s Networking options - Burn-in a choice of networked displays. Specifications PART NUMBER SCREEN SIZE RESOLUTION PIXEL PITCH COLOR PANEL TYPE SCREEN PROTECTOR COLOR SYSTEMS AUDIO VIDEO INPUTS PICTURE MODES COLOR TEMPERATURE CONTROL REMOTE CONTROL CLOSED CAPTION DECODER POWER CONSUMPTION ON-SCREEN CONTROL PICTURE AND PICTURE PICTURE IN PICTURE LIMITED WARRANTY EXTENDED WARRANTY SAFETY REGULATIONS WEIGHT DIMENSIONS (WXHXD) PACKAGE CONTENTS WARRANTY FWD-32LX1 32" WXGA 1366 x 768 .51 x .51 mm 16.7 million a-Si-TFT active matrix LCD panel Anti-Glare/Anti-Reflective NTSC, PAL, SECAM...


