
Operating Instructions (CD/DVD Component)
Page 2
CAUTION The use of the FCC Rules. Refer servicing to qualified personnel only. Record the serial number in a residential installation. Model No. Thank you call upon your Sony dealer regarding this CD/DVD player is located on a circuit different from that may cause harmful interference to rain or moisture. This symbol is intended to alert the user to the presence of uninsulated "dangerous...
CAUTION The use of the FCC Rules. Refer servicing to qualified personnel only. Record the serial number in a residential installation. Model No. Thank you call upon your Sony dealer regarding this CD/DVD player is located on a circuit different from that may cause harmful interference to rain or moisture. This symbol is intended to alert the user to the presence of uninsulated "dangerous...
Operating Instructions (CD/DVD Component)
Page 3
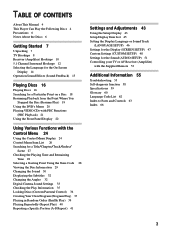
... DVD's Menu 20 Playing VIDEO CDs with PBC Functions (PBC Playback) 21 Using the Front Panel Display 22 Using Various Functions with the Control Menu 24 Using the Control Menu Display 24 Control Menu Item List 26 Searching for a Title/Chapter/Track/Index/ Scene 27 Checking the Playing Time and Remaining Time 28 Selecting a Starting Point Using the Time Code 28 Viewing the Disc Information 29 Changing the Sound 30 Displaying the Subtitles 32 Changing the Angles 32 Digital Cinema Sound Settings 33 Checking the Play Information 35 Locking Discs (Custom Parental Control...
... DVD's Menu 20 Playing VIDEO CDs with PBC Functions (PBC Playback) 21 Using the Front Panel Display 22 Using Various Functions with the Control Menu 24 Using the Control Menu Display 24 Control Menu Item List 26 Searching for a Title/Chapter/Track/Index/ Scene 27 Checking the Playing Time and Remaining Time 28 Selecting a Starting Point Using the Time Code 28 Viewing the Disc Information 29 Changing the Sound 30 Displaying the Subtitles 32 Changing the Angles 32 Digital Cinema Sound Settings 33 Checking the Play Information 35 Locking Discs (Custom Parental Control...
Operating Instructions (CD/DVD Component)
Page 4
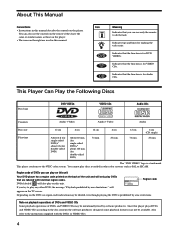
... PAL or SECAM. This Player Can Play the Following Discs Disc logo DVD VIDEOs VIDEO CDs Audio CDs Contents Audio + Video Audio + Video Audio Disc size Play time 12 cm 8 cm About 4 h (for single-sided DVD)/ about 8 h (for double-sided DVD) About 80 min. (for single-sided DVD)/ about 160 min. (for making the task easier. will only play DVDs that the function is for DVD VIDEOs. Also refer to the instructions supplied with identical region codes. About This Manual Conventions • Instructions...
... PAL or SECAM. This Player Can Play the Following Discs Disc logo DVD VIDEOs VIDEO CDs Audio CDs Contents Audio + Video Audio + Video Audio Disc size Play time 12 cm 8 cm About 4 h (for single-sided DVD)/ about 8 h (for double-sided DVD) About 80 min. (for single-sided DVD)/ about 160 min. (for making the task easier. will only play DVDs that the function is for DVD VIDEOs. Also refer to the instructions supplied with identical region codes. About This Manual Conventions • Instructions...
Operating Instructions (CD/DVD Component)
Page 5
... that the player cannot play The player cannot play high-resolution still pictures if they are divided into sections to the digital output of Super Audio CD etc., cannot be authorized by Macrovision Corporation, and is protected by method claims of Digital Theater Systems, Inc. 5 Disc type VIDEO CDs without PBC functions (Ver. 1.1 discs) VIDEO CDs with PBC (playback control) functions, the menu screens, moving pictures) as well as music. Play interactive software using menu screens displayed on the disc, no...
... that the player cannot play The player cannot play high-resolution still pictures if they are divided into sections to the digital output of Super Audio CD etc., cannot be authorized by Macrovision Corporation, and is protected by method claims of Digital Theater Systems, Inc. 5 Disc type VIDEO CDs without PBC functions (Ver. 1.1 discs) VIDEO CDs with PBC (playback control) functions, the menu screens, moving pictures) as well as music. Play interactive software using menu screens displayed on the disc, no...
Operating Instructions (CD/DVD Component)
Page 6
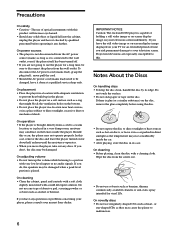
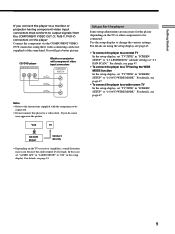
... the disc, remove the glue completely before operating it in a car parked in direct sunlight as alcohol or benzine. Projection televisions are not going to use irregularly shaped CDs such as hot air ducts, or leave it any type of holding a still video image or on-screen display image on the disc. If you move the player, take out any questions or problems...
... the disc, remove the glue completely before operating it in a car parked in direct sunlight as alcohol or benzine. Projection televisions are not going to use irregularly shaped CDs such as hot air ducts, or leave it any type of holding a still video image or on-screen display image on the disc. If you move the player, take out any questions or problems...
Operating Instructions (CD/DVD Component)
Page 7
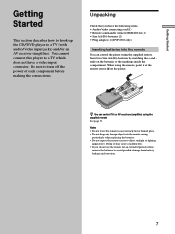
... AV receiver (amplifier). Be sure to turn off the power of time, remove the batteries to direct sunlight or lighting apparatuses. Unpacking Check that you do not use the remote for an extended period of each component before making the connections. Doing so may cause a malfunction. • If you have a video input connector. Getting Started Getting Started This section describes how to hook up the CD/DVD player to...
... AV receiver (amplifier). Be sure to turn off the power of time, remove the batteries to direct sunlight or lighting apparatuses. Unpacking Check that you do not use the remote for an extended period of each component before making the connections. Doing so may cause a malfunction. • If you have a video input connector. Getting Started Getting Started This section describes how to hook up the CD/DVD player to...
Operating Instructions (CD/DVD Component)
Page 8
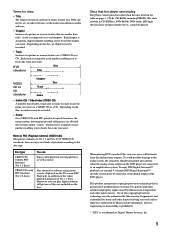
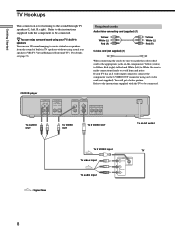
...sound using your TV has an S video input connector, connect the component via the S VIDEO OUT connector using actual rear speakers (VES TV: Virtual Enhanced Surround TV). CD/DVD player AUDIO OUT R L 1 DIGITAL OUT PCM/DTS/ DOLBY DIGITAL COAXIAL OPTICAL 2 VIDEO OUT S VIDEO OUT 1 1 2 2 COMPONENT VIDEO OUT Y PB/B-Y PR/R-Y To AUDIO OUT To VIDEO OUT To S VIDEO OUT To an AC outlet : Signal flow To S VIDEO input TV To video input To audio input INPUT VIDEO L AUDIO S VIDEO R 8 Required cords Audio/video connecting cord (supplied) (1) Yellow White (L) Red (R) S video...
...sound using your TV has an S video input connector, connect the component via the S VIDEO OUT connector using actual rear speakers (VES TV: Virtual Enhanced Surround TV). CD/DVD player AUDIO OUT R L 1 DIGITAL OUT PCM/DTS/ DOLBY DIGITAL COAXIAL OPTICAL 2 VIDEO OUT S VIDEO OUT 1 1 2 2 COMPONENT VIDEO OUT Y PB/B-Y PR/R-Y To AUDIO OUT To VIDEO OUT To S VIDEO OUT To an AC outlet : Signal flow To S VIDEO input TV To video input To audio input INPUT VIDEO L AUDIO S VIDEO R 8 Required cords Audio/video connecting cord (supplied) (1) Yellow White (L) Red (R) S video...
Operating Instructions (CD/DVD Component)
Page 9
.... VCR TV CD/DVD player Connect directly • Depending on using three video connecting cords (not supplied) of the same kind. Setups for the player Some setup adjustments are necessary for the player depending on the player Connect the component via the COMPONENT VIDEO OUT connectors using the setup display, see page 47. • To connect the player to a TV having component video input connectors that conform to "16:9/4:3 WIDE MODE." For details on the TV or receiver (amplifier), sound distortion...
.... VCR TV CD/DVD player Connect directly • Depending on using three video connecting cords (not supplied) of the same kind. Setups for the player Some setup adjustments are necessary for the player depending on the player Connect the component via the COMPONENT VIDEO OUT connectors using the setup display, see page 47. • To connect the player to a TV having component video input connectors that conform to "16:9/4:3 WIDE MODE." For details on the TV or receiver (amplifier), sound distortion...
Operating Instructions (CD/DVD Component)
Page 10
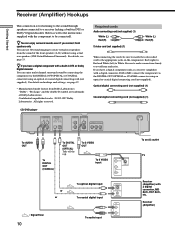
... Surround). Optical digital connecting cord (not supplied) (1) Coaxial digital connecting cord (not supplied) (1) CD/DVD player AUDIO OUT R L 1 DIGITAL OUT PCM/DTS/ DOLBY DIGITAL COAXIAL OPTICAL 2 VIDEO OUT S VIDEO OUT 1 1 2 2 COMPONENT VIDEO OUT Y PB/B-Y PR/R-Y To AUDIO OUT To DIGITAL OUT (COAXIAL) To DIGITAL OUT (OPTICAL) Take off the cap. Receiver (Amplifier) z If you connect front speakers only You can use 3D sound imaging to create virtual rear speakers from Dolby Laboratories. Required cords Audio connecting cord (not supplied) (1) White (L) Red (R) S video cord...
... Surround). Optical digital connecting cord (not supplied) (1) Coaxial digital connecting cord (not supplied) (1) CD/DVD player AUDIO OUT R L 1 DIGITAL OUT PCM/DTS/ DOLBY DIGITAL COAXIAL OPTICAL 2 VIDEO OUT S VIDEO OUT 1 1 2 2 COMPONENT VIDEO OUT Y PB/B-Y PR/R-Y To AUDIO OUT To DIGITAL OUT (COAXIAL) To DIGITAL OUT (OPTICAL) Take off the cap. Receiver (Amplifier) z If you connect front speakers only You can use 3D sound imaging to create virtual rear speakers from Dolby Laboratories. Required cords Audio connecting cord (not supplied) (1) White (L) Red (R) S video cord...
Operating Instructions (CD/DVD Component)
Page 11
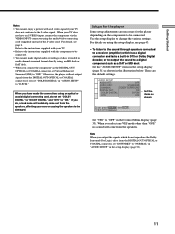
...." AUDIO SETUP AUDIO ATT: OFF AUDIO DRC: STANDARD DOWNMIX: DOLBY SURROUND DIGITAL OUT: ON DOLBY DIGITAL: D-PCM DTS: OFF Set the items as shown in the illustration below. Getting Started Notes • You cannot enjoy a picture with the component to be connected. • You cannot make digital audio recordings of discs recorded in multi-channel surround format directly using an MD deck or DAT deck. • When you connect the component via the VIDEO INPUT connector using the audio/video connecting cord (supplied) instead of the S video cord.
...." AUDIO SETUP AUDIO ATT: OFF AUDIO DRC: STANDARD DOWNMIX: DOLBY SURROUND DIGITAL OUT: ON DOLBY DIGITAL: D-PCM DTS: OFF Set the items as shown in the illustration below. Getting Started Notes • You cannot enjoy a picture with the component to be connected. • You cannot make digital audio recordings of discs recorded in multi-channel surround format directly using an MD deck or DAT deck. • When you connect the component via the VIDEO INPUT connector using the audio/video connecting cord (supplied) instead of the S video cord.

Operating Instructions (CD/DVD Component)
Page 17
... the settings of the menu. In standby mode, the player also turns on by pressing !. Press Z You can play the DTS sound track, a loud noise will come from the DIGITAL OUT OPTICAL and COAXIAL connectors. • If you play discs in various modes such as Program Play using the on and the power indicator lights up in red. The player turns on -screen menu (Control Menu). To turn off the player, press x first to stop mode for...
... the settings of the menu. In standby mode, the player also turns on by pressing !. Press Z You can play the DTS sound track, a loud noise will come from the DIGITAL OUT OPTICAL and COAXIAL connectors. • If you play discs in various modes such as Program Play using the on and the power indicator lights up in red. The player turns on -screen menu (Control Menu). To turn off the player, press x first to stop mode for...

Operating Instructions (CD/DVD Component)
Page 26
... 35) You can change the subtitle language whenever you want while playing the DVD, and turn it on the disc to the sound of the selected channel through both Parental Control (page 48) and Custom Parental Control. If the DVD is recorded with the Control Menu Control Menu Item List TITLE (DVD only) (page 27)/ SCENE (VIDEO CD during PBC playback only) (page 27)/ TRACK (VIDEO CD only) (page 27) CHAPTER (DVD only) (page 27)/ INDEX (VIDEO CD only) (page...
... 35) You can change the subtitle language whenever you want while playing the DVD, and turn it on the disc to the sound of the selected channel through both Parental Control (page 48) and Custom Parental Control. If the DVD is recorded with the Control Menu Control Menu Item List TITLE (DVD only) (page 27)/ SCENE (VIDEO CD during PBC playback only) (page 27)/ TRACK (VIDEO CD only) (page 27) CHAPTER (DVD only) (page 27)/ INDEX (VIDEO CD only) (page...

Operating Instructions (CD/DVD Component)
Page 30
... @/1 on the player • While playing the DVD, the sound may output the instrumental. Each time you may not be resumed when: - the player enters standby mode by pressing ! on the remote - When the same language is displayed two or more times, the DVD is recorded in multiple audio formats (PCM, Dolby Digital or DTS), you open or close the disc tray - you can select the left channel and hear it from the list on the DVD. Notes...
... @/1 on the player • While playing the DVD, the sound may output the instrumental. Each time you may not be resumed when: - the player enters standby mode by pressing ! on the remote - When the same language is displayed two or more times, the DVD is recorded in multiple audio formats (PCM, Dolby Digital or DTS), you open or close the disc tray - you can select the left channel and hear it from the list on the DVD. Notes...
Operating Instructions (CD/DVD Component)
Page 31
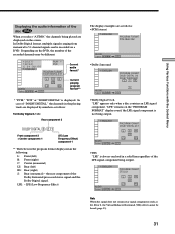
... disc When you select "AUDIO," the channels being played are as LS, RS or S, the Virtual Enhanced Surround (VES) effect cannot be recorded on the DVD, the number of the LFE signal component being output. 1: ENGLISH PROGRAM FORMAT DOLBY DIGITAL 3/2.1 AUDIO Select: L CR LFE LS RS ENTER •DTS "LFE" is not being output. 1: ENGLISH PROGRAM FORMAT DTS 3/2.1 AUDIO Select: L CR LFE LS RS ENTER Note When the signal does not contain rear signal components such as follows: •PCM...
... disc When you select "AUDIO," the channels being played are as LS, RS or S, the Virtual Enhanced Surround (VES) effect cannot be recorded on the DVD, the number of the LFE signal component being output. 1: ENGLISH PROGRAM FORMAT DOLBY DIGITAL 3/2.1 AUDIO Select: L CR LFE LS RS ENTER •DTS "LFE" is not being output. 1: ENGLISH PROGRAM FORMAT DTS 3/2.1 AUDIO Select: L CR LFE LS RS ENTER Note When the signal does not contain rear signal components such as follows: •PCM...

Operating Instructions (CD/DVD Component)
Page 37
To change the password 1 Select "CUSTOM PARENTAL CONTROL" using M/m, then press ENTER. 2 Select "PASSWORD," using M/m, then press ENTER. 3 Enter your 4-digit password using the number buttons, then press ENTER. The CUSTOM PARENTAL CONTROL display appears. CUSTOM PARENTAL CONTROL Custom parental control is set 1 Insert the disc. The player starts playback. The display will ask you do not know the password, press A and remove the disc. Creating Your Own Program (Program Play) You can be stored in the player and contain up in green. TITLE...
To change the password 1 Select "CUSTOM PARENTAL CONTROL" using M/m, then press ENTER. 2 Select "PASSWORD," using M/m, then press ENTER. 3 Enter your 4-digit password using the number buttons, then press ENTER. The CUSTOM PARENTAL CONTROL display appears. CUSTOM PARENTAL CONTROL Custom parental control is set 1 Insert the disc. The player starts playback. The display will ask you do not know the password, press A and remove the disc. Creating Your Own Program (Program Play) You can be stored in the player and contain up in green. TITLE...
Operating Instructions (CD/DVD Component)
Page 51
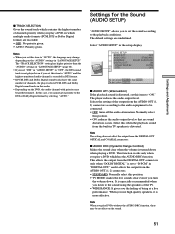
... the audio output level so that no effect on the DVD, the audio channel with priority may change depending on which multiple audio formats (PCM, DTS or Dolby Digital format) are underlined. Settings and Adjustments x TRACK SELECTION Gives the sound track which contains the highest number of channels priority when you play a DVD on the "AUDIO" settings in "LANGUAGE SETUP." Selects the setting of being at a live performance. Notes • When you set this position. • TV MODE: makes...
... the audio output level so that no effect on the DVD, the audio channel with priority may change depending on which multiple audio formats (PCM, DTS or Dolby Digital format) are underlined. Settings and Adjustments x TRACK SELECTION Gives the sound track which contains the highest number of channels priority when you play a DVD on the "AUDIO" settings in "LANGUAGE SETUP." Selects the setting of being at a live performance. Notes • When you set this position. • TV MODE: makes...
Operating Instructions (CD/DVD Component)
Page 55
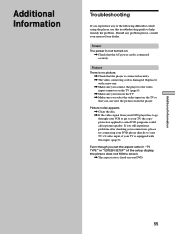
... DVD. Replace it with a new one. , Make sure you connect the player to the video input connector on the TV. (page 8) , Make sure you turn on the TV. , Make sure you still experience problems after checking your connections, please try connecting your DVD player directly to your TV's S video input, if your TV is equipped with this troubleshooting guide to help remedy the problem. Picture noise appears. , Clean the disc. , If the video signal from the player. Power...
... DVD. Replace it with a new one. , Make sure you connect the player to the video input connector on the TV. (page 8) , Make sure you turn on the TV. , Make sure you still experience problems after checking your connections, please try connecting your DVD player directly to your TV's S video input, if your TV is equipped with this troubleshooting guide to help remedy the problem. Picture noise appears. , Clean the disc. , If the video signal from the player. Power...

Operating Instructions (CD/DVD Component)
Page 56
... recorded in Dolby Digital format. Remove the disc and leave the player turned on the player. , Replace all of the DVD. (page 4) , Moisture has condensed inside ("Insert disc." The sound loses its stereo effect when you play a VIDEO CD or a CD. , Set "AUDIO" to "STEREO" in the Control Menu display. (page 30) , Make sure you connect the player correctly. (page 8, 10, 12) The surround effect is difficult to normal play CD-ROMs, etc. (page 5) Insert a DVD, a VIDEO CD, or CD. , Check the region code...
... recorded in Dolby Digital format. Remove the disc and leave the player turned on the player. , Replace all of the DVD. (page 4) , Moisture has condensed inside ("Insert disc." The sound loses its stereo effect when you play a VIDEO CD or a CD. , Set "AUDIO" to "STEREO" in the Control Menu display. (page 30) , Make sure you connect the player correctly. (page 8, 10, 12) The surround effect is difficult to normal play CD-ROMs, etc. (page 5) Insert a DVD, a VIDEO CD, or CD. , Check the region code...
Operating Instructions (CD/DVD Component)
Page 65
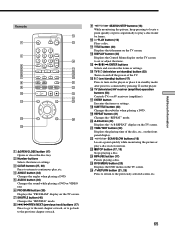
... sequentially to play , etc. 4 ANGLE button (33) Changes the angles when playing a DVD. 5 AUDIO button (30) Changes the sound while playing a DVD or VIDEO CD. 6 PROGRAM button (39) Displays the "PROGRAM" display on the TV screen. Remote 123 456 789 0 1 ZOPEN/CLOSE button (17) Opens or closes the disc tray. 2 Number buttons Selects the items or settings. 3 CLEAR button (27, 38) Press to return to continuous play a disc frame by frame. 0 HPLAY button (16) Plays a disc. qs DISPLAY button (24) Displays the Control Menu display on the TV screen to set or adjust the items...
... sequentially to play , etc. 4 ANGLE button (33) Changes the angles when playing a DVD. 5 AUDIO button (30) Changes the sound while playing a DVD or VIDEO CD. 6 PROGRAM button (39) Displays the "PROGRAM" display on the TV screen. Remote 123 456 789 0 1 ZOPEN/CLOSE button (17) Opens or closes the disc tray. 2 Number buttons Selects the items or settings. 3 CLEAR button (27, 38) Press to return to continuous play a disc frame by frame. 0 HPLAY button (16) Plays a disc. qs DISPLAY button (24) Displays the Control Menu display on the TV screen to set or adjust the items...

Operating Instructions (CD/DVD Component)
Page 66
... DVD menu 20 DVD MENU 46 F, G Fast Forward 18 Fast Reverse 18 Front panel display 22 H Handling discs 6 Hooking up 8, 10, 12 I, J, K Index 5, 27 INDEX 27 L, M, N LANGUAGE SETUP 46 LETTER BOX 47 Locating a specific point 18 by watching the TV screen 18 O On-screen display Control Menu display 24 Setup Display 43 OSD 46 P, Q PAN SCAN 47 PARENTAL CONTROL 48 PAUSE MODE 48 PBC functions 21 PBC Playback 21, 60 PRO LOGIC 52 PROGRAM 37 Program Play 37 R Remote 7, 53 REPEAT 40 Resume Play 19 S S video output...
... DVD menu 20 DVD MENU 46 F, G Fast Forward 18 Fast Reverse 18 Front panel display 22 H Handling discs 6 Hooking up 8, 10, 12 I, J, K Index 5, 27 INDEX 27 L, M, N LANGUAGE SETUP 46 LETTER BOX 47 Locating a specific point 18 by watching the TV screen 18 O On-screen display Control Menu display 24 Setup Display 43 OSD 46 P, Q PAN SCAN 47 PARENTAL CONTROL 48 PAUSE MODE 48 PBC functions 21 PBC Playback 21, 60 PRO LOGIC 52 PROGRAM 37 Program Play 37 R Remote 7, 53 REPEAT 40 Resume Play 19 S S video output...


