Installer Manual
Page 2
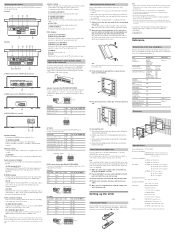
... the CDP-NW10/DVP-NW50 Use Sony's connecting cables for the DVP-NW50 since it at ...DVD-NW50 only) S.WOOFER FRONT CENTER SURROUND L SURROUND R 0 dB 0 dB 0 dB 0 dB 0 dB DIMMER OFF (CVD-NW10 only) DRC OFF (DVD-NW50 only) TEST TONE OFF (DVD-NW50...player to hook up the system. DVP-NW50 Three speaker connectors are inserted into the proper DC IN/OUT connector. 2 Plug the DC IN/OUT connector into the DC OUT of the AC power unit with new ones. • Do not leave the remote in "Mounting the Unit into the wall...DVP-NW50: 2.7 kg (5 lbs 15 oz.) AC-NW10: 2.7 kg (without AC code) AC-NW50...
... the CDP-NW10/DVP-NW50 Use Sony's connecting cables for the DVP-NW50 since it at ...DVD-NW50 only) S.WOOFER FRONT CENTER SURROUND L SURROUND R 0 dB 0 dB 0 dB 0 dB 0 dB DIMMER OFF (CVD-NW10 only) DRC OFF (DVD-NW50 only) TEST TONE OFF (DVD-NW50...player to hook up the system. DVP-NW50 Three speaker connectors are inserted into the proper DC IN/OUT connector. 2 Plug the DC IN/OUT connector into the DC OUT of the AC power unit with new ones. • Do not leave the remote in "Mounting the Unit into the wall...DVP-NW50: 2.7 kg (5 lbs 15 oz.) AC-NW10: 2.7 kg (without AC code) AC-NW50...
User Manual
Page 3
...Started Setting up the System 10 Connecting a TV (DVP-NW50 only) 10 Connecting audio Equipment 10 Selecting a method for using the remote 11 Setting up the Units 11 Setting an IP Address 11 Naming the Unit 12 Setting the time 13 Setting a remote code on the Unit 13 Selecting the time interval for automatic... 26 Selecting the audio 26 Selecting the subtitles 26 Selecting the angle 26 Parental control (limited playback) 27 Using the Setup Display (DVD Settings) 28 Setting the display (General Setup) 28 Setting the language and playback restriction (Preference) 29 Continue to the next page l 3US
...Started Setting up the System 10 Connecting a TV (DVP-NW50 only) 10 Connecting audio Equipment 10 Selecting a method for using the remote 11 Setting up the Units 11 Setting an IP Address 11 Naming the Unit 12 Setting the time 13 Setting a remote code on the Unit 13 Selecting the time interval for automatic... 26 Selecting the audio 26 Selecting the subtitles 26 Selecting the angle 26 Parental control (limited playback) 27 Using the Setup Display (DVD Settings) 28 Setting the display (General Setup) 28 Setting the language and playback restriction (Preference) 29 Continue to the next page l 3US
User Manual
Page 4
...Sony TV with the Remote 47 Controlling your TV with Persons in All Rooms Simultaneously (Party mode) 37 Excluding the Unit from MONITOR (Monitor Privacy) 39 Chapter 7 Setting the Timer Setting the Alarm 40 Setting the Sleep Timer 41 Chapter 8 Other Functions Using the Setup Display 42 Selecting the surround mode (DVP-NW50... front speaker balance (BALANCE) (CDP-NW10 only) 43 Settings for Speakers (DVP-NW50 only) 44 Selecting a speaker size 44 Setting the speaker distance 45 Setting ...remote 47 Chapter 9 Other Information Precautions 48 Troubleshooting 49 Error Messages 53 Specifications ...
...Sony TV with the Remote 47 Controlling your TV with Persons in All Rooms Simultaneously (Party mode) 37 Excluding the Unit from MONITOR (Monitor Privacy) 39 Chapter 7 Setting the Timer Setting the Alarm 40 Setting the Sleep Timer 41 Chapter 8 Other Functions Using the Setup Display 42 Selecting the surround mode (DVP-NW50... front speaker balance (BALANCE) (CDP-NW10 only) 43 Settings for Speakers (DVP-NW50 only) 44 Selecting a speaker size 44 Setting the speaker distance 45 Setting ...remote 47 Chapter 9 Other Information Precautions 48 Troubleshooting 49 Error Messages 53 Specifications ...

User Manual
Page 13
... automatically. 13US Note You cannot operate the Unit using the "HOUR" and the "MIN" SELECT. 5 Press HOME to return to Home Menu. The defalt remote code setting for the Unit is CIS2. 1 Press the "V" SELECT on the HOME Menu, then press the "SETUP" SELECT. The Setup Menu appears. 2 Press.... Note The clock is not displayed when the Unit is displayed on the right side of the Unit and the remote are different. Setting a remote code on the Unit If the supplied remote interferes with an other Unit. The Setup Menu appears. 2 Press the "TIME SET" SELECT. Chapter 1 Getting Started...
... automatically. 13US Note You cannot operate the Unit using the "HOUR" and the "MIN" SELECT. 5 Press HOME to return to Home Menu. The defalt remote code setting for the Unit is CIS2. 1 Press the "V" SELECT on the HOME Menu, then press the "SETUP" SELECT. The Setup Menu appears. 2 Press.... Note The clock is not displayed when the Unit is displayed on the right side of the Unit and the remote are different. Setting a remote code on the Unit If the supplied remote interferes with an other Unit. The Setup Menu appears. 2 Press the "TIME SET" SELECT. Chapter 1 Getting Started...
User Manual
Page 17
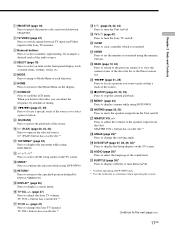
... to select the language of the sound track. wl DVD SETUP (page 27, 28, 29, 30)* Press to display the Setup display on the display. 7 DOWN/UP Press to scroll the LCD menu. 1 RM SETUP (page 18) Press to preset the remote code, and switch between CIS2/CIS3. 2 TV/VIDEO (page... 47) Press to switch signals between TV input and Video input for the Sony TV monitor. 3 Numeral buttons Press to select a number, representing, for operating a DVP-NW50 only ** Use the tactile dot as menu items, settings...
... to select the language of the sound track. wl DVD SETUP (page 27, 28, 29, 30)* Press to display the Setup display on the display. 7 DOWN/UP Press to scroll the LCD menu. 1 RM SETUP (page 18) Press to preset the remote code, and switch between CIS2/CIS3. 2 TV/VIDEO (page... 47) Press to switch signals between TV input and Video input for the Sony TV monitor. 3 Numeral buttons Press to select a number, representing, for operating a DVP-NW50 only ** Use the tactile dot as menu items, settings...
User Manual
Page 18
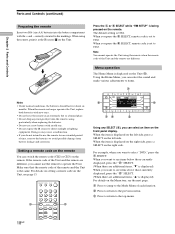
... setting is being pressed on the Unit. Note You cannot operate the Unit using the remote, point it at the IR sensor on the remote. Setting a remote code on the remote You can switch the remote code (CIS2 or CIS3) on the Menu tree, see items below those currently displayed, press...side. C Press to jump to select "DVD," press the F SELECT. Press the A or B SELECT while "RM SETUP" is CIS2. Chapter 2 Parts and Controls Parts and Controls (continued) Preparing the remote Insert two R06 (size-AA) batteries into the remote casing, particularly when replacing the batteries. &#...
... setting is being pressed on the Unit. Note You cannot operate the Unit using the remote, point it at the IR sensor on the remote. Setting a remote code on the remote You can switch the remote code (CIS2 or CIS3) on the Menu tree, see items below those currently displayed, press...side. C Press to jump to select "DVD," press the F SELECT. Press the A or B SELECT while "RM SETUP" is CIS2. Chapter 2 Parts and Controls Parts and Controls (continued) Preparing the remote Insert two R06 (size-AA) batteries into the remote casing, particularly when replacing the batteries. &#...
User Manual
Page 26
...The Unit starts playback from the TV screen, press SUBTITLE on the remote until the display is set up using the time code. Selecting the subtitles If subtitles are recorded on the remote, the angle of the DVD changes. Each time you cannot change the subtitles, or display or...or track number displayed is displayed on a DVD+RW using the remote while looking at a TV screen. Selecting the audio Switches the language of recorded on the disc. • You cannot search for a scene on the TV screen (page 29). Chapter 4 Playing Discs (DVP-NW50 only) Searching for a scene (continued) ...
...The Unit starts playback from the TV screen, press SUBTITLE on the remote until the display is set up using the time code. Selecting the subtitles If subtitles are recorded on the remote, the angle of the DVD changes. Each time you cannot change the subtitles, or display or...or track number displayed is displayed on a DVD+RW using the remote while looking at a TV screen. Selecting the audio Switches the language of recorded on the disc. • You cannot search for a scene on the TV screen (page 29). Chapter 4 Playing Discs (DVP-NW50 only) Searching for a scene (continued) ...
User Manual
Page 30
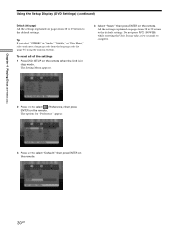
... from the language code list (page 55) using the numeric buttons. Do not press X/1 (POWER) while resetting the Unit. Chapter 4 Playing Discs (DVP-NW50 only) Using the Setup Display (DVD Settings) (continued) Default (this page) All the settings explained on the remote. To reset all of the settings 1 Press DVD SETUP on the remote. It may take...
... from the language code list (page 55) using the numeric buttons. Do not press X/1 (POWER) while resetting the Unit. Chapter 4 Playing Discs (DVP-NW50 only) Using the Setup Display (DVD Settings) (continued) Default (this page) All the settings explained on the remote. To reset all of the settings 1 Press DVD SETUP on the remote. It may take...
User Manual
Page 47
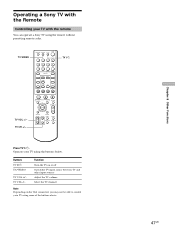
Operating a Sony TV with the remote You can operate a Sony TV using the buttons below. DVD TOP MENU MENU MUTING F MASTER VOL G ENTER g O f RETURN DISPLAY TV VOL TV CH AUDIO ANGLE SUBTITLE DVD SETUP Press TV ?/1. Function Turn the TV on or off Switch the TV input source between TV and other ... your TV using some of the buttons above. 47US Chapter 8 Other Functions TV CH +/- TV CH +/- Operate your TV using the remote without presetting remote codes. TV/VIDEO RM SETUP TV/VIDEO TV 1234 5678 90 ENTER CLEAR SELECT MODE BACK HOME DOWN UP TV ?/1 TV VOL +/- Buttons TV...
Operating a Sony TV with the remote You can operate a Sony TV using the buttons below. DVD TOP MENU MENU MUTING F MASTER VOL G ENTER g O f RETURN DISPLAY TV VOL TV CH AUDIO ANGLE SUBTITLE DVD SETUP Press TV ?/1. Function Turn the TV on or off Switch the TV input source between TV and other ... your TV using some of the buttons above. 47US Chapter 8 Other Functions TV CH +/- TV CH +/- Operate your TV using the remote without presetting remote codes. TV/VIDEO RM SETUP TV/VIDEO TV 1234 5678 90 ENTER CLEAR SELECT MODE BACK HOME DOWN UP TV ?/1 TV VOL +/- Buttons TV...
User Manual
Page 51
... Stop, Search, Repeat Play, or Shuffle Play cannot be played. , The DATA CD is available. Remove the disc and leave the Unit turned on the DVD does not match the Unit. , Moisture has condensed inside the Unit. Press +VOLUME to ISO 9660 Level 1/Level 2 or Joliet. , The MP3 audio...have the extension ".MP3." , The data is upside down. While playing such a disc, the Unit stops playback at the remote sensor on the Unit. , The remote code switch setting on the remote does not match the setting on the TV screen. Check to the next page l 51US Chapter 9 Other Information See the operating...
... Stop, Search, Repeat Play, or Shuffle Play cannot be played. , The DATA CD is available. Remove the disc and leave the Unit turned on the DVD does not match the Unit. , Moisture has condensed inside the Unit. Press +VOLUME to ISO 9660 Level 1/Level 2 or Joliet. , The MP3 audio...have the extension ".MP3." , The data is upside down. While playing such a disc, the Unit stops playback at the remote sensor on the Unit. , The remote code switch setting on the remote does not match the setting on the TV screen. Check to the next page l 51US Chapter 9 Other Information See the operating...

User Manual
Page 56
... D DATA CD 5 Default 30 DIAGNOSIS 12 DIMMER 43 Disc Menu 29 DISPLAY 17, 26 DOLBY PL 42 DOLBY PLII 42 DOWN/UP 17 DRC 46 DVD 5, 23 DVD SETUP 17 Dynamic range 46 E ENTER 17 56US F Fast forward 25 Fast reverse 25 H HOME 17 I INTERCOM 38 INTERCOM PRIVACY 38 IP ADDRESS 11... Join 37 Party mode 37 PARTY PRIVACY 37 Password 29 PBC Playback 24 Play Mode 21, 23, 36 Preset station 33 R Radio 31 Remote 11, 16, 18, 47 Remote code 13 Repeat Play 21, 23, 24, 36 RESET 30 Resume Play 23 RETURN 17 RM SETUP 17, 18 S Scan 21, 25 Screen Saver...
... D DATA CD 5 Default 30 DIAGNOSIS 12 DIMMER 43 Disc Menu 29 DISPLAY 17, 26 DOLBY PL 42 DOLBY PLII 42 DOWN/UP 17 DRC 46 DVD 5, 23 DVD SETUP 17 Dynamic range 46 E ENTER 17 56US F Fast forward 25 Fast reverse 25 H HOME 17 I INTERCOM 38 INTERCOM PRIVACY 38 IP ADDRESS 11... Join 37 Party mode 37 PARTY PRIVACY 37 Password 29 PBC Playback 24 Play Mode 21, 23, 36 Preset station 33 R Radio 31 Remote 11, 16, 18, 47 Remote code 13 Repeat Play 21, 23, 24, 36 RESET 30 Resume Play 23 RETURN 17 RM SETUP 17, 18 S Scan 21, 25 Screen Saver...


