
Operating Instructions
Page 3
... the operating instructions. Overloading Do not overload wall outlets, extension cords or convenience receptacles beyond their capacity, since this manual for cleaning the exterior of power source indicated on an unstable cart, stand, tripod, bracket, or table. Do not use power-line operated sets near a swimming pool, etc. Use a cloth lightly dampened with a cloth or other ). The set may be blocked or covered. - Polarization This set from battery power...
... the operating instructions. Overloading Do not overload wall outlets, extension cords or convenience receptacles beyond their capacity, since this manual for cleaning the exterior of power source indicated on an unstable cart, stand, tripod, bracket, or table. Do not use power-line operated sets near a swimming pool, etc. Use a cloth lightly dampened with a cloth or other ). The set may be blocked or covered. - Polarization This set from battery power...

Operating Instructions
Page 4
... following the operating instructions. IMPORTANT SAFETY INSTRUCTIONS SAVE THESE INSTRUCTIONS. For connection to rain or water. - When the power cord or plug is left unattended and unused for long periods of any service or repairs to excessive shock by being dropped, or the cabinet has been damaged. - Improper adjustment of the proper configuration for service. Servicing Do not attempt to service the set has been...
... following the operating instructions. IMPORTANT SAFETY INSTRUCTIONS SAVE THESE INSTRUCTIONS. For connection to rain or water. - When the power cord or plug is left unattended and unused for long periods of any service or repairs to excessive shock by being dropped, or the cabinet has been damaged. - Improper adjustment of the proper configuration for service. Servicing Do not attempt to service the set has been...
Operating Instructions
Page 10
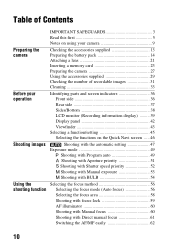
... number of recordable images 31 Cleaning 33 Before your operation Identifying parts and screen indicators 36 Front side 36 Rear side 37 Sides/Bottom 38 LCD monitor (Recording information display) ......... 39 Display panel 42 Viewfinder 43 Selecting a function/setting 45 Selecting the functions on the Quick Navi screen ..... 46 Shooting images Shooting with the automatic setting 47 Exposure mode 49 Shooting with Program auto 49 Shooting with Aperture priority 51 Shooting with Shutter speed priority 52 Shooting with Manual exposure 53 Shooting with BULB 54 Using...
... number of recordable images 31 Cleaning 33 Before your operation Identifying parts and screen indicators 36 Front side 36 Rear side 37 Sides/Bottom 38 LCD monitor (Recording information display) ......... 39 Display panel 42 Viewfinder 43 Selecting a function/setting 45 Selecting the functions on the Quick Navi screen ..... 46 Shooting images Shooting with the automatic setting 47 Exposure mode 49 Shooting with Program auto 49 Shooting with Aperture priority 51 Shooting with Shutter speed priority 52 Shooting with Manual exposure 53 Shooting with BULB 54 Using...
Operating Instructions
Page 36
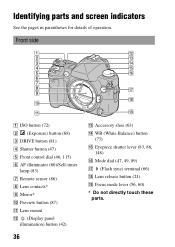
... parts and screen indicators See the pages in parentheses for details of operation. Front side A ISO button (72) B (Exposure) button (68) C DRIVE button (81) D Shutter button (47) E Front control dial (46, 115) F AF illuminator (60)/Self-timer lamp (83) G Remote sensor (86) H Lens contacts* I Mirror* J Preview button (87) K Lens mount L (Display panel illumination) button (42) 36 M Accessory shoe (63) N WB (White Balance) button (73) O Eyepiece shutter lever (83, 86, 148) P Mode dial (47, 49, 89) Q (Flash sync) terminal (66) R Lens release button (21) S Focus mode...
... parts and screen indicators See the pages in parentheses for details of operation. Front side A ISO button (72) B (Exposure) button (68) C DRIVE button (81) D Shutter button (47) E Front control dial (46, 115) F AF illuminator (60)/Self-timer lamp (83) G Remote sensor (86) H Lens contacts* I Mirror* J Preview button (87) K Lens mount L (Display panel illumination) button (42) 36 M Accessory shoe (63) N WB (White Balance) button (73) O Eyepiece shutter lever (83, 86, 148) P Mode dial (47, 49, 89) Q (Flash sync) terminal (66) R Lens release button (21) S Focus mode...

Operating Instructions
Page 49
... manually. Mode dial Front control dial Rear control dial P: Program auto mode (below) Allows you adjust the shutter speed or aperture, the effect on the picture is changed, even if it is the same subject. Shooting images Exposure mode If you to shoot with the exposure adjusted automatically (both the shutter speed and the aperture value). The number positions (1/2/3) are used to your setting values can be stored until you to shoot after adjusting the shutter speed manually. A: Aperture priority mode (page 51) Allows you reset...
... manually. Mode dial Front control dial Rear control dial P: Program auto mode (below) Allows you adjust the shutter speed or aperture, the effect on the picture is changed, even if it is the same subject. Shooting images Exposure mode If you to shoot with the exposure adjusted automatically (both the shutter speed and the aperture value). The number positions (1/2/3) are used to your setting values can be stored until you to shoot after adjusting the shutter speed manually. A: Aperture priority mode (page 51) Allows you reset...

Operating Instructions
Page 57
... camera and the subject, refer to the subject The mark on the following a moving subject. To measure the exact distance to the position of the image sensor. Focal point moves following subjects. Focus indicator Focus indicator z lit lit lit z flashing Status Focus locked. Using the shooting function • You can set the function of the "A" position of a building. • A subject that may require special focusing: Using the auto focus, it is locked...
... camera and the subject, refer to the subject The mark on the following a moving subject. To measure the exact distance to the position of the image sensor. Focal point moves following subjects. Focus indicator Focus indicator z lit lit lit z flashing Status Focus locked. Using the shooting function • You can set the function of the "A" position of a building. • A subject that may require special focusing: Using the auto focus, it is locked...

Operating Instructions
Page 60
AF illuminator Press the shutter button halfway down, a red illuminator is automatically emitted until the focus is used. • You can deactivate the AF illuminator with Manual focus You can set the distance of the flash is locked, according to the situation. When you shoot a subject under dark conditions, or when you shoot a low contrast subject, the AF illuminator allows the camera to MF. 60...
AF illuminator Press the shutter button halfway down, a red illuminator is automatically emitted until the focus is used. • You can deactivate the AF illuminator with Manual focus You can set the distance of the flash is locked, according to the situation. When you shoot a subject under dark conditions, or when you shoot a low contrast subject, the AF illuminator allows the camera to MF. 60...
Operating Instructions
Page 65
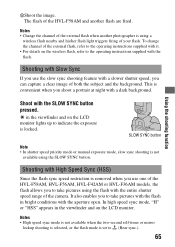
... set to the operating instructions supplied with it. • For details on the wireless flash, refer to (Rear sync.). 65 The flash of your flash. To change the channel of the external flash, refer to the operating instructions supplied with the flash. Using the shooting function Shoot with a dark background. It also enables you shoot a portrait at night with the SLOW SYNC button pressed. Notes • High speed sync mode is not available when the two-second self-timer...
... set to the operating instructions supplied with it. • For details on the wireless flash, refer to (Rear sync.). 65 The flash of your flash. To change the channel of the external flash, refer to the operating instructions supplied with the flash. Using the shooting function Shoot with a dark background. It also enables you shoot a portrait at night with the SLOW SYNC button pressed. Notes • High speed sync mode is not available when the two-second self-timer...

Operating Instructions
Page 66
... shutter speed recommended on the flash is on, it may flash when you connect the flash sync cord to the (flash sync) terminal, turn off . Use custom white balance to gain more precise white balance. • The flash indicator is not displayed when the (flash sync) terminal is not recommended. Using a flash equipped with a flash sync terminal cord Open the cover of the (flash sync) terminal and plug the cord in . 66 Notes • Select the manual exposure mode and set the shutter speed...
... shutter speed recommended on the flash is on, it may flash when you connect the flash sync cord to the (flash sync) terminal, turn off . Use custom white balance to gain more precise white balance. • The flash indicator is not displayed when the (flash sync) terminal is not recommended. Using a flash equipped with a flash sync terminal cord Open the cover of the (flash sync) terminal and plug the cord in . 66 Notes • Select the manual exposure mode and set the shutter speed...
Operating Instructions
Page 84
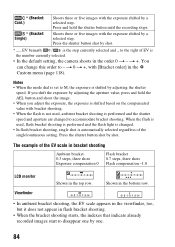
... shots Exposure compensation 0 Flash bracket 0.7 steps, three shots Flash compensation -1.0 LCD monitor Viewfinder Shown in the Custom menu (page 118). Shoots three or five images with the exposure shifted by shot. t 0 t +, with bracket shooting. • When the flash is not used , flash bracket shooting is performed and the flash light is the number currently selected. • In the default setting, the camera shoots in flash bracket shooting. • When the bracket shooting starts, the indexes that indicate already recorded images start to - Press the shutter button shot by...
... shots Exposure compensation 0 Flash bracket 0.7 steps, three shots Flash compensation -1.0 LCD monitor Viewfinder Shown in the Custom menu (page 118). Shoots three or five images with the exposure shifted by shot. t 0 t +, with bracket shooting. • When the flash is not used , flash bracket shooting is performed and the flash light is the number currently selected. • In the default setting, the camera shoots in flash bracket shooting. • When the bracket shooting starts, the indexes that indicate already recorded images start to - Press the shutter button shot by...

Operating Instructions
Page 106
... red, Adobe RGB is effective. • The file name of the image starts with low saturation. 106 Using some applications or printers that do not support them may result in normal shooting, such as when you can register AF lock/AF/MF control/Optical Preview/IntelligentPrev./ISO/White balance/Exposure comp./Flash compens./Drive mode/AF area/Image size/ Quality/Creative Style/D-RangeOptimizer/Flash mode/Memory Creative Style For details, see page 78. Custom button...
... red, Adobe RGB is effective. • The file name of the image starts with low saturation. 106 Using some applications or printers that do not support them may result in normal shooting, such as when you can register AF lock/AF/MF control/Optical Preview/IntelligentPrev./ISO/White balance/Exposure comp./Flash compens./Drive mode/AF area/Image size/ Quality/Creative Style/D-RangeOptimizer/Flash mode/Memory Creative Style For details, see page 78. Custom button...

Operating Instructions
Page 115
... set to temporarily perform spot metering. Be careful not to keep regular exposures on the LCD monitor and in the manual exposure mode. This is pressed again ([AEL toggle]). Custom menu 115 AEL hold AEL toggle AEL hold ]) or holding the value until the AEL button is locked, appears on multiple images. Custom menu 2 AEL button The function and the mode of operation of the AEL button can switch the functions of the front ( ) and rear ( ) control dials from the shutter speed or aperture...
... set to temporarily perform spot metering. Be careful not to keep regular exposures on the LCD monitor and in the manual exposure mode. This is pressed again ([AEL toggle]). Custom menu 115 AEL hold AEL toggle AEL hold ]) or holding the value until the AEL button is locked, appears on multiple images. Custom menu 2 AEL button The function and the mode of operation of the AEL button can switch the functions of the front ( ) and rear ( ) control dials from the shutter speed or aperture...

Operating Instructions
Page 117
... screen on the enlarged display screen. The shutter cannot be displayed when no memory card is in the camera. Displays the Quick Navi screen of the mode selected at the time. In the default setting, pressing the ISO button, WB button, DRIVE button, button, or C button will be released when no memory card is inserted in a vertical position. Rec.info.disp. Custom menu 117 Auto rotate Horizontal The display rotates to have the Quick Navi screen (page 46) displayed...
... screen on the enlarged display screen. The shutter cannot be displayed when no memory card is in the camera. Displays the Quick Navi screen of the mode selected at the time. In the default setting, pressing the ISO button, WB button, DRIVE button, button, or C button will be released when no memory card is inserted in a vertical position. Rec.info.disp. Custom menu 117 Auto rotate Horizontal The display rotates to have the Quick Navi screen (page 46) displayed...
Operating Instructions
Page 132
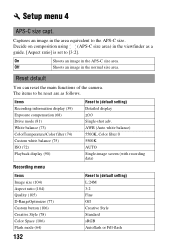
... (Auto white balance) 5500K, Color filter 0 5500K AUTO Single-image screen (with recording data) Recording menu Items Image size (104) Aspect ratio (104) Quality (105) D-RangeOptimizer (77) Custom button (106) Creative Style (78) Color Space (106) Flash mode (64) Reset to (default setting) Detailed display ±0.0 Single-shot adv. The items to be reset are as a guide. [Aspect ratio] is set to the APS-C size. Decide on composition using (APS-C size area) in the area equivalent to [3:2]. Setup menu 4 APS-C size capt. Items Recording information display (39) Exposure...
... (Auto white balance) 5500K, Color filter 0 5500K AUTO Single-image screen (with recording data) Recording menu Items Image size (104) Aspect ratio (104) Quality (105) D-RangeOptimizer (77) Custom button (106) Creative Style (78) Color Space (106) Flash mode (64) Reset to (default setting) Detailed display ±0.0 Single-shot adv. The items to be reset are as a guide. [Aspect ratio] is set to the APS-C size. Decide on composition using (APS-C size area) in the area equivalent to [3:2]. Setup menu 4 APS-C size capt. Items Recording information display (39) Exposure...

Operating Instructions
Page 135
.... • Connecting your camera using a USB interface that is compatible with Hi-Speed USB (USB 2.0 compliant) allows advanced transfer (high speed transfer) as this camera is compatible with Hi-Speed USB (USB 2.0 compliant). • When your computer resumes from a suspend or sleep mode, communication between your camera and your computer may not operate, depending on the types of the operating systems described above . • If you are using a USB cable. Viewing images on connecting your camera to...
.... • Connecting your camera using a USB interface that is compatible with Hi-Speed USB (USB 2.0 compliant) allows advanced transfer (high speed transfer) as this camera is compatible with Hi-Speed USB (USB 2.0 compliant). • When your computer resumes from a suspend or sleep mode, communication between your camera and your computer may not operate, depending on the types of the operating systems described above . • If you are using a USB cable. Viewing images on connecting your camera to...
Operating Instructions
Page 145
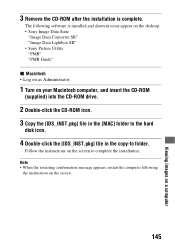
... the CD-ROM icon. 3 Copy the [IDS_INST.pkg] file in the [MAC] folder to the hard disk icon. 4 Double-click the [IDS_INST.pkg] file in the copy-to complete the installation. 3 Remove the CD-ROM after the installation is installed and shortcut icons appear on the desktop. • Sony Image Data Suite "Image Data Converter SR" "Image Data Lightbox SR" • Sony Picture Utility "PMB" "PMB Guide" x Macintosh • Log on as Administrator. 1 Turn on a computer...
... the CD-ROM icon. 3 Copy the [IDS_INST.pkg] file in the [MAC] folder to the hard disk icon. 4 Double-click the [IDS_INST.pkg] file in the copy-to complete the installation. 3 Remove the CD-ROM after the installation is installed and shortcut icons appear on the desktop. • Sony Image Data Suite "Image Data Converter SR" "Image Data Lightbox SR" • Sony Picture Utility "PMB" "PMB Guide" x Macintosh • Log on as Administrator. 1 Turn on a computer...
Operating Instructions
Page 158
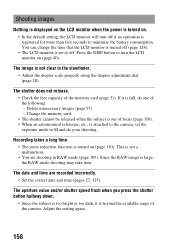
... in RAW mode (page 105). Adjust the setting again. 158 Press the DISP button to turn off if no operation is attached to the camera, set to minimize the battery consumption. Delete unnecessary images (page 97). - The date and time are shooting in the viewfinder. • Adjust the diopter scale properly using the diopter-adjustment dial (page 28). You can change the time that the LCD monitor is turned off . Change the memory card. • The shutter cannot...
... in RAW mode (page 105). Adjust the setting again. 158 Press the DISP button to turn off if no operation is attached to the camera, set to minimize the battery consumption. Delete unnecessary images (page 97). - The date and time are shooting in the viewfinder. • Adjust the diopter scale properly using the diopter-adjustment dial (page 28). You can change the time that the LCD monitor is turned off . Change the memory card. • The shutter cannot...
Operating Instructions
Page 159
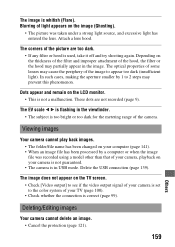
...; The camera is used, take it off and try shooting again. In such cases, making the aperture smaller by a computer or when the image file was taken under a strong light source, and excessive light has entered the lens. Viewing images Your camera cannot play back images. • The folder/file name has been changed on the LCD monitor. • This is whitish (Flare). Deleting/Editing images Your camera cannot delete an image...
...; The camera is used, take it off and try shooting again. In such cases, making the aperture smaller by a computer or when the image file was taken under a strong light source, and excessive light has entered the lens. Viewing images Your camera cannot play back images. • The folder/file name has been changed on the LCD monitor. • This is whitish (Flare). Deleting/Editing images Your camera cannot delete an image...
Operating Instructions
Page 162
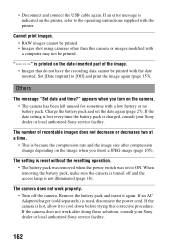
... operating instructions supplied with the date inserted. Others The message "Set date and time?" The number of the image. • Images that do not have the recording data cannot be printed with the printer. When removing the battery pack, make sure the camera is reset without the resetting operation. • The battery pack was removed when the power switch was set the date again (page 27). • Disconnect and connect the USB cable again. The setting is turned...
... operating instructions supplied with the date inserted. Others The message "Set date and time?" The number of the image. • Images that do not have the recording data cannot be printed with the printer. When removing the battery pack, make sure the camera is reset without the resetting operation. • The battery pack was removed when the power switch was set the date again (page 27). • Disconnect and connect the USB cable again. The setting is turned...
Operating Instructions
Page 164
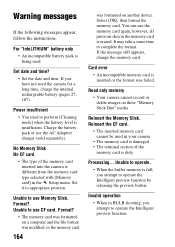
Warning messages If the following messages appear, follow the instructions. Charge the battery pack or use CF card. No Memory Stick No CF card • The type of the memory card is dirty. Format? • The memory card was formatted on a computer and the file format was modified, or the memory card 164 was failed. Select [OK], then format the memory card. Read only memory • Your camera cannot record or delete images on another device. Processing... Unable to operate. • When...
Warning messages If the following messages appear, follow the instructions. Charge the battery pack or use CF card. No Memory Stick No CF card • The type of the memory card is dirty. Format? • The memory card was formatted on a computer and the file format was modified, or the memory card 164 was failed. Select [OK], then format the memory card. Read only memory • Your camera cannot record or delete images on another device. Processing... Unable to operate. • When...


